Table of Contents >> Show >> Hide
- What Is a Flower Diptych Acrylic Pour Painting?
- Supplies You’ll Need (Beginner-Friendly List)
- Step 1: Prep Your Space and Canvases
- Step 2: Mix Your Acrylic Pour Paints
- Step 3: Pour Your Base Layer
- Step 4: Create Your Flower Pattern with the Dip Technique
- Step 5: Add Stems, Details, and Gentle Adjustments
- Step 6: Drying, Curing, and Top Coats
- Color Ideas for a Flower Diptych (Beginner Palettes)
- Common Beginner Mistakes (And How to Fix Them)
- Why the Flower Diptych Is Perfect for Beginners
- Extra : Real-Life Experiences and Tips from the Pouring Journey
- Conclusion
If you’ve ever watched an acrylic pour video and thought, “That looks so relaxing… but I’d probably just make a mess,” this guide is for you. A flower diptych acrylic pour painting sounds fancy, but it’s actually one of the most beginner-friendly ways to create wall-worthy art with zero drawing skills. If you can pour coffee without spilling it (most of the time), you can do this.
Inspired by the playful, colorful style you often see in Bored Panda art submissions and by beginner flower dip and double-dip tutorials from fluid artists like Fiona Art and other acrylic pouring creators, this step-by-step guide walks you through everything: supplies, paint mixing, the dip technique, and simple troubleshooting.
What Is a Flower Diptych Acrylic Pour Painting?
Let’s decode the name first so it doesn’t sound like a spell from a wizard school:
- Flower: We’re creating a bloom-like pattern with petals and stems using fluid paint.
- Acrylic pour: Instead of painting with brushes, you pour thinned acrylic paint and let it flow, tilt, or transfer to create organic shapes.
- Dip technique: You place one surface into wet paint (or press two surfaces together) and then pull them apart to reveal a mirrored design.
- Diptych: Two separate canvases (or boards) that make one combined artwork when displayed side by side.
In this project, you’ll drizzle or puddle your colors onto one canvas, press the second canvas on top, and then pull them apart to reveal two matching floral panels. This “double dip” or “flower dip” method is popular because it’s simple, repeatable, and surprisingly forgiving for beginners.
Supplies You’ll Need (Beginner-Friendly List)
You don’t need a full art studio to start with acrylic pouring. Here’s a streamlined supply list based on common recommendations from fluid-art tutorials and beginner guides.
Surfaces
- Two canvases or boards of the same size (for example, two 10×10 inch or 12×16 inch canvases).
- Plastic table cover or freezer paper to protect your work area.
- Painter’s tape (optional) to tape the backs of the canvases for cleaner edges.
Paints & Pouring Medium
- Student- or artist-grade acrylic paints in a few coordinated colors (for a flower look, try a dark color, 1–2 mid-tones, a metallic, and white).
- A pouring medium to thin the paint while maintaining its binding strength (ready-made products or DIY medium mixes are commonly used by pour artists).
- Water (only a bit, if needed, for final consistency).
Tools & Extras
- Plastic cups for mixing and pouring.
- Wooden sticks or plastic spoons for stirring.
- Gloves and an apron (your clothes will thank you).
- Push pins or small cups to raise the canvases off the table.
- Optional: heat gun or butane torch for popping air bubbles (use cautiously and follow all safety guidelines).
- Optional: resin or clear varnish for a glossy top coat once everything is fully dry and cured.
Step 1: Prep Your Space and Canvases
Pour painting is fun… until you realize paint has somehow reached the cat. So prep is everything:
- Cover your surface. Use a plastic tablecloth, cardboard, or a large trash bag cut open. Acrylic pouring involves a lot of paint run-off.
- Raise your canvases. Stick push pins into the back corners or set each panel on small cups. This keeps them from sticking to the table and lets excess paint drip off cleanly.
- Tape the edges (optional). If you want a crisp back edge, use painter’s tape around the back of the canvas. Many pour artists use this trick for a clean finish.
- Decide orientation. Lay both canvases side by side exactly as you want to hang the diptych later. Mark a tiny pencil line on the back to remember top and bottom.
Step 2: Mix Your Acrylic Pour Paints
Perfect pours start with good consistency. Most fluid artists aim for something like warm honey or thin pancake batterpourable but not watery.
Basic Mixing Ratio (Starter Guideline)
- 1 part acrylic paint
- 1.5–2 parts pouring medium
- A splash of water only if needed
Steps:
- Add your paint to a cup.
- Stir in the pouring medium until smooth.
- Lift your stir stick and let the paint stream back into the cup. It should fall in a smooth, ribbon-like stream and disappear into the surface within a couple of seconds.
- If it’s too thick (leaves a mound while dripping), add a few drops of water and stir again.
For the flower diptych, choose a light base color (often white) to act as a “pillow” or background, and then 3–5 colors for your flower petals and accents. Many tutorials use metallics or interference/pearl paints to add shimmer to the petals.
Step 3: Pour Your Base Layer
The base layer helps your dipped flower slide and spread beautifully.
- Coat the canvases with base color. Pour a generous amount of your base paint onto each panel and tilt until the entire surface is covered, including the edges.
- Even it out. Use a palette knife or gloved fingers to smooth thick areas. You want a wet, level layer, not puddles or dry patches.
- Pop air bubbles. Use a gentle pass of a heat gun or torch, keeping it moving and at a distance, to remove bubbles if desired.
Keep both canvases nearby. One will be your painted canvas (where you lay down your flower colors). The other will be your dipping canvas that you press on top.
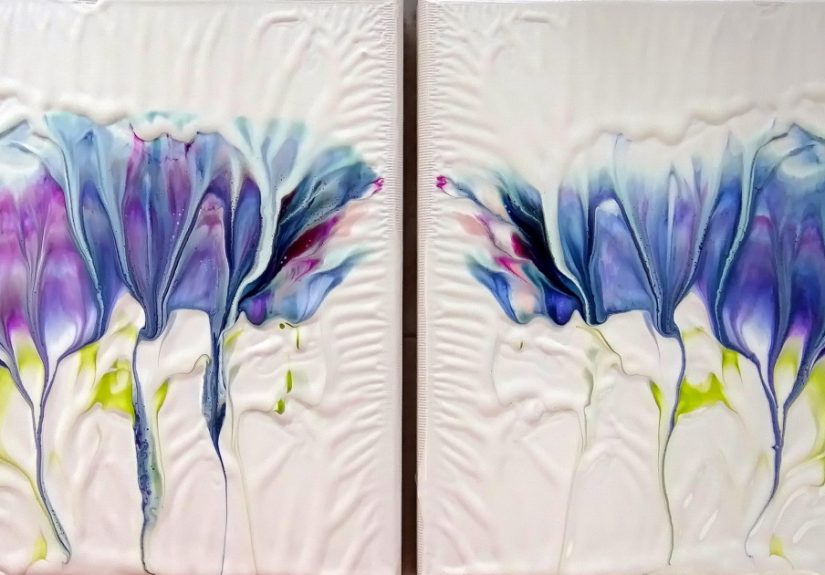
Step 4: Create Your Flower Pattern with the Dip Technique
Here comes the fun part: turning puddles into petals.
Option A: Puddles or Stripes (Double Dip)
- On Canvas A, drizzle or puddle your petal colors in a loose arch or cluster where you want the flower to appear. You can create several small puddles for multiple blooms.
- Add a bit of metallic or pearl color near the center to create a glowing flower core.
- Place Canvas B face down on Canvas A, aligning the edges so the two panels line up as one big rectangle.
- Gently press with flat hands, smoothing from the center outward. You’re encouraging the paint to spread between the canvases.
- Carefully pull Canvas B up and away in a smooth motion. As the surfaces separate, you’ll reveal two mirrored floral shapesyour diptych flower pour.
Option B: Reverse Flower Dip
A popular beginner trick is the reverse flower dip, often seen in floral pour tutorials: you lay down puddles of color on the base, press a plastic sheet or the second canvas on top, and then peel it off to reveal layered petals.
- Pour your base on both canvases as before.
- On Canvas A, make a circular or oval puddle of layered colors for each flower.
- Press Canvas B onto Canvas A and smooth. When you pull them apart, the colors stretch into petal-like shapes.
In both versions, the diptych effect comes from that single moment of contactone motion, two paintings.
Step 5: Add Stems, Details, and Gentle Adjustments
Now you can gently refine your acrylic pour flower diptych without overworking it.
- Create stems and drips. Use a skewer or the end of a paintbrush to drag a thin line of paint down from the flower shapes, forming stems. This is a common trick in flower dip pours that instantly turns abstract shapes into obvious flowers.
- Softly tilt if needed. Slight tilting can elongate petals or help balance composition, but keep it gentletoo much tilting can muddy the colors.
- Fix bare spots. If you have small gaps of canvas showing where you don’t want them, you can drip a little base paint and lightly tap with your finger or a palette knife to blend it in.
Avoid fussing too much. Acrylic pouring shines when you let the paint do its thing. Overworking the surface can mix colors into a dull tone, especially complementary colors like red and green.
Step 6: Drying, Curing, and Top Coats
Once you love how your flower diptych acrylic pour looks, it needs time to dry and cure properly.
- Level the canvases. Make sure both panels sit flat and level; otherwise, paint can slide off or pool at one edge.
- Let them dry. Most thin acrylic pours dry to the touch in 24–48 hours, but thicker pours can take several days.
- Avoid dust. If possible, create a “dust tent” using a big cardboard box or plastic bin turned upside down over the pieces.
- Curing time. Before applying resin or a heavy varnish, many artists wait at least a couple of weeks to make sure the paint is fully cured so moisture doesn’t get trapped under the finish.
After curing, you can apply a glossy varnish or a resin coat to bring out the depth, shimmer, and subtle texture that often remain from the dip technique. Many fluid artists love that glass-like resin finish, especially on diptychs meant to be statement pieces.
Color Ideas for a Flower Diptych (Beginner Palettes)
Choosing colors is half the fun, and it hugely affects the mood of your piece. Here are a few beginner palettes inspired by popular acrylic pouring flower designs.
1. Dreamy Violet Petals
- Base: White
- Petals: Violet, ultramarine blue, magenta
- Accents: Gold or copper metallic, a touch of turquoise
This palette gives a modern, slightly magical feel that looks great in living rooms and bedrooms.
2. Warm Sunset Bloom
- Base: Off-white or light beige
- Petals: Crimson, orange, deep yellow
- Accents: Bronze metallic, a hint of black for contrast
The result feels like petals lit by late-afternoon sunperfect for cozy spaces or a hallway that needs some warmth.
3. Calm Ocean Flowers
- Base: White or very light blue
- Petals: Teal, phthalo blue, soft green
- Accents: Silver metallic, pearl white
These oceanic hues look fresh and relaxing, ideal for bathrooms, studios, or anywhere you want a spa-like feeling.
Common Beginner Mistakes (And How to Fix Them)
Even with a simple flower dip, a few small tweaks can make the difference between “meh” and “wow.” Here are frequent issues beginners run into, inspired by common tips from pour-painting instructors and online communities.
1. Paint Too Thick or Too Thin
Problem: Thick paint doesn’t spread well when you dip, leaving clumps; thin paint runs off the canvas and loses its flower shape.
Fix: Adjust your pouring medium ratio. Aim for a smooth, ribbon-like pour that’s not chunky but also not watery. Mix smaller test batches and try them on scrap cardboard before committing to your main panels.
2. Muddy Colors
Problem: Your bright flower turns into a grayish blob where colors over-mix.
Fix: Limit yourself to 3–5 main colors and avoid layering too many complementary colors directly on top of each other. When in doubt, separate strong opposites (like red and green) with white or metallics as buffers.
3. Overworking the Dip
Problem: You keep pressing, tilting, and dragging until the petals lose definition.
Fix: Accept that fluid art is partly about letting go. Do the dip once, make a few gentle adjustments, then step away. Remember: perfection isn’t the goal; character is.
4. Uneven Diptych Alignment
Problem: When you hang the two canvases, the flower doesn’t line up properly.
Fix: Before dipping, mark the backs of the canvases with arrows indicating “top” and “inner edges.” When you press them together, keep those arrows aligned. You can also lightly draw an alignment line on the table to help you place them consistently.
Why the Flower Diptych Is Perfect for Beginners
There’s a reason dip and double-dip techniques appear in so many beginner acrylic pouring tutorials: they deliver dramatic results with minimal steps.
- No drawing skills needed. The flower shapes are formed by the paint itselfno sketching required.
- Built-in “wow” factor. The moment you pull the canvases apart is pure magic. Even simple color choices can look advanced.
- Great for gifts and decor. A matching two-panel painting looks intentional and artsy, making it ideal for hallway or bedroom decor.
- Easy to experiment. Once you understand the basics, you can try reverse dips, different color palettes, metallic accents, or even combine techniques like puddle pours and swipes.
Extra : Real-Life Experiences and Tips from the Pouring Journey
The first time you try a flower diptych acrylic pour painting, you’ll probably experience the full emotional roller coaster of a beginner artist: excitement, doubt, mild panic, and then, hopefully, “Wait… this actually looks amazing.” Here are some experience-based insights and stories that can make your journey smootherand more fun.
Embracing the “Reveal Moment”
If you’ve watched fluid-art creators online, you’ve seen that iconic moment: they separate two panels and gasp at the mirrored pattern. That moment is genuinely powerful in real life too. I’ve seen beginners who were convinced they “ruined it” light up when the canvases pull apart and reveal shimmering petals.
The key is to give yourself permission to be surprised. Instead of aiming for a perfectly planned flower, think of your pour as a collaboration between you and gravity. You choose the colors and the rough placement; the paint chooses the exact details. When you view it this way, every unexpected swirl feels more like a gift than a mistake.
Learning to Let Go of Control
Acrylic pouring is surprisingly therapeutic because it forces you to let go. We’re used to tightly controlling thingsperfect lines, tidy to-do lists, completely predictable outcomes. Fluid art, especially diptych pours, laughs at that a little.
One beginner shared that their first diptych didn’t look at all like the tutorial they followedbut it became their favorite piece because the petals formed a shape that reminded them of wings. Another artist talked about “happy accidents” where a small drip turned into the perfect focal point once the piece dried.
The takeaway: go in with a loose plan (colors, general design), but be ready to say, “Okay paint, show me what you’ve got.”
Discovering Your Color Personality
As you practice, you’ll notice you naturally gravitate toward certain palettes. Some pour artists fall in love with cool tonesteals, blues, violets that feel calm and dreamy. Others can’t resist fiery sunset blooms in orange, magenta, and gold. After a few diptych sessions, lay your pieces side by side and see if a pattern appears in your choices.
This “color personality” is incredibly useful. It helps you curate future pours so they look cohesive, almost like a mini collection. It also makes gifting easierfriends quickly recognize your style, even if you never touch a paintbrush.
Working in Small Batches (and Reusing Leftovers)
Another practical tip from experience: you don’t have to mix a huge amount of paint for every session. Start with smaller batches. If you love the way a particular color combination turns out, you can always remix and create more diptychs or even a triptych.
Many fluid artists hate wasting paint, so they get creative with leftoverspouring mini tiles, coasters, or small test canvases. Those mini pieces are perfect for trying new color combos, testing consistencies, or practicing the dip motion before you move on to your main canvases.
The “Drying Surprise” Factor
One thing beginners don’t always expect is how much a painting changes when it dries. Colors can deepen slightly, metallics become more obvious in certain light, and subtle textures from the dip technique appear more clearly once the surface is fully dry and level.
It’s tempting to hover over the painting and poke it, but resist the urge. Instead, snap some progress photos right after you finish the pour, then again after it dries and after you varnish or resin. You’ll start to understand how your paints evolve, which helps you predict future results more confidently.
Sharing Your Work (Yes, Even as a Total Beginner)
Finally, don’t underestimate how encouraging it can be to share your beginner acrylic pour diptych with others. Online communities and platforms like Bored Panda often feature user submissions that are playful, imperfect, and full of personality rather than technically “flawless.”
When you post your own flower diptych, you’re not just showing a paintingyou’re sharing the story behind it: the mess on the table, the moment you almost gave up, the thrill of the reveal. That story is part of the art. And who knows? Your simple beginner project might be exactly the inspiration another nervous first-timer needs.
So mix your paints, cover your table, line up those two canvases, and give the flower diptych acrylic pour painting a try. Worst case scenario: you get some abstract, colorful panels. Best case scenario: you create a mesmerizing, bloom-filled diptych that looks like it came straight from a Bored Panda art featureand you discover a relaxing new creative hobby in the process.
Conclusion
Creating a simple flower diptych acrylic pour painting is one of the most accessible ways to dive into fluid art. With basic supplies, a beginner-friendly dip technique, and a little willingness to let the paint flow where it wants, you can produce two coordinated panels that look surprisingly advanced.
From prepping your space and mixing paints to mastering the double-dip and embracing “happy accidents,” this project blends technical knowledge with playful experimentation. Hang your finished diptych in your home, gift it to a friend, or submit it to an online communityeither way, you’ve earned your place in the wonderfully colorful world of fluid acrylic pouring.