Table of Contents >> Show >> Hide
- Why Build a Bunker in Minecraft?
- Materials You Should Gather Before You Start
- How to Build a Bunker in Minecraft: 9 Steps
- Step 1: Pick a Smart Location
- Step 2: Plan the Layout Before You Dig Like a Mole on Espresso
- Step 3: Dig the Entrance and Main Chamber
- Step 4: Reinforce the Structure
- Step 5: Add a Hidden or Secure Entrance
- Step 6: Light Everything Properly
- Step 7: Build the Core Survival Rooms
- Step 8: Add Security Features and an Escape Route
- Step 9: Camouflage and Upgrade the Surface
- Best Tips for a Better Minecraft Bunker
- Common Mistakes to Avoid
- Extra Experience: What Building a Minecraft Bunker Actually Feels Like
- Conclusion
- SEO Tags
If your Minecraft survival strategy currently consists of “panic, eat bread, run, repeat,” it may be time for an upgrade. A bunker is one of the smartest bases you can build in Minecraft because it combines safety, storage, stealth, and efficiency in one beautiful underground package. It is harder for mobs to reach, easier to hide from other players on multiplayer servers, and surprisingly simple to expand once the first room is finished.
This guide walks you through exactly how to build a bunker in Minecraft in 9 practical steps. You do not need to be a redstone wizard with a secret engineering degree from Block University. You just need a solid location, basic materials, a smart layout, and a little patience. Whether you play Survival, Hardcore, Java, or Bedrock, this bunker design can give you a secure home base that looks clean on the inside and suspiciously like “nothing to see here” on the outside.
Below, you will learn where to place your bunker, what materials to bring, how to build a hidden entrance, what rooms matter most, and how to avoid the mistakes that turn a cozy underground shelter into a lava-scented regret chamber.
Why Build a Bunker in Minecraft?
A Minecraft bunker is more than a hole with a door and a chest shoved in the corner. When built well, it becomes a high-function survival base that protects your loot, shortens your travel time, and keeps your important tools and crafting stations in one organized place.
Players love underground bases because they are efficient. You already gather stone while digging, the earth around you acts like natural armor, and the structure can be hidden with far less effort than a giant castle or glass mansion. A bunker also works especially well for players who want a secret base, a hardcore world shelter, a PvP hideout, or a compact starter home that can grow into a full survival headquarters.
Materials You Should Gather Before You Start
You can build a simple bunker with basic early-game materials, but a stronger and nicer-looking version feels much better to live in. Here is a practical starter list:
- Stone, cobblestone, or deepslate for walls and structure
- Wood planks for doors, ladders, chests, and utility blocks
- Torches, lanterns, or other light sources
- A bed
- Crafting table, furnace, and chests
- Glass blocks or panes for small windows if you want them
- Iron door or piston materials for a hidden entrance
- Redstone dust, lever, button, sticky pistons, and repeaters for advanced doors
- Food, a pickaxe, shovel, and extra building blocks
If you are just starting out, do not wait until you have fancy blocks. A bunker made from stone and good planning will outperform a glamorous base made from bad decisions and twelve unsupported ceilings.
How to Build a Bunker in Minecraft: 9 Steps
Step 1: Pick a Smart Location
The best bunker location is somewhere practical, discreet, and easy to defend. Hillsides, mountain edges, forests, and quiet plains all work well. If you want a truly hidden bunker, building into a hillside or digging straight down from a disguised surface entrance is often the easiest method.
Choose a location near useful resources such as trees, stone, water, caves, or a village. You want your bunker to feel tucked away, not stranded in the middle of nowhere like a lonely potato. If you play on a multiplayer server, avoid obvious spots such as directly under your starter hut or right beside spawn unless you are deliberately building a decoy.
Also check what is around and beneath your chosen spot. Digging into an underground cave can be useful, but it can also turn your secret construction project into an unsolicited skeleton convention.
Step 2: Plan the Layout Before You Dig Like a Mole on Espresso
Before breaking blocks, sketch out a simple plan. Your bunker does not need to be huge, but it should be intentional. At minimum, plan for:
- An entrance tunnel or hidden access point
- A main room
- A bed area
- Storage space
- Crafting and smelting stations
Later, you can add an enchanting room, farm section, mine access, potion room, or escape tunnel. A compact starter bunker might begin as a 7×7 or 9×9 room with a two-block-wide hallway leading to the surface. Bigger is fine, but remember that every extra block means more digging, more lighting, and more chances to realize you accidentally built your hallway into a ravine.
Step 3: Dig the Entrance and Main Chamber
Start by creating the entrance path. A stairway into a hill is one of the easiest options, but a vertical ladder shaft or hidden trapdoor entrance works too. Once the entrance is mapped out, dig your main chamber underground.
Try to keep ceilings at least three blocks high if you want the bunker to feel comfortable rather than like you are living in a stone shoebox. If you prefer a polished survival base, make the room symmetrical. Minecraft rooms look instantly cleaner when the walls, floor, and ceiling line up in an intentional way.
As you dig, save the stone and dirt. Those materials can be reused for walls, camouflage, backup scaffolding, or emergency repairs after one unfortunate creeper introduction.
Step 4: Reinforce the Structure
Once your main room is hollowed out, replace rough dirt or uneven cave walls with proper building blocks. Stone bricks, cobblestone, smooth stone, and deepslate all look great in a bunker because they fit the underground theme and make the base feel sturdy.
This is also the step where you define the bunker’s personality. Want a military-style bunker? Use stone bricks, iron accents, and clean lines. Want a cozy hidden underground home? Mix wood beams, lanterns, and warm flooring. Want a secret villain lair? Add dark blocks and act mysteriously whenever anyone asks where you live.
Keep the floor flat, clean up corners, and think about traffic flow. The best bunker builds are easy to move through. You should not have to parkour over a furnace to reach your chests.
Step 5: Add a Hidden or Secure Entrance
This is where a plain underground base becomes a true bunker. Your entrance should be secure, hidden, or both.
For beginners, a simple iron door with a button or lever works well. It is more secure than a standard wooden door, and it is easy to install. For a stealthier design, hide the entrance behind a hillside, inside a small shack, beneath a trapdoor, behind a painting, or under a patch of ground disguised with terrain details.
If you want the classic secret-bunker vibe, use a piston door or hidden staircase. Redstone-powered hidden doors are perfect for blending the entrance into nearby stone or grass blocks, especially when the trigger is tucked out of sight. Item-frame locks, concealed buttons, and hidden levers also add another layer of secrecy.
One important warning: do not use an obvious exterior pressure plate if your goal is security. It may open the door, but it also tells every passing player and mob, “Hello, mystery hole here.”
Step 6: Light Everything Properly
If your bunker is dark, it is not a bunker. It is a mob apartment. Add enough light sources to keep the entire interior safe and comfortable. Torches are cheap and reliable, but lanterns, glowstone, sea lanterns, or recessed lighting can make the space look far better.
Focus on dark corners, hallway turns, storage areas, and stairwells. Many players build a solid bunker shell and then forget lighting until a zombie appears beside the furnace like an uninvited roommate. Place lights deliberately instead of randomly. This improves both safety and aesthetics.
If you are creating a large bunker, use a repeating pattern of lights in the floor, walls, or ceiling so the build feels designed instead of accidentally illuminated.
Step 7: Build the Core Survival Rooms
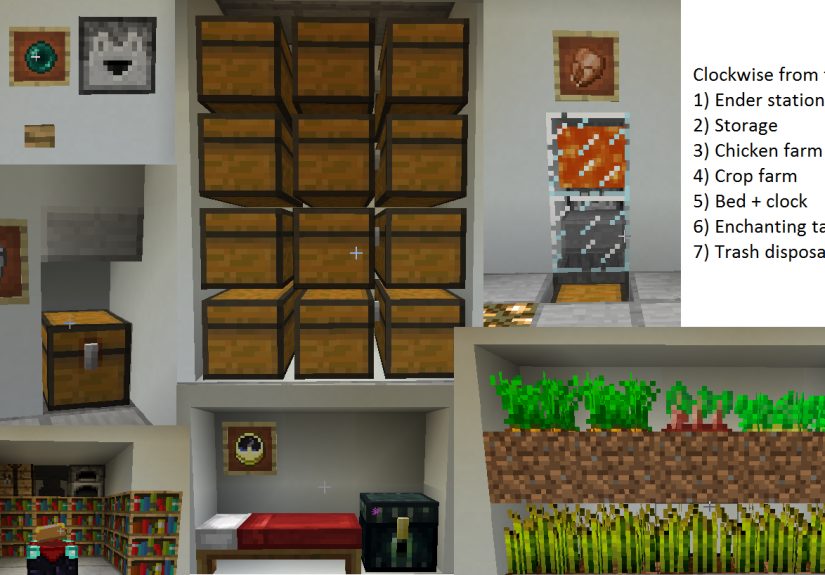
Now turn the bunker into a real base. Your main survival setup should include the essentials first:
- Bed area: Set your spawn point and create a safe rest area.
- Storage wall: Organize blocks, ores, food, tools, and rare loot.
- Crafting zone: Add a crafting table, furnaces, smoker, blast furnace, or anvil if available.
- Food support: A small indoor farm, nearby animal pen, or quick path to outdoor crops helps keep the bunker sustainable.
If you have extra space, add dedicated rooms for enchanting, brewing, armor storage, map walls, or a mine tunnel that leads deeper underground. This is where your bunker stops being a panic shelter and starts becoming your command center.
Step 8: Add Security Features and an Escape Route
The smartest bunkers always have a backup plan. Add at least one emergency exit, especially if your main entrance is narrow or redstone-powered. If the front door breaks, gets camped by mobs, or becomes compromised on a server, a hidden side tunnel can save your gear and your dignity.
Other good defensive upgrades include:
- A secondary ladder shaft
- A hidden chest room for rare loot
- A kill corridor or trap near the entrance in PvP worlds
- A map room with locked maps if you want less visible exploration data
- Blast-resistant materials around critical storage zones
You do not need to turn the place into Fort Block Knox, but a little security thinking goes a long way.
Step 9: Camouflage and Upgrade the Surface
The outside matters just as much as the inside if you want your bunker to stay hidden. Replace disturbed dirt, blend the entrance into the terrain, and avoid leaving suspiciously neat staircases in the open. A good bunker does not advertise itself.
Use grass, leaves, trapdoors, barrels, or small decorative structures to mask the surface access point. Some players hide their bunker beneath a shed, stable, crop patch, well, or tiny starter house. Others go full spy mode and bury the entrance completely under a piston door.
Once the bunker is functional, start upgrading its style. Better flooring, cleaner storage labels, improved lighting, decorative support beams, and a refined entrance can transform it from “early survival cave” into “this player absolutely has a system.”
Best Tips for a Better Minecraft Bunker
- Build near resources, but not in an obvious location.
- Keep your first version small and expandable.
- Use stone-based blocks for a natural underground look.
- Hide redstone behind walls so the interior stays clean.
- Leave room for future rooms instead of rebuilding from scratch.
- Make your storage room bigger than you think you need. You will fill it. You always fill it.
Common Mistakes to Avoid
The most common bunker mistakes are poor planning, weak lighting, no backup exit, and an entrance that is somehow both complicated and obvious. Another classic error is digging straight down without checking what is below you. That works great until the ground politely disappears and you meet lava in person.
Some players also overbuild too early. A massive underground fortress sounds amazing, but if you do not yet have enough food, tools, or lighting, you may end up living in one finished room while the rest of the bunker becomes a dark museum of unfinished ambition.
Extra Experience: What Building a Minecraft Bunker Actually Feels Like
The funny thing about building a bunker in Minecraft is that it usually starts with practical survival logic and ends with you becoming an underground interior designer against your will. At first, you only want a safe place to sleep and stash your iron. Then you place a few extra chests, carve a hallway, smooth the walls, and suddenly you are debating whether the lantern spacing feels “balanced.” Minecraft does that to people.
One of the best experiences with bunker building is the sense of progression it creates. Your first version may be ugly, cramped, and held together by optimism. Maybe the floor is still dirt. Maybe there is one furnace, two chests, and a bed jammed awkwardly into a corner. But unlike many surface houses, a bunker is incredibly easy to improve over time. You can expand one room at a time, polish one hallway at a time, and quietly transform a rough cave into a full survival HQ without ever abandoning the location.
There is also something satisfying about the rhythm of bunker life. You go out, gather wood and food, fight off mobs, come back underground, sort your inventory, smelt ore, and plan the next upgrade. The bunker becomes your reset point. It is calm, efficient, and weirdly cozy. Even when storms hit outside or creepers are wandering around the surface, your underground base feels like control in a game built around chaos.
On multiplayer servers, bunkers add a completely different kind of fun. Hiding the entrance becomes part of the game. You start thinking like a spy. Should the door be under a pond? Behind a painting? Beneath an innocent farm plot? Inside a fake starter shack that looks too boring to investigate? The design challenge becomes psychological as much as architectural. A great bunker is not only strong. It is forgettable in exactly the right way.
Another rewarding part of the experience is how well bunkers fit different play styles. If you love redstone, your bunker can become a secret automated fortress with piston doors, hidden item-frame locks, and storage systems that feel delightfully overengineered. If you prefer simple survival, it can stay compact and practical with just the essentials. If you are a builder, an underground base can evolve into a dramatic command center with vaulted ceilings, polished stone, crop rooms, enchanting wings, and a minecart tunnel that makes the whole thing feel like a subterranean city.
The biggest surprise for many players is that underground does not have to mean boring. A bunker can be warm, stylish, and full of character. Wood beams soften the stone. Lanterns create atmosphere. Small windows into caves or underwater walls can look incredible. Even a narrow hallway can feel cinematic if you frame it properly. In that sense, a bunker becomes one of the most creative builds in Minecraft because you are shaping both structure and mood.
So yes, building a bunker in Minecraft is about safety. But it is also about identity. It becomes the place where you return after every mining trip, every boss prep session, every chaotic night run, and every “I swear I was only going out for more coal” expedition. A good bunker is not just where you survive. It is where your world starts to feel like home.
Conclusion
If you want a base that is safe, expandable, and fun to customize, a bunker is one of the best builds you can make in Minecraft. Start with a smart location, keep the layout simple, secure the entrance, light every corner, and add only the rooms you truly need before expanding. The result is a hidden base that protects your loot, supports your survival goals, and looks better every time you upgrade it.
In other words, build the bunker now. Future-you, sprinting home with half a heart and a backpack full of diamonds, will be extremely grateful.