
Table of Contents >> Show >> Hide
- What Are DIY Solar Heater Lily Pads?
- How DIY Solar Heater Lily Pads Actually Work
- What DIY Lily Pads Do Well, and What They Do Not
- Best Materials for a DIY Solar Heater Lily Pad
- How to Build DIY Solar Heater Lily Pads
- How to Use Them for Better Results
- DIY Lily Pads vs. Solar Blankets vs. Roof-Mounted Collectors
- Common Mistakes to Avoid
- Maintenance and Longevity
- Field Notes: Real-World Experiences With DIY Solar Heater Lily Pads
- Conclusion
If you have ever looked at your pool, winced at the heating bill, and thought, “Surely the sun could do a little more heavy lifting around here,” you are not alone. That is exactly where DIY solar heater lily pads come in. These floating discs are a homemade take on solar rings and mini thermal covers. They sit on the water, soak up sunlight, help slow evaporation, and give your pool a gentle nudge toward warmer water without asking your utility company for a standing ovation.
Now, let’s get one thing straight before your glue gun gets too confident: DIY solar heater lily pads are helpful, but they are not magic. They are best understood as partial floating solar covers, not a full replacement for a roof-mounted solar pool heater system. In other words, they are the practical cousin, not the superhero. Still, when designed well and used consistently, they can absolutely make a difference, especially for above-ground pools, smaller backyard pools, plunge pools, and warm-climate setups where even modest heat retention matters.
What Are DIY Solar Heater Lily Pads?
DIY solar heater lily pads are floating pads or discs that rest on the surface of pool water. The basic idea is beautifully simple: create a lightweight, buoyant, sun-facing pad that absorbs sunlight and reduces heat loss at the surface. Most homemade versions borrow from the same logic used in commercial solar rings. They use a floating perimeter, a solar-absorbing center, and a design that allows multiple pads to drift or cluster together across the water.
The nickname “lily pads” fits because they look like oversized floating leaves scattered across the surface. Unlike a full solar blanket, which covers nearly the whole pool in one giant sheet of bubble-wrap cosplay, lily pads are modular. That makes them easier to move, easier to store, and far less likely to make you question your life choices every time you remove them.
How DIY Solar Heater Lily Pads Actually Work
1. They absorb solar energy
Solar thermal design has always loved dark absorber surfaces for a reason: dark materials absorb radiant energy efficiently. In plain English, a dark surface in the sun gets hot. If that surface is floating on water, some of that heat moves into the water below and around it. That is the first job of a solar heater lily pad.
2. They reduce evaporation
This is the big one. Many pool owners assume heating is mostly about adding heat, but the real villain is often heat loss. Pools lose a surprising amount of energy through evaporation. That means any floating pad that covers part of the surface can help by reducing how much warm water gives up its heat to the air. Think of it as less “heating the pool” and more “stopping the pool from donating all its warmth to the sky.”
3. They hold heat near the surface
Because they float, the pads help create a warmer zone at the water’s surface during sunny periods. Commercial solar rings are designed to do this deliberately, and DIY versions follow the same principle. The effect is usually gradual rather than dramatic, but over sunny days, especially when combined with reduced wind and cooler overnight losses, those small gains can stack up.
4. Their performance depends on coverage
This is where expectations need a seat belt. A few scattered pads on a large pool may look clever, but looks do not raise water temperature very much. Coverage matters. The more of the surface you cover, the better your evaporation control and passive heat gain. That is why commercial solar rings and solar covers are usually discussed in terms of overall surface coverage, not just individual pieces.
What DIY Lily Pads Do Well, and What They Do Not
DIY solar heater lily pads are best at boosting efficiency in a low-cost, low-tech way. They can help the pool stay warmer, reduce water evaporation, and stretch the swim season a bit. They are especially appealing if you do not want to wrestle with a full blanket or invest in a permanently installed solar collector system.
What they do not do is compete head-to-head with a properly sized solar pool heater. A full solar pool heating system circulates water through dedicated solar collectors, often sized to a large fraction of the pool’s surface area. That setup moves a lot more heat than floating pads can. So, if your dream is to heat a large in-ground pool deep into cool weather with a handful of floating discs, your dream may need counseling.
Best Materials for a DIY Solar Heater Lily Pad
A good lily pad needs to be lightweight, buoyant, durable, and reasonably sun-friendly. That usually means building around three core parts: a floating edge, an absorbing center, and a weather-resistant outer layer.
Floating edge
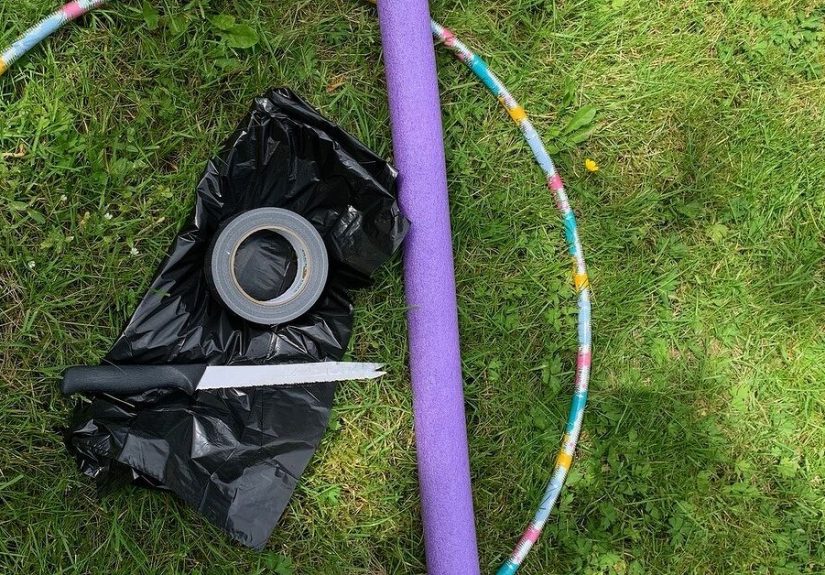
Many DIY builders use a hula hoop, flexible tubing, or foam-based edging to create the outer ring. Pool noodles or other closed-cell foam pieces can help add buoyancy. The edge should float reliably without becoming waterlogged or shedding bits into the pool like sad confetti.
Absorbing center
The center should be dark and sun-facing. A black or dark blue layer works well because it absorbs sunlight efficiently. Some DIY versions use dark plastic film or vinyl stretched across the ring. The key is keeping it taut, sealed, and reasonably durable under UV exposure.
Protective outer material
Choose materials that can handle sunlight, chlorine exposure, and repeated wet-dry cycles. UV-resistant vinyl, heavy plastic, or weather-rated polymer materials are better than flimsy bargain-bin plastic that turns crispy after three sunny weekends. If the material becomes brittle fast, your solar project becomes a pool-cleaning project.
What to avoid
Avoid sharp hardware, metal edges, adhesives that dissolve in water, and anything that can leach color, fibers, or sticky residue into the pool. Also avoid making pads so heavy that they sink halfway and become floating regrets.
How to Build DIY Solar Heater Lily Pads
Step 1: Make the floating ring
Create a circular frame using a hula hoop, flexible tubing, or another lightweight ring. The goal is a pad large enough to matter but small enough to handle easily. Multiple medium-size pads usually work better than one giant awkward disc.
Step 2: Add buoyancy if needed
If the ring alone does not float well, add closed-cell foam around the perimeter. Keep the pad balanced. A pad that tips or folds too easily will spend more time impersonating abstract sculpture than warming water.
Step 3: Attach the dark solar surface
Stretch a dark, water-resistant sheet across the frame and secure it tightly. You want a smooth surface that can absorb sun and sit flat over the water. Loose, saggy material traps water and turns your heater into a floating birdbath.
Step 4: Seal the edges
Secure the material with waterproof tape, marine-safe adhesive, zip ties, or another water-resistant fastening method that will not snag swimmers or liners. Trim everything cleanly. Pools prefer smooth edges and so do people.
Step 5: Test one prototype first
Before building a whole fleet, make one pad and test it for buoyancy, stability, and durability. Does it float flat? Does it keep its shape in light wind? Does it survive several sunny afternoons without peeling apart like a microwaved sticker? Good. Now scale up.
How to Use Them for Better Results
The smartest way to use DIY solar heater lily pads is consistently, not occasionally. Put them on during sunny periods and leave them in place whenever the pool is not in use. They are most effective when they spend actual time covering water instead of lounging beside the deck like decorative frisbees.
Place them where they can gather sun without constant shade. If your pool gets heavy wind, use landscaping, fencing, or another windbreak strategy to reduce surface turbulence. Wind speeds up evaporation, and evaporation is the thief you are trying to catch.
Also remember that lily pads work best as part of a system, not in isolation. Pair them with sensible water temperature settings, routine maintenance, limited use of splashy water features when not needed, and a basic awareness of overnight heat loss.
DIY Lily Pads vs. Solar Blankets vs. Roof-Mounted Collectors
| Option | Upfront Cost | Ease of Use | Heating Potential | Best For |
|---|---|---|---|---|
| DIY Solar Heater Lily Pads | Low | Easy to moderate | Modest | Budget-conscious owners who want partial coverage and simple storage |
| Solar Blanket / Solar Cover | Low to moderate | Moderate | Moderate to strong | Owners who want strong evaporation control and broad surface coverage |
| Roof-Mounted Solar Pool Heater | High | Very easy after installation | Strong | Owners who want a real heating system with long-term performance |
The honest verdict is this: DIY lily pads are the easiest to experiment with, solar blankets are usually better for broad low-cost coverage, and roof-mounted collectors are the real heavyweights. If you want the sweet spot between convenience and performance, lily pads can be surprisingly useful. If you want maximum heating, bigger solar infrastructure wins every time.
Common Mistakes to Avoid
Using too few pads
If your pool is large and your pad count is tiny, the result will be more “quirky decor” than thermal strategy. Build enough pads to create meaningful surface coverage.
Choosing poor materials
Cheap plastic that tears, cracks, or sinks quickly will not save money in the long run. Durable materials matter, especially under sun and chlorine exposure.
Ignoring wind
Wind can push pads together, flip them, or reduce the benefit of surface coverage. If your pool is windy, plan for that with placement, shape, or light anchoring strategies that do not damage the pool.
Expecting instant hot-tub results
These are passive solar devices. They work with weather, time, and consistency. They are not a “drop this in at noon and cannonball into bathwater at 2 p.m.” invention.
Forgetting safety
DIY solar heater lily pads are not safety covers, not flotation devices, and not toys. Remove them when they interfere with swimming, supervision, or visibility. Keep the surface clear for actual swimmers, not ambitious pool gadgets.
Maintenance and Longevity
Rinse the pads periodically, inspect seams, and replace any components that become brittle or torn. Store them out of intense sun when not needed for extended periods. If a pad starts flaking, cracking, or taking on water, retire it with dignity. A broken pad is not a heater anymore. It is just pool clutter with a backstory.
You should also watch how the pads interact with your skimmer and cleaner. Commercial solar rings are often marketed as cleaner-compatible, but DIY versions vary. Make sure they do not block circulation patterns or create trouble for automatic cleaners.
Field Notes: Real-World Experiences With DIY Solar Heater Lily Pads
One of the most common experiences people have with DIY solar heater lily pads is surprise at how much the project is really about heat retention, not just heat production. Many expect the pads to work like tiny burners under the water, but what they notice first is often slower overnight cooling, less evaporation, and a pool that feels a little less rude in the morning. That may not sound dramatic, but in pool life, “less rude” is a legitimate performance category.
Another very typical experience is discovering that modular pads are much easier to live with than a full-size solar blanket. People who dislike wrestling a giant wet cover often prefer a set of individual discs they can toss on, gather up, and stack. It feels more manageable, especially for one person. A huge blanket can save more heat overall, sure, but it can also turn ordinary pool maintenance into a strength competition nobody signed up for.
There is also the reality check phase. This usually arrives after someone makes three adorable pads for a medium-size pool and expects tropical-lagoon energy by the weekend. What they learn pretty quickly is that coverage matters. Once more pads are added and the surface coverage improves, the idea suddenly starts making more sense. The lesson is wonderfully unglamorous: the sun is free, but physics still sends invoices.
Weather plays a major role in the experience too. In sunny, warm climates, owners often feel the benefit sooner because the pads get plenty of strong sunlight and nighttime losses are easier to manage. In windy or cooler areas, people tend to notice that wind protection and routine use matter just as much as the pad design itself. A clever pad in a bad setup is still a bad setup. That part is not fun, but it is honest.
Durability is another common talking point. First-generation DIY pads are often a little rough. The seams may loosen, the center may sag, or the outer ring may not float as evenly as expected. But many builders improve the second round quickly. They switch to tougher materials, tighten the surface, reduce floppy overhangs, and make the discs more uniform. The project rewards tinkering, which is either exciting or dangerous depending on how many zip ties you already own.
People also notice a psychological perk: once they build the pads, they actually use them. A complicated system can be effective in theory and neglected in practice. DIY lily pads, on the other hand, are visible, simple, and easy to deploy. That convenience can make a real difference. A good low-tech solution used consistently often beats a perfect solution used twice and then forgotten in the shed behind a bag of mystery fertilizer.
Finally, many pool owners come away with a balanced conclusion. DIY solar heater lily pads are not a miracle cure, but they are not gimmicks either. They are a practical, budget-friendly, hands-on way to make pool heating more efficient, especially when paired with common-sense habits. The people happiest with them are usually the ones who treat them as part of a smart pool strategy rather than a one-item shortcut to summer perfection. That mindset turns the project from “cute experiment” into “actually useful backyard upgrade,” which is about as good as DIY gets.
Conclusion
DIY solar heater lily pads are a clever, affordable way to use the sun more effectively in your backyard. Their strength is not brute-force heating. Their strength is efficiency. They help absorb sunlight, reduce evaporation, and make it easier to hold on to the warmth your pool already earns during the day. Used consistently and built with decent materials, they can be a smart upgrade for pool owners who want lower-cost solar help without committing to a full collector system.
If you want the honest bottom line, here it is: build them if you want a practical weekend project that can improve pool comfort and efficiency. Just go in with realistic expectations, prioritize coverage and durability, and remember that in the battle between your pool and the atmosphere, evaporation is the drama queen. Your lily pads are there to calm things down.
Note: This article is for general informational purposes and assumes a backyard pool-use context for DIY solar heater lily pads.


