
Table of Contents >> Show >> Hide
- Why Shiplap Starts to Feel Dated (Spoiler: It’s Not Personal)
- The Fastest Fix: Change What’s Around the Shiplap
- The Biggest Upgrade: Repaint (But Not the Same White Again)
- Change the Look Without Removing It: Direction, Scale, and Geometry
- Room-by-Room Shiplap Refresh Ideas (That Don’t Require a Reality Show Budget)
- When to Keep Shiplap vs. When to Replace It
- Common Mistakes That Make Shiplap Look More Dated
- A Simple “Freshen It Up” Plan You Can Finish in a Weekend
- of Real-World Shiplap Refresh Experiences
- Conclusion
Shiplap had a very public glow-up. For a while, it was the Beyoncé of wall treatments: everywhere, effortless, and somehow always photogenic.
Then it got… popular. Like, “your dentist has it” popular. If your shiplap is starting to feel less “cozy character” and more “2016 open-house energy,”
good news: you don’t have to rip it out, list your home, and move into a minimalist concrete cube.
Most “outdated shiplap” problems aren’t caused by the boards themselves. They’re caused by how the shiplap is used: too much of it, too white,
too flat, paired with the same barn-door-and-black-hardware starter kit. With smarter color, better styling, and a few strategic upgrades, shiplap can read
as intentional architectural detail instead of a leftover trend.
Why Shiplap Starts to Feel Dated (Spoiler: It’s Not Personal)
1) Overuse turned “feature” into “default setting”
When an accent becomes the background of every living room, laundry room, powder room, and dog’s Instagram reel, it stops feeling special.
Full-room, floor-to-ceiling shiplap in bright white is the most common culprit. It’s not that white shiplap is “wrong”it’s that it’s become predictable.
2) The modern farmhouse formula got copy-pasted
Shiplap is strongly associated with modern farmhouse décor. If the rest of your room still leans heavily into rustic signs, overly distressed furniture,
“gather” lettering, and industrial lighting, the shiplap reads as part of that frozen moment in time. Update the supporting cast, and the wall suddenly
looks like it belongs again.
3) Flat color + strong lines can highlight flaws
Shiplap creates repeating grooves and edgesbeautiful, but honest. Bright whites and higher-sheen paints can emphasize dings, uneven caulk, and wavy seams.
If your wall looks “busy” or shadowy in photos, the issue might be finish choice and lightingnot the shiplap itself.
The Fastest Fix: Change What’s Around the Shiplap
Swap “farmhouse props” for cleaner, calmer pieces
Try a quick test before you buy a single paint sample: remove the most theme-y items near the shiplap. Replace them with pieces that feel more timeless:
a simple framed print, a round mirror, a sculptural lamp, or a few ceramics with clean shapes. Suddenly the shiplap becomes texture, not a costume.
Bring in contrast that isn’t “black metal everything”
If your shiplap is white, consider contrast through:
- Warm metals (brass, antique gold, champagne bronze)
- Soft black (charcoal, iron, graphite) instead of jet black
- Natural materials (oak, leather, linen, stone)
- Color accents (deep green, clay, muted blue) used sparingly
Make the wall feel curated, not wallpapered with wood
Shiplap looks freshest when it’s treated as architecture. That means giving it “purpose”:
a headboard wall, a mudroom drop zone, a fireplace surround, a hallway wainscot, or a built-in backdrop.
If your entire great room is shiplapped, consider dialing it back visually with furniture placement and art that breaks up the repetition.
The Biggest Upgrade: Repaint (But Not the Same White Again)
Modern color directions that make shiplap look intentional
Paint is the simplest way to shift the vibe from “trend” to “tailored.” Here are color families that play nicely with the shadow lines of shiplap:
- Warm whites: creamy, not icy (pairs well with wood tones and brass)
- Greige and mushroom: sophisticated neutrals that soften the grooves
- Earthy greens: olive, sage, eucalyptus (calm, modern, not shouty)
- Moody charcoals: dramatic, great for an accent wall or fireplace
- Dusty blues: coastal without going full “beach rental”
- Clay and terracotta: warm, flattering, and unexpectedly chic on wood texture
Pick the right sheen so your grooves don’t become a spotlight
Shiplap has lots of edges, and edges love to catch light. If you go too shiny, the wall can look busy.
Most people do best with matte or eggshell in low-traffic rooms, and satin where you need wipeability
(kids, kitchens, baths, mudrooms). If you’re painting trim on the same wall, keep trim a bit higher sheen than the field for crisp definition.
Prep like a pro: the part no one posts, because it’s not cute
The difference between “freshly updated shiplap” and “why does this look… sticky?” is prep.
Here’s the realistic, do-it-right sequence:
- Clean first: dust + grease make paint fail. Use a gentle degreaser in kitchens/mudrooms.
- Fix nail holes: use wood filler or spackle where appropriate; let it dry fully.
- Light sand: knock down ridges and rough filler so the finish doesn’t telegraph every patch.
- Vacuum and wipe: dust in grooves becomes gritty paint.
- Caulk the right places: seams at trim, corners, and any obvious gaps. Tool it smooth.
- Prime strategically: stain-blocking primer where there are knots, tannins, or mystery marks.
- Cut in the grooves first: brush gaps, then roll the flats so you don’t get heavy lines.
- Two finish coats: shiplap’s texture can look patchy with one coat, especially in dark colors.
Tip that saves sanity: keep a small artist brush handy for touch-ups in grooves. Shiplap has corners; corners have opinions.
Knots and tannin bleed: the “why is my wall suddenly yellow?” moment
If your shiplap is pine (or any knotty wood), those knots can bleed through paint like they’re trying to rejoin the group chat.
Spot-prime knots with a high-performing stain-blocking primer, and don’t skip dry time. If you’ve already painted and see discoloration,
don’t panicprime the stained areas and repaint. It’s annoying, but fixable.
Change the Look Without Removing It: Direction, Scale, and Geometry
Go vertical to make ceilings feel taller
Vertical shiplap shifts the vibe instantly. It feels more contemporary, less “fixer-upper,” and it visually lifts the room.
It’s especially effective in small bathrooms, narrow hallways, and entryways where you want height and structure.
Fake the “new shiplap” look with trim and spacing
If your boards are wide and screaming “farmhouse era,” you can modernize them by adding clean trim elements:
picture-frame molding over or around sections, a simple ledge, or a cap rail for a wainscot effect.
The goal is to create deliberate zones so the shiplap reads like millwork.
Introduce a new pattern nearby
Mixing patterns is a designer trick that makes shiplap feel like one layer, not the whole identity.
Pair shiplap with:
- Wallpaper above a shiplap half wall (classic and surprisingly modern)
- Fluted/reeded details on a cabinet or furniture piece
- Plaster or limewash-style finish on adjacent walls for softness
- Tile in wet zones, keeping shiplap as the “dry” architectural frame
Room-by-Room Shiplap Refresh Ideas (That Don’t Require a Reality Show Budget)
Living room: make it feel tailored
- Paint the shiplap a warm neutral or soft charcoal and keep the rest of the room lighter.
- Hang one large artwork instead of many small signs (shiplap is already “busy”).
- Add a chunky wool throw, linen drapes, or a textured rug to shift the vibe from rustic to refined.
Bedroom: turn shiplap into a headboard moment
- Stop the shiplap at “headboard height” and add a cap rail for a built-in look.
- Try a dusty color (sage, clay, muted navy) and keep bedding simple and layered.
- Swap exposed-bulb fixtures for something softershiplap loves warm light.
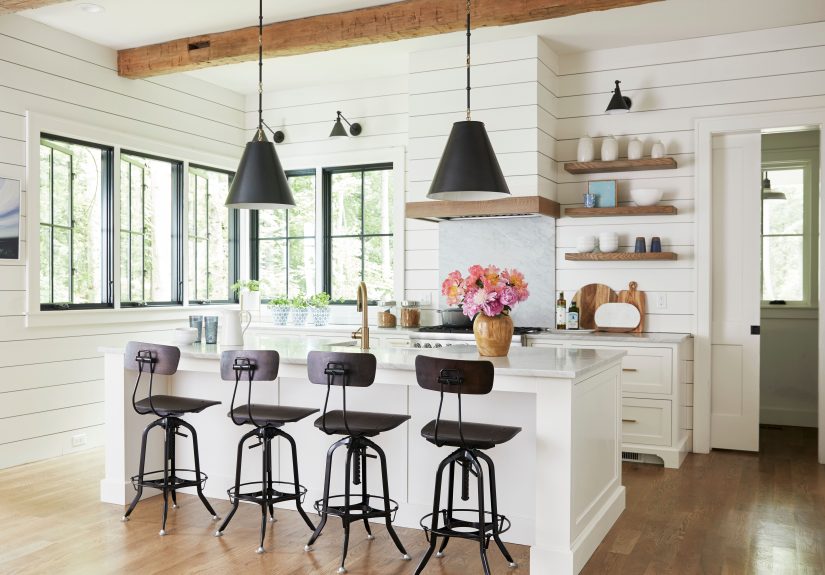
Kitchen: keep it cleanable and intentional
- Use satin paint if it’s a high-traffic wall you’ll wipe often.
- Consider shiplap only in a breakfast nook or as a backdrop to open shelves.
- Pair with stone, zellige, or a simple slab backsplash so it feels elevated.
Bathroom: moisture is the boss here
- Use a moisture-appropriate paint and good ventilation.
- Keep shiplap away from direct shower spray unless it’s properly protected and detailed.
- Go vertical for a modern spa feel, especially behind a vanity.
Mudroom/entry: turn it into millwork
- Add hooks, a bench, and a shelf/rail so the wall has a “job.”
- Paint a deeper color (olive, graphite, navy) to hide scuffs.
- Use durable sheen and keep touch-up paint labeled and stored.
When to Keep Shiplap vs. When to Replace It
Keep it if…
- It’s in good shape and adds texture you actually like.
- You can update paint and styling to match your current taste.
- You can break up large expanses with trim, zones, or built-ins.
Replace it if…
- It’s warped, poorly installed, or constantly separating at seams.
- It’s in a location where moisture damage keeps returning.
- The room needs a smoother wall for a different design direction (plaster, wallpaper, etc.).
Important safety note for older homes
If your home (or existing paint layers) dates back decades, be mindful that sanding or scraping painted surfaces can create hazardous dust.
If you suspect older paint, consider testing and using lead-safe practices, and hire qualified professionals when appropriate.
The safest “refresh” is always the one that doesn’t turn your weekend project into a cleanup saga.
Common Mistakes That Make Shiplap Look More Dated
- Repainting the same stark white and expecting a different vibe (it’s not magic, it’s paint).
- Skipping caulk and filler, then wondering why shadows look messy.
- Too much contrast (bright white shiplap + harsh black accents + cold lighting = dramatic… in a DMV way).
- Over-decorating the wall with tiny items that fight the groove pattern.
- Choosing sheen based on “what I already have” instead of how the wall will reflect light.
A Simple “Freshen It Up” Plan You Can Finish in a Weekend
Day 1: Reset and prep
- Declutter the wall and swap in a few cleaner, more modern accents.
- Patch holes, sand lightly, vacuum dust, and caulk seams.
- Prime stains/knots if needed.
Day 2: Paint and style
- Paint grooves first, roll flats second.
- Let it dry properly between coats.
- Restyle with fewer, larger pieces and warmer textures.
If you do nothing else, do this: change the color (even subtly) and update what’s around it. That’s the shiplap glow-up with the highest return on effort.
of Real-World Shiplap Refresh Experiences
Homeowners who “hate their shiplap” often discover they don’t actually hate shiplapthey hate the whole scene happening around it. One common
experience is the living room accent wall that looked bright and airy in the listing photos, but feels flat in real life. The fix is rarely demolition.
It’s usually a warmer white (or a soft greige), better lighting (hello, warm bulbs), and one large art piece that calms the busy groove pattern. People
are consistently surprised by how much less “farmhouse” the wall feels when they swap out a cluster of small décor for a single oversized frame and a
more modern lamp.
Another very relatable scenario: the entryway shiplap that’s getting scuffed to death by backpacks, dogs, and life. The frustration isn’t the shiplap,
it’s the finish. In high-traffic zones, switching from a flat wall paint to a more durable finish and a deeper color can feel like discovering a cheat
code. A rich olive, a slate blue, or a charcoal that hides marks instantly makes the space feel intentionallike designed millworkwhile also being more
forgiving. People who tried to keep a bright white mudroom “perfect” often report the same thing: it turns into a constant maintenance project. The
moment they go darker, the room becomes easier to live in.
Bathrooms bring a different kind of learning curve. Many homeowners love the texture of shiplap behind a vanity, but get annoyed when seams look rough
or paint cracks at joints. The best refresh stories usually involve slowing down and getting the prep right: smoothing caulk lines, choosing a finish
that can handle humidity, and making sure ventilation is actually doing its job. Once those pieces are in place, shiplap stops feeling “delicate” and
starts feeling like a cozy architectural detail that belongs.
And then there’s the “I want something new, but I’m not ready for a full renovation” crowd. A popular compromise is the half-wall approach:
keep shiplap on the lower portion, add a cap rail, and put wallpaper above. Homeowners often describe this as the moment their space stops looking like
a trend and starts looking custom. It’s also a great confidence builderbecause it’s a visible transformation without the mess and cost of tearing down
a whole wall system. The biggest takeaway from these experiences is consistent: shiplap looks freshest when it’s treated as architecture, paired with
updated finishes, and given a clear “role” in the room.
Conclusion
Shiplap isn’t automatically outdatedit’s just picky about its styling, like a cat with a preferred chair. If your wall feels stuck in a previous trend
cycle, you can modernize it with smarter color, a better sheen, cleaner surrounding décor, and simple architectural upgrades like half walls or trim zones.
The goal isn’t to erase texture; it’s to make it look deliberate. And deliberate always looks expensive (even when it absolutely wasn’t).


