
Table of Contents >> Show >> Hide
- Why Choose a Curtain Wire Instead of a Rod?
- What You Need Before You Start
- How to Hang Curtains with Wire: 12 Steps
- Step 1: Pick the Right Curtain for a Wire Setup
- Step 2: Measure the Width of the Area You Want to Cover
- Step 3: Decide Whether to Mount the Wire to the Wall or Ceiling
- Step 4: Mark the Mounting Points Carefully
- Step 5: Check the Height and the Curtain Length
- Step 6: Install Anchors or Screw into Solid Support
- Step 7: Attach the End Fittings
- Step 8: Cut or Adjust the Wire to Length
- Step 9: Add Curtain Clips, Hooks, or the Panel Itself
- Step 10: Tension the Wire Until It Is Firm and Straight
- Step 11: Hang the Curtain and Test the Movement
- Step 12: Finish the Look with Small Adjustments
- Common Mistakes to Avoid
- Best Places to Use a Wire Curtain System
- Styling Tips for Better Results
- Real-Life Experiences with Hanging Curtains on Wire
- Conclusion
- SEO Tags
Want the soft look of curtains without the visual heft of a chunky rod? Curtain wire might be your new best friend. It is slim, modern, budget-friendly, and surprisingly handy in small spaces where a traditional rod can feel a little too “I have arrived with decorative opinions.” Whether you are dressing a kitchen window, softening a bathroom, covering open shelving, or faking a dreamy studio divider, learning how to hang curtains with wire is one of those DIY skills that looks fancier than it really is.
The trick is keeping expectations realistic. A wire curtain system is ideal for sheer curtains, café curtains, lightweight panels, and simple decorative drapes. It is not the superhero for heavy blackout velvet. If you pair the right fabric with careful measurements and proper tension, though, the result can look clean, airy, and intentionally stylish instead of “temporary fix until further notice.”
In this guide, you will learn how to hang curtains with wire in 12 simple steps, along with common mistakes to avoid, styling ideas, and real-life experiences that can save you time, money, and a little muttering under your breath.
Why Choose a Curtain Wire Instead of a Rod?
A wire curtain system gives you a lighter, less bulky look than a standard curtain rod. That makes it especially useful in apartments, compact rooms, minimalist interiors, and awkward spots where a full rod would feel clumsy. It also works well when you want a curtain to sit close to the window, skim across a nook, or divide a room without shouting for attention.
Another bonus is flexibility. Many curtain wire kits can be mounted to the wall or ceiling, adjusted to fit your space, and trimmed to length. That means you can use them for more than windows. Think laundry areas, under-sink storage, open closets, bunk beds, craft corners, and those mysterious shelves where clutter goes to reproduce.
Still, keep one golden rule in mind: lightweight curtains win. If your fabric is thick, lined, or heavy enough to qualify as emotional support upholstery, choose a rod instead.
What You Need Before You Start
- Curtain wire kit or stainless steel wire system
- Lightweight curtains, sheers, or café curtains
- Mounting hardware and anchors
- Measuring tape
- Pencil
- Level
- Drill or screwdriver, depending on the hardware
- Wire cutters if your kit requires trimming
- Clips, rings, or hooks that fit your curtain style
- Step stool or ladder
How to Hang Curtains with Wire: 12 Steps
-
Step 1: Pick the Right Curtain for a Wire Setup
Start with the fabric, because that decision affects everything else. Curtain wire is best for sheer curtains, lace panels, net curtains, lightweight linen blends, and small decorative drapes. If the curtain feels heavy in your hands before it is even hung, that is your clue. A sagging wire is not modern design. It is a warning sign.
Rod-pocket curtains, clip-top panels, and light café curtains are often the easiest choices. For a softer look, choose a panel with a little fullness. For a cleaner, modern vibe, use simple clips and a flatter curtain style.
-
Step 2: Measure the Width of the Area You Want to Cover
Measure the exact width of the window, nook, shelf, or opening. Then decide how much extra coverage you want on each side. If you are hanging the curtain over a window, extending the wire slightly beyond the frame usually creates a fuller, more polished look.
Write your measurement down. Then measure again, because confidence is not a measuring tool. If you want the curtain to stack back neatly when open, allow a bit of extra width so the fabric does not block too much glass.
-
Step 3: Decide Whether to Mount the Wire to the Wall or Ceiling
This choice changes the final look. A wall-mounted curtain wire is simple and common for windows. A ceiling-mounted setup can make a room feel taller and works especially well for room dividers, alcoves, or windows with limited wall space.
In a bathroom, a ceiling or high wall mount can look crisp and practical. In a studio apartment, ceiling mounting often feels more intentional, especially if the curtain is dividing a sleeping zone from the rest of the room.
-
Step 4: Mark the Mounting Points Carefully
Use your pencil to mark both ends of the wire. Make sure the marks are level with each other, and double-check that they are positioned where the curtain will hang correctly. If this is over a window, step back and look at your marks before drilling.
This is the moment where many DIY projects either become elegant or become “artsy.” If your wire is crooked, the curtain will tattle immediately.
-
Step 5: Check the Height and the Curtain Length
Before installing anything, hold the curtain up or measure from the planned wire position down to the floor or sill. Decide whether you want the curtain to just kiss the floor, float slightly above it, or stop at the sill for a café-style look.
For most full-length curtains, a clean finish looks best when the fabric barely touches or lightly floats above the floor. In kitchens, bathrooms, and other high-splash zones, a slightly shorter curtain can be the smarter choice. Pretty matters, but so does not dragging fabric through daily chaos.
-
Step 6: Install Anchors or Screw into Solid Support
If you are mounting into drywall, use the proper anchors that came with your kit or that match your wall type. If you can mount into wood trim or a stud, even better. Secure mounting matters because the wire needs stable tension to stay straight.
This step is not glamorous, but it is the difference between a tidy curtain installation and a dramatic 2 a.m. hardware failure that scares everyone in the house, including the cat.
-
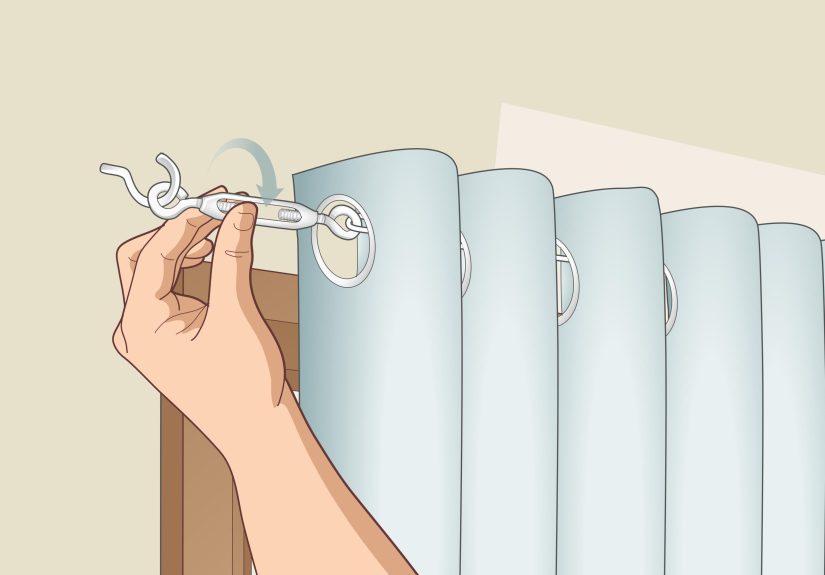
Step 7: Attach the End Fittings
Install the wire fittings or brackets at each end according to your kit instructions. Most systems include a tensioning side and a fixed side. Make sure the fittings are secure, aligned, and ready for the wire to pass through properly.
If your kit allows angled mounting or corner use, confirm the direction before tightening everything down. This is much easier now than after the curtain is hanging and judging you.
-
Step 8: Cut or Adjust the Wire to Length
Some kits come with extra-long wire that you trim to size. Others allow you to thread the wire through the fittings and tighten it without cutting until the end. Follow your kit’s design, but do not cut until you are absolutely sure of the length.
Leave enough room for the tensioning mechanism to do its job. Cutting too short is one of the fastest ways to turn a simple DIY project into a trip to buy a whole new kit.
-
Step 9: Add Curtain Clips, Hooks, or the Panel Itself
Before fully tensioning the wire, slide on any curtain clips, rings, or hooks you plan to use. If your curtain has a rod pocket or tabs that work directly on the wire, thread it through now. If you forget this step, you will get the deeply humbling pleasure of undoing your hard work.
Clip spacing matters, too. Evenly spaced clips help the curtain hang better and prevent drooping sections that make the whole setup look tired before it has even begun its career.
-
Step 10: Tension the Wire Until It Is Firm and Straight
Now tighten the wire. It should feel taut, not guitar-string dramatic. The goal is a straight line with enough tension to support the curtain without stressing the hardware. A little sag can happen over time, especially with wider spans, but a properly installed wire should look neat and stable from the start.
If your span is long, remember that lighter fabric is even more important. Wide windows and heavier panels are where many wire systems start to lose the plot.
-
Step 11: Hang the Curtain and Test the Movement
Once the wire is tensioned, hang the curtain fully and slide it back and forth. Make sure the clips move smoothly, the fabric gathers evenly, and the wire does not dip too much in the center. Adjust the spacing or the tension if needed.
This is also the time to check how the curtain behaves when open and closed. You want function, not just a nice photo for three minutes.
-
Step 12: Finish the Look with Small Adjustments
Steam or smooth out wrinkles, even the folds, and tweak the hem if necessary. Add tiebacks if you want a more styled look, or leave the panels relaxed for a softer, casual finish. Sometimes the final result comes down to tiny adjustments: one clip moved over, one fold fluffed out, one side dropped by half an inch.
And yes, half an inch can matter. Curtains are shockingly dramatic for something that mostly stands there.
Common Mistakes to Avoid
Using Heavy Curtains
This is the biggest mistake by far. Wire systems are not designed for thick blackout drapes, lined velvet, or panels that weigh as much as your weekend groceries. Keep it light if you want the wire to stay straight and the hardware to stay happy.
Skipping Proper Measurements
Eyeballing the width or height is a gamble. Measure carefully, especially if the curtain needs to clear a sill, radiator, shelf, or baseboard heater.
Mounting the Wire Too Low
If the setup is for a full window treatment, hanging the curtain wire too close to the top of the frame can make the whole window look smaller. A slightly higher placement usually feels more balanced and polished.
Overloading the Span
Even lightweight curtains can pull a wire down if the span is especially wide. In very broad areas, you may need a center support or a different system entirely.
Forgetting About Daily Use
A curtain that looks lovely but catches on the window latch, blocks a vent, brushes a damp sink, or tangles in a door is not a success story. Always think about how the curtain will function in real life.
Best Places to Use a Wire Curtain System
- Kitchens: Great for lightweight café curtains or soft privacy panels.
- Bathrooms: Useful for small windows where a rod feels bulky.
- Apartments: Helpful in tight rooms and minimalist layouts.
- Open shelving: A simple way to hide visual clutter.
- Closets and storage nooks: Softer than a door and easier on the budget.
- Studios: Perfect for creating a flexible room divider with light fabric.
- Kids’ spaces: Handy for canopies, reading corners, or low-weight decorative drapes.
Styling Tips for Better Results
If you want your DIY window treatment to look more finished, focus on proportion. Extend the wire a little wider than the window when possible, keep the curtain length intentional, and make sure the fabric has enough fullness to avoid looking skimpy. One sad, stretched panel is rarely the goal unless you are decorating a haunted lighthouse.
Choose finishes that match the room. Stainless steel wire looks clean and modern. Soft white sheers feel airy and casual. Natural linen-look panels can warm up a minimalist room. In a small bathroom, a barely-there wire and a light fabric can make the space feel bigger instead of busier.
You can also use curtain wire creatively beyond the window. A wire-hung curtain under a sink can soften a cottage-style kitchen. A small panel across open wardrobe storage can hide clutter beautifully. And in a rental, these little tricks can add personality without major remodeling.
Real-Life Experiences with Hanging Curtains on Wire
The first time many people try a curtain wire installation, they assume it will be easier than a rod because the hardware looks smaller. In one sense, that is true. A wire system is usually less bulky, less visually demanding, and often faster to install. But it also asks for a little more patience. A rod can forgive a lot. A wire does not. If your measurements are off, if your clips are uneven, or if your fabric is just slightly too heavy, the wire politely but firmly reveals every mistake.
One common experience is using wire in a small kitchen. It often starts as a practical move: the window is above the sink, the trim is narrow, and a regular rod feels oversized. Once the wire goes up with a simple café curtain, the whole space suddenly feels lighter. The window still gets sunlight, the room looks softer, and the curtain does not dominate the wall. People are often surprised by how much visual breathing room they gain from switching to this leaner setup. It is one of those rare home updates that can be both inexpensive and immediately satisfying.
Bathrooms are another place where curtain wire tends to earn its keep. In a compact bathroom with a tiny window, a standard rod can feel clunky fast. A slim wire with a sheer or lightly textured panel gives privacy without making the room feel closed in. The lesson many homeowners learn here is that fabric choice matters even more in humid spaces. A light curtain that dries quickly and does not puddle is usually the real hero. The pretty option and the practical option can actually be the same thing, which feels suspiciously mature.
Then there is the studio-apartment experience, where curtain wire often graduates from “window fix” to “space-saving genius.” A lightweight curtain hung from the ceiling can separate a bed from the rest of the room without the cost or permanence of a wall. People who try this often say the biggest surprise is psychological, not just visual. A soft divider can make a one-room home feel more organized, more private, and oddly calmer. That said, they also learn quickly that a wire divider works best when the curtain is light enough to move easily. Heavy fabric turns the whole system into a slow-motion wrestling match.
Another very real experience involves open storage. Someone gets tired of staring at shoes, bins, or laundry supplies, hangs a simple panel on wire, and suddenly the mess is still there but no longer greeting guests at eye level. This is not magic. It is strategy. Curtain wire is especially good in those in-between areas where you want coverage without the expense of cabinetry or doors. Under counters, across shelves, inside awkward alcoves, or over utility corners, it can do a lot of quiet work while staying visually discreet.
Of course, nearly everyone who uses curtain wire long enough has one story about overconfidence. Usually it goes like this: “The fabric did not seem that heavy in the store.” Then the curtain goes up, the wire sags a bit in the middle, and there is a brief period of denial. Maybe it will settle. Maybe it is supposed to look relaxed. Maybe gravity is being judgmental. The fix is almost always simple but slightly annoying: switch to a lighter panel, shorten the span, add support if the system allows it, or move to a proper rod. That lesson tends to stick.
The best experiences with how to hang curtains with wire usually come from realistic expectations. People who treat the wire as a clean, lightweight solution are happy with it. People who expect it to do the job of a heavy-duty decorative rod usually end up frustrated. Once you understand that boundary, though, wire becomes a genuinely useful tool. It is neat, modern, flexible, and surprisingly charming when installed well.
And maybe that is the biggest takeaway of all. Curtain wire is not trying to be grand. It is trying to be clever. In the right room, with the right fabric and the right setup, clever wins.
Conclusion
Learning how to hang curtains with wire is one of the simplest ways to upgrade a window, soften a space, or hide an eyesore without spending a fortune. The secret is matching the system to the job: use lightweight curtains, measure carefully, tension the wire properly, and make small finishing adjustments that help the final look feel intentional.
Whether you are adding privacy to a bathroom, dressing a kitchen window, hiding open storage, or dividing a studio apartment, a wire curtain system can be practical and stylish at the same time. Keep it light, keep it level, and keep your expectations smarter than your fabric choices. Your windows will thank you, and your walls may finally stop looking unfinished.


