
Table of Contents >> Show >> Hide
- What Is Polish Contouring, Exactly?
- Why It Works (The Optical Illusion Part)
- What You’ll Need
- How to Do Polish Contouring at Home (Step-by-Step)
- 7 Easy Polish Contouring Variations (So You Don’t Get Bored)
- Best Color Combos for Longer-Looking Nails
- Common Mistakes (And How to Fix Them Fast)
- How to Make Polish Contouring Last Longer
- How to Ask for It at the Salon (Without a 12-Minute TED Talk)
- Nail Health Notes (Because Pretty Nails Like Healthy Nails)
- Real-Life Experiences: What Polish Contouring Is Like (And Why People Get Hooked)
- Conclusion
If makeup contouring can turn a cheekbone into a work of art, why shouldn’t your nail polish get the same glow-up?
Enter polish contouring: a simple, surprisingly flattering nail trick that makes short nails look longer
in minutesno acrylics, no extensions, no “I can’t type anymore” drama.
The concept is basically optical illusion 101: you “highlight” the center of the nail and “shadow” the sides, creating
a slimmer, more elongated look. It’s the manicure equivalent of wearing vertical stripesexcept your outfit is your
fingertips, and the dress code is “cute.”
What Is Polish Contouring, Exactly?
Polish contouring (also called nail contouring in some beauty circles) is a technique where you
use color placementoften a lighter center and darker edges, or a clean strip of negative spaceto make nails look
longer and narrower. Think of it like drawing a “path” for the eye to follow vertically. Your nail suddenly looks
stretched (in a good way), even if it’s naturally short or a little wide.
You’ll sometimes see a close cousin of this trick referred to as the Italian manicure, which focuses on leaving
a tiny gap along the sides of the nail so the polish doesn’t go all the way edge-to-edge. Same goal, slightly different
approach: create the illusion of a slimmer nail bed.
Why It Works (The Optical Illusion Part)
Your eyes read shapes based on contrast and boundaries. When polish covers the entire nail from sidewall to sidewall,
it emphasizes the full width. But when you keep the sides softer (darker, nude, or bare) and draw attention to the center,
you visually “narrow” the nail. Narrower shapes look longerlike how a long, slim rectangle feels taller than a wide one.
- Vertical emphasis: Center stripes and gradients pull the eye up and down.
- Softened edges: Darker sides or side gaps reduce the perceived width.
- Cleaner cuticle line: A neat base makes nails look instantly more “grown out.”
What You’ll Need
This is a low-commitment manicureno advanced equipment required. Here’s the shopping list (and you may already own most of it):
Polish
- Base shade: A sheer nude, milky pink, soft beige, or any “your nails but better” color.
- Contour shade: A slightly deeper nude, taupe, soft brown, mocha, mauve, or even a bold color if you’re feeling spicy.
- Optional accent: A shimmer topper or fine glitter for a highlight effect.
Tools
- Base coat (helps with adhesion and smoother application).
- Top coat (glossy for a “glass nail” look or matte for a fashion-forward finish).
- Thin liner brush (or a clean, skinny art brush for stripes).
- Cleanup brush + remover (for crisp edges and side gaps).
- Optional: Nail tape or French tip guides for extra-straight lines.
How to Do Polish Contouring at Home (Step-by-Step)
Step 1: Prep Like You Mean It
Nail prep is the difference between “sleek illusion” and “why does my left thumb look like modern art?” Start with:
- Shape: File into a squoval (square-oval) or soft ovalboth tend to elongate the look.
- Cuticles: Gently push back cuticles after softening them (never aggressively cut them).
- Clean surface: Remove oils with a quick swipe of remover so polish grips better.
- Base coat: One thin layer. Let it dry.
Step 2: Apply a Sheer Base (Your “Filter” Layer)
Choose a nude or sheer shade close to your skin tone. One to two thin coats is plenty. The goal is an even, polished canvas,
not a thick layer that takes 47 minutes to dry and smudges the second you remember you have pockets.
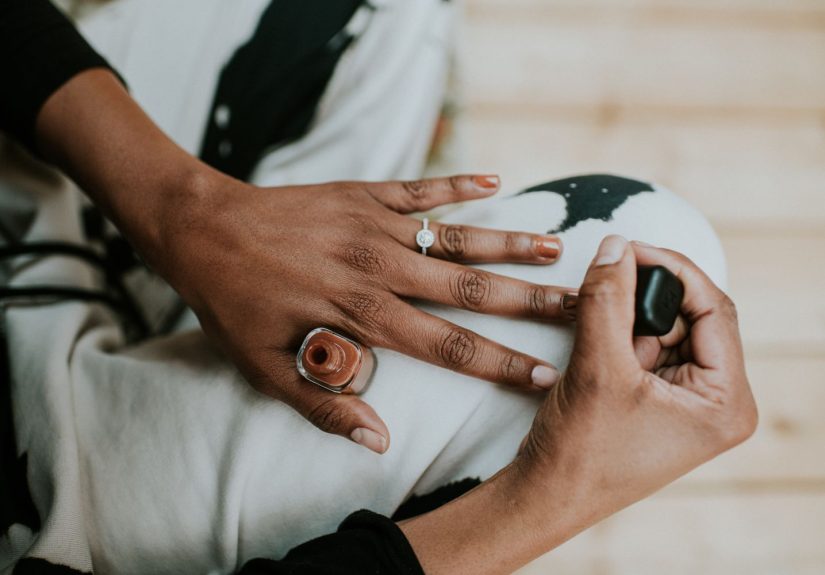
Step 3: Create the “Highlight” Down the Center
Now the magic. You have two popular options:
- Option A: Lighter center, darker sides. Paint the center with a lighter shade (or keep your base lighter) and contour with a deeper shade near the edges.
- Option B: Darker center stripe on a light base. Paint a thin, vertical line down the middle using a deeper shade.
Use a liner brush for a clean stripe. Start slightly below the cuticle and pull the brush toward the tip in one smooth motion.
If your line looks a little wiggly, don’t panictop coat is basically Photoshop.
Step 4: Add the Contour (Shadow the Sides)
If you’re doing the “highlight center, shadow sides” method, apply a deeper nude/taupe along the left and right edgeskeeping the
side areas narrow. Leave the center lighter. This creates depth without needing actual shading skills.
If you’re doing the “Italian manicure” style, leave a slim, clean gap along each side so your polish doesn’t touch the sidewalls.
You can achieve this by:
- Painting carefully inward from the edges, or
- Cleaning the edges with a small brush dipped in remover to carve out a crisp border.
Step 5: Clean Up the Cuticle Line (The Secret Sauce)
A neat cuticle line makes nails look longer instantly. Use your cleanup brush with a tiny amount of remover to refine the top curve
and sharpen the sides. Keep it subtlethis is nail contouring, not nail excavation.
Step 6: Seal with Top Coat (And Cap the Tip)
Add top coat and lightly swipe across the free edge (“capping”) to help prevent chipping. If you used multiple colors, a glossy top coat
blends everything together for a smooth finish. Matte top coat can look extremely chic, especially with neutral contours.
7 Easy Polish Contouring Variations (So You Don’t Get Bored)
Once you understand the placement, you can remix it a dozen ways:
- The Classic Center Stripe: Thin vertical line down the middle on a sheer base.
- Double Pinstripe: Two ultra-thin vertical lines close togethervery “minimalist designer bag,” but for nails.
- Negative Space Sides: Leave the edges bare and paint the center with one solid color for a super clean elongation effect.
- Micro-French + Side Gap: A tiny French tip plus a slim side gap makes short nails look longer without loud color.
- Soft Ombré Contour: Sponge a deeper shade near side edges and fade inward for a shadowy effect.
- Glitter Highlight: Add a thin shimmer stripe down the center (on top of a neutral base) for a subtle spotlight.
- Matte Base, Glossy Stripe: Same color family, different finisheslike a stealthy optical illusion.
Best Color Combos for Longer-Looking Nails
You don’t need high-contrast neon to get results. In fact, soft, close-to-skin tones often look the most believable.
Here are some combos that work well:
“Office Polished” Neutrals
- Milky pink base + taupe contour (clean, understated, elongating).
- Sheer beige base + soft brown center stripe (the easiest starter combo).
- Peachy nude base + mauve side shading (warm and flattering).
Bold But Still Lengthening
- Light nude base + deep burgundy center stripe (dramatic, but still slimming).
- Soft pink base + navy center stripe (unexpected and modern).
- Neutral base + forest green side shading (cool, moody, and very fall-friendly).
Quick Shade-Picking Tip
If you’re unsure what nude to use, pick a base shade that blends with your skin tone, then choose a contour shade 1–2 steps deeper
in the same undertone (warm with warm, cool with cool). That keeps the look natural and helps the illusion land.
Common Mistakes (And How to Fix Them Fast)
-
Mistake: The stripe is too wide.
Fix: Carve it slimmer with a cleanup brushor add a slightly darker shade to the sides to re-narrow the center. -
Mistake: The sides look messy.
Fix: Use remover and a small brush to sharpen the edges. Crisp borders = instant “professional.” -
Mistake: Thick coats take forever to dry and smudge.
Fix: Thin coats only. Two thin layers beat one thick layer every time. -
Mistake: You painted over the cuticle area and it looks shorter.
Fix: Clean a tiny crescent near the cuticle to re-open the nail bed visually. -
Mistake: The design “shrinks” under top coat.
Fix: Use a floating top coat stroke (don’t press hard) so it doesn’t drag pigment.
How to Make Polish Contouring Last Longer
A great illusion deserves great wear time. Extend your manicure with these simple habits:
- Start with a base coat (it helps polish adhere and reduces peeling).
- Cap the tip with both color and top coat to prevent edge chipping.
- Wear gloves for dishwashing/cleaningwater and chemicals are not nail polish’s best friends.
- Use cuticle oil after the manicure is fully dry to keep nails flexible and healthy-looking.
- Refresh top coat every 2–3 days if you want a glossy “just did my nails” look.
How to Ask for It at the Salon (Without a 12-Minute TED Talk)
If you’re going pro, a photo reference helps. But if you want to describe it in words, try:
- “Nail contouring” or “polish contouring” to elongate short nails.
- “Italian manicure” with a slim side gap to make the nail bed look narrower.
- “Negative space along the sidewalls” with a center-focused polish placement.
Bonus tip: Ask your nail tech to keep the cuticle line neat and the side gaps consistent. Symmetry is what makes it look intentional,
not accidental.
Nail Health Notes (Because Pretty Nails Like Healthy Nails)
Polish contouring is cosmetic, but it works best on well-prepped nails. Keep things happy by moisturizing hands and cuticles regularly,
filing gently, and avoiding using nails as tools. If nails are brittle or peeling, consider limiting harsh removers and giving nails a break
between manicures. If you notice pain, swelling, or unusual nail changes, check in with a medical professional.
Real-Life Experiences: What Polish Contouring Is Like (And Why People Get Hooked)
The first time many people try polish contouring, the reaction is almost always the same: a tiny pause, a zoom-in, and then,
“Wait… why do my nails look longer?” It’s not magicit’s placementbut it feels like you just hacked your hands.
And the best part? It works even when your nails are in that awkward stage between “short” and “I swear I’m growing them out.”
One common experience: you paint your nails as usual, step back, and everything looks… fine. Then you try the contour trick on one nail as a test.
Suddenly, that one nail looks sleeker and more elegant than the others, like it just got upgraded to business class. That’s when people go back
and redo the rest. The illusion is especially noticeable if you have wider nail beds or nails that “fan out” slightly at the tippolish placement
visually reins that in.
Another relatable moment: the learning curve is real, but it’s not scary. The first attempt might produce a stripe that’s a little wobbly,
like it was drawn during mild turbulence. But by the second or third nail, your hand figures it out. And even if it’s not perfect, the overall
effect still reads “intentional.” A glossy top coat smooths minor imperfections, and a quick cleanup brush pass can turn “oops” into “oh!”
in under a minute.
People who type all day, play instruments, or work in healthcare often love this technique because it delivers the “long nail look” without
requiring actual long nails. You get the polished, elongated vibe while keeping nails practical. It’s also a favorite for parents of small kids
and anyone who regularly battles zippers, contact lenses, or the world’s tiniest jewelry clasps. You’re not sacrificing functionjust upgrading
the aesthetic.
At salons, the experience is usually: bring one reference photo, say “I want my nails to look longer without adding length,” and let the tech do
their thing. Many nail artists already use similar concepts (like side gaps or negative space) to shape the look of the nail bed. The fun part is
when you leave and realize your hands look more “finished” in selfies, product shots, or just while holding your iced coffee like it’s an accessory.
Finally, there’s the “I didn’t expect compliments” effect. Because polish contouring often uses neutral tones, it doesn’t scream for attention
it whispers, “I have my life together,” even if you’re currently eating cereal for dinner. Friends will ask what color you used, and you’ll
casually say, “Oh, it’s just a little polish contouring.” Then you’ll pause dramatically, because yes, you are now a person with a nail technique.
Conclusion
Polish contouring is one of those rare beauty tricks that’s easy, flattering, and genuinely usefulespecially if you want the illusion of longer nails
without adding a single millimeter. With the right color placement, a neat cuticle line, and a top coat seal, your nails can look instantly more
elongated, slimmer, and salon-fresh. It’s low-effort, high-reward… basically the dream.


