
Table of Contents >> Show >> Hide
- Table of Contents
- Why a Creature Alphabet Works So Well
- Planning the A–Z Without Melting Down
- Build a Style System for Consistency
- A–Z Creature Gallery (Text Edition)
- Tools, Workflow, and Production Tricks
- SEO & Publishing Tips for “26 Pics” Posts
- Common Mistakes (and How to Dodge Them)
- Bonus: of Real-World Experience
Ever wondered why an A–Z alphabet series is so weirdly satisfying? It’s the perfect creative constraint:
26 tiny deadlines, 26 chances to surprise yourself, and exactly one letter (Q) that will make you question your life choices.
In this post, I break down how to plan and illustrate an entire alphabet of creaturesfrom picking a theme and building a repeatable style system
to designing readable letterforms that still feel alive. You’ll get practical workflow tips (sketching, shape language, line weight, color rules,
and how to avoid the “why do all my animals look like potatoes?” problem), plus a complete A–Z “text gallery” of creature concepts you can adapt.
Whether you’re into hand lettering, character design, children’s illustration, or just want a shareable art challenge, this guide will help you finish the series
without burning outand make it look like you had a plan the whole time.
Why a Creature Alphabet Works So Well
A creature alphabet is basically a creative treadmill with a snack tray: you’re moving forward (A to Z),
you know exactly what’s next (another letter), and every step is small enough to finish in one sitting.
That “small win” rhythm is why these series get finishedand why people love scrolling them.
It’s a constraint that behaves like a coach
Instead of staring into the void asking “What should I draw?”, you ask “What’s a cool creature for the letter M?”
That’s a friendlier question. Constraints don’t kill creativity; they stop creativity from wandering off to start
a brand-new hobby (like bread baking) mid-project.
It creates built-in shareability
Alphabet series posts have a natural hook: people want to see what you did for their favorite letter,
or they’ll jump straight to the “hard ones” (Q, X, and Zaka the boss fights).
The format also encourages “save this for later” behavior, which is gold for social posts and blogs.
It’s sneaky skill training
You practice letterform readability, character design, composition, and consistency26 times.
By the time you reach the final letters, your style rules are clearer, your shapes are stronger,
and your brain has stopped trying to reinvent the wheel every five minutes.
Planning the A–Z Without Melting Down
Planning is the difference between “I finished a cohesive alphabet series” and “I have four letters and a mysterious sketch of a sad llama.”
You don’t need a 40-page plan. You need a simple map.
Step 1: Pick one unbreakable theme
Decide what “creatures” means in your series. Options that tend to work well:
- Real animals only (more educational, instantly recognizable)
- Mythical creatures (more narrative, more design freedom)
- Hybrid creatures (half-real, half-imaginary; chaos in a controlled container)
- Biome-based creatures (ocean-only, desert-only, forest-only)
- Mood-based creatures (spooky, cozy, neon, “looks like it bites”)
Step 2: Make a letter list before you draw
Draft your A–Z creature picks in one sitting. This does two things:
it prevents you from boxing yourself into a corner later, and it exposes the trouble spots early (hi, X).
Pro tip: give yourself “flex letters.” If you can’t find a satisfying creature for X,
you can use a scientific name, a regional name, or a hybrid you invent (like “Xylomoth,” a moth that lives in wood and regrets it).
Step 3: Decide the “series rules” in plain language
- Format: One letter per square canvas? Poster layout? Full-page verticals?
- Readability: The letter must be readable at thumbnail size.
- Creature integration: Is the creature forming the letter, hugging the letter, or hiding inside it?
- Time budget: How long per letter? (Be honest. Your calendar knows your lies.)
Build a Style System for Consistency
Consistency is what makes 26 pieces feel like one project instead of 26 separate personalities fighting in a group chat.
The trick is to design a system that’s simple enough to follow when you’re tired.
1) Shape language: pick a “default geometry”
Choose a dominant shape vibe and stick to it. For example:
- Round = friendly, plush, children’s-book energy
- Angular = sharp, dramatic, slightly “this creature has a tax attorney”
- Fluid = elegant, oceanic, magical
You can still vary creatures wildly, but your underlying geometry keeps the family resemblance.
2) Line rules: one weight, one attitude
Decide: bold outlines or delicate? Texture-heavy or clean?
If the line weight changes every letter, the series reads as inconsistenteven if each piece is “good.”
3) Color rules: a tight palette beats 26 random rainbows
If you want cohesive, pick:
- 1 background style (paper texture, flat color, or gradient)
- 3–5 main colors
- 1 accent color for “pop” moments
Then rotate colors like a DJ rotating tracks: variety, but same vibe.
4) Letterform rules: readable first, clever second
The biggest risk is “I drew a beautiful creature and accidentally lost the letter.”
Start with a letter skeleton, then build the creature into it. If you squint and the letter disappears,
simplifyfuture-you will thank you.
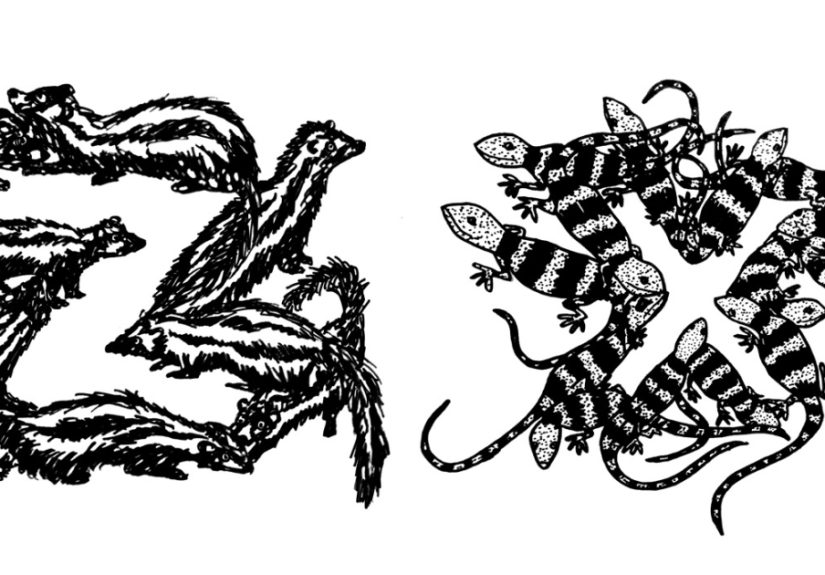
A–Z Creature Gallery (Text Edition)
Since you can’t actually see my “26 pics” inside a blog draft, here’s the next best thing:
a full A–Z list of creature-letter concepts written like tiny art briefs. Use these as prompts,
swap creatures, remix styles, or turn them into your own illustrated alphabet.
- A Axolotl: The letter A is formed by a soft, watery body; feathery gills flare like decorative serifs.
- B Bison: A thick, blocky B with shaggy fur texture; the top bowl becomes a horned forehead.
- C Cuttlefish: A glowing C, ink-splattered edges; tentacles curl to echo the curve.
- D Dragonfly: A sleek D with translucent wings as cross-hatching; tiny facets suggest compound eyes.
- E Echidna: A stubby E made of spines; each “arm” ends in a claw-like notch.
- F Fennec Fox: An F with oversized ear shapes as the top bar; sandy palette, desert dust speckles.
- G Gecko: A looping G; sticky toe pads become playful dots along the stroke.
- H Harpy Eagle: A tall H like a perch; feathers drape down the vertical stems like banners.
- I Iridescent Beetle: A shiny I with a segmented body; the dot is a tiny shell “cap.”
- J Jellyfish: A J that drips; the hook becomes a bell, trailing tentacles in thin lines.
- K Koi Fish: A K made from two koi crossing; scales create a rhythmic pattern that reads as texture, not clutter.
- L Luna Moth: A delicate L with a crescent wing flourish; soft powdery shading for “night glow.”
- M Manta Ray: The M is an ocean glide; wingspan makes the peaks, tail creates a subtle underline.
- N Narwhal: A strong N; the diagonal becomes the tusk’s direction, with icy sparkles as micro-details.
- O Octopus: A bold O with tentacles weaving inside like knotworkstill readable at a glance.
- P Pangolin: A P with overlapping armor scales; the bowl reads like a protective curl.
- Q Quokka: A Q that looks like it’s smiling back; the tail stroke becomes a little paw wave (yes, it’s cheesyown it).
- R Rattlesnake: An R made of coiled body; the leg ends in a rattle, with a tiny warning pattern.
- S Seahorse: An S that naturally flows; ridges and fins act like built-in decoration.
- T Tiger: A sturdy T with striped negative space; whiskers hint at motion without over-detailing.
- U Urchin: A U with spines radiating upward; the interior stays clean for legibility.
- V Viper: A sharp V with a head at the point; fangs become subtle highlights, not a horror movie poster.
- W Wombat: A chunky W that feels carved from stone; soft shading gives “friendly tank” energy.
- X Xerus (African ground squirrel): An X made from two tails crossing; paws anchor the letter ends.
- Y Yak: A Y with shaggy fur draping like tassels; horns sweep up to form the upper arms.
- Z Zebu: A zigzag Z with a hump silhouette integrated into the middle stroke; rope-like tail adds a finishing flourish.
Want to push this concept further? Turn each letter into a mini “habitat scene” (sand for F, tide pools for O),
or keep it minimal and let the letter-creature do all the talking. Both workjust don’t mix styles halfway through unless you mean to.
Tools, Workflow, and Production Tricks
This kind of series is half art, half logistics. The fastest way to finish is to reduce decisions.
Make one template, one set of brushes, and one repeatable process.
Sketch phase: start with the letter skeleton
- Block the letter in simple geometry (no texture yet).
- Mark where the creature features will live (head, eyes, limbs, wings, etc.).
- Check readability at thumbnail size (zoom out; if it looks like a pretzel, simplify).
Refine phase: detail with a “budget”
Give yourself a detail allowance: for example, one hero texture (fur, scales, feathers) + two accents (spots, highlights).
If you add five textures, you don’t get “more premium,” you get “busy.”
Batching: draw in squads, not one-by-one
- Batch 1: A–F (establish the look)
- Batch 2: G–L (lock the rules)
- Batch 3: M–R (speed up)
- Batch 4: S–Z (finish strong, don’t overthink)
Your brain loves batching because it reduces context switching. Also, it makes it harder to “accidentally” stop at letter H forever.
SEO & Publishing Tips for “26 Pics” Posts
If this is going on the web, you’re not just making artyou’re making a page people can find, skim, and share.
That means clear structure, strong headings, and enough context that the images aren’t floating in space.
Use search-friendly phrasing naturally
Sprinkle in terms people actually search forlike “creature alphabet,” “alphabet illustration,” “hand lettering,”
“character design,” and “A–Z art challenge”but keep it human. If it reads like a robot wrote it, readers bounce.
Write captions like mini-stories
Don’t just label “A for Axolotl.” Add a single sentence: how it’s built, what detail sells it, what mood it gives.
Captions increase time-on-page and make the post feel intentional, not just a dump of images.
Optimize for skimmers
- Short paragraphs (2–4 lines)
- Helpful subheads (H2/H3)
- Bullets for steps and rules
- A quick “gallery” section people can jump to
Common Mistakes (and How to Dodge Them)
Mistake #1: Every letter becomes a brand-new art style
Fix: lock your systemshape language, line rules, and a limited palette.
You can still experiment, but do it inside the rules (like changing creature poses, textures, or moods).
Mistake #2: The creature eats the letter (and not in a fun way)
Fix: prioritize legibility. Start with a clear letter silhouette, then weave creature features into the stroke.
Test by shrinking the artif you can’t name the letter instantly, simplify.
Mistake #3: You quit at Q
Fix: pre-plan your hard letters and give yourself permission to “cheat” with:
scientific names, regional names, hybrids, or a creature you invent. The alphabet police are not coming.
Mistake #4: You over-detail early and burn out
Fix: keep early letters slightly simpler. You can always add polish at the end with a “final pass” across the set.
Bonus: of Real-World Experience
The first time I tried illustrating a full alphabet of creatures, I thought it would be a cute weekend project.
You knowtwo coffees, a playlist, and a whimsical burst of productivity. That was adorable of me.
By letter D I realized the real challenge wasn’t creativity. It was consistency. My A looked like a picture-book mascot,
my B looked like a moody poster design, and my C looked like it belonged on a cereal box that got recalled for “excessive vibes.”
The turning point was when I stopped treating each letter like a standalone masterpiece and started treating the alphabet
like a system. I wrote down rules in plain Englishalmost embarrassingly plain: “One outline weight. Same background texture.
No more than three textures per creature. The letter must read from across the room.” That tiny checklist became my best friend.
It also made the work faster because I wasn’t re-deciding everything every time I opened the file.
Another thing I learned: momentum is a real, physical force. If I skipped a day, restarting felt like pushing a refrigerator uphill.
So I started batching. I’d sketch six letters in one sitting, then ink six, then color six. That way I only had to “warm up”
once per task. Sketch brain stayed sketch brain. Color brain stayed color brain. And when I got to the scary lettersQ, X, ZI wasn’t
panicking, because the look of the series was already locked in.
The hardest part, honestly, was fighting the urge to be too clever. I wanted every letter to be a magic trick: hidden creatures,
elaborate patterns, negative-space surprises. But when I zoomed out, the set looked like 26 different people yelling ideas at once.
The fix was restraint. I picked one “hero” detail per piecemaybe fur texture, maybe scales, maybe a glow effectand let everything
else be quieter. That’s when the alphabet started to feel cohesive, and it’s also when viewers started reacting more positively.
People don’t need you to show every trick you know; they want the set to feel intentional.
My favorite unexpected benefit was how much it improved my character design instincts. When you have to create 26 creatures,
you start noticing patterns fast: you default to the same eye shape, the same smile, the same “cute” proportions. The alphabet forces
you to stretch. You need a long creature, a round creature, a spiky creature, a creature that’s basically just a noodle with ambition.
And because each piece is small, experimenting feels safelike a laboratory instead of a final exam.
By the time I finished, I wasn’t just proud of the artI was proud that I didn’t abandon it halfway through. The series taught me that
finishing is a skill, not a personality trait. Give yourself constraints, build a style system, and keep the steps small enough that you’ll
actually do them. Also, plan Q early. Always plan Q early.


