
Table of Contents >> Show >> Hide
- What Is a Coax Cable Splice?
- Before You Start: Choose Repair Over Replacement Only When It Makes Sense
- Tools and Materials You’ll Need
- How to Splice Coax Cable: 10 Steps
- Step 1: Identify the cable type and buy matching connectors
- Step 2: Turn off connected equipment and disconnect the cable
- Step 3: Cut out the damaged section cleanly
- Step 4: Strip the first cable end to the correct dimensions
- Step 5: Fold back the braid and inspect the foil and center conductor
- Step 6: Install the first compression connector
- Step 7: Compress the connector fully
- Step 8: Repeat the process on the second cable end
- Step 9: Join both ends with a barrel connector
- Step 10: Test the signal and secure the cable run
- Common Mistakes That Ruin a Coax Cable Splice
- When a Splice Works Welland When It Does Not
- Quick Example: Splicing a Damaged Modem Line
- Real-World Lessons and Experiences From Splicing Coax Cable
- Conclusion
- SEO Tags
If your TV signal is glitching, your modem keeps acting like it needs emotional support, or your antenna line looks like it survived a wrestling match with a lawn chair, a clean coax cable splice can save the day. The good news: splicing coax cable is not black magic. The bad news: it does punish sloppy work. One loose braid, one badly cut jacket, or one bargain-bin twist-on connector, and your signal may wave goodbye.
This guide walks you through exactly how to splice coax cable in 10 clear steps, using the method that gives the best shot at a durable repair: two properly installed F-type compression connectors joined with a female-to-female coax coupler, often called a barrel connector. It is practical, beginner-friendly, and based on real-world installation standards instead of “just jam it together and hope.”
If you do it right, the splice should be secure, neat, and low-loss. If you do it wrong, you may create a tiny silver sculpture that looks impressive and works terribly. Let’s avoid that second option.
What Is a Coax Cable Splice?
A coax cable splice is a repair or extension that joins two sections of coaxial cable so signal can continue traveling between your source and your device. In most homes, that means a 75-ohm coax cable such as RG6, commonly used for cable internet, TV antennas, cable boxes, and modems.
The cleanest splice is not made by twisting bare metal together. It is made by terminating each cable end with the correct F-type compression connector and joining those ends with a barrel connector. This approach protects signal quality better, lasts longer, and is far less likely to create intermittent problems later.
Before You Start: Choose Repair Over Replacement Only When It Makes Sense
Splicing works well for a nicked section, a shortened run, a chewed-up cable end, or a damaged connector. But if the cable is old, heavily kinked, water-damaged, or crushed in multiple places, replacing the entire run is usually smarter. A splice is a repair, not a miracle. Even a good splice adds one more connection point, and every connection point is another place where signal loss or moisture intrusion can sneak in.
Tools and Materials You’ll Need
- Matching coax cable, usually RG6
- Two F-type compression connectors sized for your cable
- One F81 barrel connector or female-to-female coax coupler
- Coax cable cutter
- Coax stripper
- Compression tool
- Utility knife, only if needed for cleanup
- Weatherproof boot, weatherproof connector, or coax seal tape for outdoor splices
- Cable tester, modem, or TV/antenna setup for final testing
Pro tip: Do not cheap out on the connector type. Compression connectors usually outperform push-on, screw-on, and old-style crimp connectors for long-term reliability. This is one of those projects where the tiny metal piece matters more than your optimism.
How to Splice Coax Cable: 10 Steps
Step 1: Identify the cable type and buy matching connectors
Look at the jacket printing on the cable. Most homes use RG6 coax cable. Some older systems use RG59, which is smaller and generally has higher signal loss. Your connector, stripper setting, and compression fitting must match the cable type. “Close enough” is not a real electrical standard.
If you are repairing a cable for a modem, cable TV box, or over-the-air antenna, RG6 is usually the right fit. If you mix connector sizes, the cable may feel attached at first and fail later when touched, moved, or exposed to weather.
Step 2: Turn off connected equipment and disconnect the cable
Before cutting anything, power down the connected equipment. Unplug the modem, receiver, or TV if practical. This is communication cable, not house power wiring, but you still do not want to work on an active connection with devices trying to negotiate signal while you operate like a tiny cable surgeon.
Lay the cable where you can work comfortably. Good light helps. So does not kneeling on a Lego.
Step 3: Cut out the damaged section cleanly
Use a proper cable cutter and remove the bad section with a square, clean cut. Do not use dull diagonal cutters that crush the cable into an oval. Coax depends on its shape. The center conductor, dielectric, foil, braid, and jacket all work together to carry signal efficiently. A sloppy cut makes every step after it harder.
If you are extending a cable rather than removing damage, make sure both ends are long enough to work with comfortably before you begin the splice.
Step 4: Strip the first cable end to the correct dimensions
Now use a coax stripper. This is where the project starts looking professional instead of suspicious. Many compression systems use prep dimensions that expose about 1/4 inch of conductor and 1/4 inch of braid, while some connectors specify a slightly different strip, such as 5/16 inch by 1/4 inch by 1/4 inch. The important rule is simple: follow the specification for your connector brand.
Strip only enough material to fit the connector properly. If you remove too much jacket, foil, or dielectric, you weaken the cable end and increase the odds of signal problems.
Step 5: Fold back the braid and inspect the foil and center conductor
Once stripped, gently fold the braided shield back over the jacket. Make sure no stray braid strands touch the center conductor. That is one of the most common causes of a bad splice. Think of it as the cable equivalent of shoelaces caught in a bike chain: messy and immediately regrettable.
On many RG6 cables, the foil bonded to the white dielectric should remain in place. Do not peel it off unless your connector instructions specifically tell you to remove an outer foil layer on quad-shield cable. The dielectric should stay round and smooth, and the copper center conductor should be straight.
Step 6: Install the first compression connector
Push the F-type compression connector onto the prepared cable end until it is fully seated. On a correct install, the white dielectric should sit flush inside the connector, usually near the bottom of the nut or within the post, depending on the connector design. The center conductor should project correctly through the front.
If you have to force it like you are opening a stubborn pickle jar, stop and recheck the strip. The cable prep is probably wrong. A properly prepared cable should seat firmly, not violently.
Step 7: Compress the connector fully
Place the connector and cable into the compression tool and compress it completely. This locks the connector body onto the jacket and shielding for a secure mechanical and electrical connection. Once compressed, inspect the connector. It should look even, tight, and fully engaged.
Give it a gentle pull test. Not a heroic pull. Just enough to confirm the connector is solidly attached. If it slides off, congratulations: you have discovered why installers love doing a pull test before putting everything back in the wall.
Step 8: Repeat the process on the second cable end
Prepare the second cable exactly the same way. Cut square, strip carefully, fold back the braid, keep the foil arrangement correct, seat the connector fully, and compress it. Consistency matters. If one side is clean and the other side looks like it was repaired during a minor earthquake, the splice may still fail.
This is also the moment to verify you used the same cable type and compatible connectors on both sides. A splice is only as good as its weakest end.
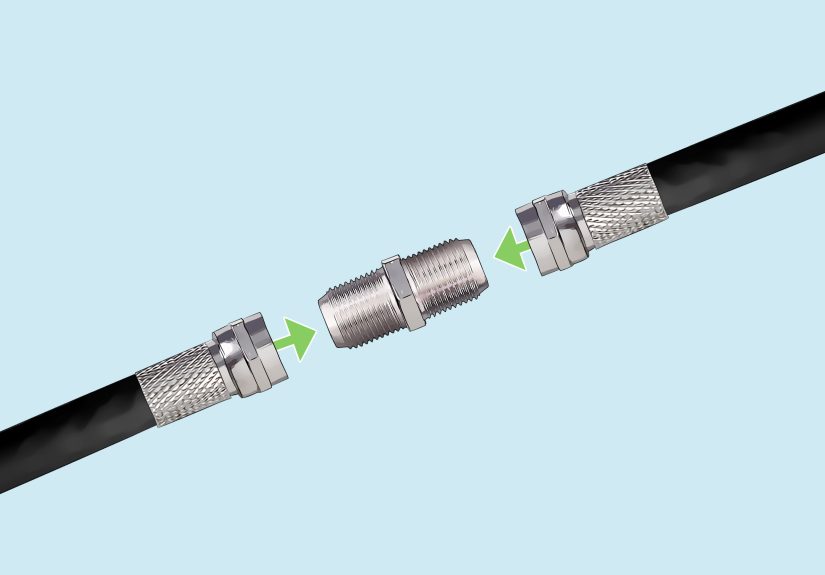
Step 9: Join both ends with a barrel connector
Screw each finished connector onto opposite sides of the barrel connector. Hand-tighten firmly. For many home uses, hand-tight is the right starting point. Do not over-muscle the fitting and damage the threads. You want snug, secure contact, not a personal grudge match with the connector.
If the splice will live outdoors or in a damp space, this step needs extra protection. Use weatherproof compression connectors, boots, or sealing tape so moisture does not enter the cable. Water intrusion is one of the fastest ways to turn a decent coax splice into a long-term headache.
Step 10: Test the signal and secure the cable run
Reconnect the cable to your device and test the signal. For a modem, check whether it comes online reliably. For TV or antenna use, scan channels or verify picture stability. Move the cable gently near the splice. A good connection stays stable when touched.
Once the splice passes testing, secure the cable so the connector is not hanging under tension. Avoid sharp bends, kinks, and contact with power cords. If signal wiring must cross electrical wiring, do it at a 90-degree angle instead of running them side by side for long distances.
Common Mistakes That Ruin a Coax Cable Splice
- Using the wrong connector size: RG6 and RG59 are not interchangeable.
- Removing the wrong foil layer: some cable types require bonded foil to stay in place.
- Letting braid touch the center conductor: this can short the connection.
- Using twist-on or bargain connectors: they are often faster to install and slower to keep working.
- Leaving the splice exposed outdoors: moisture is the enemy of long-term signal quality.
- Adding too many splitters and couplers: every extra connection adds insertion loss.
- Kinking the cable: damaged dielectric can hurt performance even if the outside looks fine.
When a Splice Works Welland When It Does Not
A clean coax cable repair is usually fine for a single damaged point in a home cable run. It is especially useful for antenna lines, TV room moves, and fixing a bad connector near a modem. But if your run is already long, already split several times, or already weak on signal, a splice may be the straw that finally makes your internet buffer during the best part of the movie.
In those situations, replacing the cable or simplifying the path may produce a better result than adding one more connector. Signal loss increases with cable length and frequency, and splitters make it worse. In plain English: the longer and more complicated the route, the less forgiving the system becomes.
Quick Example: Splicing a Damaged Modem Line
Imagine the coax line behind your desk was pinched by furniture and the modem keeps dropping offline. You cut out the damaged two-inch section, prep both RG6 ends, add compression connectors, join them with a barrel coupler, then hand-tighten everything and reboot the modem. If the line comes back stable and stays stable when the cable is moved, the repair worked.
Now imagine you used a screw-on connector instead, left two braid hairs touching the center conductor, and skipped weather protection on a damp basement wall. The modem may still come online for a while, but it will probably return later with drama. Coax has a long memory for bad installation habits.
Real-World Lessons and Experiences From Splicing Coax Cable
In real homes, splicing coax cable usually happens for boring reasons, not glamorous ones. A pet chews a line. A couch pinches a cable. Someone moves a modem and suddenly discovers the original installer gave them exactly three inches of extra slack and a prayer. The repair itself is simple, but the lesson is always the same: coax cable rewards patience.
One of the most common experiences people report is assuming the visible damage is the only problem. They replace the crushed connector, reconnect everything, and still get pixelation or intermittent internet. Why? Because the cable may also be kinked a few inches farther back, or the old splitter in the basement is corroded, or the line is routed tightly against power cords. A coax splice can fix one failure point, but it cannot cancel out every other weakness in the system. That is why good troubleshooting matters as much as good tool work.
Another frequent lesson is that connector quality matters more than expected. Many first-time DIYers assume a connector is just a connector. Then they compare a loose twist-on fitting with a properly compressed F-connector and suddenly understand why professionals are so picky. The better connector grips the jacket more securely, seats more consistently, and resists pull-out much better. In an outdoor setup, weatherproof designs with O-rings can be the difference between a repair that lasts through seasons and one that quietly fills with moisture and fails later.
People also learn quickly that neat work saves time. A square cut, a correct strip, and a straight center conductor make the whole repair go faster. Sloppy prep causes delays at every stage. The connector will not seat correctly. The braid gets messy. The dielectric deforms. Then you spend ten minutes “troubleshooting” a problem that actually began with a rushed first cut. Coax is funny that way: it looks forgiving, but it keeps score.
There is also the emotional arc of coax repair, which deserves respect. At first, confidence is high. Then the braid explodes outward like metallic hair. Then the connector refuses to slide on. Then you discover the stripper was set for the wrong cable size. Then, after a second careful try, the connector snaps into place, the barrel goes on smoothly, the modem lights stabilize, and you briefly feel qualified to host your own home wiring show. This is normal. Enjoy it.
Perhaps the most valuable real-world takeaway is this: a successful splice is not the one that merely “works right now.” It is the one that still works after the cable is nudged, after the weather changes, after the TV stand gets moved, or after the modem reboots. Long-term reliability comes from using the right coax type, the right compression connector, the right stripping dimensions, and the right weather protection when needed. The best splice is boring, tidy, and easy to forget exists. In cable repair, boring is a compliment.
Conclusion
Learning how to splice coax cable is one of those home tech skills that pays off fast. With the right tools, matching connectors, and careful prep, you can repair a damaged line without turning your media setup into a bigger project than it needs to be. Focus on a square cut, proper strip dimensions, clean braid management, full connector seating, and solid weather protection for outdoor runs.
Do those things, and your coax splice should be reliable, low-loss, and refreshingly drama-free. Ignore them, and the cable may continue its long career in performance art.


