
Table of Contents >> Show >> Hide
- What “Send from Another Email Address in Outlook” Actually Means
- How to Show the From Field in Outlook
- How to Send from Another Account Added to Outlook
- How to Send from an Alias in Outlook
- How to Send from a Shared Mailbox in Outlook
- Send As vs. Send on Behalf: What Is the Difference?
- How to Set a Default Sending Address in Outlook
- Common Problems and How to Fix Them
- Best Practices When Sending from Another Email Address
- Practical Example: Sending as a Support Team
- Practical Example: Sending from a Personal Alias
- Security and Deliverability Tips
- Experience Notes: What People Learn After Using Multiple Outlook Sender Addresses
- Conclusion
- SEO Tags
Sending email from another address in Outlook sounds simple until Outlook decides to hide the From button like it is guarding a national secret. One minute you are trying to reply as [email protected], the next you are wondering why every message insists on leaving from your personal work address. The good news: Outlook can send from another email address, but the correct method depends on what kind of address you want to use.
You might be sending from a second account, an Outlook.com alias, a Microsoft 365 alias, a shared mailbox, a group address, or another person’s mailbox where you have delegate permission. Each option works a little differently, and each comes with its own tiny Outlook personality quirk. This guide breaks it down clearly so you can choose the right sender address, avoid permission errors, and keep your email looking professional.
What “Send from Another Email Address in Outlook” Actually Means
Before clicking every button in sight, it helps to know what you are trying to do. In Outlook, “send from another email address” can mean several things:
- Send from another account: You have multiple email accounts added to Outlook and want to choose one.
- Send from an alias: You want to use an alternate address attached to the same mailbox.
- Send from a shared mailbox: You want to send as a team inbox such as sales@, billing@, or support@.
- Send on behalf of someone: Your message shows that you sent it for another person or mailbox.
- Send as another mailbox: Your message appears to come directly from that mailbox, not from you personally.
That distinction matters because Outlook will not let you simply type any random address into the From field and magically become that sender. Email systems check permissions, aliases, domain settings, and authentication. In other words, Outlook is not being dramatic; it is trying to prevent spoofing, confusion, and the kind of inbox chaos that makes IT teams drink cold coffee at 4 p.m.
How to Show the From Field in Outlook
The first step is making the From field visible. In many Outlook versions, it appears automatically only when you have more than one account or sending identity available.
In Outlook for Windows
- Open Outlook.
- Select New Email.
- Go to the Options tab.
- Select From in the Show Fields area.
- The From line should now appear above the To field.
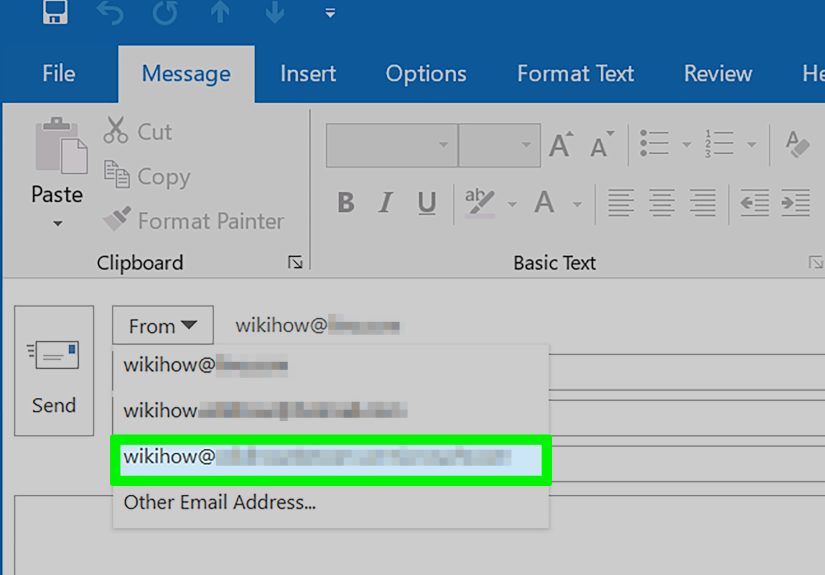
Once visible, select the From dropdown and choose the address you want to use. If the address is not listed, select Other Email Address, type the address, and choose it from the directory if available.
In New Outlook for Windows
- Open a new message.
- Look for the From line above the recipient field.
- If you do not see it, open message options and enable the From field.
- Select the From dropdown and choose the address you want to send from.
New Outlook is more web-like than classic Outlook, so some menus may look slightly different. If you are using a Microsoft 365 work or school account, your available sender addresses may depend on what your administrator has enabled.
In Outlook on the Web
- Go to Outlook on the web and start a new message.
- Select Options or the message options menu.
- Choose Show From.
- Select the dropdown next to From.
- Choose the address or select Other email address.
Outlook on the web is often the easiest place to test alternate sender addresses because Microsoft tends to roll out sending features there before they behave perfectly everywhere else.
How to Send from Another Account Added to Outlook
If you have more than one mailbox added to Outlook, sending from another account is usually straightforward.
- Create a new email.
- Make sure the From field is visible.
- Select the From dropdown.
- Choose the account you want to send from.
- Write and send your message.
For example, suppose you have [email protected] and [email protected] both added to Outlook. When composing a message, you can choose which account sends the email. Replies usually return to the address used in the From field, unless you have special reply-to rules or forwarding set up.
If the second account does not appear, add it to Outlook first. In new Outlook, go to account settings and choose Add Account. In classic Outlook, use File > Add Account. After setup, restart Outlook if the new sender does not appear right away. Outlook occasionally needs a small nap before remembering what you just told it.
How to Send from an Alias in Outlook
An email alias is another address connected to the same mailbox. For example, your main mailbox might be [email protected], but you also have [email protected] or [email protected] as aliases. The messages arrive in the same inbox, but you may want outgoing mail to show the alias.
For Outlook.com Personal Accounts
With Outlook.com, an alias uses the same inbox, contacts, account settings, and password as your primary Microsoft account. After adding an alias to your Microsoft account, you can choose which alias to send from when composing email.
- Open Outlook.com.
- Create a new email.
- Show the From field if needed.
- Select the From dropdown.
- Choose your alias.
You can also make an alias your primary sign-in address, but that is different from simply sending a single email from that alias. Be careful before changing primary aliases, especially if you use the account for subscriptions, recovery, gaming, cloud storage, or other Microsoft services.
For Microsoft 365 Work or School Accounts
In Microsoft 365, alias sending may need to be enabled by an administrator. The admin can add an alias to a user and turn on the organization setting that allows users to send from aliases. Once enabled, users may need to select the alias in Outlook settings or type it once under Other email address before it appears conveniently in the From dropdown.
Example: your main address is [email protected], but your admin adds [email protected] as an alias. If alias sending is enabled, Maria can compose a new message, choose the billing alias from the From field, and send the invoice reminder from the more appropriate address.
How to Send from a Shared Mailbox in Outlook
A shared mailbox is a mailbox multiple people can access, such as [email protected], [email protected], or [email protected]. Shared mailboxes are common because they keep team communication in one place instead of scattering customer messages across individual inboxes like digital confetti.
Step 1: Make Sure You Have Permission
You usually need the right mailbox permissions before you can send from a shared mailbox. The two most important are:
- Full Access: Lets you open and manage the shared mailbox.
- Send As: Lets you send messages that appear to come directly from the shared mailbox.
Having Full Access does not always mean you can send as the mailbox. If Outlook says you do not have permission, ask your Microsoft 365 administrator to check Send As or Send on Behalf permissions.
Step 2: Add or Open the Shared Mailbox
In many Microsoft 365 environments, shared mailboxes appear automatically after an admin grants access. If not, you can add the shared mailbox manually.
- Open Outlook.
- Go to your folder list.
- Right-click your account name or the shared mailbox area.
- Choose Add shared folder or mailbox.
- Enter the shared mailbox address.
- Select it and add it to Outlook.
Step 3: Send from the Shared Mailbox
- Create a new email.
- Show the From field.
- Select From.
- Choose the shared mailbox address.
- If it is not listed, select Other email address and type it.
- Write and send the message.
If you have Send As permission, recipients see the shared mailbox as the sender. If you have Send on Behalf permission, recipients may see wording such as “Your Name on behalf of Support.” That difference is important for branding, privacy, and customer service.
Send As vs. Send on Behalf: What Is the Difference?
This is one of the most common Outlook questions, and it is worth getting right.
Send As
Send As makes the message appear as if it came directly from the other mailbox or address. If you send as [email protected], the recipient sees [email protected] as the sender. Your personal name usually does not appear.
This is ideal for customer support, billing, HR, front desk communication, newsletters, and general business addresses where the team identity matters more than the individual sender.
Send on Behalf
Send on Behalf shows that you sent the message for someone else. The recipient may see something like Alex Rivera on behalf of Taylor Brooks. It is transparent, which is useful for executive assistants, delegated scheduling, or internal communication.
This is ideal when the recipient should know that the message was handled by a delegate rather than pretending it came directly from the mailbox owner.
How to Set a Default Sending Address in Outlook
If you frequently send from another address, choosing it every time can become annoying. That is especially true if you switch addresses all day and Outlook keeps picking the wrong one with the confidence of a GPS telling you to drive into a lake.
In new Outlook for Windows, you can manage accounts in settings and set a primary mailbox. For multiple full accounts, this helps control which account Outlook treats as the default. In Outlook.com, you may be able to set a default From address in mail settings depending on your account configuration.
For shared mailboxes and aliases, default behavior varies. Some organizations require users to choose the From address manually. If the address is mission-critical, ask your administrator whether a separate mailbox, shared mailbox, or alias is the best long-term setup.
Common Problems and How to Fix Them
The From Button Is Missing
If you do not see the From button, Outlook may only detect one sending account. Open a new message, go to message options, and turn on the From field. If it still does not appear, confirm that the second account, alias, or shared mailbox is actually available to your Outlook profile.
The Address Does Not Appear in the From Dropdown
Select Other email address and type the address manually. If it belongs to your organization, choose it from the directory when possible. If it still fails, the address may not be configured as an alias, account, shared mailbox, or approved sending identity.
You Get a Permission Error
A permission error usually means Outlook accepted the address in the From field, but Exchange or Outlook.com rejected the send request. For work or school accounts, ask an administrator to verify Send As, Send on Behalf, alias sending, or mailbox delegation settings.
The Email Sends “On Behalf Of” Instead of Directly From the Address
This typically means you have Send on Behalf permission, not Send As permission. If you want the message to appear as coming directly from the shared mailbox or group, your admin must grant Send As permission instead.
Sent Messages Save in the Wrong Sent Items Folder
When sending from a shared mailbox, sent messages may save in your personal Sent Items folder instead of the shared mailbox. Administrators can configure Microsoft 365 or Exchange settings so messages sent as or on behalf of the shared mailbox are copied to the shared mailbox Sent Items folder. This is important for teams because everyone needs to know what was already sent. Otherwise, two people may answer the same customer, and now the customer has two answers, three follow-up questions, and zero confidence.
The Alias Works in Outlook on the Web but Not Desktop Outlook
This can happen because features sometimes appear first or work more smoothly in Outlook on the web. Try sending from the alias in Outlook on the web. If it works there, update desktop Outlook, restart the app, remove and re-add the From address, or ask your admin whether alias sending is fully enabled for your organization.
Best Practices When Sending from Another Email Address
Use the Right Address for the Right Audience
Use personal work addresses for individual communication. Use shared mailboxes for team-based communication. Use aliases for branding, role separation, or cleaner public-facing addresses. For example, [email protected] looks much better on a conference invitation than [email protected], unless Steve is somehow the main attraction.
Send a Test Message First
Before sending an important message to a client, send a test to yourself or a teammate. Check the sender name, reply behavior, signature, and Sent Items location. This five-second test can prevent embarrassing sender mistakes.
Keep Signatures Consistent
If you send from multiple addresses, create signatures that match each identity. A support mailbox should have a support-style signature. A personal mailbox should have your name and title. A billing address should include payment or invoice contact details when appropriate.
Do Not Use Alternate Sending to Hide Accountability
Alternate sender addresses are for organization, branding, delegation, and workflow. They are not for pretending to be someone else without permission. Outlook permissions exist for a reason, and that reason is not “because Microsoft enjoys adding extra clicks,” although it can feel that way on a Monday.
Practical Example: Sending as a Support Team
Imagine a small software company with three employees answering customer tickets. Instead of replying from individual addresses, the company uses [email protected]. The administrator creates a shared mailbox, gives the team Full Access and Send As permission, and ensures sent items are copied to the shared mailbox.
Now, when a customer emails support, any team member can reply from the shared address. The customer sees one consistent identity. The team can review previous replies. Nobody has to ask, “Did someone already answer this?” for the 400th time.
Practical Example: Sending from a Personal Alias
Now imagine a consultant named Rachel whose main email is [email protected]. She also has an alias, [email protected], for website inquiries. She wants first replies to look friendly and brand-focused, so she sends from hello@ for new leads and from rachel@ once a client relationship becomes personal.
This is a smart use of aliases. It keeps communication organized without requiring a completely separate mailbox. The key is making sure alias sending is enabled and that Outlook shows the alias in the From field.
Security and Deliverability Tips
Sending from another email address is not only an Outlook setting. It also touches email authentication and deliverability. Business domains often use SPF, DKIM, and DMARC records to help receiving servers verify that messages are legitimate. If your organization sends from multiple systems or addresses, the domain should be configured correctly so messages do not land in spam.
For everyday Outlook users, the practical advice is simple: use addresses that your organization has properly created and authorized. Do not manually type random From addresses and hope for the best. Hope is not an email security strategy.
Experience Notes: What People Learn After Using Multiple Outlook Sender Addresses
After working with Outlook sender addresses for a while, most users discover that the technical steps are only half the story. The bigger challenge is building a clean habit around which address to use, when to use it, and how to avoid small mistakes that create big confusion.
The first real-world lesson is that the From field deserves a quick glance before every important send. When people manage several accounts, Outlook may remember the last sender used or default to the primary account. That is convenient until you send a client proposal from the internal HR mailbox or reply to a vendor from the support queue. A two-second sender check is like checking your mirrors before changing lanes. It is boring, responsible, and extremely useful.
The second lesson is that shared mailboxes work best when teams create rules. For example, a support team may agree that whoever opens a message should either reply immediately or mark it with a category. Without a system, shared mailboxes become a group project where everyone assumes someone else did the work. Spoiler: nobody did the work. Using categories, flags, folders, or simple naming conventions can turn a shared mailbox from a junk drawer into an actual workflow.
The third lesson is that signatures matter more than people think. A message from [email protected] should not end with a casual personal signature that says, “Cheers, Mike.” It should clearly identify the department, include the company name, and provide the right next step. Meanwhile, a message sent from a personal address can be warmer and more individual. Matching the signature to the sending identity makes the email feel intentional instead of accidentally assembled during a coffee spill.
The fourth lesson is to test permissions before urgent moments. The worst time to discover that Send As permission is missing is five minutes before a product launch, client deadline, school announcement, or invoice cycle. If you are added to a shared mailbox today, send a test message today. Confirm that the From address displays correctly, replies go where expected, and sent copies are stored where the team can find them.
The fifth lesson is that “alias” and “shared mailbox” are not interchangeable. An alias is great when one person needs several addresses connected to one inbox. A shared mailbox is better when several people need to manage one address together. A separate licensed mailbox may be better when the address needs its own login, rules, archive, or long-term ownership. Choosing the right structure early prevents messy migrations later.
The sixth lesson is that Outlook on the web is often the best troubleshooting friend. If something does not work in desktop Outlook, test it in the browser. If it works on the web but not the desktop app, the issue may be profile cache, app version, local configuration, or a feature difference. This does not mean desktop Outlook is broken forever; it just means the browser version can help you separate account problems from app problems.
Finally, experienced Outlook users learn to document the setup. A tiny internal note that says who can send as support@, where sent items are stored, which signature to use, and who approves permission changes can save hours later. Future you will appreciate it. Future IT will appreciate it. Future everyone will appreciate not having to solve the same Outlook mystery again while muttering at a laptop.
Conclusion
Learning how to send from another email address in Outlook is mostly about understanding which kind of sender identity you are using. If it is another account, add the account and choose it from the From field. If it is an alias, make sure alias sending is available. If it is a shared mailbox or another person’s mailbox, confirm the correct Send As or Send on Behalf permissions. Once everything is configured, Outlook becomes much easier to control.
The main rule is simple: do not fight the From field blindly. Show it, choose the right address, test it, and confirm permissions when something fails. With the right setup, you can send polished, professional messages from the correct Outlook address without turning your inbox into a detective novel.


