
Table of Contents >> Show >> Hide
- Meet Bayberry: A Tough, Fragrant Native Shrub
- Types of Bayberry You Might Grow
- Where Bayberry Thrives: Light, Soil, and Climate
- Step-by-Step: How to Plant Bayberry
- Bayberry Care: Water, Feeding, and Everyday Maintenance
- Using Bayberry in the Landscape
- Propagation: How to Make More Bayberry for Free
- Common Bayberry Issues (and Why They’re Usually Not a Big Deal)
- Real-World Experiences: What Gardeners Learn from Growing Bayberry
- Conclusion: Why Bayberry Deserves a Spot in Your Yard
If you’ve ever brushed past a shrub and suddenly smelled something fresh, spicy, and clean, there’s a good chance you just met a bayberry. These tough, fragrant shrubs are the low-maintenance overachievers of the landscape world: they tolerate salt, wind, poor soil, and still manage to look good while feeding birds all winter long. Not bad for a plant that basically asks for “sun, dirt, and a little water, please.”
Whether you’re designing a coastal hedge, shoring up a slope, or just want more wildlife in your yard, learning how to plant and grow bayberry (especially northern bayberry, Morella/Myrica pensylvanica) is a smart move. Let’s dig into everything you need to know, from choosing the right variety to planting, care, and real-world tips from gardeners who’ve fallen in love with this hardy shrub.
Meet Bayberry: A Tough, Fragrant Native Shrub
In most American landscapes, when people say “bayberry,” they’re usually talking about northern bayberry, a medium to large shrub native to the eastern United States and hardy roughly in USDA Zones 3–7. Mature plants typically reach 5–10 feet tall and wide, sometimes a bit more in ideal conditions.
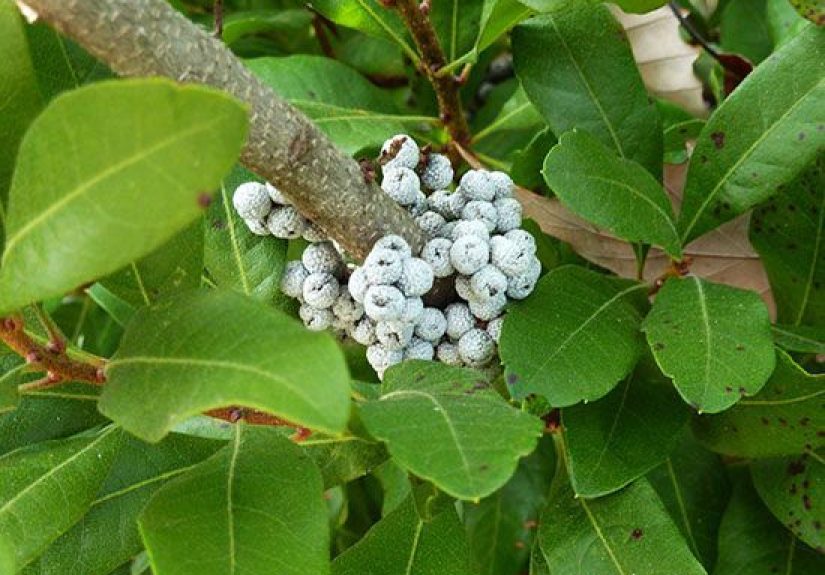
Bayberry has glossy, leathery green leaves that are pleasantly aromatic when crushed, thanks to natural oils in the foliage. In many climates it’s semi-evergreen, holding leaves well into fall and sometimes through winter. Female plants produce clusters of small, waxy, bluish-gray berries that cling to the stems through the cold months and provide food for songbirds like chickadees, bluebirds, and warblers.
Bayberry is also a champion “problem solver” shrub. It tolerates:
- Sandy or poor soils
- Low fertility (it fixes nitrogen in the soil)
- Salt spray and road salt
- Wind and exposed sites
- Moist to periodically dry conditions once established
That combination makes bayberry a top pick for coastal yards, parking-lot islands, driveways, rain gardens, and other tough locations where fussier shrubs wave the white flag.
Types of Bayberry You Might Grow
Before you rush to the nursery, it helps to know which “bayberry” you’re buying. Several related species are sold under that common name:
Northern Bayberry (Morella/Myrica pensylvanica)
This is the classic bayberry for colder climates. It’s:
- Hardy in Zones about 3–7
- Typically 6–10 feet tall and wide
- Semi-evergreen to deciduous, depending on your winter
- Very tolerant of sandy, acidic soils and salt
Northern bayberry is the go-to choice for hedges, wildlife plantings, and coastal landscapes in the Northeast and upper Midwest.
Southern Bayberry / Wax Myrtle (Morella cerifera)
Sometimes sold as “southern bayberry” or “wax myrtle,” this relative thrives in warmer regions:
- Hardy roughly in Zones 7–11
- Often evergreen and faster growing
- Can reach 10–20 feet tall in ideal conditions
- Prefers moist, average to wet soils but still handles salt well
If you live in the Southeast or Gulf Coast and want a taller, evergreen screen, southern bayberry/wax myrtle might be your better fit.
Other Bayberry Cousins
You may also see swamp bayberry or sweetgale in catalogs, as well as Asian species sometimes called red or Chinese bayberry. These are more specialized choices. For a home landscape in the U.S., northern bayberry (cooler climates) and wax myrtle (warmer climates) cover most situations.
Where Bayberry Thrives: Light, Soil, and Climate
One of the reasons bayberry is so popular is that it’s flexible. Still, giving it the conditions it prefers will make the difference between “surviving” and “thriving.”
Light Requirements
- Full sun (best): At least 6 hours of direct sun per day will give you the densest growth, best berry production, and tightest hedges.
- Partial shade: Bayberry tolerates light shade and still looks good, though it may be a bit more open or leggy.
Soil Conditions
Bayberry is surprisingly laid-back about soil, as long as it drains reasonably well:
- Prefers slightly acidic soils (common in coastal and woodland areas)
- Tolerates sandy, rocky, and low-fertility soils
- Handles periodic wetness better than many shrubs, especially wax myrtle
- Does not like to sit in consistently waterlogged, boggy soil
Hardiness and Climate
Choose the species that matches your USDA zone:
- Northern bayberry: Zones ~3–7, great for cold climates
- Wax myrtle (southern bayberry): Zones ~7–11, great for the South and coastal Southeast
In windy or exposed sites, bayberry actually shines. Its dense root system and suckering growth help stabilize slopes and tolerate salt spray, making it a natural for beachfront or roadside plantings.
Step-by-Step: How to Plant Bayberry
Ready to get your hands dirty? Here’s how to plant a bayberry shrub so it settles in quickly and happily.
1. Pick the Right Spot
Look for a place that gets at least half a day of sun and has soil that doesn’t stay soggy for long periods. If you’re planning a hedge, mark your line and note mature width: many bayberries like 6–10 feet of space between plants for a natural screen. For a denser hedge, you can plant a bit closer and accept some overlapping.
2. Time Your Planting
In most climates, the best time to plant bayberry is:
- Late summer to early fall: Cooler air and warm soil help roots establish before winter.
- Early spring: In colder regions or for southern wax myrtle, early spring planting also works well.
3. Dig the Planting Hole
- Dig a hole about twice as wide and just as deep as the root ball.
- Loosen the soil along the sides so roots can easily grow outward.
- If your soil is very compacted, rough up the sides of the hole with your shovel to break up any “pot” effect.
4. Prepare the Root Ball
Gently slide the shrub out of its container. If you see roots circling, tease them outward with your fingers or slice vertically in a few places to encourage them to grow into the surrounding soil. This helps prevent the plant from staying “pot-bound” underground.
5. Set the Shrub in Place
- Place the shrub so the top of the root ball is level with or slightly above the surrounding soil.
- Make sure the shrub is straight from several angles before you backfill.
6. Backfill and Water
- Backfill the hole about halfway with the soil you removed, gently firming as you go to remove large air pockets.
- Water thoroughly until the soil is evenly moist.
- Finish filling the hole, then water again deeply.
Resist the urge to bury the stem or mound extra soil over the root ball. Bayberry, like most shrubs, prefers to be planted at the same depth it grew in the nursery pot.
7. Mulch for Moisture and Weed Control
Apply a 2–3 inch layer of mulch (shredded bark, leaf mold, or pine needles) around the base of the shrub, keeping it a couple of inches away from the stems. Mulch helps keep the soil cool, moist, and weed-free while the roots get established.
Bayberry Care: Water, Feeding, and Everyday Maintenance
Watering
Bayberry likes “just right” moisture:
- First year: Water deeply once or twice a week during dry periods so the soil stays evenly moist but not soggy. Deep, less frequent watering encourages a strong root system.
- After establishment: Bayberry becomes moderately drought-tolerant. In normal rainfall, it may not need extra watering at all, except in extreme drought.
Fertilizing
Here’s the fun part: you usually don’t need to fertilize bayberry. As a nitrogen-fixing plant, it partners with soil bacteria to collect its own nitrogen. Over-fertilizing can actually encourage weak, overly lush growth.
If your soil is extremely poor or you see pale, stunted leaves, you can:
- Top-dress with compost in spring, or
- Use a light application of a balanced, slow-release fertilizer once a year.
Pruning and Shaping
Bayberry is naturally tidy and doesn’t demand constant pruning. That said, a little maintenance keeps it looking its best:
- Best time to prune: Late winter or very early spring before new growth emerges.
- What to remove: Dead, damaged, or crossing branches; overly long shoots that spoil the shape.
- How much: Go light. Bayberry responds best to light shaping cuts. If you need a major size reduction, spread it over a few years.
For hedges, you can shear lightly once a year, but try to keep the top slightly narrower than the base so lower branches still get sun.
Using Bayberry in the Landscape
Once you know how to grow bayberry, the next question is where to put it. This shrub’s versatility makes it useful in many design situations:
- Hedges and privacy screens: Plant a row of bayberries along a property line or driveway for a soft, natural screen that birds and pollinators will love.
- Windbreaks and coastal plantings: In windy, salty environments, bayberry stands up to conditions that defeat more delicate shrubs.
- Wildlife gardens: The berries feed winter birds, while the dense branching offers nesting and shelter.
- Rain gardens and wet spots: Especially in the case of wax myrtle, bayberry can handle periodically wet soil, making it useful along swales and low spots.
- Erosion control: Its suckering, colony-forming habit helps knit slopes together and stabilize soil.
Design-wise, bayberry pairs beautifully with other natives like winterberry holly, American cranberrybush viburnum, and switchgrass. The gray berries and deep green foliage also contrast nicely with the bright red berries and stems of other shrubs.
Propagation: How to Make More Bayberry for Free
If one bayberry shrub makes you happy, a whole hedge of home-grown plants will make you downright smug. The good news: bayberry is easy to propagate.
From Suckers and Division
Many bayberries spread slowly by rhizomes (underground stems), sending up suckers around the base of the plant. You can dig up these offsets and replant them:
- In early spring or fall, look for small shoots a short distance from the main shrub.
- Use a sharp spade to slice down between the sucker and the parent plant, making sure you get a portion of the roots.
- Lift the sucker, trim off damaged roots, and replant it at the same depth in a prepared hole.
- Water well and keep the soil consistently moist until new growth appears.
From Semi-Hardwood Cuttings
Bayberry can also be grown from cuttings taken in late summer:
- Cut a 4–6 inch piece of semi-hardwood stem (this year’s growth that has begun to firm up).
- Strip the leaves from the bottom half, leaving a few at the tip.
- Lightly wound or “scar” the base of the cutting and dip it in rooting hormone.
- Insert into a pot filled with a moist mix of peat and perlite or another well-draining propagation mix.
- Cover with a clear plastic bag or place in a propagation dome to keep humidity high.
- Keep in bright, indirect light and maintain even moisture until roots form.
Rooting may take several weeks to a few months, so this is a good project for patient gardeners or anyone who likes to check on their cuttings three times a day “just to say hi.”
From Seed
Growing bayberry from seed is possible but slower and more finicky, especially because of the waxy coating on the berries and the need for cold stratification. Most home gardeners find division or cuttings much simpler.
Common Bayberry Issues (and Why They’re Usually Not a Big Deal)
One of the reasons bayberry shrub care is so straightforward is that the plant has relatively few serious problems. Still, a couple of quirks are worth knowing about:
Suckering and Spread
Bayberry likes to form colonies over time. That’s fantastic for hedges and erosion control, but less ideal in a tightly controlled foundation bed.
Solution: Each spring, cut out any unwanted suckers with a sharp spade. If you’re feeling thrifty, pot them up and give them to friends.
Yellowing Leaves
If your bayberry’s leaves are yellowing between the veins, especially in alkaline soils, mild nutrient imbalance or pH issues could be to blame.
Solution: Top-dress with compost, check your soil pH, and avoid over-fertilizing with high-salt synthetic products. Often, a little organic matter and patience solve the issue.
Pests and Diseases
Bayberry has few serious insect or disease problems in most home landscapes. Occasionally, you may see leaf spots or minor chewing damage, but healthy shrubs usually outgrow it without treatment. Good airflow, proper spacing, and avoiding constantly wet foliage help prevent most issues.
Real-World Experiences: What Gardeners Learn from Growing Bayberry
On paper, bayberry already sounds appealing. In real yards, it tends to win people over even more. Here are some experience-based insights that gardeners often share after a few seasons with this shrub.
1. Bayberry Is the “Set It and Mostly Forget It” Hedge
Many homeowners initially choose bayberry for a functional reason: they need a screen between their house and the road, or a buffer from a neighbor’s yard. What they don’t expect is how little babysitting it needs. Once established, a bayberry hedge often soldiered through heat waves, road salt, and less-than-perfect watering schedules with far less drama than fussier evergreens.
People who previously grew high-maintenance hedges (like thirsty arborvitae in poor sites) are often pleasantly surprised to discover that bayberry doesn’t brown out the minute the sprinklers miss a day. The trade-off is that it has a more natural, informal look rather than a rigid, geometric shape. If you like slightly relaxed lines in your landscape, that’s a feature, not a bug.
2. The Wildlife Show Is Real
Another common discovery: bayberry shrubs turn into mini wildlife hubs, especially in winter. The dense, twiggy structure provides cover for birds hiding from predators or harsh weather. Once the berries ripen and soften, you’ll often see flocks of small birds working their way along the branches.
Gardeners who plant bayberry near a window or along a driveway often mention that even on dreary winter days, the constant movement of birds makes the shrubs feel “alive.” If you’re trying to create a backyard habitat, pairing bayberry with a birdbath or small water feature is a simple way to boost your yard’s appeal.
3. It’s GreatBut Not Magicalon the Coast
Along coastal highways and beach communities, bayberry is frequently planted because it tolerates salt spray and sandy soils. Gardeners in those areas appreciate that it survives where many other shrubs fail. That said, the experience on the ground is that even bayberry needs a bit of help the first year or two: supplemental water during extreme drought, and maybe a windbreak while it’s young in very exposed spots.
Once the roots are deep, bayberry usually settles in and behaves like a local, shrugging off conditions that would wipe out less adapted plants. The key takeaway from people who grow it near the ocean: you still have to baby it slightly at the beginning, but the payoff comes quickly.
4. Planting Both Sexes Matters if You Want Berries
One easily overlooked detail is that bayberry is dioeciousmale and female flowers grow on separate plants. Gardeners who unknowingly plant only male shrubs (or only females without a nearby pollinator) sometimes wonder why their “bayberry” never actually produces berries.
Experienced nursery staff will often label plants as “male” or “female” when known. When in doubt, plant a small group (three to five shrubs) instead of a single specimen, ideally purchased from the same source. Odds are good you’ll end up with a mix of sexes and, eventually, clusters of waxy berries for birdsand possibly for homemade crafts or candles if you’re ambitious.
5. Bayberry Plays Well with Other Native Plants
Gardeners who focus on native plantings often mention how well bayberry fits into mixed hedgerows with other regional shrubs. Its gray-blue berries, dark foliage, and arching branches add visual texture alongside plants like winterberry holly, chokeberry, viburnums, and native grasses.
In practice, bayberry often ends up being the “anchor” shrub that holds the planting together visually through the seasons. Even when more flamboyant plants are between bloom cycles, bayberry quietly provides structure, scent, and wildlife value.
6. The Only “Problem”? It Can Be a Little Too Happy
One recurring theme from long-time bayberry owners: in good conditions, the shrub will enthusiastically send out suckers and gradually expand its territory. That’s fantastic if you’re trying to fill a large area on a budget, but less ideal in a tightly defined bed or a small urban yard.
Experienced gardeners solve this in two simple ways:
- They give bayberry enough room from the start, treating it as a medium to large shrub, not a tiny accent plant.
- They schedule a quick spring “sucker patrol,” trimming back any adventurous shoots that wander outside the intended boundary.
The reward for that small bit of annual maintenance is a long-lived shrub that can easily outlast more delicate ornamental plants, quietly doing its job year after year.
Conclusion: Why Bayberry Deserves a Spot in Your Yard
Learning how to plant and grow bayberry is less about mastering a complicated care routine and more about understanding what this shrub naturally does well. Give it sun, reasonably well-drained (but not pampered) soil, and a bit of water while it settles in, and it will repay you with fragrance, winter berries, bird activity, and sturdy structure for many years.
Whether you’re building a privacy hedge, stabilizing a slope, designing a native planting, or just looking for an attractive shrub that won’t throw a tantrum every time the weather misbehaves, bayberry is a strong, low-maintenance choice. Plant a few, step back, and enjoy the showyour future self (and your local wildlife) will thank you.


