
Table of Contents >> Show >> Hide
- Introduction: Small Machine, Big Sewing Energy
- What Is a Mini Sewing Machine?
- Before You Start: Know the Main Parts
- Step 1: Set Up the Mini Sewing Machine Safely
- Step 2: Wind the Bobbin
- Step 3: Insert the Bobbin Correctly
- Step 4: Thread the Upper Thread
- Step 5: Raise the Bobbin Thread
- Step 6: Choose the Right Stitch and Settings
- Step 7: Test on Scrap Fabric
- Step 8: Start Sewing Slowly
- Step 9: Finish the Seam
- Common Mini Sewing Machine Problems and Fixes
- Mini Sewing Machine Maintenance
- Best Beginner Projects for a Mini Sewing Machine
- Extra Experience Tips: What You Learn After Actually Using a Mini Sewing Machine
- Conclusion: Your Mini Sewing Machine Is Ready When You Are
Note: Mini sewing machines are small, friendly, and surprisingly useful, but every model has its own tiny personality. Before sewing your first masterpieceor your first suspiciously crooked napkincheck your machine’s manual for model-specific threading, bobbin, and safety details.
Introduction: Small Machine, Big Sewing Energy
A mini sewing machine looks harmless enough. It is compact, lightweight, and often cute enough to sit on a desk without scaring the houseplants. But once you plug it in, thread it correctly, and guide fabric under the presser foot, it becomes a real sewing tool capable of simple repairs, craft projects, hemming, lightweight quilting practice, and beginner-friendly sewing lessons.
Learning how to operate a mini sewing machine is not about memorizing a giant technical manual. It is about understanding the basic flow: set up the machine, wind and insert the bobbin, thread the top thread, raise the bobbin thread, choose a stitch setting, test on scrap fabric, and sew slowly. Think of it like learning to drive a tiny sewing car. You do not begin on the highway. You begin in the parking lot, preferably without running over your own thread tails.
This guide explains how to use a mini sewing machine step by step, including setup, threading, speed control, fabric handling, troubleshooting, maintenance, and real-life experience tips. Whether your machine has a foot pedal, a start button, a battery option, or a basic straight-stitch dial, the principles are mostly the same. Once you learn them, the machine stops looking like a mysterious plastic toaster and starts feeling like a helpful creative sidekick.
What Is a Mini Sewing Machine?
A mini sewing machine is a compact version of a standard sewing machine. Most models are designed for light sewing tasks such as mending seams, sewing cotton fabric, making small crafts, practicing stitches, or teaching beginners the basics. They usually have fewer stitch options, a smaller motor, a smaller work area, and simpler controls than full-size machines.
That simplicity is part of the charm. A mini sewing machine is easier to store, easier to move, and less intimidating for new sewists. It is a good choice for dorm rooms, apartments, travel, classrooms, craft corners, and anyone who wants to repair a loose hem without turning the dining table into a textile factory.
Best Uses for a Mini Sewing Machine
Mini sewing machines work best with lightweight and medium-light fabrics. Cotton, quilting cotton, thin linen, polyester blends, lightweight denim, felt, and basic craft fabrics are usually manageable. They are great for small projects like tote bags, pillow covers, doll clothes, fabric bookmarks, simple curtains, face cloths, decorative patches, and basic hemming.
However, they are not built for every job. Thick denim seams, leather, heavy canvas, multiple bulky layers, upholstery fabric, and complicated garment construction may be too much for a tiny motor. A mini sewing machine is like a compact city car: perfect for errands, not ideal for towing a boat.
Before You Start: Know the Main Parts
Before operating a mini sewing machine, take a minute to identify the main parts. This makes every step easier and prevents the classic beginner moment of staring at the machine like it just asked you to solve algebra.
Common Parts on a Mini Sewing Machine
The spool pin holds the top thread. The thread guides direct thread through the correct path. The tension dial controls how firmly the upper thread is pulled. The handwheel moves the needle up and down manually. The needle carries the upper thread through the fabric. The presser foot holds the fabric steady. The feed dogs move the fabric under the presser foot. The bobbin holds the lower thread. The bobbin case or bobbin compartment keeps the bobbin in place. The foot pedal or start button controls sewing speed.
Most mini machines also include a stitch-length or stitch-selector dial, though some very basic models only sew a straight stitch. If your machine has a reverse button or lever, it lets you sew backward for a few stitches to secure the seam.
Step 1: Set Up the Mini Sewing Machine Safely
Place the machine on a flat, stable surface with enough room for your fabric to move. A shaky table is not your friend. If the machine wobbles while sewing, your stitches may wander, your fabric may pull, and your patience may quietly leave the room.
Plug in the power adapter or insert batteries if your machine supports battery operation. If your machine includes both options, do not use batteries and the power adapter at the same time unless the manual specifically says it is allowed. Connect the foot pedal if your model uses one. Keep the pedal on the floor where your foot can reach it comfortably.
Before threading, switching needles, adjusting the bobbin, or touching the needle area, turn the machine off. This is one of the simplest sewing safety habits, and it matters. The needle moves fast, even on a mini sewing machine. Fingers are excellent tools, but they should not volunteer as fabric.
Step 2: Wind the Bobbin
The bobbin supplies the lower thread. Without it, your machine may make enthusiastic needle movements but no real stitches. Many mini sewing machines come with pre-wound bobbins, but learning how to wind your own bobbin is essential.
Place a spool of thread on the spool pin. Follow the bobbin-winding thread guide shown on your machine or in the manual. Insert the thread through the small hole in the bobbin from the inside outward, then place the bobbin on the bobbin winder spindle. Push the spindle into the winding position if your model requires it.
Hold the thread tail gently, then press the foot pedal or start button slowly. Let the bobbin wind evenly. Stop after a few turns to trim the loose tail, then continue winding until the bobbin is filled neatly but not overstuffed. A bobbin should look smooth, not like a tiny thread volcano.
Bobbin Winding Tip
If the thread piles up on one side of the bobbin, stop and check the thread path. Uneven bobbin winding can lead to tension problems, skipped stitches, or thread jams later. A smooth bobbin gives your mini sewing machine a much better chance of behaving like a civilized appliance.
Step 3: Insert the Bobbin Correctly
Turn off the machine and raise the needle to its highest position using the handwheel. Open the bobbin cover. Depending on your mini sewing machine, the bobbin may drop in from the top or fit into a front-loading bobbin case.
Place the bobbin so the thread unwinds in the direction shown in your manual or on the machine diagram. This direction matters. If the bobbin is inserted backward, the machine may jam, loop, or make stitches that look like spaghetti having a nervous breakdown.
Pull the bobbin thread through the slot or tension spring as directed. Replace the bobbin cover, but leave a short thread tail available so you can pull it up in the next step.
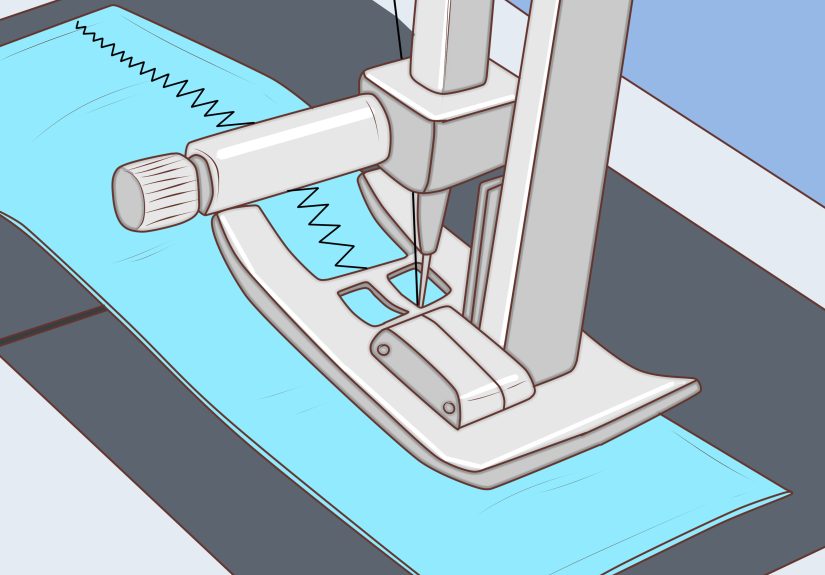
Step 4: Thread the Upper Thread
Raise the presser foot before threading the upper thread. This is one of the most important beginner sewing tips. When the presser foot is raised, the tension discs open and allow the thread to sit properly. If you thread with the presser foot down, the thread may not enter the tension system correctly, and your stitches may loop underneath the fabric.
Place the spool on the spool pin. Follow the numbered thread path on your machine if it has one. Usually, the thread travels through an upper guide, down around the tension area, up through the take-up lever, down through another guide, and finally through the needle.
Thread the needle from front to back unless your manual says otherwise. Pull several inches of thread through the needle. Place the upper thread under the presser foot and toward the back of the machine.
Threading Tip for Beginners
Use good-quality all-purpose polyester thread for practice. Old, fuzzy, bargain-bin thread may break easily and make you think the machine is broken. Sometimes the machine is innocent; the thread is the drama queen.
Step 5: Raise the Bobbin Thread
Hold the upper thread tail lightly with your left hand. Turn the handwheel toward you with your right hand. The needle will go down into the machine and come back up. As it rises, it should catch the bobbin thread and form a small loop.
Use a pin, small scissors, or your fingers to pull that loop up. Then pull both the upper and bobbin thread tails toward the back of the machine under the presser foot. Many sewing problems happen because beginners forget this step. Starting with both threads behind the presser foot helps prevent tangles at the beginning of the seam.
Step 6: Choose the Right Stitch and Settings
Most mini sewing machines are designed for basic straight stitching. Some include zigzag stitches, decorative stitches, or adjustable stitch length. For your first project, choose a straight stitch and use a medium stitch length if the machine allows adjustment.
A short stitch length is useful for tight seams but can be difficult to remove. A longer stitch length works well for basting or temporary seams. For general sewing on cotton fabric, a medium stitch length is usually a safe starting point.
Understanding Thread Tension
Thread tension controls how the upper and lower threads lock together inside the fabric. Balanced tension creates smooth stitches on both sides. If the upper thread loops underneath, the upper tension may be too loose or the machine may be threaded incorrectly. If the bobbin thread shows strongly on top, the upper tension may be too tight.
On many mini sewing machines, the upper tension dial is the main adjustment available. Make small changes, then test again. Do not spin the dial wildly like you are cracking a safe in an action movie. Sewing tension rewards patience.
Step 7: Test on Scrap Fabric
Before sewing your actual project, test on a scrap piece of the same fabric. Fold it into the same number of layers you plan to sew. Place it under the presser foot, lower the presser foot, and turn the handwheel toward you to place the needle into the fabric.
Press the foot pedal gently or use the start button at the slowest speed. Sew a short line. Check the top and bottom of the fabric. The stitches should lie flat without puckering, looping, skipping, or bunching. If the test looks messy, rethread the machine, check the bobbin, adjust tension slightly, and test again.
Testing may feel like an extra step, but it saves fabric, time, and emotional stability. A two-inch test seam can prevent a twelve-inch disaster.
Step 8: Start Sewing Slowly
Place your project fabric under the presser foot. Line up the fabric edge with a seam guide, the edge of the presser foot, or a piece of removable tape placed on the machine bed. Lower the presser foot. Hold both thread tails gently behind the machine for the first few stitches.
Begin sewing slowly. Do not pull the fabric. The feed dogs are designed to move it for you. Your job is to guide the fabric, not drag it. Pulling can bend the needle, create uneven stitches, or damage the machine.
After sewing a few stitches, use the reverse button or lever to backstitch if your machine has one. Then continue forward. Backstitching secures the seam so it does not unravel. If your mini machine does not have reverse, leave longer thread tails and tie them by hand after sewing.
How to Turn a Corner
To turn a corner, stop with the needle down in the fabric. Raise the presser foot, pivot the fabric, lower the presser foot, and continue sewing. Keeping the needle down holds your place and gives you a cleaner corner. It is a tiny move that makes your project look much less like it was sewn during an earthquake.
Step 9: Finish the Seam
When you reach the end of the seam, backstitch a few stitches if possible. Raise the needle to its highest position using the handwheel. Raise the presser foot and gently pull the fabric back and to the side. Cut the threads with scissors or the built-in cutter if your machine has one.
Do not yank the fabric away while the needle is still down or while the thread is tight. That can bend the needle, break the thread, or pull the bobbin thread into a knot. Sewing machines appreciate manners.
Common Mini Sewing Machine Problems and Fixes
Thread Bunches Under the Fabric
This is often caused by incorrect upper threading, threading with the presser foot down, or forgetting to pull both thread tails to the back before sewing. Turn off the machine, remove the tangled thread, raise the presser foot, rethread the upper thread, check the bobbin, and test again.
Needle Breaks
A needle may break if it is bent, inserted incorrectly, too fine for the fabric, or forced through thick layers. Replace bent or dull needles immediately. Never pull fabric while stitching. Let the machine feed the fabric naturally.
Machine Skips Stitches
Skipped stitches can happen when the needle is dull, the wrong needle type is used, the machine is threaded incorrectly, or the fabric is too stretchy for the setup. Try a new needle, rethread the machine, and test on scrap fabric.
Fabric Does Not Move
Check that the presser foot is lowered. If the presser foot is up, the feed dogs cannot move the fabric properly. Also make sure the stitch length is not set too close to zero if your machine has stitch-length control.
Thread Keeps Breaking
Thread breakage may be caused by poor thread quality, incorrect threading, a damaged needle, tension that is too tight, or rough spots near the needle plate. Replace the needle, rethread carefully, lower the tension slightly, and test with better thread.
Mini Sewing Machine Maintenance
A mini sewing machine does not require complicated maintenance, but it does need basic care. After sewing, turn off and unplug the machine. Remove lint from the bobbin area with a small brush. Do not blow into the machine, because moisture from your breath can encourage dust to stick inside.
Change needles regularly. A dull needle can cause skipped stitches, fabric snags, and thread breaks. Store the machine covered when not in use. Keep it away from moisture, dust, and curious pets who believe thread is a lifestyle choice.
Only oil the machine if the manual says to do so. Some machines need sewing-machine oil in specific places; others are designed to run without user oiling. Never use cooking oil, hair oil, or mystery oil from the garage. Your sewing machine is not a salad.
Best Beginner Projects for a Mini Sewing Machine
Start with simple projects that use straight seams. A fabric bookmark is a good first project because it is small and quick. A pillow cover teaches seam allowance and turning corners. A tote bag introduces longer seams and basic construction. Cloth napkins are excellent for practicing hems. A drawstring pouch helps you learn channels and edge stitching.
Avoid starting with stretchy knits, slippery satin, thick denim, or complicated clothing patterns. Those fabrics are not impossible, but they can make a beginner feel like the sewing machine has joined a secret rebellion.
Extra Experience Tips: What You Learn After Actually Using a Mini Sewing Machine
After spending real time with a mini sewing machine, you learn that the machine is not difficult, but it is sensitive. It rewards calm hands, correct threading, and slow speed. It also has a wonderful talent for revealing every shortcut you tried to take. Skip the test seam? The machine knows. Use old thread from the drawer of forgotten craft supplies? The machine knows. Forget to lower the presser foot? Oh, it absolutely knows.
One of the biggest lessons is that slow sewing is not beginner weakness. It is beginner wisdom. Mini sewing machines are lightweight, and many do not have the same stability as full-size machines. When you sew too fast, the machine may vibrate, the fabric may drift, and your seam may curve like it is avoiding responsibility. Sewing slowly gives you more control, especially when turning corners or following a narrow seam allowance.
Another practical experience is to keep your left hand and right hand relaxed. Beginners often grip the fabric too tightly, trying to force it into a straight line. This usually makes things worse. The better approach is to guide the fabric lightly from both sides while letting the feed dogs do the work. Your hands are steering, not wrestling.
Lighting also matters more than people expect. A mini sewing machine may not have a powerful built-in light, so place a desk lamp nearby. Good lighting helps you see the needle, seam guide, thread path, and fabric edge. It also helps you notice problems early, before a tiny thread nest becomes a full-blown yarn casserole.
Thread tails are another small detail with big consequences. Holding the upper and bobbin threads behind the presser foot for the first few stitches can prevent tangling. Once the seam is started, you can let go. This habit feels fussy at first, but it quickly becomes automatic.
It is also helpful to prepare fabric before sewing. Press wrinkled fabric with an iron, trim loose threads, and pin or clip layers neatly. Mini machines handle fabric better when the layers are flat and even. If the fabric is bumpy, twisted, or bulky, the machine may struggle.
Needle choice is another experience-based lesson. Many mini sewing machines come with a basic universal needle, which is fine for cotton practice. But if stitches skip or the needle punches roughly through the fabric, changing to a fresh needle can make the machine feel brand-new. A needle is small, inexpensive, and often the secret villain behind sewing problems.
Finally, accept that the first seams may not be beautiful. They may lean. They may wiggle. They may look like they were sewn by a determined squirrel. That is normal. The goal of early practice is not perfection; it is familiarity. After a few practice lines, your foot learns the pedal, your hands learn the fabric, and your eyes learn where to focus.
The best experience tip is simple: keep a scrap pile next to your machine. Before every project, test the stitch on scrap fabric. Try the tension. Check the seam. Practice the corner. This little ritual turns confusion into confidence. A mini sewing machine may be small, but with the right habits, it can teach the same core sewing skills used on larger machines.
Conclusion: Your Mini Sewing Machine Is Ready When You Are
Operating a mini sewing machine becomes much easier once you understand the basic sequence: set up safely, wind the bobbin, insert it correctly, thread the upper path with the presser foot raised, pull up the bobbin thread, test your stitch, and sew slowly. Most beginner problems come from threading mistakes, tension issues, old needles, poor thread, or trying to sew fabric that is too thick for the machine.
Start with small projects, use lightweight fabric, and give yourself permission to practice. A mini sewing machine is not meant to replace every full-size model, but it is a fantastic tool for learning, crafting, repairing, and building confidence. Treat it gently, keep it clean, and do not rush the process. Before long, you will be sewing straight seams, neat hems, and cute little projects with the satisfied grin of someone who has successfully tamed a tiny mechanical beast.


