
Table of Contents >> Show >> Hide
- Why Tart Tin Christmas Trees Are So Popular
- What You Need to Make Tart Tin Christmas Trees
- How to Make Cute Tart Tin Christmas Trees Step by Step
- Five Cute Tart Tin Christmas Tree Ideas to Try
- Common Mistakes to Avoid
- How to Display Tart Tin Christmas Trees
- What It’s Really Like to Make a Whole Little Forest of Tart Tin Christmas Trees
- Final Thoughts
- SEO Tags
If you have ever looked at a pile of old tart tins and thought, “You know what this needs? More Christmas,” congratulations. You are exactly the kind of creative genius this project was waiting for. Cute tart tin Christmas trees are one of those holiday crafts that look charmingly vintage, cost far less than most store-bought décor, and make guests assume you have your life together in December. You do not need to correct them.
The beauty of this DIY Christmas decoration is that it can go in several directions at once. You can make a tiny tabletop tree from stacked tart tins, create a whole forest in graduated sizes, or style them with bottle brush trees, glitter, jute bows, and old sheet music for that “I found this in a magical antique market” look. Even better, this craft works with thrifted tart tins, new metal tart molds, or whatever fluted little baking pans happen to be hiding in your cabinet waiting for a glamorous second act.
In this guide, you will learn how to make cute tart tin Christmas trees step by step, what supplies work best, how to decorate them without turning your dining table into a glitter crime scene, and how to make each tree look thoughtfully handmade instead of accidentally assembled during a holiday sugar rush.
Why Tart Tin Christmas Trees Are So Popular
Tart tin Christmas trees hit a sweet spot between vintage holiday charm and easy upcycled holiday décor. They are small enough for shelves, mantels, tiered trays, place settings, and gift toppers, but they still bring big “look at me, I’m festive” energy. Their fluted edges already look decorative, which means the metal does a lot of the heavy lifting before you even add paint, glitter, or embellishments.
They also fit beautifully into several decorating styles. Want farmhouse Christmas décor? Use white paint, old book pages, and jute twine. Prefer retro whimsy? Go for pastel paint, candy-colored beads, and bottle brush trees dusted with faux snow. Love vintage Christmas decorating? Use tarnished tins, tea-stained paper, tiny bells, and antique-looking trim. Tart tins are basically the little black dress of holiday crafting. They go with everything, and somehow glitter makes them even more convincing.
What You Need to Make Tart Tin Christmas Trees
Basic supplies
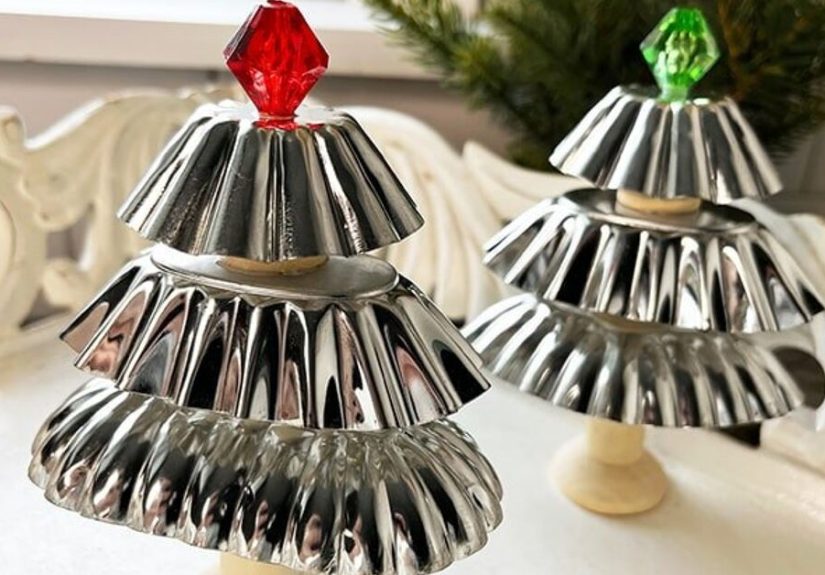
- 3 tart tins in graduated sizes for each tree
- Strong adhesive such as E6000 or craft epoxy
- Spacers for the layers, such as wood spools, small foam balls, beads, or tiny hardware pieces
- A topper, such as a bead, button, rhinestone, tiny bell, or mini star
- Optional base piece for freestanding display
Decorating supplies
- Acrylic paint or spray paint
- Fine glitter or glitter glue
- Mod Podge or another decoupage medium
- Scrapbook paper, sheet music, dictionary pages, or plaid paper
- Mini bottle brush trees
- Faux snow, fluffy cotton, ribbon, jute twine, sequins, and beads
If your tart tins are not already drilled, you may also need a small drill bit, metal punch, or heavy spike to create a hole for hanging or tying on a bow. For painted tins, a quick clean and light surface prep can make a big difference. In other words, do not spray paint over cookie grease and call it rustic. That is not a finish. That is a cry for help.
How to Make Cute Tart Tin Christmas Trees Step by Step
Step 1: Pick the right tart tins
The easiest tart tin tree uses three tins in graduated sizes: large on the bottom, medium in the middle, and small on top. The fluted edges create built-in texture, so even plain metal looks pretty. If you are thrifting, look for tins with similar shapes so the stack feels intentional. A little variation is charming. Total chaos is modern art.
For a classic mini tree, aim for a wide base tin, a medium tin, and a petite top tin. If you cannot find a matching set, mix what you have and let the spacing do some visual magic. Some crafters use wood spools between the layers; others use small foam balls or glittered balls. Both methods work. Wood spools feel a bit more structured, while foam spacers create a softer, slightly whimsical look.
Step 2: Clean and prep the tins
Before decorating, wipe the tart tins clean and dry. If you plan to paint them, lightly sand glossy surfaces so the finish sticks better. For old tins, remove any loose rust or debris first. This is the least glamorous part of the project, but it helps the final tree last longer than one awkward holiday season.
If you love the naturally aged look, skip the paint and keep the patina. Vintage tart tins already have personality, and frankly, they have earned it.
Step 3: Decide on your finish
This is where your tart tin Christmas tree gets its personality. There are several easy directions you can take:
- Vintage neutral: Keep the metal finish, add old paper, twine, and a tiny bottle brush tree.
- Farmhouse: Paint the inside matte white or cream, dry brush the edges with brown or bronze, then add plaid paper and a jute bow.
- Retro candy: Use pink, mint, red, or aqua paint with glitter edges and a bright bead topper.
- Snowy woodland: Add bottle brush trees, faux snow, and tiny bells or stars.
- Minimal chic: Paint the tins one solid color and finish with a metallic bead on top.
If you are using paper inside the tins, trace each tin onto your chosen paper, cut the circles to size, and decoupage them into place. Sheet music, old dictionary pages, winter scrapbook paper, and plaid prints all look especially charming. Let the paper dry fully before moving on. Holiday crafts reward patience, even if your playlist is telling you to hurry because Mariah has entered the chat.
Step 4: Add glitter, paint, or snow details
Once the paper or base coat is dry, decorate the tins before assembly. This is much easier than trying to glitter a fully stacked tree while balancing it like a caffeinated circus act. You can run a thin line of glitter glue along the edges, brush faux snow into the inside rim, or add tiny sequins, miniature pom-poms, or metallic dots.
For an especially cute look, dry brush a soft white over the ridges to mimic frosty metal. You can also dust bottle brush trees with white paint or glitter for a snow-kissed finish. Small details matter here. Tart tin trees are tiny, so every little bead, bow, or sparkle reads as a big design choice.
Step 5: Assemble the tree
Now the tree starts looking like a tree instead of a collection of very festive pie fragments. Apply strong adhesive to the center of the largest tart tin and attach your spacer. Let it set enough to hold. Then glue the medium tin on top, add the next spacer, and finish with the smallest tin.
For structural parts, a stronger adhesive is usually better than hot glue because smooth metal can be slippery. Hot glue is handy for lightweight embellishments, but the main stacked layers benefit from E6000 or epoxy if you want the tree to survive handling, gifting, and enthusiastic compliments.
If you want a freestanding tree, glue the bottom tin to a small base such as a larger spool, a wood round, a vintage knob, or a hardware piece. If you prefer an ornament-style tree, attach a hanging loop at the top or back with wire, ribbon, or pipe cleaner.
Step 6: Add the topper
No Christmas tree should walk around without a topper. That is just poor holiday manners. Finish your tart tin tree with a bead, rhinestone earring, tiny star, pearl button, bell, or even a small wooden shape. If the topper has an awkward point or uneven back, add a little washer or flat bead beneath it for stability.
This tiny finishing touch often makes the whole project look polished. The difference between “cute craft” and “where did you buy that?” is usually about one good topper and a little confidence.
Five Cute Tart Tin Christmas Tree Ideas to Try
1. Classic vintage tree
Use tarnished tart tins, old book pages, jute twine, and a small cream-colored bead topper. This style looks beautiful on a mantel with mercury glass and old ornaments.
2. Pink peppermint tree
Paint the tins blush pink, add red glitter to the edges, and use a bright faceted bead on top. This is adorable for a whimsical Christmas setup or a pastel holiday theme.
3. Farmhouse plaid tree
Line the tins with plaid paper, dry brush the edges with chalky brown paint, and tie a simple bow from butcher’s twine. Rustic, cozy, and very “hot cocoa with excellent lighting.”
4. Snowy bottle brush tree
Build the stacked tart tin tree, then tuck a mini bottle brush tree or two into the center of the tins if the shape allows. Add fluffy cotton snow and a few tiny beads for a miniature woodland scene.
5. All-metal glam tree
Leave the tins metallic or spray paint them gold or silver. Keep the rest simple with just a crystal-look topper. Perfect if your holiday décor leans elegant rather than extra. Or elegant and extra. That is also a valid religion in December.
Common Mistakes to Avoid
- Using tins that are too similar in size: The stack will not read clearly as a tree.
- Skipping surface prep: Paint and glue behave better on clean, dry surfaces.
- Decorating after assembly: It is possible, but it is also how glitter ends up in your coffee.
- Using weak glue for the structure: Save hot glue for tiny accents, not the main load-bearing layers.
- Overcrowding the design: These trees are small, so one or two focal details usually look better than twenty-seven tiny opinions.
How to Display Tart Tin Christmas Trees
One tart tin tree is cute. A small forest is better. Group three to five trees in different heights on a shelf, sideboard, or entry table. Add old ornaments, bottle brush trees, pinecones, or candleholders nearby to create a cozy vignette. These mini trees also work beautifully as:
- Tiered tray décor
- Holiday place-setting accents
- Gift toppers
- Teacher gifts
- Craft fair items
- Secondary tree decorations for small spaces
If you are making a batch, keep the materials coordinated but not identical. Matching color palettes with slightly different toppers or embellishments make the group look collected instead of copy-pasted.
What It’s Really Like to Make a Whole Little Forest of Tart Tin Christmas Trees
There is something weirdly satisfying about making tart tin Christmas trees that regular holiday décor just cannot compete with. Maybe it is the sound of metal tins clinking together like tiny festive cymbals. Maybe it is the moment a random thrift-store find suddenly becomes a decoration that looks thoughtful, nostalgic, and surprisingly expensive. Or maybe it is because this craft lets you feel creative without requiring the engineering skills of a holiday wizard.
The first time I made a tart tin tree, I assumed it would be one of those “simple” projects that craft blogs describe with suspicious confidence. You know the kind: five minutes, a dab of glue, and somehow you end up with showroom décor while wearing a cream sweater that remains glitter-free. Reality, of course, had a little more personality. I spent a chunk of time choosing tins, rearranging them, swapping spacers, and trying to decide whether the tree looked charmingly uneven or just lopsided. This, as it turns out, is part of the magic.
What I learned quickly is that tart tin trees are forgiving in the best way. If your stack feels too flat, add taller spacers. If the metal looks dull, dry brush some paint over the ridges. If the whole thing seems a little plain, one good topper changes everything. A rhinestone earring? Cute. A pearl bead? Sweet. A tiny bell? Suddenly the tree has a personality and possibly a tiny backstory.
I also learned that old tart tins have a lot of visual charm all by themselves. Some have patina, some have scratches, and some look like they survived at least three pie seasons and a family argument. That history is part of what makes them beautiful. When paired with soft paper, jute, glitter, or bottle brush trees, they feel warm and collected instead of mass-produced. In a season full of plastic perfection, that slightly imperfect handmade look feels refreshing.
Another pleasant surprise is how easy it is to customize these trees for different rooms. A white-and-plaid version looks cozy in a kitchen. Metallic trees feel right at home on a dining table. Pastel tart tin trees are ridiculously cute in a craft room, guest room, or anywhere you want a softer, playful holiday look. Make a few in different colors and suddenly you have décor that can travel around the house like festive little overachievers.
And then there is the group effect. One tree is nice. Three trees look intentional. Five trees together look like you know what a vignette is and have strong opinions about ribbon widths. A cluster of tart tin trees on a shelf with old ornaments and bottle brush trees has that layered holiday style people spend hours trying to fake. It turns out the secret is not spending a fortune. It is giving tiny metal baking tins a glamorous second chance.
Most of all, this project feels fun instead of fussy. It is the kind of craft you can make on a quiet afternoon with coffee, Christmas music, and a table full of bits and pieces that somehow start making sense. The trees do not need to be perfect. In fact, the cutest ones usually are not. They just need a little sparkle, a little balance, and enough confidence to stand there on your mantel looking adorable. Honestly, that is a life lesson in holiday form.
Final Thoughts
If you love easy Christmas crafts with vintage charm, tart tin Christmas trees are absolutely worth making. They are flexible, affordable, and endlessly customizable, which is holiday craft code for “you can make twelve and still think up another version tomorrow.” Whether you keep them simple with patina and twine or go full sparkle with painted tins and jeweled toppers, these little trees bring warmth, personality, and handmade cheer to your holiday décor.
So raid the thrift store, dig through your craft stash, and give those fluted tins a holiday promotion. Your mantel will look cuter, your ornaments will have competition, and your tart tins will finally fulfill their true destiny: becoming tiny Christmas trees instead of waiting around for a pastry that may never come.


