
Table of Contents >> Show >> Hide
- Why Bandana Bracelets Are Having a Moment
- Supplies You’ll Need
- Pick the Right Bandana (Your Future Self Will Thank You)
- Method 1: The Classic Fold-and-Tie Bandana Bracelet (No Sewing)
- Method 2: Beaded Bandana Bracelet (Kid-Friendly, Parade-Ready)
- Method 3: Braided Bandana Bracelet with a Charm (Festival-Ready)
- Bonus Method: The No-Sew “Wrapped Bangle” Bandana Bracelet
- Make It Adjustable: Two Closure Options That Feel “Real”
- Customization Ideas (So It Doesn’t Look Like Everyone Else’s)
- Troubleshooting (Fix the Annoying Stuff Fast)
- Care and Wear Tips
- FAQ
- My “Experience-Based” Tips After Making a Whole Pile of Bandana Bracelets
- Conclusion
Bandanas are the Swiss Army knives of soft goods: headwear, neckwear, emergency napkin, dramatic movie-in-a-dust-storm accessory…
and yesbracelets. A bandana bracelet is basically wearable summer camp energy, but with enough style potential to look intentional
instead of “I got bored near a craft table.”
In this guide, you’ll learn several bandana bracelet methodsfrom the classic fold-and-tie to bead-loaded and braided versions
plus how to add an adjustable closure so you don’t need a second person (or a very patient dog) to help you put it on.
Why Bandana Bracelets Are Having a Moment
A bandana bracelet hits a sweet spot: it’s cheap, fast, customizable, and surprisingly durable when you pick the right fabric.
The bold prints do the heavy lifting, so even a simple knot looks like “a look.” And if you mess up? Congratulationsyou’ve invented
a new trend. That’s how fashion works now.
Supplies You’ll Need
Most versions take 10–30 minutes. Difficulty ranges from “I can do this while watching TV” to “I can still do this while watching TV, but with scissors.”
Basic supplies (for every method)
- 1 cotton bandana (or similar non-stretch fabric)
- Sharp scissors (fabric scissors are best)
- Ruler or measuring tape (optional, but helpful)
- Clothespin, binder clip, or tape (to hold work in place)
Optional add-ons (for upgrades)
- Large-hole beads (pony beads, wood beads, or “big-hole” jewelry beads)
- Charms + jump rings (a small metal ring that connects charms)
- Clear nail polish or anti-fray liquid (to reduce fraying)
- Needle threader, thin skewer, or bead stringer tool (to help feed fabric through beads)
- Waxed cotton cord or embroidery floss (for adjustable sliding knots)
- Needle + thread (if you want a button closure)
Pick the Right Bandana (Your Future Self Will Thank You)
Not all bandanas behave the same. The best ones for bracelets are tightly woven cotton. Looser fabric can fray quickly and turn your
bracelet into a sad little tassel situation.
- Go for: tight weave, 100% cotton, crisp feel, clean edges.
- Be cautious with: very soft, loosely woven fabric that sheds threads when cut.
- Pro move: pre-wash and dry your bandana if it’s new. Some dyes can bleed, and cotton can shrink a bit.
Method 1: The Classic Fold-and-Tie Bandana Bracelet (No Sewing)
This is the iconic version: fold the bandana into a strip, wrap it, tie it. Simple, adjustable, and the fastest path to “effortlessly cool.”
Step-by-step
- Fold into a triangle: Lay the bandana flat and fold corner-to-corner diagonally.
-
Roll into a strip: Starting at the long folded edge, roll (or accordion-fold) toward the point until you have a strip about
1–1.5 inches wide. Keep it snug for a cleaner look. - Wrap your wrist: Place the center of the strip on your inner wrist and wrap around once.
- Tie a square knot: Tie it like a shoelace knot, but stop at the “first knot” stage and make sure it’s a true square knot.
- Adjust and style: Slide the knot to the side of your wrist, fluff the ends a bit, or tuck them for a cleaner finish.
How to tie a square knot (the one that doesn’t betray you)
A square knot is basically: right over left, then left over right (or the opposite, as long as you alternate).
If you do the same direction twice, you get a granny knot, which is the bracelet equivalent of “I’ll totally call you” (it won’t hold).
Make it easier to take on/off
- Tie it slightly loose so you can wiggle your hand through without untying every time.
- If you hate that idea, jump to the “Adjustable Closures” section below.
Method 2: Beaded Bandana Bracelet (Kid-Friendly, Parade-Ready)
This style is perfect for group activities, parties, and anyone who loves maximum color with minimal effort. It’s also great for using up random beads
that have been rolling around your drawer since 2014.
What you’ll do
You’ll cut a long fabric strip, thread big-hole beads onto it, and tie it on your wrist.
Step-by-step
-
Make a strip: Cut a long strip about 3/4 inch to 1 inch wide. If you want a “rustic” look, you can cut small slits and tear along
the fabric grain (tearing often creates straighter edges on cotton). - Trim stray threads: If it looks fuzzy, snip the wispy threads. Optional: dab clear nail polish/anti-fray on the cut ends.
-
Prep the tip for threading: Wrap the first inch of the fabric end with a tiny piece of tape to make a stiff “shoelace tip,”
or cut the end into a narrow point. (A little triangle point helps it slide through bead holes.) -
Thread your beads: Slide on pony beads or other large-hole beads. If it’s stubborn, use a bead stringer tool, a thin skewer,
or a needle threader to pull the fabric through. - Center the beads: Push the beads toward the middle of the strip so they sit on top of your wrist.
- Tie it on: Wrap around your wrist and tie a square knot or bow.
Design ideas that look intentional
- Spell a name or word with letter beads (keep it short; wrists are not billboards).
- Use a repeating pattern: red-white-blue, or two colors that match an outfit.
- Mix bead sizes, but keep the palette consistent for a “boutique” vibe.
Method 3: Braided Bandana Bracelet with a Charm (Festival-Ready)
If you want your bracelet to look more like jewelry and less like “I tied fabric to myself,” braiding is the upgrade. You can also add a charm or a
decorative ring in the center for a focal point.
Step-by-step
-
Cut three strips: Cut three long strips from the bandana (about 1/2–3/4 inch wide). If your bandana is small, you can use two strips
from one bandana and one strip from a second bandana for contrast. - Anchor the top: Knot the three strips together at one end and clip or tape that knot to a table/clipboard.
- Braid: Do a simple three-strand braid until it’s long enough to wrap your wrist with a little extra for tying.
-
Add a charm (optional): Slide a charm onto a jump ring, then work that jump ring onto the middle section by threading one braid strand
through it before continuing. Alternatively, tie the charm onto the braid with a short piece of cord. - Finish the end: Knot the braid end tightly.
- Close it: Tie on your wrist as-is, or add an adjustable sliding closure (next section).
Keep the braid neat
- Cut strips evenly so the braid stays consistent.
- If one strip stretches more than the others, pause and gently tug the braid to even it out.
- For less fray, choose a tighter weave fabric and avoid overly thin strips.
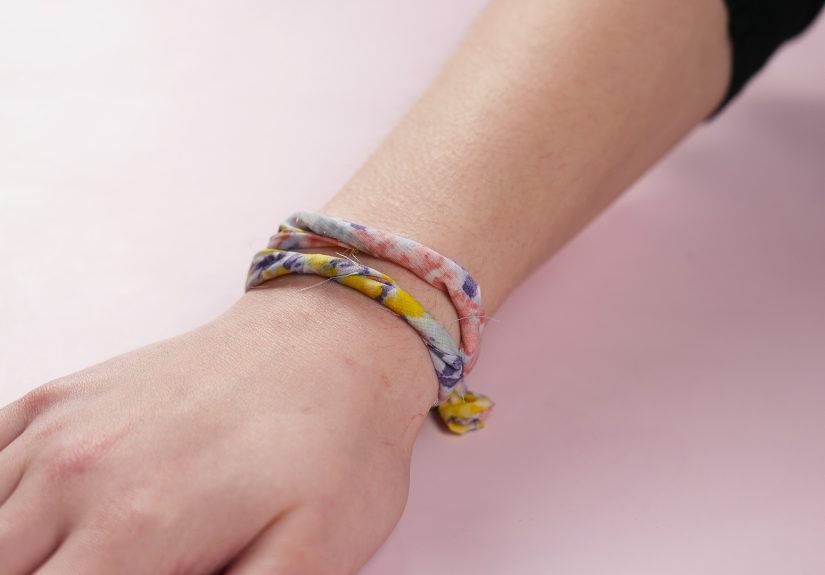
Bonus Method: The No-Sew “Wrapped Bangle” Bandana Bracelet
This version is sneaky because it looks like a chunky cuff, but it’s basically fabric wrapped around a flexible tube. If you like a more structured
bracelet (and you don’t want to tie knots every time), this one’s your friend.
What you’ll need
- 1-inch bandana or fabric strips
- Flexible plastic tubing (the kind used for aquariums)
- A small connector inside (some people use small stick pieces) + hot glue
High-level steps
- Cut tubing to bracelet size and connect ends into a circle with a small internal support and hot glue.
- Glue the start of the fabric strip to the tube.
- Wrap fabric tightly around the tube, twisting the strip as needed for full coverage.
- Glue the end down and let it dry.
It’s comfy, sturdy, and doesn’t require tying. The downside: you’ll want to avoid soaking it in water because glue and long swims don’t usually stay in love.
Make It Adjustable: Two Closure Options That Feel “Real”
If you love the look but hate the “please hold still while I tie your wrist like a shoe” part, use one of these closures.
Option A: Sliding Knot Closure (Adjustable + Secure)
This is the same concept used in cord bracelets: overlap the ends, then wrap a separate piece around them to create a moveable “slider.”
Great for braided bandana bracelets or fabric strips with beads.
- Leave tails: Make your bracelet body and leave at least 4 inches of tail on each end.
- Overlap ends: Cross the tails so they run parallel in opposite directions (overlap 1–2 inches).
- Cut a separate cord: Use a 10–12 inch piece of waxed cotton cord or embroidery floss.
- Wrap 4–6 times: Wrap the cord around both bracelet tails (and around itself) moving in one direction.
- Thread and tighten: Pass the cord end back through the wraps and pull snugtight enough to hold, loose enough to slide.
- Finish tails: Add a bead to each tail end or tie small stopper knots so it doesn’t slip through the slider.
Option B: Button + Loop (Cute and Classic)
This works best for a flat bandana strip.
- Sew a button securely onto one end of your bracelet strip.
- On the other end, form a small loop (you can fold fabric and stitch it, or tie a small loop with cord).
- Button it closed. Done.
Customization Ideas (So It Doesn’t Look Like Everyone Else’s)
- Use two bandanas: Twist two thin strips together for a candy-cane effect.
- Add a focal charm: One charm in the center looks more “styled” than five charms jangling like a tiny keychain.
- Try an “infinity” connector: Use a decorative ring or metal connector in the middle and tie fabric on both sides.
- Mix textures: Pair bandana fabric with waxed cord or a small chain segment.
- Keep ends clean: A tiny dab of anti-fray solution or clear nail polish on cut ends can help a lot.
Troubleshooting (Fix the Annoying Stuff Fast)
“My fabric is fraying like it’s auditioning for a scarecrow role.”
- Switch to a tighter weave fabric (bandanas usually behave better than soft scraps).
- Cut slightly wider strips and avoid aggressive pulling.
- Dab cut ends with anti-fray liquid or clear nail polish and let dry fully.
“The beads won’t go on.”
- Use larger-hole beads (pony beads and wood beads are usually easiest).
- Make a stiff tip with tape, or cut a narrow point.
- Thread beads one at a time using a bead stringer tool or a needle threader.
“The knot slips or feels bulky.”
- Use a square knot for a flatter, more secure tie.
- Move the knot to the side of your wrist so it’s not pressing into your desk/keyboard all day.
- Consider a sliding closure for a smoother fit.
Care and Wear Tips
- Take it off before showering, swimming, or doing dishesespecially if it has glue or metal charms.
- If it gets dirty, hand wash gently and air dry flat.
- If dye transfer is a concern, wash the bandana before crafting and avoid wearing it with white cuffs.
FAQ
Can I use fabric scraps instead of a bandana?
Absolutely. Just aim for a tighter weave fabric that doesn’t unravel easily. Bandanas are popular because they’re sturdy and come in bold prints,
but they’re not the only option.
How long should the strip be?
If you’re wrapping once and tying, a strip around 18–22 inches usually works for many wrists. If you want multiple wraps, go longer (30+ inches).
When in doubt, cut longyou can always trim.
What’s the easiest style for a group activity?
Beaded bandana bracelets with pony beads are hard to beat: fast, colorful, and satisfying. If you’re crafting with younger kids, pre-cut the strips
and pick beads with large holes.
My “Experience-Based” Tips After Making a Whole Pile of Bandana Bracelets
Let’s be honest: the first bandana bracelet you make is usually adorable in a “handmade with love” way… and slightly chaotic in a “why is it shaped like a
soft pretzel?” way. The good news is that bandana bracelets have a rapid learning curvemostly because the materials are forgiving and the stakes are low.
Here are the most useful, real-world lessons that come up once you’ve made more than one (or once you’ve tried to teach a group of kids who are fueled by
juice boxes and confidence).
First: fabric choice is everything. A crisp cotton bandana behaves like it has a plan. A super soft scrap behaves like it’s auditioning for a role as
“mystery lint.” If your strip frays the moment you look at it, don’t fight it for 45 minutesswitch fabrics or seal the ends and move on. Your time is
valuable. Your patience is finite. Your bracelet should not be shedding like a golden retriever.
Second: the “stiff tip” hack is the difference between fun and frustration. If you’re threading beads and the fabric end keeps mushrooming and refusing to
go through the hole, wrap the tip with a tiny piece of tape or trim it into a point. This one small move saves so much annoyance that it feels like cheating.
(In crafting, we call that “being efficient,” and it is celebrated.)
Third: knots are fashion’s tiny engineering projects. A square knot looks neater and holds better than a random double twist. When a bracelet feels bulky,
it’s often not the fabricit’s the knot sitting right where your wrist hits a table. Slide the knot to the side and suddenly you’re comfortable and stylish,
like a person who definitely has their life together and isn’t wearing yesterday’s hoodie.
Fourth: if you’re making these as party favors or for a group, do yourself a favor and pre-cut the strips. People love “DIY” until they’re ten minutes into
cutting uneven fabric noodles and asking if you have “a better scissor.” Pre-cut strips turn the activity into what it’s supposed to be: creative, colorful,
and fast. Also, set out bead options in little bowlsotherwise you’ll witness the Great Bead Spill of 2026.
Fifth: the best designs are usually the simplest. One charm in the center, a clean braid, or a short bead pattern looks more intentional than stuffing on
every bead you own. A good rule is “choose one statement”: either the print is loud, or the beads are loud, or the charm is loud. If everything is loud,
the bracelet becomes a tiny wearable argument.
Finally: bandana bracelets are secretly great memory markers. People make them for camp, concerts, holidays, and trips because they’re easy to personalize and
easy to keep. The bracelet might not survive forever (especially if it meets a swimming pool), but the “I made this with friends on that day” vibe absolutely does.
And that’s the pointcrafts that are wearable are basically souvenirs you make yourself, which feels both wholesome and slightly like you outsmarted the gift shop.
Conclusion
Making a bandana bracelet is one of those rare crafts that checks every box: simple, customizable, beginner-friendly, and actually wearable. Start with the
classic fold-and-tie, then level up with beads, braids, and an adjustable closure once you’re feeling fancy. Whether you’re crafting solo or running a full-blown
bracelet-making station for a group, the key is choosing a good fabric, keeping your steps simple, and letting the bandana print do the talking.


