
Table of Contents >> Show >> Hide
- Why SSH matters on CentOS 7
- Before you begin
- Step 1: Check whether OpenSSH Server is installed
- Step 2: Start the SSH service
- Step 3: Enable SSH to start automatically at boot
- Step 4: Open SSH in the firewall
- Step 5: Test the SSH connection
- How to verify that SSH is listening on port 22
- Optional but smart: basic SSH hardening on CentOS 7
- Troubleshooting SSH on CentOS 7
- Best practices for legacy CentOS 7 servers
- Conclusion
- Field Notes: Real-World Experiences Enabling SSH in CentOS 7
- SEO Tags
If you want to manage a CentOS 7 server without sitting in front of it like a dramatic movie hacker, SSH is your best friend. Secure Shell, better known as SSH, lets you log in remotely, run commands, move files, and handle server administration without physically touching the machine. In plain English: it gives you a secure remote doorway into your server.
On CentOS 7, enabling SSH is usually straightforward. The real trick is doing it correctly without opening the wrong firewall hole, forgetting to start the service, or locking yourself out like a sitcom character who slammed the door with the keys inside. In this guide, you will learn how to install OpenSSH if needed, start the SSH service, enable it at boot, allow traffic through firewalld, test the connection, and apply a few smart hardening tweaks so your server is not running with the digital equivalent of a screen door.
Why SSH matters on CentOS 7
SSH is the standard method for secure remote administration on Linux servers. It encrypts traffic between your client and the server, which is a very big deal when you are managing systems over a network you do not fully control. For CentOS 7 administrators, SSH is essential for routine jobs such as updating packages, checking logs, restarting services, deploying code, managing users, and troubleshooting when a website decides to take an unscheduled nap.
Even though CentOS 7 is now a legacy platform, many organizations still keep older servers alive for internal apps, lab systems, or inherited workloads. If that is your situation, enabling SSH the right way helps you maintain those systems safely while you plan a migration path to a supported platform.
Before you begin
Make sure you have the following:
- A CentOS 7 machine or virtual server
- Root access or a user account with
sudoprivileges - Access to the local console, a cloud provider console, or another recovery method just in case remote login does not work on the first try
- A basic understanding of the terminal
One more important tip: if you are modifying SSH settings on a remote server, keep your current session open until you confirm that the new SSH connection works. Closing the only working terminal before testing is one of those mistakes you usually make only once.
Step 1: Check whether OpenSSH Server is installed
CentOS 7 often includes SSH components, but not every installation is identical. So the first move is to check whether the server package is installed.
If the package is installed, you will see something like:
If it is not installed, install it with yum:
This installs the server-side SSH daemon, usually called sshd. Think of ssh as the client and sshd as the polite but security-conscious bouncer at the server door.
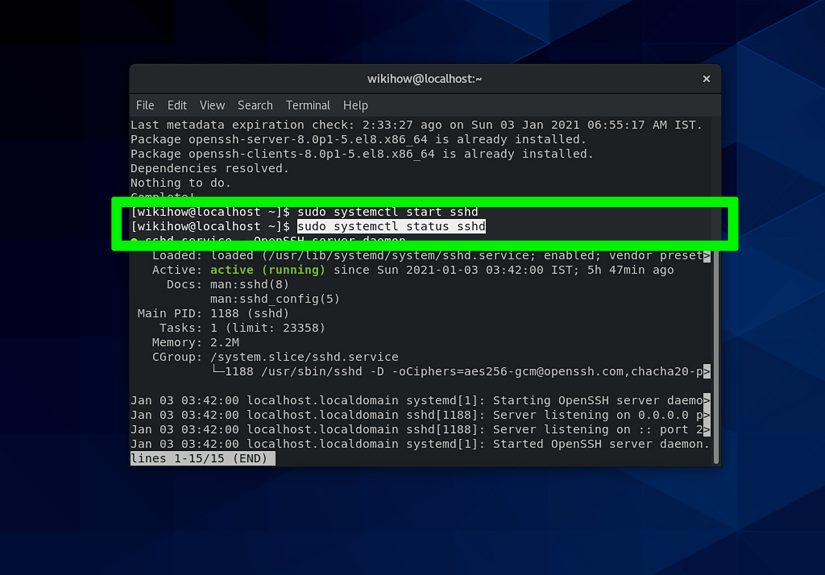
Step 2: Start the SSH service
Once the package is installed, start the SSH daemon:
This launches the service for the current session. If everything goes well, the command returns quietly. Linux is charming that way. No applause, no confetti, just competence.
To confirm that the service is running, use:
You want to see the service marked as active (running). If it is not active, do not panic. We will cover common troubleshooting steps later in the article.
Step 3: Enable SSH to start automatically at boot
Starting SSH manually is useful, but you also want it to survive a reboot. Otherwise, the server comes back online while remote administration stays offline, which is not exactly a productivity booster.
This tells systemd to start the SSH service automatically when the server boots. To verify that the service is enabled, run:
If the output says enabled, you are in good shape.
Step 4: Open SSH in the firewall
On CentOS 7, firewalld often manages inbound traffic. Even if sshd is running, remote connections can still fail if the firewall does not allow SSH traffic.
To allow the standard SSH service through firewalld, use:
The first command adds the SSH service permanently. The second reloads the firewall so the rule actually takes effect instead of just existing in theory like a gym membership in January.
You can verify the current allowed services with:
If you see ssh in the list, the firewall is ready.
Some CentOS 7 environments already allow SSH by default in the public zone. Even so, explicitly checking is wise, because assumptions are where outages like to hide.
Step 5: Test the SSH connection
Now it is time to verify that SSH is actually reachable from another machine. From your local computer or another server, run:
Replace username with a valid user on the CentOS 7 machine and server_ip with the server’s IP address or hostname.
If the connection works, you will likely see a host key prompt the first time:
Type yes, then enter the password for the user account if password authentication is enabled. Congratulations: SSH is enabled, functional, and no smoke is coming from the server rack.
How to verify that SSH is listening on port 22
If you want extra confirmation from the server side, check that sshd is listening on the standard SSH port:
You should see output showing the daemon listening on port 22. If you do, the service itself is ready. If remote logins still fail, the issue is usually the firewall, SELinux configuration, the wrong IP address, or a typo in the username.
Optional but smart: basic SSH hardening on CentOS 7
Enabling SSH is the first step. Securing it is the adult version of the task. Here are the practical improvements worth making.
1. Create a regular user with sudo access
Using root directly over SSH is convenient, but convenience and security often fight like siblings in the back seat. A safer pattern is to log in with a normal account and use sudo when needed.
On CentOS 7, members of the wheel group can usually use sudo.
2. Use SSH keys instead of passwords
SSH keys are more secure and far less vulnerable to brute-force guessing than passwords. Generate a key pair on your local machine if you do not already have one:
Then copy the public key to the server:
After that, test logging in with the key. If it works, you can tighten security further.
3. Disable password authentication after keys work
Open the SSH server configuration file:
Find or add these lines:
Then test the configuration:
If there are no errors, restart the service:
Important: open a new terminal and make sure key-based login works before closing your current session. This is not paranoia. This is experience wearing steel-toed boots.
4. Change the default SSH port if needed
Changing the SSH port will not magically make a server bulletproof, but it can reduce noise from basic automated scans. Edit the configuration file:
Set a custom port, for example:
Then update both SELinux and the firewall.
Install the tool that provides semanage if it is not already available:
Add the new SELinux port label:
If the rule already exists and the add command complains, use modify instead:
Now open the new port in the firewall and remove the default SSH service if you no longer need port 22:
Restart SSH:
Test the new port from another terminal:
Do not remove access to port 22 until the new port works. Locking yourself out because of one missing firewall rule is a very efficient way to ruin your afternoon.
Troubleshooting SSH on CentOS 7
If SSH still refuses to cooperate, work through these checks.
Check the service status
Validate the SSH configuration syntax
Review recent logs
Confirm the firewall rules
Check whether SELinux is enforcing
If SELinux is enforcing and you changed the port without adding the proper ssh_port_t context, the daemon may start but connections may still fail. SELinux is not being mean. It is doing its job. It is just doing it with the personality of a very strict airport agent.
Common error: connection refused
This usually means one of the following:
sshdis not running- The firewall is blocking the port
- SSH is listening on a different port than you expect
- The server IP or hostname is wrong
Common error: permission denied
This usually points to a bad password, incorrect SSH key permissions, the wrong username, or settings in sshd_config that disable the authentication method you are trying to use.
Best practices for legacy CentOS 7 servers
If you must keep CentOS 7 running for now, follow these practical guidelines:
- Prefer SSH keys over passwords
- Disable direct root login when possible
- Keep a console access path available through your hosting provider or hypervisor
- Review logs regularly for failed login attempts
- Use a supported migration target such as AlmaLinux, Rocky Linux, or a supported RHEL-based platform in your long-term plan
- Document any custom SSH port, firewall rule, and SELinux change so the next admin does not have to become a detective
Conclusion
Enabling SSH in CentOS 7 is not difficult, but doing it cleanly matters. Install openssh-server if needed, start sshd, enable it at boot, allow the service through firewalld, and test the connection from another machine. After that, take a few extra minutes to improve security with SSH keys, a non-root admin account, and careful configuration changes.
The biggest lesson is simple: SSH is easy to enable, but it rewards patience and punishes overconfidence. Test each step, keep one working session open while making changes, and remember that the safest server is the one you can still log in to after your “tiny little edit.”
Field Notes: Real-World Experiences Enabling SSH in CentOS 7
In real environments, enabling SSH on CentOS 7 is rarely just about typing systemctl start sshd and calling it a day. The messy part is everything around it. One common situation is inheriting an old VPS or virtual machine where nobody remembers whether SSH was installed, whether the firewall was adjusted, or whether SELinux was left enforcing, permissive, or somewhere in the emotional middle. On paper, the fix is easy. In practice, you start with one small command and end up tracing service files, network rules, and half-forgotten changes from an administrator who has probably moved on to another company, another project, or a cabin in the woods.
A classic example is the server that looks healthy from the console but refuses SSH connections from the network. The first instinct is to blame the service, but often sshd is running just fine. The real culprit is usually firewalld or a custom port that was set months ago and never documented. I have seen admins confidently say, “SSH is definitely broken,” only to discover the daemon was happily listening on port 2222 while everyone kept trying port 22. That is not a security masterpiece. That is just infrastructure hide-and-seek.
Another common experience involves SELinux. Many administrators are perfectly comfortable until they change the SSH port. Then the daemon restarts, the firewall rule looks correct, and the connection still fails. That is the moment SELinux clears its throat and reminds everyone that operating systems do, in fact, have opinions. Once the proper semanage port rule is added, everything suddenly works, and the admin goes from “this server is cursed” to “I totally knew that was the issue” in about seven seconds.
There is also the unforgettable lesson of testing before disconnecting. Nearly every Linux administrator has either locked themselves out of a server or come terrifyingly close. The pattern is always the same: update sshd_config, restart the service, close the session, and then realize the key was not installed correctly or PermitRootLogin was disabled before the replacement user was ready. That moment teaches humility better than any official training course. It also teaches respect for backup console access.
My strongest takeaway from working with CentOS 7 systems is that SSH itself is not usually the hard part. The hard part is discipline. Document the changes. Test from a new session. Confirm the firewall. Respect SELinux. Use SSH keys. Keep a recovery path. On legacy systems especially, success comes from careful sequencing rather than heroic command-line speed. The admin who moves slowly and checks everything usually finishes faster than the one who tries to improvise through ten tabs, three terminals, and one rising sense of panic. In server administration, calm beats clever more often than people admit.


