
Table of Contents >> Show >> Hide
- Before You Start: The 60-Second Rule
- Step 1: Define the Symptom Like a Pro (Not Like a Panicked Human)
- Step 2: Check the Obvious Stuff (Because It Works More Often Than Your Pride Wants)
- Step 3: Watch the Startup Like It’s a Crime Scene
- Step 4: Reduce the System to “Bare Minimum Mode”
- Step 5: Check Updates (OS, Drivers, Firmware) Without Turning It Into Roulette
- Step 6: Read the Logs (Because Computers Love Gossiping About Their Problems)
- Step 7: Run Built-In Diagnostics (Memory, Storage, and Vendor Tools)
- Step 8: Isolate Drivers and Conflicting Software
- Step 9: Check for Malware and “Sneaky Stuff” (Even If You’re Sure You’re Careful)
- Step 10: Choose the Right Fix (Repair, Restore, Reset, or Replace)
- Quick Troubleshooting Map (When You’re Busy and Slightly Annoyed)
- FAQ: Common Questions People Ask Mid-Troubleshoot
- Troubleshooting Experiences and Lessons (Extra 500+ Words)
- Conclusion
Your computer is acting weird. Maybe it’s crawling like it’s running Windows on a potato. Maybe it’s making a noise that sounds like a tiny lawnmower.
Or maybe it just stares at you with a black screen like it’s judging your life choices.
Whatever the symptom, diagnosing a computer problem is less about “randomly clicking stuff until it works” and more about
testing one idea at a timelike a detective, but with more cables and fewer dramatic monologues.
This guide walks you through a practical, repeatable troubleshooting process in 10 steps, with picture prompts so you can document what you see.
Before You Start: The 60-Second Rule
The fastest way to solve computer issues is to avoid creating new ones while you’re diagnosing. Before you change settings or uninstall anything:
- Save your work (if the computer is still cooperating).
- Write down what’s wrong in one sentence (example: “PC restarts when I open a game”).
- Note what changed recently (updates, new apps, new hardware, a coffee spill you’re calling “humidity”).
- Back up anything important if the machine is unstable.
Step 1: Define the Symptom Like a Pro (Not Like a Panicked Human)
Vague symptoms create vague fixes. Instead of “my computer is broken,” aim for a description that a stranger could test:
when it happens, what you see, and how to reproduce it.
What to write down
- Trigger: “After I wake it from sleep,” “When I join a Zoom call,” “Only on battery,” etc.
- Visible error: message text, error code, stop code, spinning beach ball, frozen cursor.
- Frequency: every time, once per day, only when it’s raining (suspicious).
- Scope: one app vs the whole system.
Why this matters: A repeatable problem is diagnosable. A “sometimes” problem is still diagnosable
it just takes better notes and less superstition.
Step 2: Check the Obvious Stuff (Because It Works More Often Than Your Pride Wants)
Most troubleshooting pros start with the basics because basics fail constantlyand because it’s cheaper than replacing a motherboard out of vibes.
Quick checks
- Power: Is it charging? Try a different outlet. For laptops, verify the charger LED (if present).
- Cables: Reseat HDMI/DisplayPort/USB cables. Try a different cable if you can.
- Peripherals: Unplug everything except power + keyboard/mouse. Faulty USB devices can cause boot issues.
- Overheating signs: hot chassis, loud fans, sudden shutdowns under load.
Specific example: If your external monitor randomly blanks, swap the cable before you spend an hour reinstalling graphics drivers.
A flaky cable can mimic GPU failure in a truly unhelpful way.
Step 3: Watch the Startup Like It’s a Crime Scene
If the computer won’t bootor it boots but acts possessedstartup clues can narrow down whether you’re dealing with
hardware, firmware, drivers, or the operating system.
What to look for
- POST beeps / LED patterns: Some desktops/laptops use beep codes or light patterns to indicate hardware issues.
- Boot loops: powers on → restarts → powers on again (often hardware/firmware/driver related).
- Black screen with cursor: can point to display driver issues, login problems, or corrupted system components.
- Stop code / blue screen: record the code and any driver name shown.
Mac tip: macOS has startup key combinations that can launch Safe Mode or diagnostics tools. If you suspect hardware, built-in diagnostics are worth running early.
Step 4: Reduce the System to “Bare Minimum Mode”
Your goal is to answer one powerful question:
Does the problem still happen when only essential drivers/services run?
If it goes away, you’re likely dealing with software, drivers, or a startup program. If it remains, hardware becomes more suspicious.
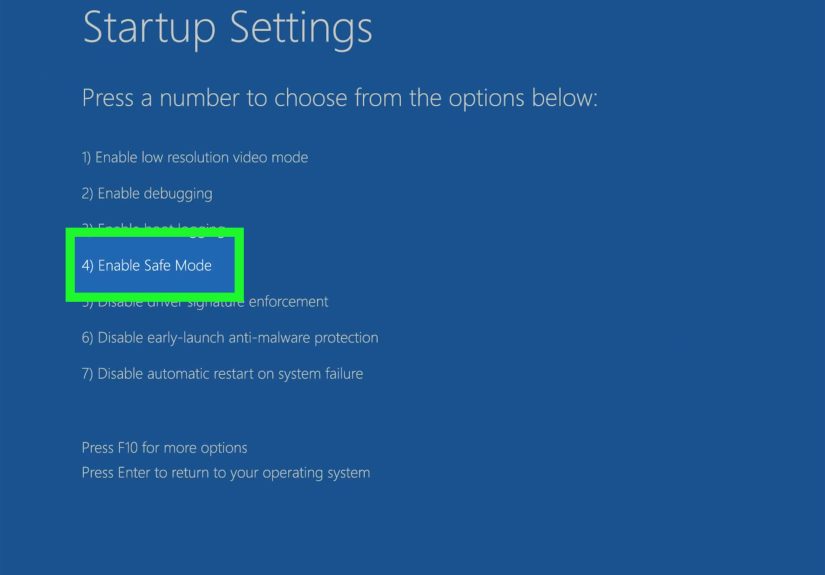
On Windows: Safe Mode and Startup Settings
- Use Windows Startup Settings to boot into Safe Mode.
- Try Safe Mode with Networking if you need internet to test drivers or updates (but remember: networking adds variables).
On macOS: Safe Mode
- Safe Mode loads essentials and performs certain checks during startup.
- If Safe Mode is stable but normal boot isn’t, you’re likely chasing a login item, extension, or software conflict.
Mini-diagnosis shortcut: If Safe Mode works and normal mode doesn’t, don’t blame “the computer.”
Blame what loads in normal mode: drivers, startup apps, shell extensions, antivirus add-ons, and background services.
Step 5: Check Updates (OS, Drivers, Firmware) Without Turning It Into Roulette
Updates fix real problemsbut they can also introduce them. You’re not “updating because it’s Tuesday.”
You’re updating strategically, after you’ve recorded the symptom.
What to update first
- Operating system updates: stability patches and bug fixes.
- Critical drivers: graphics, storage controller, Wi-Fi/Ethernetespecially if the symptom matches the component.
- Firmware/BIOS: only if recommended for your issue, or if you’re troubleshooting serious stability problems.
Practical example: If you get random freezes while gaming, a GPU driver update might help.
If your laptop won’t charge reliably, a firmware update might be relevantbut only after you confirm it’s not a bad charger or port.
Step 6: Read the Logs (Because Computers Love Gossiping About Their Problems)
Logs turn “it crashed” into “it crashed because a driver timed out” or “an app faulted in module X.”
You don’t need to become a full-time log archaeologistjust learn where the big clues live.
Windows: Reliability Monitor + Event Viewer
- Reliability Monitor gives a timeline view of crashes, failed updates, and app failures.
- Event Viewer (Windows Logs → System/Application) helps identify driver and device errors around the time of the issue.
macOS: Console
- Use Console to review system logs, crash reports, and recurring errors.
- Look for repeating patterns right when the symptom happens.
Pro move: Don’t fix everything the logs mention. Fix what matches your symptom.
Computers complain constantly; your job is to find the complaint that lines up with the moment everything went wrong.
Step 7: Run Built-In Diagnostics (Memory, Storage, and Vendor Tools)
When problems are randomcrashes, freezes, corrupted filessuspect storage and memory.
When the machine won’t boot, suspect hardware and run diagnostics early.
Windows / PC options
- Vendor pre-boot diagnostics: Many PC brands include built-in tests you can run before Windows loads.
- Storage checks: Look for disk errors, low space, and failing drives (slowdowns + errors can be an early warning).
Mac options
- Apple Diagnostics: Helps identify internal hardware issues and returns reference codes if something fails.
Specific example: If memory tests fail, symptoms can include random app crashes, blue screens, and file corruption.
If storage diagnostics show warnings, you may see slow boots, frequent freezes, and programs that “forget” what they’re doing.
Step 8: Isolate Drivers and Conflicting Software
Once you’ve narrowed down “software vs hardware,” it’s time to identify which driver or program is the troublemaker.
The best strategy: change one thing, test, repeat. (Yes, it’s slower. No, it’s not optional if you want a real answer.)
Windows: Device Manager and driver actions
- Update driver for the suspected device (graphics, network, audio, etc.).
- Roll back driver if the issue started after a driver update.
- Disable a device temporarily (only if safe to do so) to test whether it triggers the issue.
Startup programs and clean boot logic
- Disable non-essential startup items and test.
- If the issue disappears, re-enable items in batches until the culprit returns.
Common pattern: If the computer is fine until you plug in a specific device (printer, USB hub, audio interface),
suspect the device driver or power draw. Test on a different port, with a different cable, and without other peripherals.
Step 9: Check for Malware and “Sneaky Stuff” (Even If You’re Sure You’re Careful)
Malware isn’t always dramatic. Sometimes it’s just: slow computer, browser pop-ups, weird startup items, random network activity,
or a system that feels like it’s wading through syrup.
Windows: use built-in security scans
- Run a Quick scan, then a Full scan if symptoms persist.
- If you suspect stubborn malware, consider an offline scan that runs outside the normal Windows environment.
Browser sanity check (all platforms)
- Remove unknown extensions.
- Reset browser settings if redirects/popups persist.
- Check if the problem happens in a new browser profile.
Also: If you’re troubleshooting a business machine or anything with sensitive data, keep good backups.
Security guidance consistently emphasizes patching and tested backups as part of staying resilient.
Step 10: Choose the Right Fix (Repair, Restore, Reset, or Replace)
Diagnosis is only useful if it leads to a sensible next step. Here’s a practical decision tree that avoids both extremes:
“reinstall Windows for every issue” and “never change anything and hope the laptop heals itself.”
When to repair
- The problem is tied to one app → reinstall or update that app.
- A driver is the culprit → update/rollback and confirm stability.
- A setting changed recently → revert it and test.
When to restore or reset
- System is unstable across many apps and logs point to system corruption.
- You can’t reliably boot normally, even after driver/software isolation.
- Malware cleanup is uncertain and you need high confidence.
When to replace hardware (or ask a pro)
- Diagnostics fail for memory, storage, or other core components.
- Physical damage, burning smell, liquid exposure, or repeated overheating shutdowns.
- Intermittent power issues that persist across chargers/outlets (especially on laptops).
Rule of thumb: If the computer holds irreplaceable photos/documents, prioritize data safety first.
Fixes are easier than recoveries.
Quick Troubleshooting Map (When You’re Busy and Slightly Annoyed)
It won’t turn on
- Step 2 (power/cables) → Step 3 (startup clues) → Step 7 (pre-boot diagnostics) → Step 10 (repair/replace).
It turns on but won’t boot
- Step 3 (boot behavior) → Step 4 (Safe Mode / recovery options) → Step 6 (logs if possible) → Step 8 (drivers/software).
It’s slow
- Step 1 (define “slow”) → Step 8 (startup/background) → Step 7 (storage health) → Step 9 (malware check).
It crashes randomly
- Step 6 (Reliability Monitor/Event Viewer/Console) → Step 7 (memory/storage diagnostics) → Step 8 (drivers).
FAQ: Common Questions People Ask Mid-Troubleshoot
How do I know if it’s hardware or software?
If the issue persists in Safe Mode (or a minimal boot environment), hardware becomes more likely.
If the issue disappears in Safe Mode, software/driver/startup items become more likely. Combine that with logs and diagnostics results for confidence.
Should I reinstall the operating system right away?
Not first. Reinstalling can mask the real cause (especially if failing storage is corrupting files) and costs time.
Use reinstall/reset as a later stepideally after checking logs and running hardware diagnostics.
What’s the “one habit” that prevents the most disasters?
Backups you’ve tested. A backup that fails when you need it is just an optimistic rumor.
Troubleshooting Experiences and Lessons (Extra 500+ Words)
The steps above are the “clean” version of troubleshootingorganized, logical, and pleasantly predictable.
Real life is messier. Problems show up at the worst possible time, symptoms change, and the one clue you needed vanishes after a restart.
To make this guide more practical, here are a few real-world-style scenarios technicians and power users commonly run into, along with what actually worked.
Experience #1: The “It Only Crashes During Meetings” Laptop
A classic: the laptop runs fine for browsing and email, but the moment a video meeting starts, it freezes or reboots.
The first instinct is to blame the meeting app. Sometimes that’s correctbut the pattern matters:
video calls hit the CPU, GPU, camera subsystem, microphone drivers, network stack, and often Bluetooth headphones all at once.
That’s like making your computer juggle while riding a unicycle.
The winning approach was Step 1 + Step 6 + Step 8: confirm it only happens during video calls, then check Reliability Monitor/Event Viewer around the crash time,
then isolate drivers. In many cases, the log points toward graphics driver timeouts or audio driver faults. Disabling hardware acceleration in the video app
can be a fast test (not always the final fix), while updating or rolling back graphics/audio drivers can stabilize the system.
Also: unplug docks temporarily. Some docks deliver video, power, and USB through one connection, and a flaky dock can imitate “random system instability.”
Experience #2: The Desktop That “Got Slower Overnight”
Slowdowns feel mysterious, but they often have very boring causes: too many startup programs, a nearly full drive, or a drive beginning to fail.
The key is to avoid guessing. Use Step 8 to reduce startup load, then Step 7 to check storage health.
If the computer is slow even at the login screenor file explorer hangs when opening foldersstorage becomes a prime suspect.
One practical example: a system had plenty of CPU and RAM, but launching apps took forever. The user kept reinstalling programs and “optimizing” settings.
The real culprit was a drive throwing intermittent read errors, which showed up as repeated warnings in system logs and reliability history.
Once the data was backed up and the drive replaced, performance snapped back to normal instantly.
The lesson: when performance problems feel “sticky” (everything is slow, not just one program), check storage early.
Experience #3: The “Black Screen but the PC Is Clearly On” Mystery
This one makes people panic because it feels like the computer diedfans spin, lights are on, but the display is blank.
The fastest path is Step 2 and Step 3: confirm the monitor is on the right input, swap the cable, try a different port,
and test with a different display if possible. If you’re using a desktop with a dedicated GPU, confirm the monitor is connected to the GPU output,
not the motherboard port (unless your system uses integrated graphics).
If that doesn’t help, Step 4 becomes important. Safe Mode (or a recovery environment) can reveal whether a graphics driver update went sideways.
If Safe Mode displays fine but normal boot is black, that’s a strong hint the driver or display configuration is the problem.
Rolling back the display driver or reinstalling it cleanly often fixes it. When Safe Mode also shows no display,
hardware becomes more likelybad GPU, bad RAM seating, or even a failing power supply that can’t keep the GPU stable under initialization.
Experience #4: The “Everything Is Fine… Until Wi-Fi” Problem
Networking issues are sneaky because the “computer problem” might actually be a router problem, ISP problem, or interference problem.
The method still works: Step 1 (define: does Wi-Fi drop only on one device?), Step 4 (Safe Mode with Networking for Windows),
then Step 8 (network adapter driver) and a sanity check: does Ethernet work reliably?
If multiple devices drop at once, the computer is probably innocent and the network is the suspect.
The big lesson from these experiences is that troubleshooting is a discipline, not a talent.
If you keep notes, test one change at a time, and use logs + diagnostics instead of hunches, you’ll usually reach a confident answer
even when the computer tries its best to be dramatic.
Conclusion
Diagnosing a computer problem doesn’t require magic, secret technician chants, or threatening to throw the PC out a window
(though it may feel therapeutic to consider it). The winning formula is consistent:
define the symptom, test the basics, reduce variables, check logs, run diagnostics, and only then apply bigger fixes.
If you work through these 10 steps and keep simple “what I changed / what happened” notes, you’ll either fix the issueor you’ll collect enough evidence
to get fast help from a repair shop, IT team, or manufacturer support without starting from scratch.


