
Table of Contents >> Show >> Hide
- First, Identify Your Lazy Susan Type (So You Don’t “Fix” the Wrong Thing)
- Tools & Prep (A.K.A. “Clear the Cabinet Before Gravity Teaches You a Lesson”)
- Adjusting Pole-Mounted Lazy Susan Shelves (The Classic Corner Cabinet Setup)
- Adjusting Shelf-Mounted Turntables (When the Spin Is Crunchy or Crooked)
- Adjusting Lazy Susan Cabinet Doors (Because Crooked Doors Ruin Your Victory Lap)
- When “Adjustment” Isn’t Enough: Signs You Should Replace Parts
- Quick Troubleshooting Guide (Symptoms & Fast Fixes)
- Maintenance That Keeps Everything Working (Without Turning You Into a Full-Time Cabinet Mechanic)
- Real-World Experiences: What Actually Happens in Kitchens (and How People Fix It)
- Conclusion
A Lazy Susan is basically a tiny carnival ride for your pots, pans, and spicesuntil it starts wobbling, scraping, or
refusing to spin like a moody teenager. The good news: most lazy susan cabinet adjustments are DIY-friendly,
require minimal tools, and can usually be handled in under an hour (often in under 10 minutes, assuming you don’t get
distracted reorganizing your entire kitchen mid-project… which has never happened to anyone, ever).
This guide walks you through easy ways to adjust a Lazy Susanincluding fixing droopy shelves, smoothing a gritty spin,
stopping the dreaded “bottom shelf scrape,” and aligning those corner-cabinet doors that love to drift out of formation.
We’ll keep it practical, specific, and lightly comedicbecause nothing says “homeownership” like laughing so you don’t cry.
First, Identify Your Lazy Susan Type (So You Don’t “Fix” the Wrong Thing)
Not all Lazy Susans are built the same, and the adjustment points depend on what you’ve got:
-
Pole-mounted (center-shaft) Lazy Susan: Two (or more) round trays clamped to a vertical pole in a corner cabinet.
These commonly slip downward, wobble, or scrape the cabinet floor. -
Shelf-mounted turntable: A single rotating platform (often in a base cabinet or pantry) that spins on a bearing ring/plate.
These usually get crunchy from crumbs, loose screws, or a slightly twisted mount. -
Pie-cut, kidney, D-shape: Specialty trays shaped to match corner cabinets. Adjustment is similar to pole-mounted systems,
but centering matters more because corners are unforgiving. -
Pull-out corner systems: Technically not a classic Lazy Susan, but people call them that anyway. Adjustment focuses on slides
and brackets (a different beast).
Tools & Prep (A.K.A. “Clear the Cabinet Before Gravity Teaches You a Lesson”)
Tools you’ll likely need
- Phillips screwdriver (and possibly a flathead)
- Hex key/Allen wrench (many pole systems use set screws)
- Flashlight or headlamp (highly recommended for corner-cabinet spelunking)
- Small level (optional, but helpful)
- Clean rag + mild cleaner
- Wood toothpicks / wood glue (for stripped hinge holes, if needed)
Prep steps
- Empty the Lazy Susan. Yes, all of it. Including that one mystery jar from 2019.
- Vacuum crumbs and wipe down shelves/bearings. Dirt can mimic “mechanical failure.”
-
Do a quick symptom check:
- Wobble = usually loose screws, worn bearing, or uneven mounting
- Scrape = shelf height slipped, pole shifted, or cabinet floor isn’t level
- Gritty spin = debris in the bearing or dried lubricant
- Door misalignment = hinge screws need adjustment (often 3-way hinges)
Adjusting Pole-Mounted Lazy Susan Shelves (The Classic Corner Cabinet Setup)
If you have two circular shelves on a center pole, your adjustment points are usually:
locking/set screws, a clamp collar, or a bracket under/near each tray.
The goal is to set shelf height, stop scraping, and keep trays level and centered.
1) Fix shelves that scrape the cabinet floor
-
Find the shelf locks: Look near the center hub of each tray for one or two screws (often set screws).
Sometimes the clamp is on top of the tray; sometimes it’s below. -
Loosen (don’t remove) the locking screws: Back them out just enough so the shelf can slide.
If there are two shelves, you may need to loosen both before anything moves. -
Lift the shelf(s): Raise the bottom tray so it clears the cabinet floor by at least
1/4 inch (more if your cabinet floor is uneven). If shelves bind on the pole, gently wiggle while lifting
not aggressive twisting like you’re opening a stubborn pickle jar. -
Re-tighten the screws evenly: Tighten one side a bit, then the other, so the shelf clamps straight.
Close the door and spin the tray fully to confirm it doesn’t rub anywhere.
2) Stop the wobble (without over-tightening into misery)
Wobble is usually a loose clamp, a loose base/top mount, or a pole that’s not fully seated. Here’s the quick sequence:
- Tighten the shelf clamp/set screws (snug, not “Hulk”).
- Check the top and bottom pole mounts: Many systems anchor at the cabinet floor and ceiling (or a top bracket). Tighten mounting screws.
-
Re-center the pole: If trays hit the cabinet frame on one side, the pole may be off-center. Loosen the base slightly, center it,
then re-tighten. -
Test under load: Put a few typical items back (not the cast-iron collection) and spin.
If wobble returns only when loaded, you may be exceeding what the hardware can comfortably handle.
3) Adjust shelf spacing for real-life items (not imaginary “perfectly sized” containers)
The best Lazy Susan is the one that fits your actual stuff. A practical spacing method:
- Bottom shelf: leave room for tall oils, vinegar, blender cups, or cleaning supplies.
- Top shelf: set for medium heightspices, sauces, snacks, cansthings you grab often.
- Keep 1–2 inches of headroom above the tallest item on each shelf so nothing drags.
Important caution: don’t “solve everything” with lubricant
It’s tempting to spray lubricant on the center pole when shelves feel stuck. But many pole-mounted shelves
rely on friction/clamping to hold positionlubricating the pole can make shelves slip later. If you need smooth rotation,
focus on bearings and mounts, not the clamping surface.
Adjusting Shelf-Mounted Turntables (When the Spin Is Crunchy or Crooked)
If your Lazy Susan is a single rotating platform (often a pantry or base cabinet turntable), the fixes are usually about
mounting alignment and bearing cleanliness.
1) If it won’t rotate smoothly
- Remove the turntable if possible (some lift off; others are screwed down).
- Clean the bearing area: wipe out crumbs, dust, pet hair, and whatever else migrated into there.
-
Check screw length and placement: screws that are too longor driven in slightly crookedcan contact the rotating ring
and cause a hard stop every quarter turn. If you feel a repeating bind, this is a prime suspect. -
Re-seat and re-tighten evenly: a slightly twisted mount can make a bearing feel “gritty.”
Tighten in a star pattern like you’re tightening lug nuts (but, you know, smaller and less dramatic).
2) If it wobbles side-to-side
- Confirm the cabinet shelf/floor is flat: a warped surface makes even good hardware feel bad.
- Tighten the mounting screws into solid material. If screws spin freely, you may need slightly larger screws or a repair method (wood filler/dowel).
- Upgrade the bearing if it’s visibly worn, rusted, or bent. Bearings are cheaper than repeated annoyance.
3) Light lubrication: when it helps (and when it’s a grease festival)
For bearing-based turntables, a small amount of appropriate lubricant can help after cleaning.
The key word is small. If it drips, you used too much. If it attracts every crumb in a five-mile radius, you used too much.
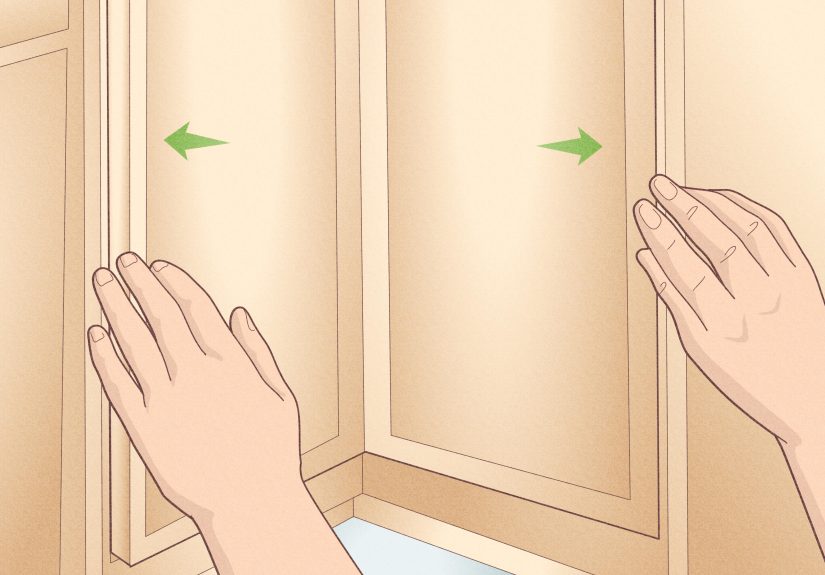
Adjusting Lazy Susan Cabinet Doors (Because Crooked Doors Ruin Your Victory Lap)
Many corner cabinets have two doors that meet at an angle. Sometimes they’re bi-fold; sometimes they’re two separate doors.
Either way, door alignment issues are usually hinge-relatedand modern concealed “Euro-style” hinges are wonderfully adjustable.
The best order of operations (so you don’t chase your tail)
- Start with tightening: tighten screws that mount hinges to the door and to the cabinet.
- Adjust height (up/down): aligns top and bottom edges with neighboring doors.
- Adjust side-to-side: evens the gap between doors and keeps the meeting edges consistent.
- Adjust depth (in/out): makes doors sit flush and close properly without rubbing.
Three common hinge adjustments (what each one actually does)
- Height (up/down): Often done by loosening mounting plate screws and shifting slightly, or by a dedicated adjustment screw on some systems.
- Side-to-side: Moves the door left/right to even out gaps and align the meeting edges.
- Depth (in/out): Moves door closer to or farther from the cabinet box for a clean close and flush look.
Fix the “door won’t stay aligned” problem (stripped screws)
If a hinge screw won’t tighten, the hole is likely stripped. A simple repair:
- Remove the screw.
- Pack the hole with wood toothpicks dipped in wood glue (or a small dowel if it’s really blown out).
- Let it set, then re-drive the screw carefully.
This one small fix often solves “mysterious recurring sag” that people blame on the hinge itself.
Special note for Lazy Susan corner doors
Corner cabinets can amplify tiny misalignments. If one door looks perfect but the pair still meets awkwardly,
adjust the hinges in tiny increments and re-check the meeting edge frequently. Think “quarter-turns,” not “full revolutions.”
When “Adjustment” Isn’t Enough: Signs You Should Replace Parts
Sometimes you can tighten and tweak forever, and the hardware is still tired. Consider replacement if:
- Bearings grind even after cleaning (rust, pitting, or bent plates).
- Center shaft is bent (trays never stay level no matter what you do).
- Trays are cracked/warped and flex under normal loads.
- Hinges are worn or the cabinet face frame is damaged around mounting points.
Upgrading to sturdier components can be a “do it once, enjoy it for years” moveespecially in high-use kitchens.
Quick Troubleshooting Guide (Symptoms & Fast Fixes)
If your Lazy Susan…
- Scrapes the bottom: loosen shelf locks → lift bottom tray → re-tighten evenly.
- Wobbles: tighten shelf clamps → tighten top/bottom mounts → re-center pole → test with load.
- Binds every quarter-turn: check for screw tips contacting the rotating ring → re-seat bearing plate.
- Feels gritty: remove tray → clean debris → inspect bearing → lightly lubricate if appropriate.
- Doors look crooked: tighten hinge screws → height adjust → side adjust → depth adjust.
Maintenance That Keeps Everything Working (Without Turning You Into a Full-Time Cabinet Mechanic)
- Don’t overload one side of a tray. Heavy items all on one edge invite sagging.
- Wipe spills quickly. Sticky syrup + crumbs = instant bearing sandpaper.
- Do a twice-a-year check: a quick tighten of screws can prevent bigger issues later.
- Store smarter: heaviest items low and nearer the center; light items higher and toward the edge.
Real-World Experiences: What Actually Happens in Kitchens (and How People Fix It)
Let’s talk about what adjusting a Lazy Susan feels like in real lifenot in a perfectly staged tutorial kitchen where
everything is white, spotless, and suspiciously free of paprika.
One of the most common “I swear it happened overnight” scenarios is the bottom shelf scrape. Usually it’s not overnight at all
it’s slow settling. Someone loads the shelf with olive oil, a giant bag of rice, and three cast-iron pans (because apparently
the Lazy Susan is now a weightlifting platform). The shelf clamp gradually slips, and suddenly every spin sounds like a raccoon
sharpening knives. The fix is almost always the same: empty it, loosen the set screws, lift the shelf, tighten evenly, and
thenthis part mattersredistribute the load so the shelf isn’t being asked to carry the emotional baggage of the entire pantry.
Then there’s the “crunchy spin”. People assume the bearing is broken, but it’s often just debris. Corner cabinets are crumb
magnets because you can’t see the back corner unless you fold yourself into a geometry problem. What typically happens:
a small spill (sugar, flour, rice grains, or a rogue caper) falls into the bearing area, and every rotation becomes a tiny
gravel road. Cleaning it out feels ridiculously satisfyinglike popping bubble wrap with purpose. In many cases,
a careful wipe-down and re-seating the hardware is all it takes to get back to smooth rotation.
My favorite category is the “victory adjustment… ruined by the doors”. You fix the shelves, the turntable spins like a dream,
you stand up proudlyand then the doors don’t align, so your kitchen still looks like it’s winking at you.
This is where adjustable concealed hinges shine. The first time you learn that a few screws can move a door up/down, left/right,
and in/out, it feels like discovering cheat codes. The trick is making small changes, checking frequently, and adjusting in the
right order. Otherwise, you’ll fix the gap on one side, create a new gap on the other, and begin questioning reality.
Finally, there’s the “it was never the Lazy Susan” plot twist. Sometimes the cabinet itself isn’t level, the face frame has
loosened, or the mounting screws are biting into damaged particleboard. In those cases, the most effective repair isn’t more
adjustingit’s reinforcing. Filling stripped holes, using the right-length screws, and making sure the hardware is anchored into
something solid can turn a “constantly slipping” setup into a stable one. It’s not glamorous work, but it’s the kind of fix you
feel every day when the cabinet stops fighting you.
The big takeaway from real kitchens: most Lazy Susan problems are small mechanical issues that feel huge because you interact
with them constantly. When the shelf stops scraping and the doors sit straight, the whole kitchen feels calmerlike you just
took a pebble out of your shoe that you didn’t realize was driving you insane.
Conclusion
Adjusting a Lazy Susan isn’t complicatedit’s just a mix of small, correct steps: tighten what’s loose, lift what’s scraping,
clean what’s gritty, and align what’s crooked. Start with the simplest fixes (tightening and cleaning), then move into shelf height,
centering, and hinge adjustments. Most importantly: make tiny changes, test often, and resist the urge to solve everything with
a can of lubricant and optimism.


