
Table of Contents >> Show >> Hide
- Can You Really Do a Green Screen Effect in MS Paint?
- Before You Start: Set Yourself Up for Better Results
- Method 1: The Easiest Way in Modern MS Paint
- Method 2: How to Do a Green Screen Style Background Change in Older MS Paint
- What If the Background Isn’t Pure Green?
- How to Make the Final Background Look More Natural
- Common Problems and How to Fix Them
- Best Use Cases for Changing Backgrounds in MS Paint
- MS Paint vs. More Advanced Editors
- Real-World Experiences With Changing Backgrounds in MS Paint
- Final Thoughts
- SEO Tags
Changing an image background in MS Paint used to sound like one of those tech jokes people told right before opening Photoshop anyway. But Paint has grown up. Quite a bit, actually. If you want to create a simple green-screen effect, remove a plain background, or drop a person or object onto a new backdrop, Microsoft Paint can now handle more than its old reputation suggests.
The trick is understanding which Paint you’re using and what kind of image you’re editing. On newer Windows 11 versions, Paint has background removal, transparency, and layers, which makes the whole process much easier. On older versions of Paint, you can still pull off a basic “green screen” look with a clever workaround, as long as the background is one solid color and your image doesn’t look like it was photographed in a swamp at midnight.
In this guide, you’ll learn how to change an image background in MS Paint step by step, how to use a green-screen-style method, how to avoid ugly white boxes and jagged edges, and how to save your final image without undoing all your hard work in one heartbreaking click.
Can You Really Do a Green Screen Effect in MS Paint?
Yes, but with a small reality check. In photo editing, a “green screen” effect usually means removing a solid colored background from behind a subject and replacing it with something else. In video editing, that process is called chroma keying. In Paint, you’re doing the still-image version of that idea.
If you’re using the modern version of Paint in Windows 11, the easiest method is to remove the original background first, save the cutout as a transparent PNG, and then place it over a new background image. That’s the cleanest approach for most people.
If you’re using an older version of MS Paint, you can fake a green-screen effect with Transparent Selection. This method works best when the background is a single flat green color, with very little shading, shadow, or color spill. In other words, it works beautifully on simple images and starts sweating heavily when faced with curly hair, reflective glasses, or messy lighting.
Before You Start: Set Yourself Up for Better Results
Before diving into the steps, choose the right image. This matters more than most tutorials admit. Paint is helpful, but it is not a mind reader with a design degree.
Choose an image with strong contrast
If your subject stands out clearly from the background, Paint will do a much better job. A person in dark clothing against a bright green wall? Great. A lime-green shirt in front of a green screen? That is a problem wearing another problem.
Use a clean, simple background
Solid green, white, or blue backgrounds are easiest to remove. Busy backgrounds with trees, shadows, wrinkles, and color variations make the process harder and usually leave rough edges.
Start with a larger image
Higher resolution images give Paint more detail to work with. Small, blurry images tend to create ragged outlines, strange missing pixels, and that classic “I cut this out with safety scissors” look.
Know your final file format
If you want the background to remain transparent, save the cutout as a PNG. If you save too early as a JPG, the transparency will be flattened and replaced with a solid background. That’s the digital equivalent of carefully frosting a cake and then dropping it face-first on the floor.
Method 1: The Easiest Way in Modern MS Paint
This is the best method for most Windows 11 users. If your Paint app includes Remove background, layers, and transparency support, use this workflow.
Step 1: Open your image in Paint
Launch Paint and open the photo you want to edit. This should be the image with the subject you want to keep, such as a person, product, pet, or logo.
Step 2: Remove the background
Look for the Remove background button in the toolbar. Click it, and Paint will try to detect the main subject automatically and cut away the background. If the entire image is not cooperating, use the selection tool first to highlight the area you want Paint to focus on, and then run background removal.
At this point, examine the edges closely. Hair, transparent objects, and objects with similar colors to the background can still confuse the app. For simple photos, though, the result is often surprisingly good for a tool bundled with Windows.
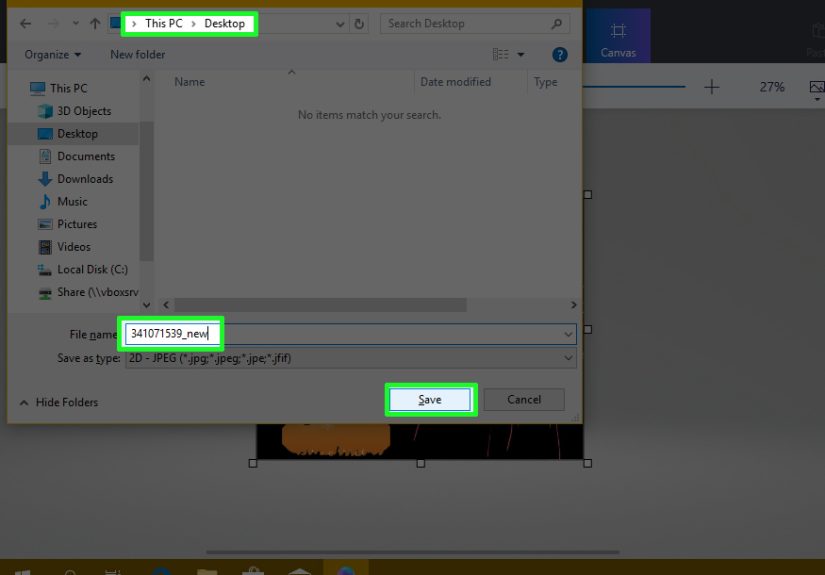
Step 3: Save the subject as a PNG
Once the background is removed, save the file as a PNG. This keeps the transparent areas intact. Name it something obvious like subject-cutout.png so you don’t accidentally overwrite your original image and then stare into the distance for five full minutes.
Step 4: Open the new background image
Now open the image you want to use as the new background. This could be a plain color, a scenic photo, an office setting, a studio backdrop, or any other image that fits your goal.
Step 5: Paste the transparent cutout onto the new background
Copy your PNG cutout and paste it onto the new background in Paint. Resize and reposition it until it looks natural. If the subject appears too large, too small, or suspiciously floating like a confused ghost, adjust the scale and placement until the composition feels believable.
Step 6: Fine-tune with layers if needed
If your Paint version supports layers, use them. Put the background on one layer and the subject on another. This makes adjustments easier and keeps you from accidentally editing the wrong part of the image. Layers are one of those features that make you feel wildly efficient even when you are mostly just nudging a cutout left and right.
Step 7: Save the final image
When you’re happy with the result, save your final composition. Use PNG if you want to preserve quality and flexibility, or JPG if you want a smaller, flat image for web use and the final background is already baked in.
Method 2: How to Do a Green Screen Style Background Change in Older MS Paint
If your version of Paint doesn’t have one-click background removal, you can still create a basic green-screen effect using Transparent Selection. This old-school method is not elegant, but it can absolutely work for simple images.
When this method works best
- The background is a single solid green color
- The subject does not contain that same green color
- The edges are clean and not too detailed
- You’re working with logos, cartoons, simple objects, or basic portraits
Step 1: Open the new background image first
In Paint, open the image that will become your replacement background. This is your destination canvas.
Step 2: Paste the green-screen image into Paint
Use Paste or Paste from to place the original green-background image onto the new background. At first, it may look like a big rectangle with a green box around your subject. That’s normal. Paint is being dramatic, not broken.
Step 3: Set the background color as Color 2
Select Color 2. Then use the color picker to sample the exact green from the image background. In older Paint workflows, right-clicking with the eyedropper typically assigns the sampled color to Color 2. This step is important because Transparent Selection removes the color set as the secondary background color.
Step 4: Turn on Transparent Selection
Click Select and enable Transparent selection. Once it is active, the solid green area should disappear when the image is moved or positioned over the new background.
Step 5: Position the subject
Drag the image into place. The green should no longer cover the new background, leaving only the subject visible. If you still see green, your sampled color may be slightly off. Try sampling again from a cleaner area of the background.
Step 6: Resize and save
Adjust the subject size if needed, then save the finished image. Since this older method is less flexible, save a copy before making major changes.
What If the Background Isn’t Pure Green?
That’s where things get tricky. Transparent Selection in classic Paint only works well when the background is basically one flat color. If the green screen has shadows, gradients, wrinkles, lighting changes, or a bunch of darker and lighter green patches, Paint will only remove the exact sampled color. The rest will hang around like uninvited party guests.
In those cases, the newer Paint with background removal is the better option. It can identify the subject rather than just removing one flat color. If you do not have that version yet, update Paint through the Microsoft Store and check again. A missing feature is often just an outdated app, not a personal betrayal.
How to Make the Final Background Look More Natural
Changing the background is easy enough. Making it look believable is where the real editing begins.
Match the lighting
If your subject is lit from the left and the new background is clearly lit from the right, the composite may look off. Try choosing a background with similar lighting direction and mood.
Match the scale
A tiny person standing in front of a giant coffee mug is only a good idea if you’re making surreal art. Resize the subject so it fits the scene naturally.
Keep perspective in mind
If the original photo was taken straight-on, a new background shot from a dramatic top-down angle may feel strange. Matching perspective makes your edit look more polished.
Use simple backgrounds when possible
Clean walls, blurred office scenes, skies, and soft gradients tend to work better than busy cityscapes or highly detailed interiors. A simpler background hides minor cutout flaws much more effectively.
Common Problems and How to Fix Them
The white box won’t disappear
This usually happens when you pasted an image with transparency into an older Paint workflow, or when Transparent Selection is off. Turn on Transparent Selection and make sure the correct background color is assigned to Color 2. On modern Paint, save and reuse a transparent PNG.
The subject looks jagged
This is usually caused by a low-resolution source image or a difficult selection edge. Start with a sharper image, remove the background again, and avoid enlarging the subject too much after cutting it out.
Paint removed part of the subject
This can happen when the subject color is too similar to the background. Try using a different source image with stronger contrast, or limit the area with a selection before applying Remove Background.
The green color is still visible around the edges
This is known as color spill in more advanced editing workflows. In Paint, your best fix is to use a cleaner source image, crop tighter, or choose a replacement background that hides slight edge problems.
The Remove Background button is missing
You are likely using an older Paint version. Update the app and check whether your Windows 11 Paint build includes the newer image editing features.
Best Use Cases for Changing Backgrounds in MS Paint
MS Paint is especially handy when you need a quick result and don’t want to open a giant design suite just to swap a background and move on with your life.
- Creating a basic profile picture with a clean backdrop
- Making product images for online listings
- Cutting out logos or icons for presentations
- Placing a person onto a simple marketing graphic
- Creating thumbnails, school projects, or blog visuals
- Fixing screenshots, memes, and low-stakes internet art with maximum enthusiasm
MS Paint vs. More Advanced Editors
Paint is excellent for fast, simple background changes. It is built in, easy to learn, and now much more capable than many people expect. But it still has limits. If you need pixel-perfect hair masking, shadow recovery, advanced edge refinement, or professional compositing, you’ll hit Paint’s ceiling eventually.
That said, for everyday editing, quick blog images, ecommerce photos, simple green-screen replacements, and casual design work, Paint is often enough. And honestly, there is something deeply satisfying about getting a decent result from a tool people used to dismiss as a glorified doodle pad.
Real-World Experiences With Changing Backgrounds in MS Paint
One of the most interesting things about changing an image background in MS Paint is how often it starts as a “quick little task” and turns into a mini adventure. Someone opens Paint thinking they’ll swap a green background in two minutes, only to spend the next twenty adjusting edges, moving a cutout one pixel at a time, and quietly judging every background choice they have ever made. That experience is incredibly common, and it says a lot about how people actually use Paint in real life.
For beginners, the first big surprise is usually that modern Paint is far more capable than expected. Many people still think of it as the basic app they used years ago to draw crooked circles and accidentally spray-paint their homework. Then they discover features like background removal, layers, and transparency support, and suddenly Paint feels less like a relic and more like a handy little editing sidekick.
There’s also a practical side to the experience. A lot of users aren’t trying to create magazine covers or blockbuster movie posters. They just want a cleaner headshot, a product image without a messy bedroom in the background, or a quick graphic for a blog post, presentation, or online store. In those moments, Paint feels refreshingly direct. You open it, click a few tools, and get something useful without signing up for an app, paying a subscription, or learning seventeen different panels with names like “feather radius” and “adaptive luminance.”
Of course, not every experience is smooth. Users often run into the same frustrations: white boxes around PNGs, weird halos around hair, background colors that almost disappear but not quite, and pasted objects that suddenly look either ant-sized or hilariously enormous. But those small frustrations are part of what makes Paint approachable. The app encourages trial and error. You test something, undo it, try again, and gradually figure out what works.
Another common experience is discovering that image quality matters more than the tool itself. A sharp photo with a simple backdrop can make Paint look brilliant. A blurry photo with bad lighting can make even a smart feature struggle. This teaches a useful lesson: good editing often starts with a good source image, not just better software.
For content creators, students, bloggers, and small business owners, Paint often becomes the “good enough in the best possible way” tool. It may not do everything, but it does enough to save time, simplify small tasks, and make quick visual changes without a full production workflow. And that, honestly, is why so many people keep coming back to it. MS Paint may never be the king of precision editing, but when you need a quick background swap and a low-drama workflow, it shows up, rolls up its sleeves, and gets the job done.
Final Thoughts
If you want to change an image background in MS Paint, the best method depends on your version of Paint and the image you’re starting with. On modern Windows 11 Paint, use Remove background, save your cutout as a PNG, and place it over a new background. On older Paint versions, use Transparent Selection to remove a solid green background and fake a classic green-screen effect.
The good news is that you do not need expensive software for every background swap. For simple edits, MS Paint can be fast, effective, and surprisingly fun. Just remember the golden rules: start with a clean image, save transparency as PNG, and never trust a suspiciously perfect green shirt in front of a green screen.


