
Table of Contents >> Show >> Hide
- What Counts as the Base of a Deck?
- Step 1: Plan the Deck Before You Build Anything
- Step 2: Mark the Layout and Square It Up
- Step 3: Build the Foundation With Proper Footings
- Step 4: Install Posts and Beams
- Step 5: Install the Ledger Board or Build Freestanding Support
- Step 6: Frame the Joists and Rim Joists
- Step 7: Add Blocking, Bracing, and Stability Details
- Common Mistakes That Ruin a Deck Base
- How To Know the Deck Base Is Ready
- Experience-Based Lessons From Building a Deck Base
- Conclusion
- SEO Tags
If a deck were a movie star, the decking boards would get all the attention. They are the pretty face, the polished smile, the reason neighbors suddenly remember your name. But the base of a deck? That is the unsung bodyguard doing all the hard work behind the scenes. And if the base is weak, crooked, soggy, or slapped together with the confidence of someone assembling furniture at 11:47 p.m., the whole deck will remind you of your choices every time it squeaks, sags, or wobbles.
So, how do you build the base of a deck the right way? You start with a plan, respect gravity, make peace with your tape measure, and build a foundation and frame that can handle weather, weight, and time. In practical terms, the base of a deck includes the footings, posts, beams, ledger or freestanding support, joists, rim joists, and bracing or blocking that create the structure under the surface boards.
This guide walks through the process in clear, real-world terms. No robotic fluff. No mystery jargon. Just the stuff that actually matters when you want a deck that feels solid instead of suspicious.
What Counts as the Base of a Deck?
Before you grab a shovel and a dream, it helps to know what you are actually building. The base of a deck is everything structural that supports the decking surface.
The main parts usually include:
- Footings: Concrete supports that transfer the load into the ground.
- Posts: Vertical members that sit on approved post bases or anchors.
- Beams: Horizontal structural members that support the joists.
- Ledger board: The board that attaches the deck to the house on attached decks.
- Joists: Repeating framing members that support the decking boards.
- Rim joists: Outer framing pieces that tie the joists together.
- Blocking and bracing: Extra structural pieces that reduce twist, sway, and bounce.
Think of it like a dining table. The tabletop may be what people notice, but if the legs are uneven and the base is flimsy, dinner gets exciting for all the wrong reasons.
Step 1: Plan the Deck Before You Build Anything
The best deck bases start on paper, not in panic. Decide whether you are building an attached deck or a freestanding deck. Attached decks rely on a properly installed ledger connected to the home’s structure. Freestanding decks support themselves with their own posts and beams and are often the safer choice when the house wall is tricky, such as brick veneer, stone veneer, stucco, or uncertain older construction.
Next, settle the basics:
- Deck size and shape
- Finished deck height
- Stair location
- Post and beam layout
- Joist direction
- Decking material, since some products require tighter joist spacing
Then comes the less glamorous but absolutely essential part: check local building requirements. Your permit office or building department may have specific rules for frost depth, footing size, beam spans, guard requirements, fasteners, and connector types. Translation: the internet can help you understand the process, but your local code gets the final vote.
Step 2: Mark the Layout and Square It Up
A strong deck base that is out of square is still a headache. Layout matters because every mistake you make here gets passed down the line like a cursed family recipe.
Use batter boards and mason’s line to mark the deck perimeter. Measure carefully, then square the layout using the 3-4-5 method or diagonal measurements. If the diagonals match, the layout is square. If they do not, the deck frame will fight you later, and lumber always wins that argument eventually.
Good layout habits include:
- Double-checking overall dimensions before digging
- Marking footing locations from the framing plan, not by guesswork
- Confirming setbacks and easements if required locally
- Allowing room for stairs, fascia, and trim
This stage is not flashy, but it is where a professional-looking deck begins.
Step 3: Build the Foundation With Proper Footings
If the deck base has a hero, it is the footing. Footings support the weight of the deck and help prevent movement, sinking, and frost heave. A gorgeous frame sitting on bad footings is basically a very expensive lesson.
Most deck bases rely on poured concrete footings or piers, though the exact type depends on local code, climate, soil, and deck design. In colder climates, footings typically must extend below the frost line. In softer or unstable soil, larger or more carefully engineered footings may be required.
Basic footing process:
- Mark footing locations from your layout plan.
- Dig each hole to the required depth and diameter.
- Use forms if needed to shape the above-grade portion.
- Pour concrete and set anchors or post bases as required.
- Let the concrete cure properly before loading it.
Keep wood out of direct soil contact whenever the design calls for approved post bases and connectors. That small detail can do a lot to reduce long-term moisture problems. Water is patient, petty, and undefeated when ignored.
Step 4: Install Posts and Beams
Once your footings are cured, you can move on to posts and beams. This is the part where the deck starts to look less like a geometry exercise and more like a structure.
Posts are typically installed on approved hardware that anchors them to the footing. Beams are then attached to or supported by those posts, depending on the design. The exact post size, beam size, and spacing should come from your deck plan and the applicable span tables.
Key tips for a solid beam-and-post setup:
- Use pressure-treated lumber rated for the application
- Cut posts carefully so the beam sits level
- Check plumb on every post before fastening permanently
- Use approved structural connectors and corrosion-resistant fasteners
- Do not assume “close enough” is a valid engineering strategy
Many DIY builders rush this stage and end up compensating later with shims, trimming, and colorful language. A level beam line makes the rest of the project dramatically easier.
Step 5: Install the Ledger Board or Build Freestanding Support
If the deck is attached to the house, the ledger board becomes one of the most important parts of the base. It has to be fastened to the house structure correctly, not just to siding or trim. It also needs proper flashing to keep water from sneaking behind it and causing rot where you cannot easily see it.
That means this is not the place for improvisation. If your house has brick veneer, stone veneer, certain cladding systems, or questionable framing conditions, a freestanding deck is often the smarter route. It adds another beam line near the house so the deck supports itself rather than depending on the wall connection.
For an attached deck, the ledger should be:
- Fastened to the correct structural member
- Protected with proper flashing and moisture detailing
- Installed with approved structural fasteners
- Paired with compatible, corrosion-resistant hardware
This is one of the most failure-prone parts of deck construction when done poorly. In other words, if there is one stage where you should slow down and get fussy, this is it.
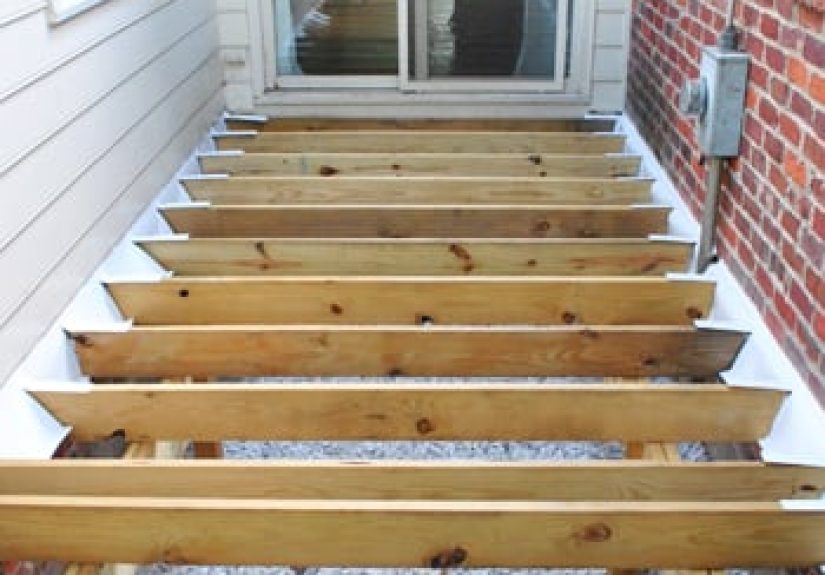
Step 6: Frame the Joists and Rim Joists
With beams and ledger support ready, you can build the framing grid that actually supports the deck boards. Joists run from beam to beam or from ledger to beam, depending on the design. Rim joists tie the ends together and help lock the frame into shape.
Many deck builds use joists spaced 16 inches on center, but spacing depends on the decking product, the framing design, and local requirements. Some deck boards, especially certain composite products or angled installations, need tighter spacing. This is why reading the decking manufacturer’s instructions is not optional, even if the paperwork is about as thrilling as plain oatmeal.
Framing best practices:
- Install joists crown-up for a flatter deck surface over time
- Use joist hangers where required
- Keep the frame square as you go
- Check for level across the tops of joists
- Use proper fasteners for every connector
If you are adding picture framing, heavy planters, an outdoor kitchen, or a hot tub, the base may need extra framing support. The deck surface may look simple, but the structure below it often gets more complicated once you start adding “just one more thing.”
Step 7: Add Blocking, Bracing, and Stability Details
A deck can technically stand up and still feel bad underfoot. That is where blocking and bracing come in. These details reduce twisting, bounce, and lateral movement and help the base feel firm and intentional.
Useful stability upgrades include:
- Mid-span blocking: Helps keep joists aligned and reduces twisting
- Diagonal bracing: Adds rigidity to taller decks
- Lateral connection hardware: May be required on attached decks depending on the design and local code
- Extra framing: Supports stair openings, border boards, and heavy loads
If your future deck is supposed to feel sturdy enough for summer dinners, family traffic, and the occasional guest who insists on testing every railing with suspicious enthusiasm, these details matter.
Common Mistakes That Ruin a Deck Base
Plenty of deck problems begin long before the decking boards go down. Here are the usual suspects:
1. Skipping the permit and plan stage
This is how people discover, much too late, that their footing depth, beam sizing, or stair geometry is wrong.
2. Underbuilding the footings
Too shallow, too small, or poorly placed footings can lead to movement and sagging.
3. Installing a ledger incorrectly
Bad attachment and poor flashing are a recipe for moisture damage and structural trouble.
4. Using the wrong hardware
Deck connectors and fasteners need to be compatible with pressure-treated lumber and outdoor exposure.
5. Ignoring square and level
A frame that starts wrong only gets more wrong as the build continues.
6. Forgetting the final load
Built-in benches, pergolas, stairs, grills, and hot tubs all change what the base needs to support.
How To Know the Deck Base Is Ready
Before you lay a single deck board, pause and inspect the structure. The base should feel boring in the best possible way: straight, level, square, rigid, and drama-free.
Your checklist should include:
- Footings cured and correctly placed
- Posts plumb and securely connected
- Beams level and properly fastened
- Ledger flashed and attached correctly, or freestanding supports installed
- Joists spaced consistently
- Frame square from corner to corner
- Blocking and bracing installed where needed
If all of that checks out, congratulations. You have built the part of the deck that actually earns its keep.
Experience-Based Lessons From Building a Deck Base
Now for the practical side that comes from real-world deck projects: the build never feels hard because of one giant problem. It feels hard because of ten tiny decisions that stack up fast. The first lesson most people learn is that the base takes longer than expected, and that is normal. Digging, measuring, leveling, rechecking, and waiting for concrete to cure do not make for glamorous social media content, but they are what separate a solid deck from a future repair project.
Another big lesson is that layout is everything. If your lines are off by even a little at the start, the error follows you into the footings, then the beams, then the joists, then the decking. Suddenly, you are trimming boards to hide a mistake that began with one lazy measurement. Builders who take the time to square the layout carefully almost always save themselves frustration later.
People also tend to underestimate how important the ground conditions are. Soil that looks firm can behave differently after rain. A slightly sloped yard can create more complexity than expected. Even moving materials around the site becomes part of the job. In real builds, the deck base is often less about carpentry at first and more about problem-solving. You are reading the site, adjusting the plan, and making sure every support point works with the yard instead of fighting it.
There is also a mental shift that happens once beams and joists go in. Up to that point, the project can feel abstract, like you are building invisible homework. But once the frame appears, you can finally see the deck coming together. That is usually when builders either gain confidence or get a healthy reminder that precision matters. A joist that is crowned the wrong way, a beam that is slightly out of level, or a ledger detail that looked “good enough” will suddenly become much more obvious.
And perhaps the biggest experience-driven takeaway is this: rushing the base is never worth it. Nobody walks onto a finished deck and compliments your footings, but they absolutely notice when the deck feels springy, uneven, or shaky. The base is where patience pays off. Careful measuring, code-friendly connections, proper flashing, and solid support do not create instant bragging rights, but they create the kind of deck people trust. In the long run, that matters far more than shaving a few hours off the build.
Conclusion
Building the base of a deck is not the glamorous part of the project, but it is the part that decides whether the whole thing succeeds. A strong deck base starts with a smart plan, accurate layout, proper footings, solid posts and beams, careful ledger or freestanding support, and clean framing with the right hardware. Get those pieces right, and everything above them becomes easier, safer, and longer-lasting.
So yes, the deck boards may get the compliments. Let them enjoy their moment. You will know the truth: the base is the reason the whole deck feels rock-solid instead of like a wooden trampoline with ambition.


