
Table of Contents >> Show >> Hide
- Why Bother Blocking Off Under the Bed?
- Step 1: Measure Your Bed and Check the Floor Type
- Option 1: Use Underbed Storage to Block the Space
- Option 2: Install a Commercial Under-Bed Blocker
- Option 3: DIY Cardboard or Foam Panels
- Option 4: Pool Noodles, Body Pillows, and Soft Blockers
- Option 5: Simple Wood or PVC Frames
- Safety and Design Tips
- Step-by-Step Project Example (with Pictures)
- Extra 500-Word Experience Section: Real-Life Lessons from Blocking Under the Bed
- Lesson 1: Your First Attempt Might Not Be Escape-Proof
- Lesson 2: You’ll Appreciate Easy Access Later
- Lesson 3: Style Matters More Than You Think
- Lesson 4: Pets Need Emotional Support, Not Just Physical Barriers
- Lesson 5: Decluttering Makes the Whole Project Easier
- Lesson 6: Once It’s Done, Everyday Life Gets Easier
If you’ve ever fished a missing sock, a dusty cat toy, or a mysteriously sticky sippy cup out from under the bed, you already know: that space is chaos territory. Whether you’re trying to keep pets out, baby-proof the room, or stop clutter from migrating into the “underbed black hole,” blocking off under the bed is one of the easiest home upgrades you can do.
In this guide, we’ll walk through practical ways to block off under the bed, from budget DIY solutions to ready-made blockers you can buy. We’ll also talk about safety, storage, and a few tricks straight from pet parents and organizers who’ve been there, done that, and vacuumed up the dust bunnies.
Why Bother Blocking Off Under the Bed?
1. Pets Love It a Little Too Much
Cats and small dogs treat under the bed like their private studio apartment. It’s dark, cozy, and conveniently hard for humans to reach. The problem? It’s also dusty, full of cords, and difficult to clean. Vets and cat experts often recommend limiting access if your pet hides when they’re sick or anxious, because it makes monitoring their health and giving meds much harder. Using storage containers or under-bed blockers is a common recommendation to discourage hiding under there while still giving pets safer alternative hideouts like cat caves or covered beds.
2. Kids, Toys, and Baby-Proofing
If you’ve got a crawler or toddler, under the bed is like a tunnel of temptation. Baby-proofing guides emphasize blocking access to dangerous or hard-to-reach zones and keeping small items out of reach. By closing off under-bed access, you reduce the risk of kids going under the bed, bumping their heads, or hoarding questionable “treasures” you’d really rather stay out of their mouths.
3. Dust, Allergies, and Clutter
Under the bed is a dust magnet. Organizing and cleaning experts often warn that textiles stashed loosely under the bed collect dust and can aggravate allergies or asthma. Either you keep that space truly clearor you intentionally fill it with closed storage, leaving no room for loose debris, pets, or random items to accumulate.
4. Better Storage, Better Sleep
Blocking off under the bed doesn’t mean wasting space. Many people use low-profile bins or drawers that both store items neatly and act as a physical barrier. Some stylish underbed baskets with lids or covers are specifically designed to keep dust out and clutter hidden while still looking good if a corner peeks out. So you can protect your sanity, your allergies, and your aestheticall at once.
Step 1: Measure Your Bed and Check the Floor Type
Before you buy or build anything, grab a tape measure. A tiny bit of measuring now will save you from returning bins that don’t fit later.
- Measure the height (clearance): From the floor to the bottom of the bed frame or side rail.
- Measure the length and width: How wide each side is and whether there are legs or supports in the middle that could block storage bins or panels.
- Note your flooring: Carpet, hardwood, laminate, or tile. Some commercial blockers and adhesive bumpers stick better to smooth hard floors than to carpet.
Keep those measurements handy. Every option that follows depends on how much space you’ve got to work with.
Option 1: Use Underbed Storage to Block the Space
One of the easiest ways to block off under the bed is to fill that space intentionally with storage containers or drawers. This is a popular trick for pet owners and organizers alike because it solves two problems at once: storage and access control.
What You’ll Need
- Low-profile storage bins, baskets, or drawers (with lids or zip covers, if possible).
- Optional: bins on wheels for easier access.
- Optional: labels, so you don’t have to guess what’s inside.
How to Do It (Picture 1)
- Plan your “wall” of storage. Sketch or visualize how many containers you need to fully cover the visible sides of the bed. Leave as little gap as possible between bins.
- Slide bins under the bed from the side. Start at the headboard side and work your way toward the foot. Fill the width, then move to the next row if you have extra depth.
- Check for gaps. If your cat or kid can slip through a 3–4 inch opening, so can toys and dust. Use smaller boxes, rolled blankets, or pillows to close any small gaps.
- Label bins. Store off-season clothing, extra bedding, or rarely-used items. Use lids or fabric covers to keep dust off textiles.
Pro tip: For the “with pictures” version, snap a top-down shot of your empty bed frame, then another after you’ve filled the space with bins. Side-by-side before-and-after photos look impressively satisfying in a blog post or home project album.
Option 2: Install a Commercial Under-Bed Blocker
If DIY isn’t your style, there are ready-made under-bed blocker kits designed specifically to keep pets and toys from disappearing underneath furniture. These often use rigid panels, adjustable lengths, and adhesive strips or angled supports to stay in place.
What You’ll Need
- A commercial under-bed blocker kit (check the maximum height and length in the product description).
- Measuring tape (to confirm fit).
- Optional: scissors or a utility knife if the product is cut-to-size.
How to Install It (Picture 2)
- Measure the sides of your bed. Confirm that the kit’s adjustable range matches your bed’s length and clearance.
- Attach any connectors. Some blockers use plastic connectors or zip ties to link multiple panels.
- Position the blocker along the floor. Place it slightly inset from the edge of the bed so you’re less likely to stub your toes when walking by. Many designs angle the panel under the bed to resist pressure from pets or kids.
- Secure as directed. Use the included adhesive strips or brackets according to the instructions. Press firmly along the floor for good adhesion, especially on smooth surfaces.
- Test it. Push gently with your hand or have a friend (or very cooperative cat) try nudging it to make sure it doesn’t shift easily.
Commercial blockers are ideal if you want something that looks neat out of the box, especially in a primary bedroom or guest room where you don’t want obvious DIY panels peeking out.
Option 3: DIY Cardboard or Foam Panels
Cardboard and foam core boards are surprisingly effective for quick, low-cost under-bed blockers. Pet owners often tape foam boards to the bed frame or use cardboard panels along the outside to stop rabbits or cats from sneaking under.
What You’ll Need
- Thick cardboard boxes or foam core boards (poster-board style).
- Utility knife or scissors.
- Painter’s tape, strong packing tape, or removable mounting strips.
- Optional: fabric or contact paper to make it look nicer.
How to Build the Panels (Picture 3)
- Measure the height and length. Each panel should be just slightly taller than the gap from floor to bed frame so it sits snugly.
- Cut panels to size. Use a straightedge for cleaner lines. For long sides, you may need 2–3 panels per side.
- Decorate (optional). Wrap panels in fabric, adhesive vinyl, or pretty paper to match your room’s décor.
- Attach the panels.
- For frames with flat sides, tape the panels directly to the bed frame.
- For metal frames or slats, tape them to the rails or use removable strips.
- Check for chew risks. If you have a pet rabbit or a dedicated cardboard shredder of a cat, foam board with a slick outer surface tends to be harder for them to chew through than plain cardboard.
This method is perfect for renters or anyone who wants something temporary and low-cost. Plus, if you mess up a panel, you’re literally one shipping box away from a do-over.
Option 4: Pool Noodles, Body Pillows, and Soft Blockers
Sometimes you don’t need a solid walljust enough of a barrier that toys, dust bunnies, and pets stop rolling or crawling into the abyss. That’s where softer blockers come in.
Pool Noodles as Gap Fillers
DIY toy and pet blockers often use pool noodles lined along the base of furniture to keep items from sliding underneath. You can cut them to size and wedge them between the bed frame and the floor.
How to Use Pool Noodles (Picture 4)
- Measure the length of each visible side of the bed.
- Cut pool noodles to match. A serrated knife or sharp scissors work well.
- Slide them under the bed edge. If the gap is higher than the noodle, stack two or use a slightly larger “jumbo” noodle.
- Secure if needed. On slippery floors, you can add a strip of non-slip rug tape underneath to keep them from rolling out.
Body Pillows and Bolsters
Long body pillows can also work as soft under-bed blockers. Some cat owners shove body pillows under the sides of the bed to block all but a small “emergency” hiding zone they can still reach. This is perfect if you don’t want to completely remove your pet’s favorite safe spot but want to be able to retrieve them when you need to.
With pictures tip: For this section, photos showing the pool noodles tucked along the baseboard and body pillows wedged under the bed edge make the method immediately clear to visual learners.
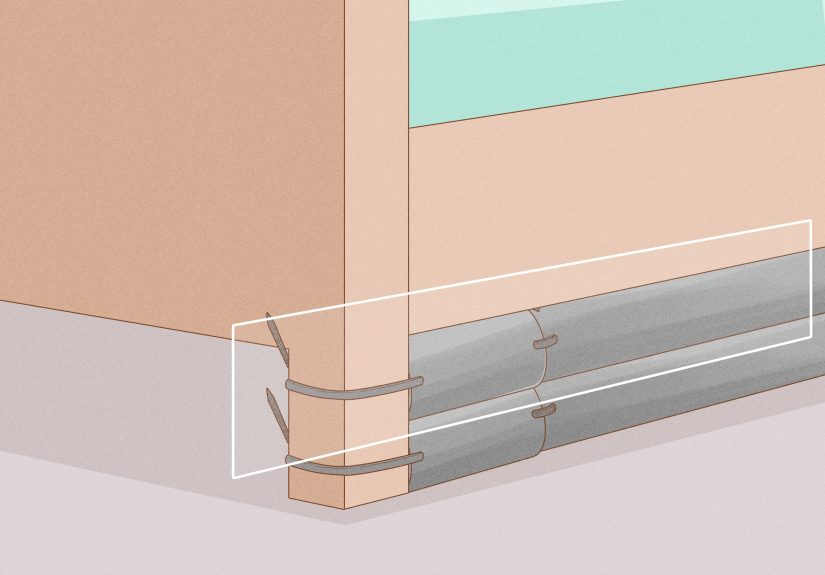
Option 5: Simple Wood or PVC Frames
If you want something more durable but still DIY, you can build a simple low “fence” or frame using wood boards or PVC pipe. Pet DIY guides often suggest wood or PVC panels as long-term blockers for determined animals.
What You’ll Need
- 1×4 or 1×6 wood boards or PVC pipes and fittings.
- Saw (hand saw or miter saw for wood, pipe cutter for PVC).
- Sandpaper (for wood edges).
- Optional: paint to match your furniture, or zip ties/brackets to secure to the bed frame.
How to Build a Simple Wood Panel (Picture 5)
- Cut boards to length. You can run one continuous board along each side of the bed, or use several shorter sections.
- Sand corners and edges. No one wants splinters on the way to the laundry basket.
- Paint or stain (optional). Match your bed frame or baseboards for a built-in look.
- Position the boards. Push them against the bed legs or frame so that they press lightly against the floor and block the gap.
- Secure if needed. Use small brackets, zip ties, or L-brackets screwed to the bed frame (not the floor, if you’re renting) to keep them from shifting.
How to Build a PVC Rail (Picture 6)
- Measure each side of the bed.
- Cut PVC pipes to size. Use corner fittings at the head and foot to create a long rectangular “barrier” frame.
- Assemble and test. Dry-fit the frame under the bed and adjust lengths if needed.
- Glue joints (optional). If you’re happy with the fit and want it permanent, cement the joints.
- Slide into place. The frame should sit snugly under the bed edge so pets can’t slip through.
This option takes a bit more work, but the result can be sturdy, long-lasting, and surprisingly subtle if painted to match your room.
Safety and Design Tips
Give Pets Alternative Safe Spots
If you’re blocking off under the bed primarily for pets, make sure they still have a cozy, secure place to hide and relaxlike a covered cat bed, a crate with a blanket over it, or a small “den” in a quiet corner. Pet behavior experts emphasize that blocking access to a beloved hiding spot without offering alternatives can increase anxiety.
Watch Out for Cords and Outlets
While you’re down there, check for power strips, lamp cords, chargers, and outlets. Baby-proofing and pet-proofing guides consistently recommend securing or hiding cords so kids and animals can’t chew on them or get tangled.
Think About Cleaning
Make sure whatever blocker you choose still allows you to clean periodically. Storage bins on wheels or removable panels make it easy to vacuum or dust under the bed every few months. This is especially important if anyone in the house has allergies or asthma.
Match Your Room Style
If you’re worried about how it looks, lean toward:
- Woven baskets or lidded bins that double as décor.
- Panels wrapped in fabric that matches your curtains or bed skirt.
- Wood boards painted the same color as your baseboards or bed frame.
Step-by-Step Project Example (with Pictures)
Here’s how a complete project might come together in real life. Imagine this as a mini “tutorial with pictures” you could easily photograph:
Step 1: The “Before” Shot
Take a photo of the bed with all the chaos underneathrogue shoes, pet hair, random cables, and that one slipper you thought you lost forever. This is Picture 1.
Step 2: Clear and Clean
Pull everything out, sort items into keep/donate/trash piles, then vacuum thoroughly. Wipe down the floor if it’s hard surface. Take Picture 2 of the clean, empty space under the bed.
Step 3: Install Your Chosen Blocker
For example, say you choose a combo strategy:
- Under-bed bins across both long sides.
- A pool noodle “bumper” along the foot of the bed.
Photograph the storage layout (Picture 3) and the finished, tidy side view of the bed (Picture 4).
Step 4: Add a Bed Skirt (Optional)
Top it all off with a bed skirt to hide everything and create a polished, hotel-style look. Snap Picture 5: the final “after” shot that makes you feel like you just shot a home magazine cover.
And that’s ityou’ve successfully blocked off under the bed, reclaimed lost floor space, and made life easier for your future self.
Extra 500-Word Experience Section: Real-Life Lessons from Blocking Under the Bed
Blocking off under the bed sounds simple on papermeasure, buy or build a barrier, done. In real life, you learn a few things only after you’ve crawled around on the floor, bonked your head on the bed frame twice, and discovered that your cat is more determined than you are. Here are some practical “experience-based” lessons that can help you skip the annoying parts.
Lesson 1: Your First Attempt Might Not Be Escape-Proof
A lot of people start with whatever they have on handcardboard, random bins, maybe an extra comforterand discover that their pet or toddler treats this as a fun puzzle instead of a barrier. Cats, in particular, are excellent at squeezing through tiny gaps or simply flattening themselves to slide under a flimsy blocker.
What works better: think in terms of continuous coverage. Instead of one or two big pieces, use multiple panels or containers that fully cover the length and don’t leave corners open. If there’s even a small triangle-shaped gap near a leg, that’s the exact place your pet will aim for. Adding a small filler piecelike a trimmed foam block or a smaller binoften transforms a “nice idea” into a solid solution.
Lesson 2: You’ll Appreciate Easy Access Later
It’s tempting to over-engineer your blocker and wedge it in so tightly that even you can’t move it. A month later, when you drop your phone charger or want to clean under the bed, you’ll regret building a permanent fortress. Experience says: make at least one side easy to move.
For example, you might:
- Use bins on wheels along one side so you can roll them out for cleaning.
- Create one “hinged” or removable panel held with Velcro or removable mounting strips.
- Leave a small, deliberate access area at the foot of the bed that you can open up if needed.
This kind of flexibility is especially helpful in kids’ rooms, where the furniture layout and storage needs change as they grow.
Lesson 3: Style Matters More Than You Think
In a guest room or main bedroom, you’ll see your blocking solution every day. People who start with bare cardboard or mismatched plastic bins often end up upgrading later to something that looks more intentionallike woven baskets with lids or panels wrapped in fabric. The project feels “finished” when it looks like part of the design instead of a temporary hack.
A simple trick from seasoned organizers: stick to one or two colors and one material type under each bedsay, all white plastic bins, or all rattan baskets with fabric liners. This visual consistency makes the space look calm, even if it’s mostly hidden behind a bed skirt.
Lesson 4: Pets Need Emotional Support, Not Just Physical Barriers
People who block off under the bed to manage anxious pets often learn that simply removing the hiding place isn’t enough. The cat or dog still needs somewhere to feel safe. Many pet owners report that when they add a covered bed, a crate in a quiet corner, or a soft “cave” in the closet, their animals adjust much more quickly to losing under-bed access.
Another common experience: leaving a small, controlled hideaway is sometimes better than a total ban. For example, one side of the bed might be fully blocked with storage bins, while a one-foot section at the foot is intentionally left openbut kept reachable for you and free of cords or hazards. That compromise keeps pets calmer and still lets you intervene when necessary.
Lesson 5: Decluttering Makes the Whole Project Easier
Many people discover that the hardest part isn’t the blocking itselfit’s confronting what’s already living under there. Old paperwork, shoes that don’t fit, electronics, random memorabilia… It’s like a time capsule of procrastination.
The upside is that blocking off under the bed forces you to make decisions. Most experienced organizers recommend using this moment to declutter instead of just shifting everything into bins. If something’s been under the bed for years and you forgot it existed, ask yourself whether it really deserves premium space in your home. A leaner, more intentional set of items makes it easier to store things neatly and keep the under-bed area clean over time.
Lesson 6: Once It’s Done, Everyday Life Gets Easier
After the project, people often notice dozens of small quality-of-life wins:
- No more bending down with a broom handle to fish out toys or socks.
- Less dust in the room, especially near pillows and headboards.
- Fewer nighttime “thunks” when items slide under the bed unnoticed.
- Peace of mind, knowing kids and pets aren’t disappearing into hard-to-reach spaces.
Blocking off under the bed is one of those low-key home improvements you only think about oncebut you feel the benefits every day. It’s the difference between “I’ll deal with that later” and “Nope, nothing gets lost under there anymore.” And that’s a pretty great feeling.


