
Table of Contents >> Show >> Hide
- What Are Basket Reed Woven Stars?
- Why Basket Reed Is Ideal for Woven Stars
- Materials and Tools You’ll Need
- Step-by-Step: How to Weave a Simple Reed Star
- Creative Design Ideas for Reed Woven Stars
- Cultural Roots: A Blend of Traditions
- Buying vs. Making: Which Is Right for You?
- Care and Storage Tips for Reed Woven Stars
- Experiences and Lessons from Making Basket Reed Woven Stars
If you love the look of woven baskets and the magic of twinkling stars, handmade basket reed woven
stars are basically your dream décor mashed into one object. They’re light, sculptural, and
surprisingly sturdy like tiny star-shaped baskets that decided to become wall art, ornaments, or
statement pieces on your holiday table. Whether you’re a seasoned basket weaver or just someone who
can reliably find the scissors, reed stars are a fun way to experiment with weaving in a smaller,
more forgiving format.
In this guide, you’ll learn what basket reed woven stars are, why makers are obsessed with them,
which materials you’ll need, and how to weave a simple star step by step. We’ll also talk about
design variations, styling ideas, and practical tips from real-life crafters. At the end, you’ll
find a longer section of “experience-based” tips and stories to help you avoid common mistakes and
get inspired for your own projects.
What Are Basket Reed Woven Stars?
Basket reed woven stars are decorative stars made from basket-weaving reed typically flat or round
rattan strips that are soaked, bent, and woven into layered star shapes. Think of them as a cross
between traditional Scandinavian woven stars and classic American basketry. Many makers draw
inspiration from Native American basket designs and Nordic ornaments, combining geometric layouts
with warm, natural materials.
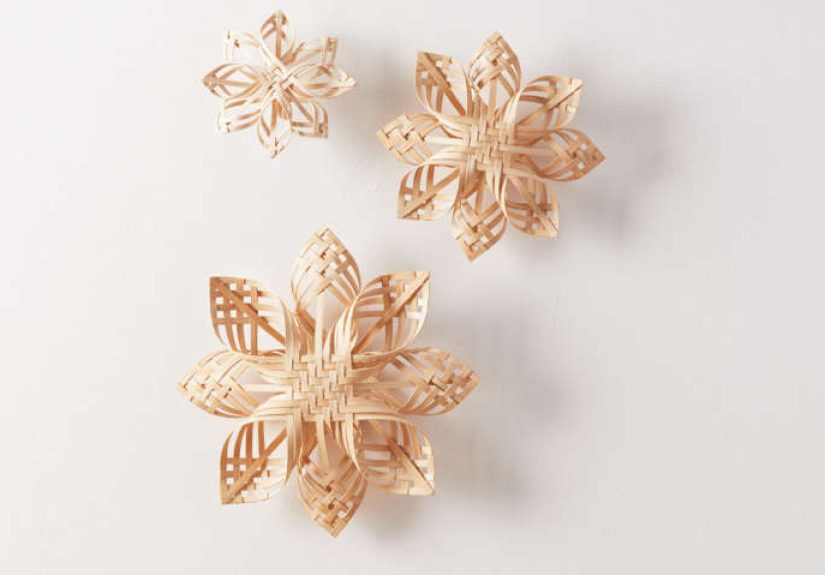
Retailers and artisans often sell these as handmade décor pieces in several sizes. A common lineup
includes small stars around 5–6 inches in diameter, medium stars around 8 inches, large stars around
11 inches, and extra-large stars around 14–16 inches that can work as tree toppers or dramatic wall
art. The structure is usually double-sided, so the star looks finished from any angle useful if
you’re hanging it in a window or from the ceiling.
Because they’re made from reed, these stars are very lightweight but still durable. You can dye the
reed for subtle color accents or stick with natural tones for a minimalist, Scandinavian-inspired
look. Add a simple hanger, and you’ve got an ornament; cluster several together and you’ve got an
instant focal point for a mantel, entryway, or holiday tablescape.
Why Basket Reed Is Ideal for Woven Stars
Basket reed (often rattan) is a favorite material of basket makers for good reasons:
- Flexible when wet, firm when dry. Soaking reed briefly in warm water makes it bendable. Once the star dries, it holds its crisp, sharp shape.
- Lightweight but strong. A 16-inch reed star can hang from a single nail or even tape on a window, yet it doesn’t feel flimsy.
- Easy to dye or leave natural. You can use natural reed for a neutral look or incorporate dyed reed for pattern and contrast.
- Widely available. Basket-weaving suppliers and online shops sell coils of flat and round reed in various widths, often marketed specifically for baskets, ornaments, and small craft projects.
For woven stars, flat reed in narrow widths (around 3/16″ to 1/4″) is common. It’s wide enough to be
visible and sturdy, but slim enough to fold and weave around tight corners without cracking.
Materials and Tools You’ll Need
You don’t need a professional studio or a giant workbench to make reed stars. A kitchen table, a
towel, and a shallow pan of water will do just fine. Here’s a typical supply list:
Basic Materials
- Flat basket reed (about 3/16″–1/4″ wide), natural or dyed.
- Warm water for soaking the reed and making it pliable.
- Wood glue (optional but helpful for securing ends).
- String, twine, or ribbon if you want a hanging loop.
Tools
- Basket shears or sharp scissors for cutting reed cleanly.
- Ruler or tape measure to keep strip lengths consistent.
- Clothespins or small clips to hold layers together while you work.
- Pencil for marking lengths if needed.
- Shallow pan or tub to soak reed coils or pre-cut strips.
Once you have the basics on hand, you can make multiple stars from the same coil of reed. Many
weavers batch their projects cutting enough strips for five or six stars at once because the
setup and soaking time is the same.
Step-by-Step: How to Weave a Simple Reed Star
There are many versions of reed stars, from ultra-simple to “I definitely need a class for this.”
Below is a beginner-friendly method that echoes the feel of traditional woven star ornaments but is
adapted for basket reed.
1. Prep and Soak Your Reed
-
Cut your strips. For a small to medium star, cut 8 strips of flat reed, each about
16–18 inches long. The longer the strips, the larger your finished star. -
Soak. Place the strips in warm water for about 5–10 minutes until flexible. You
want them bendable, not mushy. If they start to feel too soft or fuzzy, shorten the soaking time
for the next batch. -
Pat dry. Lay the strips on a towel and gently pat away excess water before
weaving. Slightly damp reed is easier to control than dripping wet reed.
2. Lay Out the Star Core
-
Create a plus sign. Lay two strips across each other in a “+” shape, with the
center overlapping. -
Add the diagonals. Place two more strips diagonally to make an “X.” Adjust until
all strip centers meet in the middle, forming an 8-spoke wheel. -
Weave the center. Working around the center, alternate over-under with each new
strip to lock the middle into a tight woven square. You should end up with a solid hub and eight
strips radiating out like spokes.
3. Shape the Points
-
Fold a point. Choose one spoke. Fold it forward, then to the side, creating a
loop that will become one arm of the star. Think of it as forming a triangle or elongated V
shape. -
Tuck and weave. Wrap the strip over the next spoke and tuck it under the central
weaving or under itself to secure. Use clothespins to hold the new point in place if needed. -
Repeat around the star. Work your way around, folding each spoke into a point and
tucking it into the weaving. You should see a symmetrical star emerging as you go.
4. Secure and Finish
-
Trim excess. Once all points are formed and tucked, trim any reed tails on the
back so they sit neatly inside the weave. -
Optional glue. Add tiny dabs of wood glue on the underside where the strips
overlap if you want extra security, especially for stars that will be handled or shipped. -
Add a hanger. Tie a loop of twine or ribbon to one point or through the center.
For a tree topper, you can attach the star to a cone or coil of wire at the back. -
Dry completely. Lay the star flat on a towel and let it dry fully. As it dries,
it will stiffen and keep its crisp, architectural lines.
Once you feel comfortable with this simple star, you can level up to more complex patterns: double
layers, 3D “snowflake” variations, or stars that use twisted or wrapped reed for more texture.
Creative Design Ideas for Reed Woven Stars
One of the best parts of making reed stars is experimenting with color, size, and placement. Here
are a few ideas to spark creativity:
-
Scandinavian minimalism. Use all-natural reed with clean, even points. Hang a
cluster of stars in different sizes on a white wall or in a window for a calm, wintery feel. -
Subtle color accents. Pair natural reed with a few dyed strips in deep red,
forest green, or indigo. The color can highlight every other point or just the center square. -
Tree toppers and wall art. Larger stars (14–16 inches wide) make beautiful tree
toppers or flat wall pieces. Because they’re so light, you can hang them with a single nail or
command hook. -
Table centerpieces. Lay a medium star flat on the table and place a jar candle or
small vase in the middle. Instant centerpiece, no floral design degree required. -
Gift toppers. Tiny stars (3–4 inches wide) can be tied on top of gift boxes as a
reusable ornament instead of a disposable bow. -
Mixed-material clusters. Combine reed stars with paper, fabric, or straw stars
for a collected, layered look on a mantel or garland.
Cultural Roots: A Blend of Traditions
The charm of basket reed woven stars is partly visual and partly cultural. These pieces often sit at
the intersection of several traditions:
-
Scandinavian and Danish ornament traditions. Woven stars and hearts have long
been part of Nordic holiday décor, originally created with paper, straw, or fabric. Reed versions
borrow the same folded and woven geometry and translate it into a more durable, sculptural form. -
Basket weaving heritage. Star-shaped bases, hexagonal patterns, and radiating
spokes show up in many basket designs. Turning these layouts into stand-alone stars celebrates
the craft of basketry in a smaller, decorative piece. -
Modern American craft culture. Today, reed stars have become popular with
makers’ markets, online shops, and design-forward retailers that highlight handmade, natural
materials. They fit seamlessly into rustic, farmhouse, minimalist, and boho interiors.
When you make or buy a reed star, you’re not just hanging a pretty shape you’re carrying bits of
design language that span continents and generations, reinterpreted in a way that fits contemporary
homes.
Buying vs. Making: Which Is Right for You?
You can absolutely support artisans who specialize in reed stars, or you can dive into the DIY
process yourself. Both options have their perks.
If You Buy Handmade Stars
Purchasing a handmade star from a maker or curated retailer is ideal if:
- You want a high-quality piece right away, with perfect points and balanced proportions.
- You prefer to support small businesses, artists, or traditional craftspeople.
- You don’t have space or time for soaking reed and setting up a mini workshop on your dining table.
Many sellers offer sets of stars in graduated sizes, which makes styling much easier. You can also
find unique variations such as dyed patterns, layered stars, and extra-large statement pieces.
If You Make Your Own Reed Stars
DIY is the way to go if:
- You enjoy working with your hands and find repetitive crafts relaxing.
- You like customizing color, size, and pattern or experimenting until you find your favorite look.
- You want enough stars to decorate a tree, a mantel, and half the neighborhood without blowing the budget.
One coil of reed and a free afternoon can yield a surprising number of stars. The first one may look
a little “abstract,” but your hands quickly learn the motions. By star three or four, you’ll be
folding points and tucking ends like you’ve been doing it for years.
Care and Storage Tips for Reed Woven Stars
Handmade reed stars are sturdy but not indestructible. A little care will keep them looking crisp and
beautiful season after season.
-
Keep them dry. Reed doesn’t love humidity. Avoid hanging stars in damp bathrooms
or directly over a constantly boiling kettle. If a star does get slightly damp, lay it flat and
let it air-dry completely. -
Avoid direct, harsh sunlight. Natural reed will mellow and slightly darken over
time. A bit of patina is beautiful; long-term intense sunlight, however, can cause uneven
discoloration and brittleness. -
Dust gently. Use a soft brush, microfiber cloth, or a gentle puff of compressed
air to remove dust. Don’t scrub with a wet cloth that can distort the shape. -
Store flat. When the season is over, wrap stars in tissue or kraft paper and store
them flat in a box. Avoid heavy objects on top. Label the box so you remember where your little
“reed constellation” lives.
Experiences and Lessons from Making Basket Reed Woven Stars
The technical instructions tell you how to make a reed star. Experience is what tells you what to do
when things start to go sideways and they will, at least a little, while you’re learning. Here are
some practical, real-world observations that many makers eventually discover.
Your First Star Will Probably Be Weird (That’s Normal)
The first time you weave a star, expect at least one lopsided point and one strip that insists on
popping out of place. That doesn’t mean you’re bad at this. It just means your fingers haven’t
memorized the pattern yet. Most people find that the second and third stars look dramatically
better, even if they’re using the exact same materials and instructions.
A helpful mindset: treat the first star as a practice piece. Label it “Prototype No. 1” and tuck it
somewhere you can see your progress later. By the time you’ve made several, you’ll look back and
laugh at how far you’ve come.
Soaking Time Is Everything
One of the biggest learning curves is figuring out how long to soak the reed. Too dry, and the strips
crack when you bend them into tight points. Too wet, and they stretch or feel mushy, making your star
look tired instead of crisp.
A good rule of thumb is to soak a small batch of strips for a short time, test one, and adjust. If a
strip bends easily around your finger without splitting, you’re in the sweet spot. If it fights you or
creaks when you fold it, it needs a little more time. Once you find your ideal soaking time, write it
down somewhere future you will be grateful.
Clothespins Are Secret Heroes
In theory, you can weave a reed star using only your hands. In practice, clothespins or small clips
make the process much less stressful. Pinning each new point in place while you work around the star
keeps everything aligned and frees your hands to focus on the next fold instead of babysitting the
last one.
If you’re crafting with kids or beginners, clips are especially helpful. They turn the process into a
slower, more deliberate rhythm fold, clip, tuck, repeat rather than a frantic race to stop the
entire star from unraveling.
Color Experiments Can Surprise You
Many people start with all-natural reed stars and then decide to try a bit of color. Sometimes that
means using pre-dyed reed for every other spoke; other times it’s dipping just the tips of each point
in a dye bath for an ombré effect.
The interesting part is that color behaves differently on reed than on fabric or paper. Stains and
dyes tend to highlight the texture of the fiber, giving stars a subtle striped or woodgrain effect.
If you like clean, graphic lines, you might choose deeply dyed reed. If you prefer a softer,
organic look, stick with lighter or uneven washes that let the natural material show through.
Reed Stars Make Surprisingly Memorable Gifts
People tend to remember handmade gifts that are both beautiful and clearly crafted with care and
reed stars check both boxes. They’re unusual enough that most recipients haven’t seen them before,
yet not so fragile that they’re afraid to actually use them.
Many makers like to give stars as part of a “use it now, keep it later” gift: tied on top of a box of
cookies, attached to a bottle of wine, or slipped into a holiday card as a bonus ornament. Years
later, they’ll pull the star from their décor box and remember who made it for them.
Group Projects Create Instant Atmosphere
Hosting a craft night or workshop built around reed stars is a fun way to make memories along with
décor. Lay out pre-cut strips, clips, glue, and a few finished samples. Put on your favorite playlist,
and encourage everyone to try at least one star, even if they “aren’t crafty.”
The room usually gets very quiet when people focus on the over-under rhythm in a good way. It’s a
type of moving meditation, with just enough challenge to keep your brain engaged but not so much that
you can’t chat between steps. At the end of the evening, each person walks away with a star (or
several) and the satisfaction of having made something with their own hands.
Imperfections Are Part of the Charm
Handmade basket reed woven stars are not machine-cut, laser-perfect objects. A point might be slightly
shorter than its neighbor; a strip might show a natural knot or color variation. Instead of trying to
fight these quirks, many makers embrace them as proof that the star has a story and a human behind
it.
Whether you’re buying from an artisan or weaving your own, those small irregularities are what make
each star unique. Display them with pride. Your home doesn’t need perfect stars; it needs meaningful
ones.
In the end, handmade basket reed woven stars are more than decorative shapes. They’re little reminders
that simple materials, patient hands, and a few quiet hours can turn into something beautiful, season
after season.


