Table of Contents >> Show >> Hide
- Table of Contents
- What Is Cream Fondant Candy?
- Tools You’ll Want
- Ingredients (and What They Actually Do)
- Cream Fondant Candy Recipe (Cooked, Creamy Centers)
- Chocolate Dipping + Finishing Ideas
- Flavor Variations (So You Don’t Eat the Whole Batch “for testing”)
- Troubleshooting: Grainy, Too Soft, Too Stiff
- Storage + Make-Ahead Tips
- FAQ
- Real-World Experiences (The Fun, the Oops, the Wins)
- Conclusion
Cream fondant candy is basically what happens when sugar decides to stop being chaotic and become silky, dreamy, and
dangerously snackable. It’s the classic “melt-in-your-mouth” center you find inside chocolate-dipped creams, cherry
cordials, peppermint patties, and a lot of holiday candy tins that mysteriously empty themselves overnight.
In this guide, you’ll get a reliable cream fondant candy recipe (the cooked kind that tastes like a real candy shop),
plus the “why it works” science, troubleshooting, flavor ideas, and chocolate-dipping tipsso your fondant turns out
smooth instead of gritty, and creamy instead of “tiny sugar rocks wearing a disguise.”
Table of Contents
- What Is Cream Fondant Candy?
- Tools You’ll Want
- Ingredients (and What They Actually Do)
- Cream Fondant Candy Recipe (Cooked, Creamy Centers)
- Chocolate Dipping + Finishing Ideas
- Flavor Variations (Vanilla, Peppermint, Maple, Citrus, More)
- Troubleshooting: Grainy, Too Soft, Too Stiff
- Storage + Make-Ahead Tips
- FAQ
- Real-World Experiences (The Fun, the Oops, the Wins)
What Is Cream Fondant Candy?
Candy “fondant” is not the same thing as rolled fondant you’d put on a cake. Candy fondant is a cooked sugar syrup
that’s cooled, then beaten until it turns opaque and creamy. The goal is to create tiny, uniform sugar crystals
suspended in a supersaturated syrupso it tastes smooth instead of sandy.
Cream fondant adds dairy (milk and/or cream) and butter for a richer flavor and softer bite. Once you have the base,
you can flavor it, shape it into centers, and dip it in chocolate. It’s the choose-your-own-adventure of homemade candy.
Safety note (because hot sugar is clingy)
Boiling sugar syrup is extremely hot and sticky. It can cause serious burns if splashed. Use a deep pot, keep kids and pets
out of the “sugar splash zone,” and avoid multitasking like you’re starring in a cooking show with commercial breaks.
Tools You’ll Want
- Heavy-bottomed saucepan (3–4 quarts): deep sides help prevent boil-overs.
- Candy thermometer: the easiest way to hit the soft-ball stage.
- Pastry brush + warm water: for brushing down sugar crystals on the pan walls.
- Silicone spatula or wooden spoon: gentle stirring only at the beginning.
- Stand mixer (optional but helpful): beating fondant by hand is a workout.
- Sheet pan + parchment: for resting centers, drying, and dipping.
- Chocolate dipping tools (optional): fork, dipping tool, or just a regular fork and confidence.
Ingredients (and What They Actually Do)
- Granulated sugar: the main eventprovides structure and sweetness.
- Heavy cream + whole milk: boosts flavor and gives that “cream candy” richness.
- Butter: adds smoothness and helps mellow the sweetness.
- Light corn syrup: helps control crystallization so fondant stays silky.
- Cream of tartar (or lemon juice): adds a little acidity to reduce graininess by partially inverting sugar.
- Salt: tiny amount, huge differencekeeps the flavor from tasting flat.
- Flavoring: vanilla, peppermint, almond, citrus oils, espresso powderyour call.
If you’ve ever wondered why candy recipes say “don’t stir” like it’s a haunted-house warning: once syrup boils,
agitation can encourage large crystals to form. Large crystals = gritty texture. Small crystals = creamy bliss.
Cream Fondant Candy Recipe (Cooked, Creamy Centers)
This recipe makes a generous batch for dipping and gifting. If you’re new to cooked fondant, read the steps once before starting.
Candy rewards preparationand punishes improvisation. (It’s basically a delicious chemistry lab.)
Yield
About 2 to 2 1/2 pounds fondant (roughly 60–90 small centers depending on size).
Ingredients
- 4 cups granulated sugar
- 3/4 cup heavy cream
- 3/4 cup whole milk
- 3 tablespoons unsalted butter
- 1/3 cup light corn syrup
- 1/4 teaspoon cream of tartar
- 1/4 teaspoon fine salt
- 1 1/2 teaspoons vanilla extract (or other flavoring; see variations)
- Optional: 3/4 cup chopped toasted nuts, coconut, or crushed peppermint
Step-by-step Instructions
-
Prep your setup.
Line a sheet pan with parchment. Measure flavorings and add-ins ahead of time. Fill a small cup with warm water and keep
a pastry brush nearby for the pan sides. Clip your thermometer to the pot so the tip sits in syrup, not touching the bottom. -
Combine and dissolve.
In a heavy saucepan, add sugar, cream, milk, butter, corn syrup, cream of tartar, and salt. Warm over medium heat,
stirring gently just until the sugar dissolves and the mixture looks uniform. Once it starts to simmer seriously,
stop stirring. -
Brush down the sides.
If you see sugar crystals clinging to the inner walls of the pot, dip your pastry brush in warm water and brush them down.
Crystals on the sides can seed graininess later. -
Boil to soft-ball stage.
Let the syrup boil steadily (no stirring) until it reaches 236–238°F on a candy thermometer.
Want firmer centers? Go closer to 239–240°F. Remove from heat immediately when you hit your target. -
Pour and cooldon’t disturb.
Pour the hot syrup onto a clean, lightly buttered sheet pan or a shallow heat-safe dish. Important: don’t scrape
the potscraping can drag in crystals. Let it cool undisturbed until it’s lukewarm, about 110–120°F, or until
the pan feels warm but not hot. -
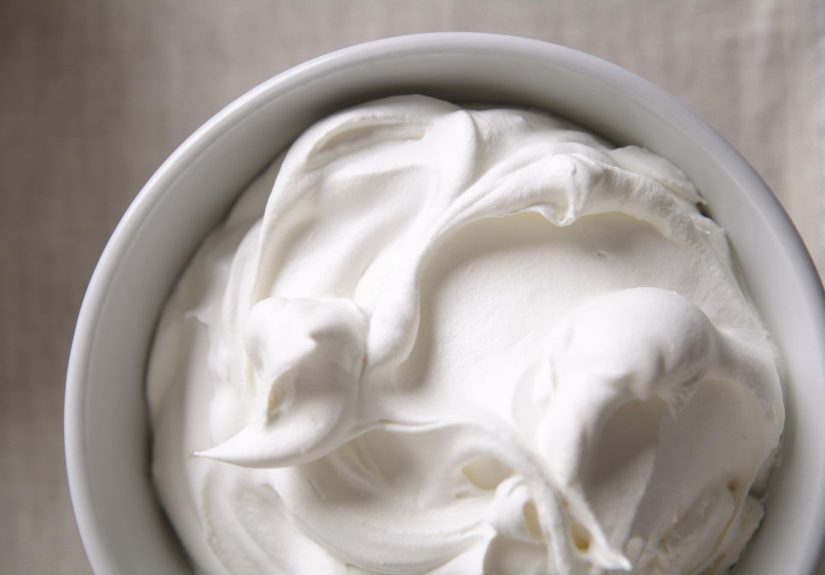
Beat until creamy.
Transfer the syrup to a stand mixer bowl (or work it by hand with a sturdy spatula). Beat on low to medium speed.
At first it will look glossy and translucent. Then it will turn paler, thicker, and eventually become opaque and creamy.
This can take 6–12 minutes in a mixer, longer by hand. When it holds its shape and looks like soft dough or thick frosting,
you’re there. -
Add flavoring and mix-ins.
Mix in vanilla (or other flavoring). Fold in nuts or crunchy add-ins if using. If your fondant stiffens quickly,
knead by hand to distribute evenly. -
Rest for best texture.
Wrap fondant tightly in plastic wrap and let it rest at room temperature for a few hours (or overnight). This mellowing time
helps the texture become smoother and easier to shape. -
Shape into centers.
Scoop and roll into 1-inch balls (or press into small molds). Place on parchment. If fondant is sticky, dust your hands lightly
with powdered sugar. If it’s too stiff, knead briefly to warm it up.
Quick texture check
Perfect cream fondant for dipping should feel like firm cookie dough: pliable, smooth, and not crumbly. If yours feels like dry clay,
it needs a tiny bit of moisture and kneading. If it oozes like frosting, it likely cooked a touch low or needs resting time.
Chocolate Dipping + Finishing Ideas
Fondant centers are delicious on their own, but dipping them in chocolate is where they become “gift tin worthy.”
You have two main approaches:
Option A: Dip in tempered chocolate (best snap, best shine)
- Use couverture or good-quality chocolate bars (chips work, but many contain stabilizers that affect texture).
- Temper if you want a glossy finish and a clean “snap.”
- Dip centers with a fork, tap off excess, and slide onto parchment.
Option B: Dip in melted chocolate + a little fat (easiest)
- Melt chocolate gently (microwave in short bursts or use a double boiler).
- For smoother coating, you can stir in a tiny amount of coconut oil or cocoa butter.
- Chill briefly to set, but don’t leave candies uncovered in the fridge for days (condensation can cause spotting).
Finishing touches
- Classic: sprinkle flaky salt on dark chocolate-dipped vanilla fondant.
- Holiday: crushed peppermint over semi-sweet chocolate.
- Fancy: drizzle white chocolate in thin stripes.
- Retro: press a pecan half on top before the coating sets.
Flavor Variations (So You Don’t Eat the Whole Batch “for testing”)
Once you have the base, you can split the fondant into smaller bowls and flavor each one differently.
Aim for extracts and oils designed for candy when possiblestrong flavor, minimal added liquid.
1) Vanilla Bean “Cream Shop”
- Add 1 1/2 tsp vanilla extract plus 1/2 tsp vanilla bean paste.
- Dip in dark chocolate and finish with a pinch of salt.
2) Peppermint Patty Vibes
- Use peppermint extract sparingly (start with 1/4 tsp, then adjust).
- Flatten centers into discs before dipping.
3) Maple Cream (Cozy and a little dangerous)
- Use maple extract or a small amount of maple syrup (go easytoo much liquid can soften fondant).
- Pair with milk chocolate or dark chocolate.
4) Citrus Cream (Lemon, Orange, or Lime)
- Add finely grated zest (microplane) plus a drop or two of citrus oil.
- White chocolate coating works beautifully here.
5) Coffee or Mocha
- Dissolve 1–2 tsp instant espresso powder in 1 tsp warm cream; add gradually while kneading.
- Finish with dark chocolate and a dusting of cocoa.
Troubleshooting: Grainy, Too Soft, Too Stiff
Problem: Fondant is grainy or “sandy”
Common causes: stirring during the boil, sugar crystals on the pan walls, scraping the pot, or beating too early while it’s still hot.
Fix: You can often rescue it by re-melting with a little liquid. Put the fondant back in a saucepan with
2–4 tablespoons milk or water, warm gently until dissolved, then re-cook to target temperature and cool/beat again.
Problem: Fondant never turns creamy when beating
If it stays glossy and slack, it may be slightly undercooked (not enough concentration), or you started beating while it was too warm.
Fix: Let it cool a bit more, then beat again. If it still won’t thicken, re-cook to 236–238°F and try again.
Problem: Fondant is too stiff to knead or shape
That can happen if it cooked a bit higher, or if it’s been stored and dried slightly.
Fix: Knead it with warm hands. If needed, add a teaspoon of warm cream or water at a time (tiny amounts!) until pliable.
You can also cover it with a damp towel for 10–15 minutes, then knead.
Problem: Fondant is too soft or sticky
Usually: cooked a little low, or added too much liquid flavoring.
Fix: Let it rest (it often firms up). If needed, knead in a small amount of powdered sugar, but don’t overdo it
or you’ll dull the flavor and change the texture.
Storage + Make-Ahead Tips
- Fondant base: Wrap airtight and store in a cool place for up to 1–2 weeks. For longer storage, freeze well-wrapped.
- Shaped centers: Store airtight at cool room temp for several days before dipping, or freeze for later dipping.
- Chocolate-dipped candies: Keep in an airtight container in a cool, dry place. If you refrigerate, protect from condensation
(airtight container, let come to room temp before opening).
Because candy fondant is high in sugar and low in available water, it’s generally not a “quick spoilage” foodbut dairy-based candies
can still pick up off-flavors and moisture if stored poorly. Keep them sealed, cool, and away from humidity (aka: not next to the kettle).
FAQ
Do I need a thermometer?
It’s strongly recommended. You can use the cold-water soft-ball test, but a thermometer removes guesswork and makes repeatable results.
If candy is your new hobby, a thermometer pays for itself fast (in saved sugar and sanity).
Why can’t I stir after it boils?
Stirring can encourage larger crystals to form. The goal is controlled crystallization later during beating, when the syrup has cooled and is
ready to form tiny, uniform crystals.
Can I make this without corn syrup?
Corn syrup helps inhibit crystallization. You can experiment with other invert sugars (like glucose syrup or invert sugar), but results vary.
If you remove it entirely, you may increase the odds of grainy fondantespecially on humid days or with less experienced technique.
Can I turn this into liquid-center chocolates?
Yescandy makers often use enzymes like invertase in certain fondant centers so they slowly liquefy over time. That’s a more advanced method
(and a different formula), but it’s absolutely doable if you want to level up after you nail the basic cream fondant.
Real-World Experiences (The Fun, the Oops, the Wins)
If you’ve never made cream fondant candy before, here’s what the experience is usually likebased on common home candy-maker outcomes,
the kind people talk about after they’ve licked the spoon, washed the pot, and promised themselves they won’t “just taste one more.”
First: the boil feels calm until it suddenly doesn’t. As the syrup heats, it looks like sweetened cream and behaves politely.
Then it hits a true boil and starts rising like it’s trying to escape. This is normal; it’s also why a deep pot matters. Most beginners learn
the “use a bigger pot than you think” lesson onceand then never again.
Next: you’ll notice candy-making has a weird emotional curve. At around 230°F you may think, “This is taking forever.”
Then you blink and it shoots upward, and suddenly you’re hovering like a hawk at 235°F. That last stretch is where people either nail it or
overshoot while answering a text. (Pro tip: sugar does not care about your notifications.)
The cooling phase is where impatience tries to negotiate. A lot of folks assume, “If I beat it sooner, it’ll finish sooner.”
Unfortunately, beating too early (while it’s still hot) often encourages graininess. The best candy makers develop a superpower:
the ability to leave it alone. Cooling undisturbed feels boring, but it’s the part that helps your later beating create
fine crystals instead of crunchy regret.
Then comes the moment of truth: beating. At first, the syrup looks glossy and stubborn, like it’s not interested in becoming fondant.
People often think they’ve ruined it at this stage. And thenalmost dramaticallyit starts to turn cloudy, thicken, and go from “shiny pudding”
to “soft dough.” The transformation is satisfying enough that it should come with a tiny applause track.
Flavoring is where most “happy accidents” happen. Vanilla is forgiving. Peppermint is powerfulmany first-timers add too much and end up with
candies that taste like they could clear a stuffy nose from three rooms away. Citrus oils can be amazing, but they’re intense, so most people find
that a drop or two is plenty. If you use regular juice for flavor, you’ll usually notice the fondant softeningbecause extra water changes texture.
That’s when candy oils and concentrated extracts become your best friend.
Finally, dipping. The first few pieces often look a little messy. Chocolate can get too thick, centers can slip off forks, and your parchment can
look like a modern art project titled “Gravity, But Make It Candy.” Most home candy makers find a rhythm by the fifth dip: tap off excess,
scrape the bottom lightly, slide it onto parchment, and move on. By the time you finish the tray, you’ll have a mix of “gift-worthy” and “chef’s snack”
piecesand that is completely normal and honestly the correct outcome.
The biggest win people report? Once you master the base, you stop needing “a recipe” every time. Cream fondant becomes a flexible technique:
you can make peppermint creams for December, citrus creams for spring, coffee creams for grown-up gifts, and nutty chocolate-dipped centers any time
you want your kitchen to smell like a candy shop. The second biggest win? Realizing you can make small batches on purpose…
although your friends may try to vote against that.
Conclusion
Cream fondant candy is the perfect blend of old-school technique and modern kitchen practicality: a simple ingredient list, a little temperature control,
and a surprisingly satisfying “beat it until it turns creamy” transformation. Once you’ve got the base, you can make endless variationsvanilla, peppermint,
maple, mochaand dip them in chocolate for candies that taste like they came from a fancy box with a ribbon.
If your first batch isn’t flawless, you’re in excellent company. Candy is chemistry, and chemistry is learnable. Nail the temperature, respect the cooling time,
and you’ll be turning out smooth, creamy fondant centers that disappear faster than you can say, “These are for gifting.”