
Table of Contents >> Show >> Hide
- Why a Shower Curtain Works So Well for DIY Pillows
- What You Need Before You Start
- How to Choose the Right Shower Curtain
- The Best Pillow Styles for This Project
- Step-by-Step: How to Make DIY Pillows From a Shower Curtain
- Easy Ways to Make the Pillows Look More Expensive
- Creative Design Ideas for Shower Curtain Pillows
- Common Mistakes to Avoid
- Is This Project Worth It?
- Experiences and Lessons Learned From Making DIY Pillows From a Shower Curtain
- Conclusion
If you have ever stared at a shower curtain and thought, “That pattern is way too cute to spend its whole life getting splashed by shampoo,” congratulations: you already think like a smart DIY decorator. Turning a shower curtain into throw pillows is one of those home projects that feels suspiciously clever. It is budget-friendly, beginner-friendly, and surprisingly stylish when done right. Better yet, it is a fantastic way to create custom pillow covers without buying pricey designer fabric by the yard.
In other words, this is not just a craft. It is a decorating hack with main-character energy.
A fabric shower curtain often gives you a generous amount of material, which means you can make multiple pillows from a single purchase. That is especially helpful when you want a coordinated look on a sofa, bench, porch swing, bed, or reading nook. Instead of hunting down matching covers and paying separately for each one, you can cut, sew, stuff, and style your own. The result feels custom because it is custom. Fancy that.
Why a Shower Curtain Works So Well for DIY Pillows
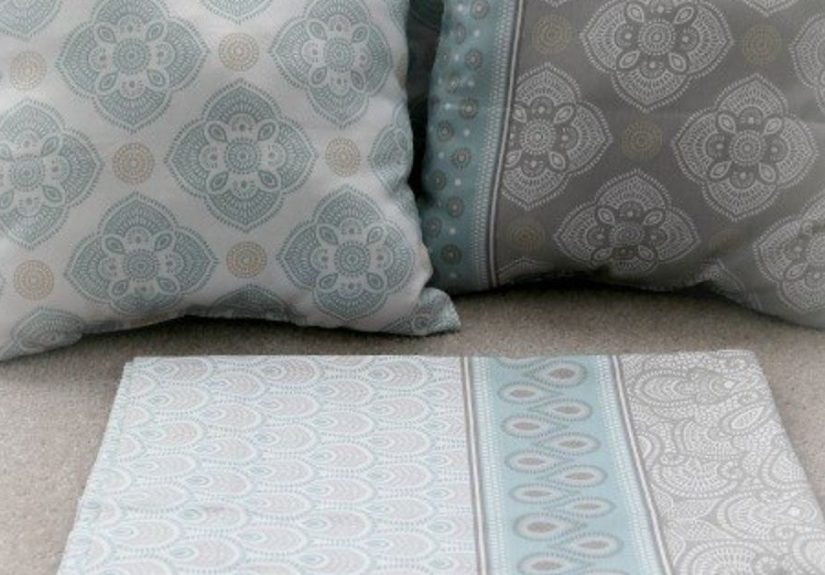
The beauty of making DIY pillows from a shower curtain is that shower curtains are often sold in large, practical cuts of fabric. Many are made from polyester, cotton blends, linen-look materials, or other sturdy textiles that can handle daily wear. Some are also designed to resist moisture, which can make them useful for decorative pillows in busy family spaces or even covered outdoor areas. The best candidates are fabric shower curtains or heavyweight fabric-style liners, not brittle, cracked plastic liners that feel more like a grocery bag having a bad day.
Another major perk is width. A shower curtain usually gives you more usable fabric than many standard craft cuts, and that extra yardage opens the door to larger pillow sizes, coordinated sets, or bonus details like contrast backs, ties, or boxed edges. If the print is bold, painterly, botanical, striped, or geometric, you can get that high-end “where did you buy those?” look for a lot less money.
There is also the sustainability angle. Upcycling home textiles into decorative pillow covers helps stretch the life of a fabric that still has style left in it. That is good for your budget, good for your storage closet, and good for anyone who enjoys the thrill of saying, “I made that,” while casually pretending it was no big deal.
What You Need Before You Start
This project can be as simple or as polished as you want. For a basic shower curtain pillow cover, gather the following:
- A clean fabric shower curtain
- Pillow inserts or old pillows to recover
- Fabric scissors or a rotary cutter
- Tape measure or ruler
- Straight pins or clips
- Sewing machine and matching thread
- Iron or steamer
- Optional zipper, fabric glue, trim, piping, or buttons
If you do not sew, you can still make a no-sew pillow cover with hem tape or fabric adhesive for lighter fabrics. That route is especially handy for temporary seasonal decor, renter-friendly decorating, or anybody who hears the words “install a zipper” and immediately needs a snack.
How to Choose the Right Shower Curtain
1. Pick fabric over flimsy plastic
The best results usually come from woven or fabric-style curtains. Polyester curtains are common, sturdy, and easy to clean. Cotton or linen-look curtains give a softer, more natural finish. PEVA or EVA liners may be useful in some projects, but for a sofa pillow you generally want something that feels pleasant to the touch and drapes nicely.
2. Check the condition carefully
If you are upcycling an old curtain, make sure it is completely clean, dry, and free of mildew, stains, or weak spots. A gorgeous print is not worth much if the fabric smells like a haunted bathroom.
3. Watch the pattern direction
Large florals, medallions, and directional prints need planning before you cut. You do not want your beautiful birds flying sideways unless that is your artistic vision. Lay out your pieces first and decide which motifs you want centered on the pillow front.
4. Think about placement
For a living room or bedroom, softer fabric and decorative detail matter most. For a mudroom bench or covered porch, durability matters more. Matching the curtain material to the pillow’s future job makes the finished piece feel intentional instead of random.
The Best Pillow Styles for This Project
Envelope-back pillow cover
This is the easiest method and the one most beginners should start with. An envelope pillow cover has overlapping back panels, so you can slip the insert in and out without sewing in a zipper. It is practical, washable, and fast. If you like seasonal pillow swaps, this method is your best friend.
Zippered pillow cover
A zippered cover looks more tailored and polished. It is ideal for everyday throw pillows when you want a crisp finish. This takes more time, but the result feels closer to store-bought decor.
No-sew folded cover
If you want a quick win, use fabric adhesive or hem tape to make a folded cover. It may not survive years of wrestling with pets, kids, or your one relative who body-slams decorative pillows like they are auditioning for a wrestling promo, but it can look great for styling and seasonal use.
Step-by-Step: How to Make DIY Pillows From a Shower Curtain
Step 1: Wash, dry, and press the curtain
If the care label allows it, wash and dry the curtain before cutting. This helps remove dust, relax wrinkles, and reduce surprises later. Press the fabric so your measurements are accurate. Wrinkled fabric lies to you.
Step 2: Measure your pillow insert
Measure the insert from seam to seam. Common square sizes include 16×16, 18×18, 20×20, and 22×22 inches. For a fuller, more designer-looking result, many decorators like to size the insert slightly larger than the finished cover. For example, a 20×20 insert can give an 18×18 cover a plumper shape, especially with softer fabrics.
Step 3: Cut the front panel
For a simple sewn cover with a 1/2-inch seam allowance, cut the front panel 1 inch larger than your intended finished size. So, for an 18×18 cover, cut one front piece at 19×19 inches.
Step 4: Cut the back panels
For an envelope back on that same 18×18 pillow, cut two back pieces at 19×14 inches. This gives you seam allowance plus enough overlap to keep the insert from peeking out like a nosy neighbor.
Step 5: Hem the inner back edges
On each back piece, fold one long edge over 1/2 inch, press, then fold again and sew. These two finished edges will overlap in the center of the pillow back.
Step 6: Layer the pieces
Place the front piece right side up. Put the two back pieces right side down on top of it, overlapping the hemmed edges in the middle. Pin or clip around all four sides.
Step 7: Sew around the perimeter
Sew all the way around using a 1/2-inch seam allowance. Reinforce the corners and the spots where the back panels overlap, since those areas get more tugging.
Step 8: Trim corners and turn right side out
Trim the seam allowance at the corners without cutting through the stitching. Turn the cover right side out, gently push out the corners, and press again for a neat finish.
Step 9: Insert the pillow form
Stuff in the pillow insert through the back opening. Fluff, pat, adjust, and stand back for your well-earned moment of superiority.
Easy Ways to Make the Pillows Look More Expensive
Homemade does not have to look homemade. A few smart choices can take your upcycled pillow covers from “cute craft” to “wow, those look custom.”
- Center the print: Put the prettiest part of the pattern on the front panel.
- Use fuller inserts: A plump pillow instantly looks more upscale.
- Mix textures: Pair your shower-curtain pillows with linen, velvet, boucle, or knit throws.
- Add trim: Piping, flange edges, pom-pom trim, or a contrast welt can dress up a simple square cover.
- Style in odd numbers: Three or five pillows often look more relaxed and layered than a perfectly matched army.
If your shower curtain has a dramatic pattern, let it be the star. Use solid pillows around it so the whole setup feels collected instead of chaotic. You want “designer mixed prints,” not “laundry basket exploded.”
Creative Design Ideas for Shower Curtain Pillows
Botanical statement pillows
A floral or leafy curtain can become two or three large statement pillows for a neutral sofa. This works especially well when the curtain print looks like something you would see on expensive drapery.
Coastal lumbar pillows
Striped blue-and-white or sandy-toned curtains are perfect for lumbar shapes. These look great on a bed, entry bench, or porch rocker.
Kid-friendly room decor
Fun prints with stars, animals, rainbows, or graphic shapes can be turned into washable decorative pillows for a playroom or reading corner.
Seasonal swaps
One inexpensive shower curtain can become a whole set of fall, holiday, spring, or summer pillow covers. Because envelope covers are easy to store flat, you do not have to devote an entire closet shelf to decorative fluff.
Patchwork covers
If the curtain is damaged in spots, cut around the bad sections and piece together the good fabric into a patchwork design. The result can look charming, intentional, and a little artsy in the best possible way.
Common Mistakes to Avoid
Even a simple budget-friendly sewing project can go sideways if you rush it. Here are the big mistakes to avoid:
- Skipping the wash step and dealing with shrinkage later
- Cutting without checking pattern direction
- Using a pillow insert that is too small, which makes the cover look sad and flat
- Choosing a curtain that feels stiff, noisy, or unpleasant to touch
- Ignoring the care label when making washable covers
Another mistake is assuming every shower curtain must become a square pillow. Not true. Some patterns look better as a rectangular lumbar, a long bench pillow, or even a pair of mismatched accent cushions. Let the fabric tell you what it wants to be. That sounds dramatic, but it is surprisingly practical advice.
Is This Project Worth It?
Absolutely. Making DIY pillows from a shower curtain is one of the easiest ways to create custom decor on a modest budget. It works for beginners, rewards careful measuring more than advanced sewing skills, and gives you a surprisingly high-end result when the fabric choice is strong. It is also a smart trick for decorators who want coordinated textiles without paying boutique prices.
Most of all, it is satisfying. You start with a household item people usually overlook, and you end with something polished, useful, and personal. That kind of transformation is what makes DIY decorating so addictive. First it is one pillow. Then it is four. Then suddenly you are eyeing a tablecloth like it owes you fabric. It happens fast.
Experiences and Lessons Learned From Making DIY Pillows From a Shower Curtain
One of the most common experiences people have with this project is surprise. The first surprise is usually how much fabric a shower curtain actually gives you. Once it is spread out on a table or floor, it starts looking less like a bathroom item and more like a secret fabric source you somehow ignored for years. A single curtain can often produce several pillow fronts, back panels, or matching accents, which makes the whole project feel efficient right away.
The second big experience is learning that not all shower curtains behave the same. Some feel soft, flexible, and easy to sew, while others are heavier, slicker, or a little stubborn under the presser foot. That moment teaches an important DIY lesson: fabric choice matters as much as pattern choice. A curtain can be gorgeous but still annoying to work with if it frays too much, shifts constantly, or feels crunchy. Most people remember their first successful pillow cover not because it was perfect, but because the fabric cooperated and made them feel more skilled than they actually were. That is a lovely little confidence boost.
Another relatable experience is the magic of the envelope back. Beginners tend to worry that pillow sewing will involve complicated closures, but once they make one envelope-style cover, the whole project becomes less intimidating. Suddenly, swapping seasonal covers seems realistic. Storage becomes easier too, because flat covers take up almost no room compared with bulky stuffed pillows. Many people start this project wanting one decorative accent and end up realizing they have accidentally solved a storage problem at the same time.
There is also the styling moment, which is honestly half the fun. You put the finished cover on an insert, fluff it, set it on the sofa, and immediately notice the room looks more intentional. That reaction is part pride, part relief, and part, “Wait, did I just trick my living room into looking more expensive?” The answer is yes. Yes, you did.
Of course, the project can come with small frustrations. Matching patterns across multiple pillows takes patience. Cutting around grommets or avoiding worn sections can change your layout plan. Sometimes a print you loved on the full curtain looks better on a lumbar pillow than on a giant square. But those little detours are useful. They teach flexibility, proportion, and the value of dry-fitting your design before sewing anything permanent.
Perhaps the best experience tied to this project is how personal it feels. Store-bought decor can look nice, but it rarely carries a story. A pillow made from a shower curtain has character. Maybe it came from a thrift store. Maybe it was left over from a bathroom refresh. Maybe it was a bold pattern you loved but did not want hanging behind a tub forever. When that fabric becomes a pillow, it feels rescued, reimagined, and far more connected to the rest of the home.
That is why this DIY idea tends to stick with people. It is approachable, practical, and just creative enough to feel exciting. It turns an ordinary household textile into something useful and beautiful, and it reminds you that good decorating does not always start in the fabric store. Sometimes it starts in aisle seven, near the shower hooks.
Conclusion
If you want a home project that is stylish, practical, affordable, and genuinely fun, turning a shower curtain into pillows is a strong contender. It gives you custom-looking decor, stretches your budget, and lets you experiment with pattern, texture, and seasonal style without committing to expensive designer covers. Whether you choose a simple envelope back, a polished zipper finish, or a quick no-sew version, the core idea is the same: take a hardworking fabric and give it a second life somewhere a lot more glamorous than the bathroom.
And really, that may be the most satisfying part of all. Your shower curtain retires from splash duty and gets promoted to accent pillow. Frankly, that is the kind of career growth we love to see.
Note: This article is formatted as body-only HTML for easy web publishing and can be styled further with your site’s CSS.


