Table of Contents >> Show >> Hide
- What “In the Wild” Actually Means
- Choose Your Navigation: Wire, RTK, Vision… or Mild Regret
- Hardware That Survives the Wild
- The Brain: A Control Stack That Doesn’t Panic
- Safety and the “Please Don’t Sue Me” Checklist
- A Practical Build Path (So You Actually Finish This)
- Testing in the Wild Without Losing Your Mind
- Common “Wild” Failures (and How to Design Around Them)
- Final Thoughts
- Extra: of Real-World Builder Experiences (What You’ll Actually Go Through)
Building a DIY autonomous mower is a little like training a very determined puppy: it will eventually learn the route, but first it will chew a shoe, chase a squirrel, and get stuck under a bush it has walked past every day for years.
And that’s in a nice yard. “In the wild” means the yard isn’t a flat green carpetit’s a living obstacle course with tree cover, slopes, ruts, random toys that appear overnight, and the occasional mystery stick that looks innocent until it meets a spinning blade.
This guide is for builders who want more than a garage demo. We’re talking about a DIY autonomous lawn mower that can survive real-world chaos: keep its line, avoid trouble, and fail safely when the world gets weird (because it will).
What “In the Wild” Actually Means
A robot mower that works perfectly on a smooth test patch can become a confused Roomba the moment it hits:
- Tree cover that blocks satellite signals and turns GPS into interpretive dance.
- Slopes that cause wheel slip, drift, or “help, I’m crab-walking downhill.”
- Uneven ground (gopher holes, root bumps, sprinkler heads) that mess with traction and cutting height.
- Obstacles with feelings like pets, kids, and that neighbor who thinks your lawn is a shortcut.
- Weather (dew, rain, heat) that tests sealing, connectors, and battery sanity.
Commercial robot mowers struggle with these realities tooespecially in yards with heavy tree cover and lots of “stuff.” The difference is you can design yours to be cautious, resilient, and honest about when it doesn’t know what’s happening.
Choose Your Navigation: Wire, RTK, Vision… or Mild Regret
Option 1: Boundary Wire (Old School, Surprisingly Effective)
Boundary-wire mowers don’t “know” where they are in the GPS sensethey follow a low-power perimeter signal and use behaviors (bump, turn, wander, guide-wire homing) to cover the lawn. Setup is labor, but reliability can be excellent when GPS conditions are bad (hello, trees). Many consumer robotic mowers still use this approach for a reason.
DIY builders often underestimate how much wild yards favor boring solutions. A wire doesn’t care about satellite geometry. A wire doesn’t need firmware updates. A wire also doesn’t apologize when you accidentally slice it with an edger.
Best for: heavy tree cover, small-to-medium lawns, people who prefer “dig once, relax later.”
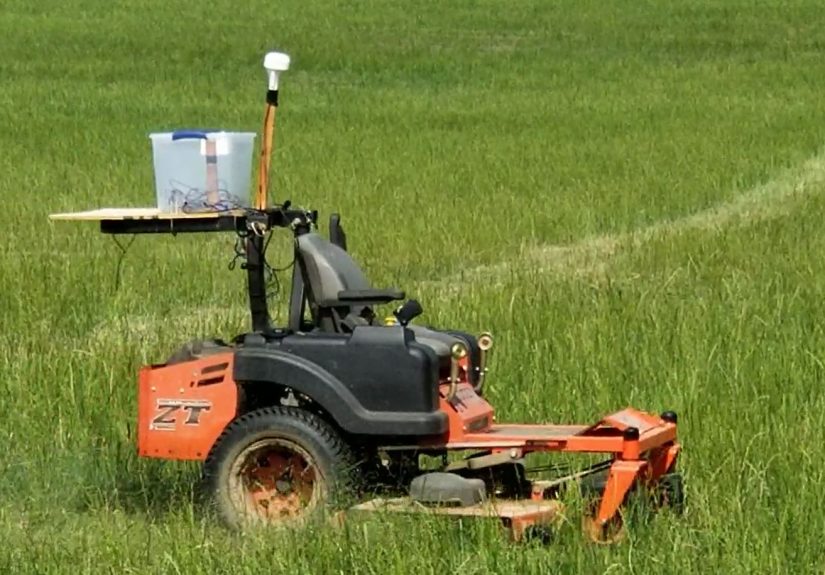
Option 2: RTK GNSS (Modern, Precise, but Demands Good Conditions)
RTK (Real-Time Kinematic) GNSS can deliver centimeter-level positioning when you feed the rover receiver correction data from a base station or an NTRIP correction service. That accuracy is the magic sauce that enables straight lines, efficient coverage paths, and neat “lawn stripes” instead of random wandering.
The catch: RTK is picky. You need a clear sky view, a good antenna setup, stable corrections, and a plan for what happens when you drive under branches or near buildings. In the wild, you design your mower to degrade gracefully: slow down, trust odometry/IMU briefly, and stop if localization confidence drops too far.
If you’re building around popular RTK modules (like multi-band receivers commonly used in robotics), you’ll see specs like fast update rates and “centimeter accuracy” advertisedbut your yard decides whether you get that accuracy today.
Best for: open yards, large lawns, builders who want clean paths and enjoy tuning radios and antennas.
Option 3: Vision / LiDAR / SLAM (Coolest, Hardest, Most “Robotics”)
SLAM-based navigation (mapping and localization with LiDAR/vision) can work where GPS struggles, and it can support dynamic obstacle avoidance. The tradeoff is complexity: you’re now building a perception system that must handle changing lighting, grass texture, dust, fog, and the fact that your yard looks different after every growth spurt.
If you’re already in the ROS 2 world, navigation frameworks can help structure localization, planning, and behaviors (including coverage patterns), but you still need robust sensor data and careful tuning for outdoor conditions.
Best for: builders comfortable with robotics stacks, sensors, and debugging at the “why does this tree look like a wall?” level.
Hardware That Survives the Wild
Start With a Platform: Upgrade or Build From Scratch
Two common DIY paths:
- Upgrade an off-the-shelf robot mower: You inherit a working chassis, motors, deck, and weatherproofing. You add a smarter brain (RTK, better compute, better planning). Open-source communities often start here because it’s faster than reinventing wheelsliterally.
- Build a custom chassis: You get full control over traction, deck design, battery size, and sensor placement. You also get full responsibility when it decides to invent a new kind of lawn art by spinning in place.
Drive and Traction: Grass Is a Terrible Flooring Choice
Outdoor traction is where indoor-robot assumptions go to retire. In the wild, prioritize:
- Torque over top speed (you’re mowing, not qualifying for NASCAR).
- Wider wheels or more aggressive tread for wet grass.
- Wheel encoders (or hall sensors) so you can detect slip and compensate.
- Low center of gravity so slopes don’t become dramatic.
A practical rule: if your mower can’t climb your yard when it’s slightly damp, it’s not “wild-ready.” It’s “demo-ready.”
Cutting System: The Part That Deserves the Most Respect
Cutting decks are not the place to “move fast and break things.” A spinning blade is the business end of your robot, and your entire build should assume worst-case scenarios:
- A stick gets sucked under the deck.
- A small rock becomes a projectile.
- A curious hand tries to investigate a sound.
Thrown objects and contact injuries are serious risks with mowing equipment, which is why safety guidance emphasizes guarding, keeping people away, and eye protection around cutting machinery. Even if your mower is autonomous, treat its operating zone like an active work area.
Power and Charging: Lithium-Ion Is Great… Until It Isn’t
Battery design is where “DIY” meets “please don’t burn down my garage.” Lithium-ion systems demand:
- A proper BMS (battery management system) for balancing and protection.
- Fusing sized for worst-case current.
- Connector discipline (weatherproof, strain-relieved, no sketchy crimp jobs).
- Charging rules that avoid damage, overheating, and questionable chargers.
Fire risk isn’t theoreticalbattery-powered mowers (including robotic models) have had recalls related to overheating and fire hazards. Build your charging setup like you expect it to be inspected by your most judgmental electrician friend.
Consumer safety guidance on lithium-ion batteries consistently stresses avoiding damage, using correct chargers, and stopping use if you notice heat, swelling, or odd smells. Your mower can’t tell you it feels “a little puffy today,” so add temperature monitoring where it matters.
Weatherproofing: Dew Is Not a Suggestion
Wild yards include dew, sprinkler schedules, and storms that arrive right after you say, “It’s probably fine.” Use gaskets, cable glands, conformal coating where appropriate, and drip loops so water doesn’t ride a cable straight into your electronics like it paid for a ticket.
The Brain: A Control Stack That Doesn’t Panic
Split the Job: Real-Time Control vs “Thinking”
A common architecture is:
- Microcontroller for motor control, safety interlocks, sensor polling, and emergency stops.
- Single-board computer (or similar) for mapping, planning, communications, and UI.
This keeps your mower stable even if your high-level software has a moment of existential crisis.
Coverage Planning: Mow Like You Mean It
Efficient mowing isn’t “drive around until it looks shorter.” It’s coverage planning: systematic paths, overlap control, and boundaries. Robotics navigation frameworks can support behaviors like point-to-point navigation and complete coverage patterns, but outdoor mowing adds constraints like turn radii, slip, and grass load.
In practice, you’ll want:
- Stripe mode (back-and-forth lanes) for open areas.
- Edge-first mode to define boundaries cleanly.
- Keep-out zones for flower beds, muddy corners, or “the place the dog buried something unspeakable.”
Geofencing and “Nope” Rules
Whether you’re using boundary wire or GNSS, you need a hard limit on where the mower is allowed to go. Geofencing concepts are widely used in autonomous vehicle stacks to enforce inclusion/exclusion zones and prevent runaway behavior. Your mower should stop (not “think about it”) when it detects it’s outside its allowed region.
Safety and the “Please Don’t Sue Me” Checklist
Non-Negotiables
- Physical E-stop that kills blades and drive power immediately.
- Lift/tilt detection so the cutting system stops if the mower is picked up or flips.
- Obstacle detection (bump sensors at minimum; more if you can).
- Audible/visible status so humans can tell it’s active.
- Operational rules: never run when kids/pets are in the yard. Ever.
Robotic mower safety is commonly evaluated against appliance/robot safety standards (for example, robotic lawn mowers are often assessed to IEC 60335-2-107), and broader robot safety standards exist for various service robot classes. You don’t need to be certified to learn from the mindset: predictable behavior, protective construction, and safe failure modes.
Why the Caution Is Worth It
Traditional mower injuries can be severe, including lacerations and amputationsespecially in incidents involving bystanders and riding equipment. Autonomous mowing changes the “operator” role, but it doesn’t erase risk. Treat your mower like a power tool that moves on its own, because that’s exactly what it is.
A Practical Build Path (So You Actually Finish This)
Phase 1: Prove You Can Drive Safely
- Build the chassis and drive control.
- Implement E-stop and blade interlocks before you spin anything sharp.
- Test low-speed driving and stopping on grass, slopes, and rough patches.
Phase 2: Add Localization You Can Trust
- Wire approach: install boundary/guide wire, verify signal quality, test homing.
- RTK approach: mount antennas correctly, validate correction link, test open-sky performance, then test near trees.
If you go RTK, corrections can come from your own base station or an NTRIP service, and configuration details matter. This is where careful setup pays off more than heroic debugging.
Phase 3: Plan Coverage and Handle Exceptions
- Start with simple stripe patterns.
- Add slow-turn logic to reduce turf damage.
- Implement “stuck detection” (current spikes, no encoder motion, tilt changes).
- Define safe stop behaviors when localization confidence is low.
Phase 4: Make It Livable
- Docking/charging that works without drama.
- Weather sealing you can trust.
- Logs you can read when something goes wrong at 6:12 a.m.
Testing in the Wild Without Losing Your Mind
The fastest path to a dependable mower is boring, incremental testing:
- Dry run with blades disabled. Always first.
- Slow mow (high cut height, low speed) to reduce load while you tune.
- Edge cases: under trees, near fences, across slopes, around garden beds.
- Failure drills: simulate GPS dropouts, kill the correction link, block a wheel.
If you ever think, “It’ll probably be fine,” that is your cue to add a safety check, not optimism.
Common “Wild” Failures (and How to Design Around Them)
1) RTK Dropouts Under Trees
Design a confidence-based system: if position quality drops, reduce speed, switch to short-term odometry/IMU smoothing, and stop if you can’t recover quickly. “Keep going anyway” is how robots learn about fences the hard way.
2) Wheel Slip on Slopes
Slip makes your mower drift off-path and chew up grass. Use encoder feedback, tune acceleration limits, and consider mechanical improvements (tread, weight distribution). If the yard is extreme, accept that no amount of code beats physics.
3) Grass Load and Deck Clogging
Tall or wet grass increases load dramatically. Solutions include higher torque margins, slower mowing speed, and a conservative schedule (mow more often, remove less each pass). The wild rewards consistency, not hero runs.
4) Surprise Obstacles
Your mower needs a personality trait: caution. Even commercial mowers can get stuck or wedged in real yards with changing obstacles, so your DIY build should default to stopping and alerting rather than pushing through.
Final Thoughts
A DIY autonomous mower in the wild is absolutely doablebut the winning move is not “more autonomy.” The winning move is better behavior: slow when uncertain, stop when unsafe, and recover without drama.
If you build for traction, safety, reliable boundaries (wire or geofence), and graceful failure, you’ll get the best kind of automation: the kind that quietly handles the boring work while you pretend you were always going to spend Saturday doing something fun.
Extra: of Real-World Builder Experiences (What You’ll Actually Go Through)
Builders who take “DIY autonomous mower” from idea to yard-ready tend to report a similar emotional journeyregardless of whether they use boundary wire or RTK. It usually starts with confidence (“How hard can it be?”), then quickly becomes respect (“Oh. Outdoors is… a lot.”), and finally lands on satisfaction (“It’s mowing. It’s actually mowing.”).
The first big “wild” lesson is that the yard is not a lab. Grass grows, shadows shift, and the ground changes after rain. A mower that tracks perfectly at noon may wander at dusk when the sensors see different contrast, the dew changes traction, or satellite geometry changes enough to reduce GNSS quality. That’s why experienced builders focus less on perfect performance and more on predictable failure. A mower that stops and asks for help earns trust. A mower that “guesses” earns a rescue mission.
The second lesson is that setup is half the project. With boundary wire, the effort is physical: planning the perimeter, stapling or burying wire, making clean splices, and testing that the signal remains stable in tricky corners. The experience is often: “It took longer than I thought,” followed by, “Now it just works.” With RTK, setup is mental: antenna placement, correction links, and debugging why “centimeter-level accuracy” sometimes behaves like “a confident shrug.” Many builders end up treating RTK like a high-performance sports car: amazing on a good track, temperamental when conditions get messy.
The third lesson is that traction and safety are not optional upgrades. Builders commonly discover wheel slip when the mower tries a slope or crosses a damp patch. The fix isn’t always codeoften it’s tread, weight distribution, torque margin, or simply slowing down. Safety improvements also evolve over time: adding a bigger E-stop, improving lift/tilt shutoffs, tuning obstacle detection to stop sooner, and creating strict operating rules (like “never run when kids are outside,” no exceptions). People don’t “overbuild” safety after a near miss because they love extra wiringthey do it because they like their fingers.
The fourth lesson is that logging saves weekends. Builders who add simple logs (position quality, wheel speed, motor current, stop reasons) solve problems in hours instead of days. When the mower stops in the same corner repeatedly, logs reveal whether it’s wheel slip, localization loss, or an obstacle trigger. Without logs, you’re left with interpretive lawn art and theories.
The final lesson is the most satisfying: once the mower becomes reliable, it changes how you think about lawn care. Instead of one long weekly mow, you shift toward frequent, lighter cuts that keep load low and results clean. The mower stops being a science project and becomes a quiet yard employeeone that doesn’t call in sick, doesn’t ask for a raise, and only occasionally demands you remove a branch it insists is “an impossible wall.”