
Table of Contents >> Show >> Hide
- What Exactly Is a Luminary (and Why Do They Feel So Fancy)?
- Quick Planning: Where Your DIY Luminaries Should Live
- Choose Your Light Source: Candle, LED, or Solar?
- DIY Luminary Projects That Bring the Whimsy
- Project 1: Sea-Glass Mason Jar Lanterns (Coastal, Even If You Live in Kansas)
- Project 2: Paper Bag Luminarias (Classic Walkway Magic, Modern Safety)
- Project 3: Punched Tin Can Lanterns (Upcycled, Dramatic Shadows)
- Project 4: Painted Mason Jar Glow Jars (Colorful, Kid-Friendly, Party-Ready)
- Project 5: Basket Pendant Luminaries (No Wires, Big Impact)
- Project 6: Leaf-Silhouette Luminaries (Seasonal, Artsy, Surprisingly Easy)
- Project 7: Picture-Frame Lanterns (Dollar-Store Chic Meets Cottagecore)
- Project 8: Solar Lantern Box (For the “I Built That” Crowd)
- Design Tips: Make Your Outdoor Luminaries Look Intentional (Not Accidental)
- Weatherproofing and Outdoor Durability
- Troubleshooting: When Your Luminary Has Opinions
- Conclusion
Outdoor lighting has two jobs: keep everyone from tripping over the garden hose and make your backyard feel like it belongs in a movie montage. Luminaries do bothwithout requiring you to become a licensed electrician or summon a contractor named “Chip” who only communicates through sighs.
In this guide, you’ll learn how to make whimsical DIY luminaries that look charming on a patio, magical along a walkway, and downright heroic on a dinner table. We’ll cover the best materials, the safest light sources, and several project ideas that range from “easy weekend craft” to “I can’t believe I made that.” Expect practical tips, specific examples, and a sprinkle of humor (the non-flammable kind).
What Exactly Is a Luminary (and Why Do They Feel So Fancy)?
A luminary is basically a light source dressed up for the outdoors. Think: lanterns, luminarias, glowing jars, punched-tin wonders, and anything that turns “dark backyard” into “cozy outdoor sanctuary.” The secret sauce is diffusionsoft, indirect light that flatters your plants, your patio furniture, and yes, your friends’ faces in photos.
Whimsical luminaries add personality. They’re the outdoor décor equivalent of wearing fun socks with a serious outfit: subtle enough to feel classy, playful enough to make people smile.
Quick Planning: Where Your DIY Luminaries Should Live
Before you hot-glue a single thing, decide what kind of “glow story” you want your outdoor space to tell. The best backyard lighting feels layeredlike a good dessert, not like a stadium.
1) Path and Safety Lighting
Use luminaries to mark edges: walkways, steps, a tricky transition from patio to grass, or that one stone that always tries to take someone’s ankle. Aim for a steady, low-level glow that guides people without blasting them in the retinas.
2) Ambient Lighting
Ambient lighting is the general “ahhh” feeling. Cluster luminaries near seating, tuck them into corners, or hang them where light can bounce off nearby surfaces. Warm light (rather than bright white) makes everything feel more welcoming.
3) Accent Lighting
Accent lighting is where whimsy shines. Highlight a plant, frame a patio vignette, or create a “glow moment” on an outdoor dining table. One great luminary can become the focal point that makes your whole outdoor setup look intentional (even if you assembled it in five minutes).
Choose Your Light Source: Candle, LED, or Solar?
Your luminary can be whimsical, but your lighting choice should be strategic. Here’s how to pick the right glow-maker for your outdoor space.
Real Flame Candles
Candles create gorgeous, living light. They also create… fire. Use them only when you can supervise, and keep them protected inside stable holders. If you’re making paper luminaries or placing lights near dry leaves, candles are a hard “maybe” (and often a “nope”).
Battery-Operated LED Tea Lights
LEDs are the stress-free favorite. You get the look of candlelight without the “Who left the candle burning?” mystery. For paper bags, kids’ crafts, and windy patios, LEDs are the MVP.
Solar Lights
Solar is ideal when you want luminaries to turn on automatically. They’re great for walkways and everyday ambiance. The key is placement: solar panels need real daylight, not shade all day under a tree that’s basically running a leaf-based monopoly on sunlight.
DIY Luminary Projects That Bring the Whimsy
Below are several outdoor luminary ideaseach with a distinct vibe. Mix and match styles, or commit to one theme like you’re the creative director of Backyard Fashion Week.
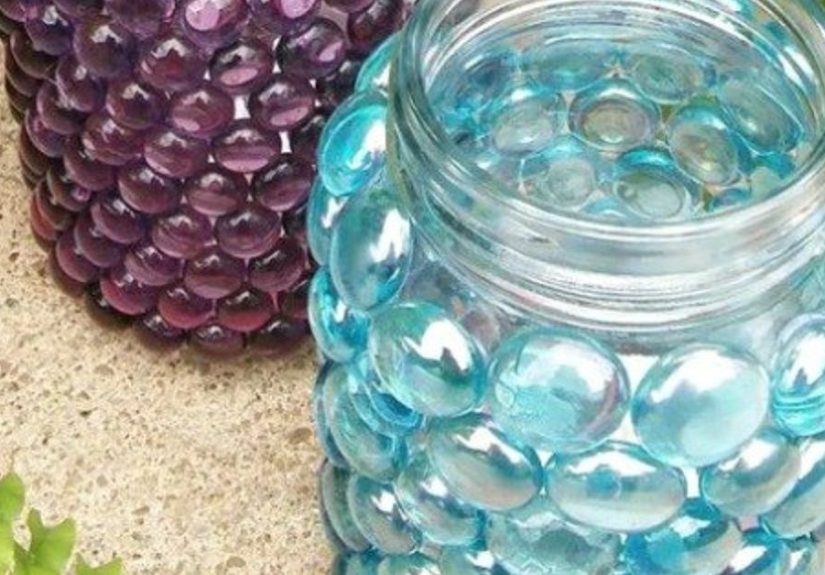
Project 1: Sea-Glass Mason Jar Lanterns (Coastal, Even If You Live in Kansas)
This project gives you that “beach vacation” glow using wide-mouth jars, a small inner votive holder, and decorative filler like sea glass or colorful stones. The inner votive keeps your light centered and stable, and the stones add sparkle when the light hits.
- Place a small glass votive holder in the center of a wide-mouth jar.
- Add sea glass or smooth stones around it, keeping the votive centered.
- Drop in a flickering LED tea light for a candle-like effect.
- Wrap sturdy wire around the jar’s neck and form a handle for hanging.
Whimsical twist: Use colored glass (blue/green) for mermaid vibes, or mix in a few metallic beads for a “treasure chest” shimmer.
Project 2: Paper Bag Luminarias (Classic Walkway Magic, Modern Safety)
Paper bag luminaries (also called luminarias) are iconic for lining paths and driveways. They’re quick to make, easy to customize, and look wildly impressive for something that starts with “paper bag.”
- Sketch or stencil a simple pattern (stars, moons, hearts, tiny aliensyour choice) onto the bag.
- Cut shapes with a craft knife or punch holes for a dotted constellation look.
- Add a scoop or two of sand or small rocks to weight the bottom.
- Place a battery-operated LED tea light inside and fold the top slightly if it’s windy.
Whimsical twist: Make a “galaxy” set by mixing tiny punched stars with a few larger cutouts. Space them like a little Milky Way along your walkway.
Project 3: Punched Tin Can Lanterns (Upcycled, Dramatic Shadows)
Tin can lanterns throw patterned light onto nearby surfacesvery “enchanted garden,” very “I definitely meant to do that.” A classic trick is to fill the can with water and freeze it first so it holds its shape while you punch holes.
- Clean a can thoroughly and remove labels.
- Fill with water and freeze overnight (this helps prevent denting).
- Draw a simple design with a marker (spirals, stars, zigzags, initials).
- Use a nail and hammer to punch holes along your design.
- Let the ice melt, dry the can, and add an LED candle or small string lights.
Whimsical twist: Make “constellation cans” and label them like a planetarium exhibit: “The Great Backyard Bear,” “The Patio Swan,” etc.
Project 4: Painted Mason Jar Glow Jars (Colorful, Kid-Friendly, Party-Ready)
Painting jars creates a stained-glass effectespecially when you keep the paint slightly translucent so light can shine through. This style is perfect for parties, seasonal décor, or adding a bright pop to neutral patios.
- Paint the outside (or inside) of clean jars using acrylic paint; keep coats light for translucency.
- Add dimensional paint or “puff paint” details for texture and pattern.
- Place fairy lights or a battery candle inside.
- Finish with twine, ribbon, or a wire handle.
Whimsical twist: Create a themed set: “Citrus Summer” (yellow/orange), “Garden Party” (green/pink), “Midnight Sky” (navy with gold dots).
Project 5: Basket Pendant Luminaries (No Wires, Big Impact)
Want overhead glow without installing anything permanent? Lightweight baskets (or lantern-style shades) can become hanging luminaries with battery puck lights. It’s a clever way to create an outdoor “ceiling moment” over a table or seating areaespecially under a pergola or porch roof.
- Choose baskets with openings that allow light to shine through.
- Attach battery puck lights inside using strong hook-and-loop fasteners.
- Hang baskets with eye hooks or sturdy outdoor-rated hanging hardware.
- Stagger heights for a layered, whimsical look.
Whimsical twist: Mix basket sizes like a floating “lantern cloud.” Keep it asymmetrical on purpose“perfectly imperfect” is the goal.
Project 6: Leaf-Silhouette Luminaries (Seasonal, Artsy, Surprisingly Easy)
This one is pure fall magic, but you can adapt it year-round: ferns in spring, wildflowers in summer, evergreen sprigs in winter. The silhouette effect looks like fancy printmaking, but it’s basically nature doing the design work.
- Place leaves against paper bags or vellum sleeves and secure lightly.
- Mist paint lightly (or sponge paint) over the surface and let it dry.
- Remove leaves to reveal silhouettes.
- Use flameless candles inside for a soft, safe glow.
Whimsical twist: Make it a “memory lane” set: use leaves from a favorite tree or flowers from your garden for a personal story in light form.
Project 7: Picture-Frame Lanterns (Dollar-Store Chic Meets Cottagecore)
Picture-frame lanterns look like boutique décor, but they’re essentially frames glued into a lantern box. Add clear panels (like acrylic sheets) or leave them open for airy light.
- Paint or stain four matching frames.
- Add “panes” (clear acrylic, thin plastic, or even decorative mesh).
- Glue frames into a cube and attach a base/top using wood or sturdy cardboard.
- Add a candle (LED recommended) and a handle or finial for polish.
Whimsical twist: Use patterned film (frosted, stained-glass style) so the lantern throws colorful shadows.
Project 8: Solar Lantern Box (For the “I Built That” Crowd)
If you want a more permanent luminary that can live outside regularly, a small lantern box with a solar light insert is a solid upgrade. Seal and finish it well, and it becomes an all-season porch staple.
- Build a simple wood frame (scrap boards work) and add mesh or “hardware cloth” panels.
- Stain or paint, then seal with an outdoor-friendly top coat.
- Cut a hole at the top sized for your solar light insert.
- Glue or secure the solar light in place and test it in direct daylight.
Whimsical twist: Add a cutout pattern on one side (moons, dots, zigzags) so you get both glow and shadow play.
Design Tips: Make Your Outdoor Luminaries Look Intentional (Not Accidental)
Cluster Like a Pro
Groups of three to five luminaries read as styled, even if you assembled them while wearing pajama pants and determination. Vary height and width: a tall lantern, two medium jars, one low tin caninstant “designer” energy.
Repeat a Motif
Repeat one element across multiple luminaries: the same star cutout, the same twine wrap, the same paint palette, or the same style of light. Repetition creates cohesion; your yard stops feeling like a craft supply explosion.
Pick a “Glow Temperature” and Stick With It
Warm white is the friendliest outdoor light for patios and garden paths. Mixing warm and cool bulbs can make the space feel visually confusedlike wearing flip-flops with a winter coat.
Use Shadows on Purpose
Tin cans, patterned paper bags, and cutout panels cast designs on nearby surfaces. Place them near a wall, fence, or patio floor where shadows can show up. Shadow-play is where “cute lantern” becomes “wow, that’s magical.”
Weatherproofing and Outdoor Durability
Outdoor luminaries are basically tiny décor athletes. They deal with humidity, dew, wind, and the occasional surprise rain like it’s their job. Help them succeed with these simple upgrades.
For Paper Luminaries
- Use LED lights onlypaper and open flame are not friends.
- Weight the bottom with sand or small rocks so wind doesn’t send them on a neighborhood tour.
- Set them out only when needed (especially if rain is likely).
For Metal Lanterns (Tin Cans)
- Dry thoroughly to prevent rust.
- Spray with a clear outdoor sealer or use outdoor-rated spray paint.
- Consider a small drainage hole at the bottom if it will live outdoors.
For Glass Jars
- Use outdoor-safe wire for handles and avoid thin craft wire that can snap.
- Keep electronics in removable inserts (battery lights) so you can bring them inside easily.
- If hanging, make sure the hook or branch can support the weightglass is not lightweight décor.
Troubleshooting: When Your Luminary Has Opinions
“My Luminary Keeps Falling Over”
Add weight (sand, stones), widen the base, or move it out of wind paths. If it’s a jar, consider a wider jar or a stable lantern frame.
“The Light Looks Too Dim”
Check diffusion. Dark paint, thick paper, or overly dense filler can swallow light. Switch to brighter LEDs, lighten your paint layer, or use fewer decorative stones.
“My Solar Luminary Barely Turns On”
Solar panels need direct sunlight to charge well. Relocate to a brighter spot during the day, wipe dust off the panel, and confirm the light sensor isn’t shaded by leaves or décor.
“The Shadows Look Weird (Not the Fun Weird)”
Try changing distance. Patterned luminaries need space between the lantern and the surface to cast crisp shadows. Move it closer to a wall, or elevate it slightly.
Conclusion
Whimsical DIY luminaries are one of the fastest, most satisfying ways to transform an outdoor space. They’re budget-friendly, endlessly customizable, and they do something rare in the world of home projects: they create instant atmosphere. Whether you line a path with paper bag luminarias, hang glowing jars from tree branches, or build a sturdier solar lantern for everyday use, you’re not just adding lightyou’re adding mood, personality, and a little bit of magic.
Start small, make a set, and then let your creativity escalate responsibly. (Like sprinkles. Or confetti. Or buying “just one more” mason jar.)
Extra: Real-World “You’ll Probably Experience This” Notes (About )
The first time most people try DIY outdoor luminaries, they discover an unexpected truth: the craft isn’t the hard partplacement is. You can make a gorgeous lantern and still end up with a yard that feels oddly lit if everything is spaced randomly. A common experience is walking outside, turning the lights on, and realizing the glow is either too scattered (“Where did my ambiance go?”) or too concentrated (“Why does my patio look like a spotlight audition?”). The fix is usually simple: group luminaries in clusters and repeat styles along key zones, like the path to seating or the edge of a dining area.
Another classic moment: wind. Paper luminarias look serene in photos, but in real life, a breeze can turn them into tiny paper tumbleweeds. People quickly learn to add enough sand or pebbles to weight the baseand to keep the top opening slightly folded when the forecast is spicy. Many DIYers also “graduate” to flameless LED tea lights after one nervous evening of babysitting real candles like they’re temperamental pets. That switch tends to boost enjoyment immediately, because you can relax and actually use the space instead of monitoring the glow like a lifeguard.
With jar luminaries, the experience is often: “Wow, these are heavier than I thought.” Hanging glass jars is dreamy… until you realize your hook needs to be sturdy, your wire needs to be strong, and your favorite tree branch may not be the structural beam you believed it to be. People commonly test-hang jars low first, then raise them once the hardware feels solid. When done right, that small extra effort pays off: the jars sway slightly, the light flickers, and suddenly your yard feels like it has its own soundtrack.
Tin can lanterns bring their own learning curve. The pattern-punching part is satisfyinglike making pixel art with a hammerbut denting is real. DIYers often discover that freezing the can (or bracing it well) makes the process smoother and the final lantern more crisp. The payoff is huge: the shadow patterns on a fence or patio floor look genuinely magical, and guests usually assume you bought them somewhere “artisan.” (You can nod modestly. You can also accept compliments with snacks.)
Finally, many people experience the “theme spiral.” You start with a couple of simple luminaries, and suddenly you’re planning seasonal sets: stars for summer, leaves for fall, icy cutouts for winter, flowers for spring. This is normal. The best part is that luminaries store well, feel special every time you bring them out, and keep your outdoor space usable long after sunset. That’s not just décorthat’s quality-of-life glow.


