
Table of Contents >> Show >> Hide
- Before You Start: A Quick Reality Check (and a Safety Check)
- DIY Weed Killer #1: The Vinegar + Soap Spot Spray (a.k.a. “Leaf Dehydration Day”)
- DIY Weed Killer #2: The Boiling Water Blitz (a.k.a. “Tea Kettle Justice”)
- Which DIY Weed Killer Should You Use?
- How to Keep Weeds From Coming Back (Because They Will Try)
- FAQ
- Conclusion
- Field Notes: of Real-World Experience With DIY Weed Killers
Weeds are basically tiny green comedians with impeccable timing. They wait until you’re feeling proud of your yard, then pop up in the one place you absolutely don’t want them: the driveway crack that laughs at your kneeling pad, the patio seam that refuses to be pulled, the edge of the garden bed where your favorite flower lives rent-free (and you’d like it to keep living).
If you want a couple of DIY weed killers that have been used for years, actually make sense scientifically, and don’t require a chemistry degree (or a hazmat suit for the whole neighborhood), you’re in the right place. Today we’re covering two reliable approaches for spot-treating weeds: a vinegar-based spray and a boiling-water “thermal takedown.”
These methods are best for small, young weeds and hardscape areas like pavers, gravel, patios, and sidewalk cracks. They are not miracle fixes for every weed in every situation (sorry, dandelions with a personal grudge), but used correctly, they’re genuinely effective.
Before You Start: A Quick Reality Check (and a Safety Check)
DIY weed killers are usually non-selective. Translation: if you spray it on a plant, that plant will have a bad day. If that plant is your prized petunia, you will also have a bad day.
Where DIY weed killers work best
- Cracks in sidewalks, driveways, and patios
- Between pavers (where you don’t want anything growing)
- Gravel paths and rock beds (spot treatment only)
- Newly emerged annual weeds (small leaves, shallow roots)
Where you should think twice
- Lawns: you’ll likely damage turf
- Garden beds: risk of drift and collateral damage
- Near desirable plant roots: especially if you’re tempted to add salt (more on that soon)
- Large perennial weeds: deep roots often resprout after “top kill”
Safety isn’t optional
“Natural” does not mean “harmless.” Strong vinegar can irritate or burn skin and seriously injure eyes. Boiling water is… boiling water. Treat both with the respect you’d give a hot pan and a grumpy cat: carefully, and with full attention.
DIY Weed Killer #1: The Vinegar + Soap Spot Spray (a.k.a. “Leaf Dehydration Day”)
Vinegar works as a contact herbicide. It damages exposed leaf tissue by breaking down cell membranes, causing the plant to dry out. The key phrase there is contact: it only affects what it touches. It usually doesn’t travel down into roots, which is why large or perennial weeds may come back for an encore.
Why it’s “tried and tested”
Homeowners and extension educators commonly describe vinegar sprays as most useful for small annual weedsespecially in bright sun and dry conditions. The science supports the “fast burn-down” effect on foliage, with the tradeoff being limited root kill and limited long-term control.
The simple recipe (recommended)
Vinegar + Soap Weed Spray (best for cracks and hardscape)
- White vinegar (standard household vinegar works for tiny weeds)
- Liquid dish soap (just a small amount)
- Spray bottle or pump sprayer
How to mix: Fill your sprayer with vinegar, then add a small squirt of dish soap and gently swirl. The soap acts as a surfactanthelping the vinegar spread and stick to leaves instead of beading up and rolling away like it’s late for a meeting.
What about adding salt?
You’ll see lots of “vinegar + salt + soap” recipes online. Salt can increase plant stress, but it comes with a major downside: salt can linger in soil and make it hard for anything to grow there later. That might be fine for driveway cracks where you want a permanent plant-free zone, but it’s a bad idea anywhere near lawns, beds, or roots you care about.
If you do use salt, keep it for hardscape-only spots (between pavers, deep driveway seams) and apply carefully. Think “precision,” not “salting the earth like an ancient conqueror.”
How to apply vinegar spray for best results
- Pick a warm, sunny, dry day. Dry leaves hold spray better, and heat speeds visible damage.
- Target young weeds. Seedlings and small annual weeds are the easiest to knock out.
- Spray to wet, not to puddle. Coat leaves and the growing point, but don’t soak the soil.
- Avoid wind. Drift happens fast, and plants you like don’t appreciate surprise vinegar facials.
- Keep people and pets away until dry. The odor fades; the irritation potential is real.
What you’ll see (timeline)
- Within hours: wilting, dulling, leaf curl
- Within 24 hours: strong “burn down” on small weeds
- Within a week: some weeds may resproutespecially perennials or larger plants
When vinegar spray disappoints (and why)
Vinegar sprays often struggle when weeds are:
- Too big: more leaf mass survives, and the plant has energy reserves
- Perennial: roots store fuel and can push new growth
- Grassy: narrow leaves and protected growing points can reduce impact
- Wet or dusty: spray slides off or gets blocked from contacting leaf tissue
Safety notes for vinegar (seriously, read this)
Household vinegar is relatively mild, but “horticultural vinegar” can be much stronger and more hazardous. Higher concentrations are more effective on weeds, but also more irritating or corrosive. If you use stronger products, wear eye protection and gloves, and treat it like a real pesticidebecause functionally, it is.
DIY Weed Killer #2: The Boiling Water Blitz (a.k.a. “Tea Kettle Justice”)
Boiling water is the simplest weed killer on earth: it uses heat to rupture plant cells on contact. No mixing. No measuring. No mysterious internet potion that smells like a salad bar during an electrical fire.
Why it’s “tried and tested”
Extension guidance commonly recommends boiling water for weeds in places like sidewalk cracks and patios, especially where you want to avoid chemical sprays. It acts as a contact treatment: it damages what it touches, usually leaves roots intact, and works best on young weeds.
What you need
- A tea kettle (or any kettle with a controlled pour spout)
- Water
- Closed-toe shoes and attention (both mandatory)
How to use boiling water safely and effectively
- Boil water and carry the kettle carefully to the weed zone.
- Pour slowly and precisely directly onto the weed’s crown and leaves.
- Use enough water to thoroughly drench the weed’s above-ground growth.
- Wait 1–2 days for browning and collapse to fully show.
- Plan to retreat if the weed resprouts (common with established roots).
Best places to use it
- Sidewalk cracks and driveway seams
- Between pavers (where you can pour without splashing nearby ornamentals)
- Gravel edges and hard-to-pull crevices
Limitations (boiling water is not magic, it’s physics)
Boiling water kills the parts it touches. If roots are deep or protected, the plant can regrow. That doesn’t make the method “bad” it just means you may need repeat applications, especially for tough perennial weeds.
Pro tips that save time (and skin)
- Pour when you have a clear path. Tripping while holding boiling water is a “no, thank you.”
- Don’t pour near desirable plants. Roots and stems don’t get immunity just because you didn’t mean it.
- Follow up with prevention. After weeds die, brush polymeric sand into paver joints or seal cracks to reduce return visits.
Which DIY Weed Killer Should You Use?
Choose vinegar + soap when…
- You need a quick spot spray for tiny weeds
- You can aim carefully and avoid drift
- You’re working on hot, dry days and want fast visual results
Choose boiling water when…
- You want a no-chemical option for cracks and patios
- Weeds are clustered in a pourable area
- You prefer “kitchen-simple” tools and zero mixing
Use both (strategically) when…
You’re dealing with repeat offenders. For example: boiling water to knock down a clump in a crack, then vinegar spray for small seedlings that pop up later. Think of it as a one-two combo: “hot punch,” then “acidic side-eye.”
How to Keep Weeds From Coming Back (Because They Will Try)
Killing weeds is only half the story. The other half is making the spot less inviting for the next batch of seeds that blows in like it owns the place. Pair DIY weed killers with these low-effort prevention moves:
1) Remove the “welcome mat”
- Fill cracks with appropriate filler or sealant
- Refresh gravel paths so sunlight doesn’t reach hidden soil pockets
- In beds, maintain 2–3 inches of mulch to block light
2) Get them early
Both vinegar spray and boiling water work best on young, newly emerged weeds. Small weeds are easier to kill, easier to pull, and dramatically less smug.
3) Keep notes (yes, really)
If you’re experimentingespecially with vinegar strength, timing, and which weeds respondwrite down what you used, when you applied it, and how it worked. Over a season, those notes turn into your own custom weed-control playbook.
FAQ
Will DIY weed killers kill the roots?
Usually not. Vinegar and boiling water are typically contact methods: they damage leaves and crowns. Many perennials can resprout from stored energy in roots, so repeat treatments (or digging) may be needed.
Is vinegar weed killer safe around pets?
Mild household vinegar is less risky than many alternatives, but it can still irritate mouths and stomachs if licked or eaten. Stronger vinegar can cause burns. Keep pets away while applying and until the area is dry.
Can I use vinegar weed killer in my vegetable garden?
It’s risky. Vinegar is non-selective and can injure desirable plants easily. If you must, use extreme precision on isolated weeds and avoid windy days. Many gardeners prefer hand-pulling and mulching in food beds.
Does adding salt make it work better?
Salt can increase damage, but it can also harm soil and prevent future growth. If you use it, reserve it for hardscape cracks where you truly don’t want anything growing. Avoid using salt near lawns, garden beds, and tree roots.
How often can I reapply?
For vinegar sprays, many people re-treat as needed when regrowth appears (often within a week or two). For boiling water, follow-up treatments are commonly done when resprouts show upespecially for established weeds.
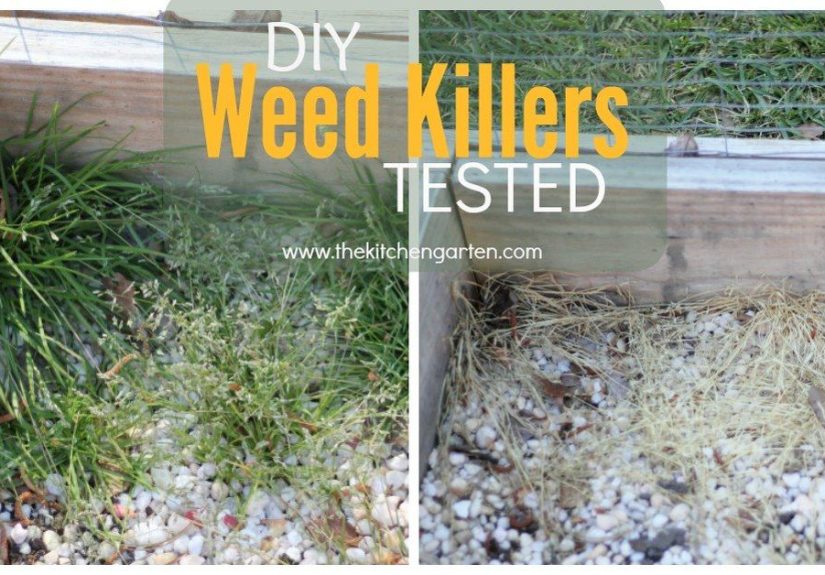
Conclusion
If you want two DIY weed killers that are practical, understandable, and actually work in the real world, this is the short list: vinegar + a touch of soap for spot-spraying young weeds, and boiling water for crack-and-crevice takedowns. Used in the right places, at the right time, they’re effective toolsespecially when you combine them with basic prevention like crack filling and mulching.
The secret isn’t finding a mythical “one spray to rule them all.” It’s targeting weeds early, applying carefully, and making your yard a less welcoming hotel for the next wave of freeloading sprouts.
Field Notes: of Real-World Experience With DIY Weed Killers
People usually start DIY weed control with the same emotional energy as reorganizing a junk drawer: confident, slightly annoyed, and deeply optimistic that this time, things will stay tidy forever. Then weeds remind you they are nature’s most persistent hobby.
The most common “first lesson” with a vinegar weed killer is overspray. You aim for the weed in the driveway crack, but there’s a tiny breeze you can’t feel, and suddenly the edge of your lawn gets a surprise misting. A day later, that grass looks like it’s considering a career change. It’s not permanent in every case, but it’s enough to teach the golden rule: spray low, spray close, and skip windy days.
The second lesson is about weed size. Vinegar spray can make small seedlings collapse fast, which feels wildly satisfyinglike watching a time-lapse video in real life. But if you wait until weeds are tall, leafy, and confident, you may get “burned leaves” without a true kill. That’s when people discover the difference between a plant looking dead and a plant being dead. Many perennials treat vinegar like a dramatic spa day: they wilt, they brown, and then they come back refreshed.
Salt is another frequent learning moment. It’s tempting because it sounds decisive: “Surely salt will teach these weeds a lesson.” It mightbut it can also teach your soil a lesson you didn’t want it to learn. When salt ends up where you later want plants, the area can stay stubbornly bare longer than expected. The practical takeaway most seasoned DIYers land on is simple: salt belongs in hardscape cracks only, and even then, applied sparingly.
Boiling water creates its own set of “field notes,” mostly centered on technique. A tea kettle with a controlled pour is a game changer. People who try to pour from a big pot often splash or miss the crown, and that’s when the method feels less effective than promised. With a kettle, you can get right into the crack, soak the weed’s growing point, and watch it wilt almost immediately. The visible browning typically shows up over the next day or two, which can make impatient folks think it “didn’t work” until it very much did.
The final, surprisingly empowering experience is tracking what works in your specific yard. Different surfaces, different weeds, different microclimates. Keep a quick note on your phone: what you used, the weather, the weed type, and the result a week later. Over time, you’ll build a repeatable routinelike “boiling water in early spring for the first flush” and “vinegar spot spray for tiny summer seedlings.” That’s when DIY weed control stops feeling like whack-a-mole and starts feeling like a system. Not a perfect systembecause weeds are weedsbut a system that wins often enough to keep you smiling.


