
Table of Contents >> Show >> Hide
- What Is Martha Stewart Liquid Gilding?
- Why Crafters Love Plaid:Craft – Martha Stewart Liquid Gilding
- Best Uses for Martha Stewart Liquid Gilding
- How to Use Plaid:Craft – Martha Stewart Liquid Gilding
- Safety Tips You Should Not Skip
- Design Ideas for a Better Finish
- Martha Stewart Liquid Gilding vs. Traditional Gold Leaf
- Common Mistakes to Avoid
- Buying Tips and Product Availability
- of Real-World Experience: What It Feels Like to Craft With Liquid Gilding
- Conclusion
If your craft project looks nice but whispers “plain oatmeal,” Plaid:Craft – Martha Stewart Liquid Gilding is the tiny bottle that walks in wearing a tuxedo. This one-step metallic leafing paint was designed to give ordinary surfaces a rich, reflective finish without the delicate drama of traditional metal leaf sheets. Instead of handling whisper-thin foil, adhesive size, and a brush that somehow attracts every pet hair in the house, you simply shake, brush, and watch your project start acting expensive.
Martha Stewart Crafts Liquid Gilding, produced under the Plaid craft family, became popular because it offered the look of brass, gold, silver, copper, and other metallic finishes in a compact 0.75-ounce bottle. Older product listings describe it as a liquid gilding paint that creates a metallic luster similar to precious metal and can be used on paintable surfaces. Today, depending on availability, shoppers may find original Martha Stewart Crafts bottles through resale or older craft stock, while Plaid’s similar current leafing products are often sold under lines such as Liquid Leaf. The key appeal remains the same: a fast, dramatic metallic finish for DIY décor, frames, furniture accents, ornaments, party pieces, and small home upgrades.
What Is Martha Stewart Liquid Gilding?
Martha Stewart Liquid Gilding is a solvent-based, metallic leafing paint made for decorative craft and home décor projects. Unlike standard acrylic metallic paint, liquid gilding usually contains fine metallic pigments suspended in a solvent formula, which helps create a brighter, smoother, more reflective surface. That is why a single brushed coat can look closer to metal leaf than the soft shimmer of typical craft paint.
The phrase “liquid gilding” can sound fancy, like something a Renaissance apprentice would whisper while polishing a cathedral frame. In reality, it is wonderfully practical. It gives crafters a way to add metallic highlights, borders, edges, lettering, stenciled details, and full-coverage finishes without mastering traditional gilding techniques. You do not need to burnish leaf sheets or chase gold flakes across the table like confetti in a windstorm.
Why Crafters Love Plaid:Craft – Martha Stewart Liquid Gilding
The biggest reason crafters reach for this product is the finish. A good liquid gilding paint catches light beautifully. It can make a thrifted picture frame look boutique, a plain vase look holiday-ready, or a basic wooden ornament look like it came from a charming little shop where everything costs more than expected.
It Delivers a Rich Metallic Look
Liquid gilding is known for its intense shine. While many metallic acrylic paints look pearly or sparkly, Martha Stewart Liquid Gilding leans more toward a true leafed effect. Brass and gold shades can feel warm and antique, while silver can look clean and classic. Copper gives projects a cozy glow that pairs well with teal, navy, black, cream, and natural wood.
It Is a One-Step Leafing Paint
Traditional gilding often requires adhesive, metal leaf sheets, soft brushes, sealing, and patience. Liquid gilding simplifies the process. You brush it directly onto a prepared surface, let it dry, and admire your handiwork while pretending you did not just upgrade a $2 thrift-store object into something that deserves mood lighting.
It Works on Many Paintable Surfaces
Product descriptions and crafter experience commonly point to use on paintable surfaces such as wood, metal, glass, ceramic, paper mâché, canvas, frames, ornaments, and decorative accessories. Smooth surfaces usually show the most dramatic shine, while textured surfaces create an aged or hand-finished look. The product is especially popular for highlighting carved details, raised edges, trim, knobs, and stenciled designs.
Best Uses for Martha Stewart Liquid Gilding
A little bottle can go surprisingly far, especially when you use it for accents instead of full coverage. The secret is to think like a stylist: where would a small metallic detail make the biggest visual impact?
Picture Frames and Mirror Frames
Frames are one of the easiest and most satisfying uses for liquid gilding. A dull black frame can become a brass-accented statement piece. A scratched wooden frame can be revived with a full gold finish. A mirror frame can get a refined metallic edge that makes the whole room feel more polished. For ornate frames, liquid gilding is excellent because it settles into carved details and emphasizes texture.
Furniture Accents
You do not need to cover an entire dresser in gold to make furniture look special. In fact, please do not turn your whole dresser into a treasure chest unless that is truly your personal brand. Instead, use liquid gilding on drawer pulls, table legs, carved trim, cabinet edges, feet, chair spindles, or decorative molding. Small metallic details can add elegance without overwhelming the piece.
Holiday and Seasonal Crafts
Liquid gilding feels right at home during the holidays. It can dress up ornaments, pumpkins, pinecones, candle holders, place cards, napkin rings, wreath details, and centerpiece elements. Brass and gold finishes are especially useful for Thanksgiving, Christmas, New Year’s Eve, weddings, and anniversary décor. Copper works beautifully for fall crafts, while silver suits winter and modern holiday themes.
Glass, Ceramic, and Decorative Objects
Plain glass jars, ceramic vases, trays, and bowls can be transformed with metallic rims, stripes, dots, or stencil designs. However, liquid gilding should generally be treated as decorative rather than food-safe unless the product label specifically says otherwise. Keep it away from surfaces that directly touch food, lips, or high heat. A gilded vase? Lovely. A gilded soup spoon? Let’s not give dinner guests a chemistry experiment.
Art, Signs, and Lettering
Liquid gilding can add bright metallic lettering to signs, canvases, journals, and handmade gifts. It looks especially striking over deep colors such as navy, charcoal, emerald, burgundy, and matte black. For clean lettering, use a stencil, fine brush, or paint marker-style technique if decanting carefully onto a palette. Work slowly because solvent-based metallic paint can be harder to correct than regular acrylic.
How to Use Plaid:Craft – Martha Stewart Liquid Gilding
Liquid gilding is beginner-friendly, but it rewards careful preparation. Think of prep work as the broccoli of crafting: not always glamorous, but your final result will thank you.
Step 1: Prepare the Surface
Clean the item before painting. Dust, grease, wax, and fingerprints can interfere with adhesion. For wood, lightly sand rough areas and wipe away dust. For glass or ceramic, clean with rubbing alcohol and let the surface dry completely. For previously painted furniture, make sure the paint is fully cured before adding gilded details.
Step 2: Protect Your Workspace
Because liquid gilding is usually solvent-based, it can stain surfaces and produce strong fumes. Work in a well-ventilated area, protect the table with disposable paper or a drop cloth, and keep the product away from heat, sparks, open flames, candles, and smoking materials. Wear gloves if you want to avoid metallic fingertips that make you look like you lost a thumb war with a robot.
Step 3: Shake and Stir Thoroughly
Metallic pigments settle quickly. Shake the bottle well before using it, and stir during longer projects. If the paint looks thin on top or uneven, the metallic particles may not be fully mixed. Proper mixing helps create that smooth, reflective finish liquid gilding is known for.
Step 4: Use the Right Brush
A small, soft brush is ideal for detailed work. For edges, trim, and frames, a flat craft brush can help maintain control. Use a brush you can dedicate to solvent-based products, because cleanup may require the thinner recommended on the label rather than soap and water. Avoid your favorite watercolor brush unless you enjoy heartbreak.
Step 5: Apply Thin, Even Coats
Brush on a thin coat and avoid overworking the paint. Liquid gilding often levels nicely when applied smoothly. Heavy coats can look streaky, puddled, or uneven. For more coverage, apply a second thin coat after the first coat dries according to the product directions.
Step 6: Let It Dry Completely
Drying time can vary depending on the surface, room temperature, humidity, and coat thickness. Avoid touching the finish too soon, even if it looks dry. Metallic finishes can show fingerprints, smudges, and brush marks if handled early. Let your project rest before sealing, styling, or gifting.
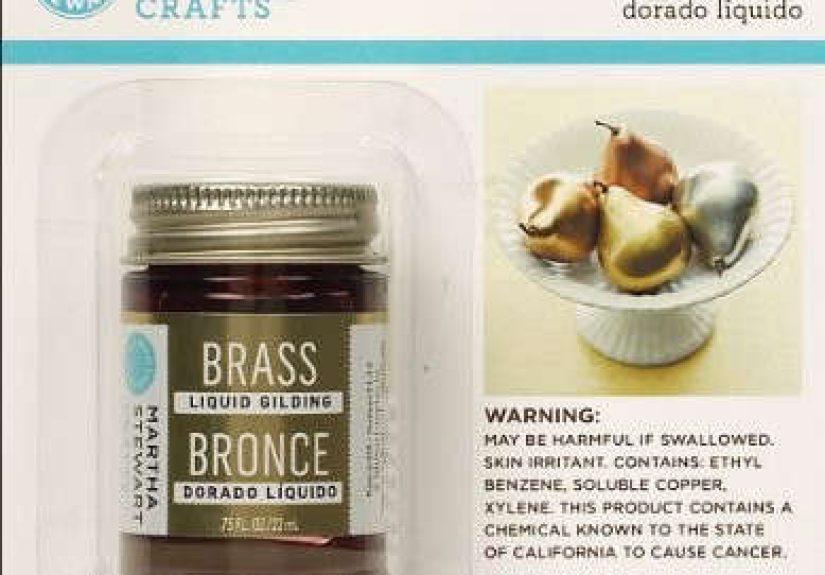
Safety Tips You Should Not Skip
Martha Stewart Liquid Gilding and similar liquid leafing paints are decorative products, but they still deserve respect. Many liquid leaf paints are solvent-based and flammable. That means ventilation matters, storage matters, and “I’ll just paint this beside a candle” is a bad idea wearing glitter.
Use Good Ventilation
Open windows, use a fan that moves air safely, or work outdoors when possible. Avoid using solvent-based gilding products in tiny closed rooms. If you are sensitive to fumes, take breaks and follow the safety instructions on the label.
Keep Away From Heat and Flame
Do not use liquid gilding near stoves, pilot lights, fireplaces, candles, or sparks. Store the bottle tightly closed in a cool place, away from children and pets.
Avoid Food-Contact Areas
Use liquid gilding on decorative surfaces, not eating surfaces. If you decorate a tray, keep the gilding on the handles or outer edge rather than the area where food sits. If you decorate glassware, keep the paint away from the rim and any area that touches the mouth.
Follow Cleanup Instructions
Because this type of paint is not usually water-based, brushes may not clean up with soap and water. Check the label for the recommended thinner or cleanup method. Dispose of used materials responsibly, especially solvent-soaked cloths or paper towels.
Design Ideas for a Better Finish
Liquid gilding shines brightest when paired with contrast. Metallic paint against a matte background often looks more expensive than metallic paint on an already glossy surface. Try brass over black, gold over deep green, copper over teal, or silver over navy. The more intentional the contrast, the more professional the project feels.
Use Painter’s Tape for Clean Lines
For stripes, borders, and geometric designs, apply painter’s tape firmly and remove it carefully before the paint fully hardens. This helps create crisp edges. Test first on delicate surfaces because tape can lift weak paint underneath.
Dry Brush for an Antique Look
For frames, carved wood, or textured surfaces, dip the brush lightly, wipe off the excess, and skim the surface. This technique catches raised areas and creates a vintage patina. It is perfect when you want “old European flea market” rather than “brand-new trophy.”
Stencil for Instant Detail
Stencils can turn plain boxes, trays, and signs into customized décor. Use very little paint on the brush to prevent bleeding under the stencil. Several light passes are better than one wet, impatient blob. Crafting rewards restraint, which is rude but true.
Martha Stewart Liquid Gilding vs. Traditional Gold Leaf
Traditional gold leaf has a unique beauty. It can look incredibly delicate, layered, and luminous. But it also requires more tools and patience. Liquid gilding is faster and easier, especially for beginners or practical DIY projects. It is best for crafters who want a metallic leaf effect without the fragile handling process.
Gold leaf sheets may be better for fine art, restoration-style projects, or work where authentic leaf texture matters. Liquid gilding is better for quick décor updates, small household accents, holiday crafts, and projects where durability and convenience matter more than traditional technique.
Common Mistakes to Avoid
The most common mistake is not mixing the product well enough. Metallic particles settle, and poor mixing leads to dull or uneven coverage. Another mistake is applying too much paint at once. A heavy coat may look tempting, but it can create streaks and take longer to dry.
Skipping ventilation is another problem. Solvent-based craft products need fresh air. Finally, do not assume the finish is automatically waterproof, dishwasher-safe, outdoor-safe, or food-safe. Unless the label confirms a use, treat the finished piece as decorative and protect it accordingly.
Buying Tips and Product Availability
Because Martha Stewart Crafts products have changed availability over time, shoppers may find original Martha Stewart Liquid Gilding through online marketplaces, resale shops, craft destash listings, or older inventory. Plaid’s related liquid leafing products may be easier to find in current craft stores and online retailers. When comparing bottles, look for finish names, bottle size, manufacturer details, surface recommendations, and whether the formula is solvent-based.
Before buying older stock, check whether the bottle appears sealed and usable. A dried-out or separated bottle may not perform well. Some separation is normal for metallic paint, but hardened product, damaged lids, or strong leakage are warning signs. For important projects, test the paint on scrap material first.
of Real-World Experience: What It Feels Like to Craft With Liquid Gilding
Using Plaid:Craft – Martha Stewart Liquid Gilding feels a little like discovering a cheat code for home décor. The first thing most people notice is how small the bottle is. At 0.75 ounces, it does not look like much. You may stare at it and wonder whether it can finish more than one picture frame and a very ambitious button. Then you open it, stir it well, brush on the first stroke, and realize the coverage is more dramatic than expected. This is not shy paint. It enters the room, clears its throat, and announces that the project is now fancy.
On a frame, the transformation can happen almost instantly. A dull brown or chipped black frame becomes warmer and more intentional with just a gilded inner edge. If the frame has raised details, the liquid gilding catches those high points and creates depth. The best results often come from not trying too hard. A slightly imperfect brushed finish can look handmade in the best possible way, especially on vintage-style décor.
On glass, the product can look sleek, but preparation is everything. Any oil from your fingers can cause uneven application, so cleaning first makes a big difference. A narrow gilded rim on a vase or a few metallic dots on a jar can look charming. The trick is to keep the design simple. Liquid gilding has a bold personality, and too much can turn elegant into “pirate birthday party” very quickly.
Furniture accents are where liquid gilding becomes especially satisfying. Painting only the feet of a small side table, the edge of a drawer, or the raised trim of a cabinet creates a designer effect without requiring a full furniture makeover. The project feels manageable because you are not repainting the whole piece. You are adding jewelry to it. And just like jewelry, the best result often comes from choosing one or two accents rather than covering every visible inch in shine.
The smell is the part beginners should be ready for. This is not the same experience as using mild acrylic craft paint at the kitchen table during a cozy movie night. Liquid gilding needs ventilation. Open a window, protect your work area, and keep children, pets, candles, and snacks away from the project. The finish is worth it, but safety is not optional.
Another practical lesson: dedicate a brush to this product. Cleanup can be different from water-based paints, and a beloved brush may never be quite the same. Use a small craft brush, work neatly, and close the bottle between uses so the formula does not thicken too quickly. Stir again if the shine starts looking inconsistent.
The most enjoyable part is how forgiving the product can be when used for accents. If a line is not perfect, it can still look artisanal. If a dry-brushed edge catches unevenly, it may look aged rather than mistaken. That is the charm of liquid gilding. It lets everyday objects look curated, collected, and just a little glamorous without requiring a workshop full of professional tools.
Conclusion
Plaid:Craft – Martha Stewart Liquid Gilding remains a favorite-style product because it gives crafters a fast path to a rich metallic finish. Whether you are upgrading a frame, decorating seasonal pieces, adding detail to furniture, or creating handmade gifts, liquid gilding offers shine, elegance, and flexibility in a small bottle. The best results come from good preparation, thin coats, careful mixing, and safe handling. Use it thoughtfully, and it can make ordinary craft projects look like they have been personally blessed by the décor gods.
Note: This article is based on real product descriptions, manufacturer-style usage guidance, craft retailer information, and practical DIY experience with liquid leafing paints. Always read and follow the label on the specific bottle you purchase, especially for ventilation, flammability, cleanup, surface use, and sealing instructions.


