
Table of Contents >> Show >> Hide
- Why a No Math, No Measure Geometric Design Table Works So Well
- What Is a No Math, No Measure Geometric Table?
- Supplies You Need for a Geometric Table Makeover
- Step-by-Step: How to Make a No Math, No Measure Geometric Design Table
- Step 1: Choose the Right Table
- Step 2: Clean the Table Thoroughly
- Step 3: Sand or Scuff the Surface
- Step 4: Prime If Needed
- Step 5: Paint the Base Color
- Step 6: Create the Geometric Pattern with Tape
- Step 7: Seal the Tape Edges
- Step 8: Paint the Geometric Sections
- Step 9: Remove the Tape Carefully
- Step 10: Protect the Finished Table
- Design Ideas for a No Measure Geometric Table
- Common Mistakes to Avoid
- Why This Project Is Perfect for Furniture Flipping
- Extra Experience: Lessons Learned from Making a No Math, No Measure Geometric Design Table
- Conclusion
- SEO Tags
A creative furniture makeover guide for anyone who loves bold design, thrifted tables, painter’s tape, and the sweet freedom of not doing geometry homework.
Why a No Math, No Measure Geometric Design Table Works So Well
A geometric design table sounds like the kind of project that should involve rulers, calculators, graph paper, and at least one dramatic sigh. But the charm of a No Math, No Measure Geometric Design Table is that it skips the intimidating part and goes straight to the fun. Instead of calculating exact angles, you use your eyes, painter’s tape, contrast, and instinct to create a bold table surface that looks planned, polished, and designer-approved.
This project became especially popular in the furniture-flipping world because it combines two very lovable things: rescuing an old table and making it look dramatically more expensive than it was. The hashtag #septfabflippincontest connects the idea to the September Fab Furniture Flippin’ Contest, where “geometric design” inspired makers to transform plain, outdated furniture into modern statement pieces. Think thrift-store table meets modern art, but without the museum guard judging your brushstrokes.
The best part is flexibility. A no-measure geometric table can be rustic, midcentury modern, playful, elegant, colorful, monochrome, metallic, farmhouse, boho, or clean and minimalist. The pattern can be random or balanced. The colors can whisper or shout. The only rule is that the finished table should make you pause and say, “Wait, I made that?”
What Is a No Math, No Measure Geometric Table?
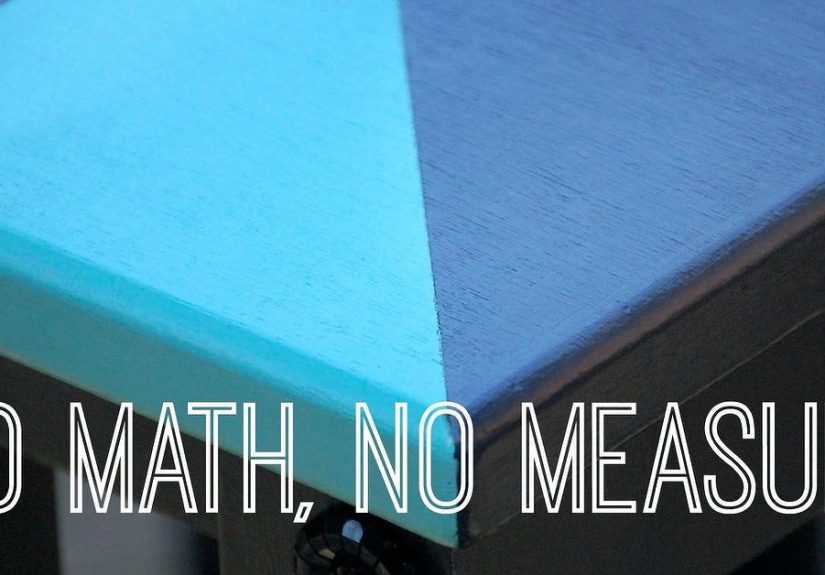
A no math geometric table is a painted or stained table makeover that uses taped-off shapes to create a geometric pattern without exact measuring. Instead of marking every inch, you place painter’s tape at different angles across the tabletop, forming triangles, diamonds, trapezoids, sunburst shapes, or abstract blocks. Then you paint or stain the open sections, remove the tape, and reveal crisp lines.
The approach works because geometric design does not always need perfect symmetry. In fact, many modern furniture designs look better when they feel slightly organic. A table with angled shapes can feel energetic and custom even when the pattern was created by simply letting the tape wander across the surface like it had a tiny artistic mission.
Common Styles for This Project
There are several ways to approach the design. A random geometric pattern uses tape in multiple directions and creates a lively, abstract look. A sunburst pattern starts near one corner or center point and radiates outward. A color-blocked table uses larger geometric sections in two or three shades. A wood-and-paint combination keeps some natural grain visible while adding painted shapes for contrast.
If you are new to furniture flipping, start with two or three colors. Too many shades can make the table look busy, unless that is your goal. If the table is going into a calm room, try soft neutrals, sage green, charcoal, white, tan, or muted blue. If the room needs personality, try navy and gold, black and white, terracotta and cream, or emerald and warm wood.
Supplies You Need for a Geometric Table Makeover
You do not need a professional workshop to create a beautiful DIY geometric table. A small table, a few basic supplies, and a little patience will do most of the heavy lifting. The patience is important because paint, like a toddler wearing rain boots, refuses to be rushed gracefully.
Basic Materials
- Old wood table, side table, coffee table, or kids’ art table
- Painter’s tape in one or two widths
- Sandpaper or sanding sponge
- Cleaning cloth or tack cloth
- Primer, if needed
- Furniture paint, chalk-style paint, milk paint, stain, or acrylic enamel
- Small foam roller or quality paintbrush
- Clear protective topcoat
- Drop cloth or cardboard to protect the floor
If the table will get heavy daily use, choose a durable finish. Coffee tables, kids’ tables, and entryway tables need protection from cups, crayons, keys, snack crumbs, and the mysterious sticky spot no one in the house will admit to creating. A water-based polyurethane or furniture-grade topcoat can help preserve the design while keeping the surface easier to wipe clean.
Step-by-Step: How to Make a No Math, No Measure Geometric Design Table
Step 1: Choose the Right Table
Look for a table with good bones. Solid wood is ideal, but veneer, MDF, and previously painted pieces can also work if they are structurally sound. Wobbly legs, peeling veneer, deep water damage, or cracked joints may need repair before painting. A simple square, rectangle, or round tabletop is easiest for beginners.
Do not dismiss an ugly table too quickly. Many furniture flips begin with a piece that looks tired, scratched, or trapped in a decade it did not enjoy. If the shape is good and the surface can be cleaned and sanded, it may be the perfect candidate.
Step 2: Clean the Table Thoroughly
Before sanding or painting, remove dust, grease, wax, and old polish. Use a mild cleaner suitable for furniture and wipe the surface dry. Paint does not bond well to grime, and no amount of artistic confidence can convince it otherwise. Pay special attention to edges, corners, carved details, and the underside of the tabletop where dust likes to hold secret meetings.
Step 3: Sand or Scuff the Surface
Light sanding gives primer and paint something to grip. You usually do not need to strip the piece down to raw wood unless the old finish is failing or you want a stained design. For painted designs, scuff-sanding the glossy surface is often enough. Wipe away sanding dust with a tack cloth or damp cloth and allow the surface to dry fully.
If the old finish may contain lead, especially on older furniture, avoid sanding until it has been properly tested and handled safely. For most modern thrifted pieces, basic sanding in a ventilated area is enough, but safety should never be treated like an optional accessory.
Step 4: Prime If Needed
Primer helps paint adhere and creates a more even base. Use primer when the surface is glossy, stained, slick, dark, or likely to bleed through. If you are using a high-bond furniture paint, you may be able to skip primer, but only if the product instructions say so. When in doubt, test a small area first.
Step 5: Paint the Base Color
Choose one base color for the entire tabletop. This color will become the lines between your geometric shapes when the tape is removed. White, black, charcoal, navy, or natural wood can all work beautifully. Apply thin, even coats and let each coat dry according to the paint label.
Thin coats are better than one thick coat. Thick paint may look efficient at first, but it can dry unevenly, leave brush marks, and peel when tape is removed. Thin coats are the quiet heroes of painted furniture.
Step 6: Create the Geometric Pattern with Tape
Now comes the no-math magic. Once the base color is fully dry, start placing painter’s tape across the tabletop. Begin with one long diagonal strip, then add more strips at different angles. Let the tape cross over itself to form triangles and irregular polygons. Step back often and look at the design from different sides.
You do not need to measure. Use your eye to balance large and small sections. If one corner looks too empty, add another strip. If the design feels too crowded, remove one. The goal is not mathematical perfection; it is visual rhythm. Imagine the pattern as music. You want enough repetition to feel intentional and enough variation to keep it interesting.
Step 7: Seal the Tape Edges
For extra-crisp lines, press the tape edges firmly with your finger, a plastic card, or a putty knife. Some furniture painters also seal the tape edge with a thin coat of the base color before applying the next color. If any paint seeps under the tape, it will be the base color, which helps prevent messy lines.
Step 8: Paint the Geometric Sections
Fill in the open shapes with your chosen colors. You can use one accent color for a simple modern look or several colors for a playful design. Try to avoid placing the same color in neighboring sections unless you want them to visually merge. A small foam brush or artist brush can help with tight corners.
Apply paint lightly and move away from the tape edge rather than pushing paint under it. This small habit can make the difference between clean lines and a design that looks like it sneezed.
Step 9: Remove the Tape Carefully
Remove the tape while the final coat is still slightly tacky or after it has dried enough to lift cleanly, depending on the paint and tape instructions. Pull slowly at an angle. If paint begins to lift, use a craft knife to score gently along the tape edge. Take your time. This is the reveal moment, and it deserves a little ceremony.
Step 10: Protect the Finished Table
After the paint cures, apply a clear topcoat. A satin finish is a popular choice because it adds durability without making every fingerprint announce itself. For a high-use tabletop, apply multiple thin coats, allowing proper drying time between coats. Once cured, the table will be ready for books, lamps, coffee mugs, homework, board games, or whatever daily life throws at it.
Design Ideas for a No Measure Geometric Table
Black and White Modern Table
A black-and-white geometric table is bold, graphic, and surprisingly versatile. Use a white base with black shapes for a clean Scandinavian-inspired look, or reverse it for a moodier statement piece. This style works well in entryways, offices, and living rooms with simple decor.
Natural Wood and Painted Geometry
If your table has attractive wood grain, let part of it show. Tape off geometric sections and paint only a few shapes, leaving the rest stained or sealed wood. This creates a warm, modern contrast and is especially beautiful on midcentury-style tables.
Metallic Accent Table
Gold, copper, or bronze accents can make a small table look boutique-worthy. Metallic paint works best in limited sections because a little shine goes a long way. Think of it as jewelry for furniture: fabulous in the right amount, chaotic if the table looks like it raided a treasure chest.
Kids’ Art Table
A geometric kids’ table can be colorful, forgiving, and fun. Use bright blocks of paint on the top and a durable topcoat to help protect against markers, glue, and snack-related incidents. This style is perfect for playrooms because the pattern already has energy, so a few future scuffs will not ruin the look.
Common Mistakes to Avoid
Using Cheap Tape
Painter’s tape matters. Low-quality tape can bleed, lift paint, or leave fuzzy edges. Choose tape designed for delicate or painted surfaces if your base coat is fresh. Press edges down firmly before painting.
Rushing Dry Time
Paint needs time to dry and cure. Dry means it can be touched. Cured means it has hardened enough for regular use. A table may feel dry after a few hours but still need days or weeks before it reaches full durability. Treat the finished piece gently at first.
Skipping Surface Prep
Preparation is not glamorous, but it is the reason the final project lasts. Clean, sand, wipe, prime if needed, and then paint. Skipping prep is like building a house on pudding. It may look fine briefly, but the future is not promising.
Choosing Too Many Competing Colors
Color is exciting, but too many strong shades can make a small table look cluttered. A good rule is to choose one base color, one main accent color, and one supporting color. Add metallic or wood tone only if the palette still feels calm.
Why This Project Is Perfect for Furniture Flipping
A geometric painted table is ideal for furniture flipping because it creates a strong before-and-after transformation without requiring expensive materials. Small tables are easy to find secondhand, easy to transport, and manageable for beginners. A dramatic tabletop pattern photographs well, which matters if you plan to sell the piece, post it on social media, or enter a furniture makeover contest.
The no-measure approach also reduces pressure. Many people avoid furniture painting because they fear making a mistake. But geometric design is forgiving. If a shape looks odd, add another stripe. If a color feels too loud, paint over it. If the whole thing becomes a little too wild, congratulations: you have invented maximalism.
For SEO and social sharing, this topic naturally connects with phrases like DIY geometric table, painted furniture makeover, no measure geometric design, furniture flipping ideas, painter’s tape table design, and upcycled table project. These keywords reflect what readers are actually searching for when they want a creative but approachable furniture project.
Extra Experience: Lessons Learned from Making a No Math, No Measure Geometric Design Table
The first lesson from a project like this is that confidence often arrives after the first strip of tape. Before that, the blank tabletop can feel oddly intimidating. It is just a table, yes, but it also stares back like it expects you to have a design degree. Once the first diagonal line goes down, the pressure drops. The project starts to feel less like a test and more like a conversation.
One of the best experiences with a no-measure geometric design is learning to trust your eye. At first, you may want to adjust every strip of tape until it feels “correct.” But the beauty of this method is that correct does not mean equal. Correct means balanced. A large triangle on one side can be balanced by two smaller shapes on the other. A bold color can be softened by neutral space. A slightly strange angle can become the most interesting part of the whole tabletop.
Another practical lesson is that preparation changes everything. The most exciting part is the pattern, but the most important part happens before the color appears. Cleaning the table, sanding away the slick finish, wiping off dust, and allowing paint to dry properly may not feel creative, but those steps make the finished piece look intentional instead of rushed. A beautifully taped design on a poorly prepared surface will not stay beautiful for long.
Color choice is also an experience in restraint. It is tempting to use every pretty paint sample in the drawer. However, the most successful geometric tables usually have a controlled palette. Three colors can look stylish and custom. Seven colors can work too, but only if the goal is playful and energetic. For a living room table, soft contrast often feels more expensive. For a craft table or kids’ table, bright colors can make the piece feel joyful and durable rather than precious.
The tape reveal is the emotional peak of the project. Peeling back the strips feels like opening a present from your own past self. Sometimes the lines are perfect. Sometimes there is a little bleed. That is normal. A small artist brush can fix most edges, and tiny imperfections often disappear once the topcoat is applied and the table is styled in a room. Handmade does not mean flawless. It means the piece has evidence of a human being who cared enough to try.
Finally, a no math, no measure geometric table teaches that furniture flipping does not have to be complicated to be impressive. You do not need a garage full of tools or a spreadsheet of angles. You need a sturdy table, a simple plan, decent tape, patient drying time, and the willingness to let the design evolve. The finished table becomes more than a surface. It becomes proof that creativity can be practical, affordable, and a little rebellious. After all, any project that makes geometry look cool without making you solve for x deserves a permanent spot in the house.
Conclusion
A No Math, No Measure Geometric Design Table is one of the most satisfying DIY furniture projects because it delivers a high-impact result without complicated tools or calculations. With painter’s tape, good prep, a thoughtful color palette, and a protective finish, an ordinary table can become a custom statement piece. Whether you are joining the spirit of #septfabflippincontest, refreshing a thrift-store find, or just trying to make your living room look less “temporary apartment chic,” this project gives you room to experiment.
The secret is simple: let the tape guide the design, let the colors create personality, and let the imperfections remind you that handmade furniture has more soul than anything mass-produced. No math required. No measuring required. Just creativity, patience, and maybe a celebratory snack when the tape comes off clean.
SEO Tags
Note: This article is written as original, web-ready HTML content based on real DIY furniture-refinishing practices, geometric table makeover techniques, and furniture flipping experience. It does not include unnecessary citation placeholders or publishing artifacts.


