Table of Contents >> Show >> Hide
- What a Gadget Cache Is (and Why People Love Them)
- Meet the Magic Blocks: A Proximity-and-Order Puzzle
- How the Trick Works (No Actual Wizards Required)
- Parts You’ll Need (and What They Actually Do)
- Build Overview: A Weekend Project with Big Payoff
- 1) Pick Your Code Like You’re Designing a Movie Heist
- 2) Solder Cleanly (Your Future Self Will Thank You)
- 3) Install the DIP Switch and 7-Segment Display in the Correct Orientation
- 4) Wire the Battery Pack and Reed Switch
- 5) “Program” Each Digit Using the DIP Switch
- 6) Mount Everything in the Block Enclosure
- Encoding the Correct Order: Making the Blocks “Care” About Their Neighbors
- Designing the “Cache Around the Cache”
- Weatherproofing and Battery Life: Keeping the Magic Alive Outdoors
- Safety and Etiquette: Build Smart, Hide Responsibly
- Troubleshooting Cheatsheet (Because “It’s Fine” Is Not a Diagnostic)
- Fun Variations and Upgrades (If You Want to Go Full Mad Scientist)
- Builder Experiences and Field Notes ( of Real-World Vibes)
- Conclusion
If you’ve ever found a geocache and thought, “Neat,” you’ve met the standard container-and-logbook experience.
If you’ve ever found a geocache and thought, “Wait… why is this birdhouse judging me?” you’ve met a gadget cache.
Gadget caches turn the “find the box” moment into a “solve the thing” momentoften with clever mechanics, electronics, or both.
And the Magic Blocks gadget cache sits right in that sweet spot: simple enough to build over a weekend, satisfying enough to make grown adults
whisper “I am never emotionally recovering from this” when the final digit lights up.
What a Gadget Cache Is (and Why People Love Them)
Gadget caches are geocaches that go beyond a standard container by adding a hands-on puzzle or “device” you must figure out to reach the logbook.
Sometimes it’s a mechanical contraption. Sometimes it’s an electronic trigger. Sometimes it’s both and you start wondering if the cache owner
has a background in theme-park engineering. The best ones feel fair: you can reason your way through them, reset them easily, and they don’t require
brute force, guesswork, or sacrificing your dignity to the geocaching gods.
Meet the Magic Blocks: A Proximity-and-Order Puzzle
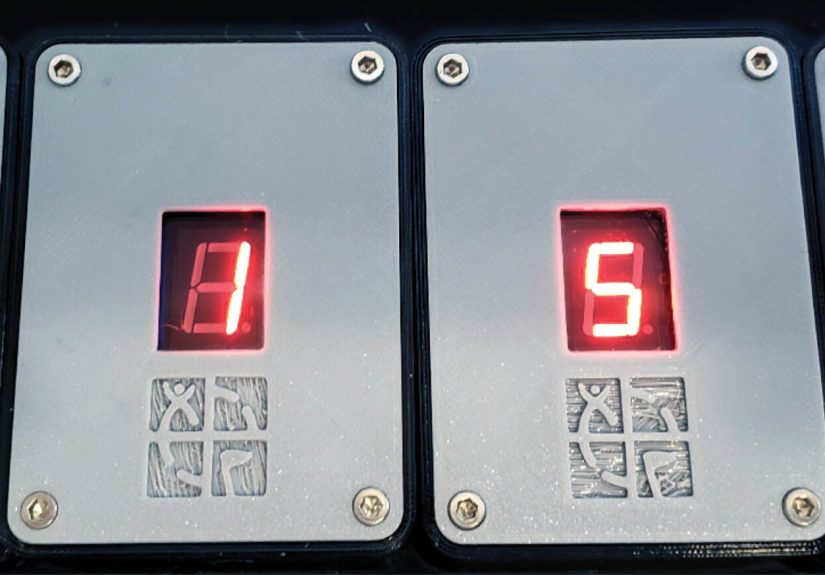
The Magic Blocks concept is delightfully straightforward: you build four separate blocks. Each block displays one digit on a 7-segment LED,
but only when the blocks are placed side-by-side and in the correct order. Arrange them incorrectly and the blocks stay dark, like they’re
giving you the silent treatment. Arrange them correctly andbamyour code appears.
That 4-digit code can be used as a combination for a lock, a keypad clue, or any “now you may access the real container” moment you want to create.
The “magic” is actually good design: strategically placed magnets plus magnetic sensing switches detect when the right neighbors are present.
Each block runs on two AA batteries and can last a long time in the fieldprovided you store the blocks so they don’t accidentally activate while hidden.
How the Trick Works (No Actual Wizards Required)
Magnet + Reed Switch = “Wake Up and Show the Digit”
At the heart of each block is a simple switching idea: a reed switch is a small device that changes state when a magnetic field is nearby.
Bring a magnet close, the switch closes, and the circuit can power the display. Move the magnet away, the circuit opens, and the display turns off.
Because it’s just a switch, polarity isn’t an issue for the reed switch wiringmaking it beginner-friendly and very forgiving.
The Digit Is Set by a DIP Switch (a Tiny “Code Wheel”)
Each block includes an 8-position DIP switch. Think of it like a tiny, physical settings menu.
Flip certain switches “on,” and you light specific segments on the 7-segment display so the digit you want appears.
No microcontroller required. No firmware updates. No “my cache needs Wi-Fi” nonsense.
Resistors Keep the LEDs Happy (and Not Toasted)
LEDs need current limiting, and the Magic Blocks approach uses 220Ω resistors to keep current in a safe range.
A clever twist: different digits may use different numbers of resistors so the overall brightness looks consistent across the set.
(Because nothing kills “magic” like the number 8 blazing like the sun while the number 1 looks like it needs a nap.)
Parts You’ll Need (and What They Actually Do)
You can build Magic Blocks from a kit or source your own parts. Either way, the core shopping list is similar:
- 4 PCBs (or perfboard, if you’re feeling brave)
- 4 common-cathode 7-segment displays (one digit each)
- 4 eight-position DIP switches (to “program” each digit)
- 220Ω resistors (quantity depends on your exact design)
- 4 reed switches (magnetic sensing switches)
- 4× 2-AA battery holders + 8 AA batteries
- Magnets (strong enough to reliably trigger the reed switch at the designed distance)
- Enclosures (3D-printed cases are common) + fasteners (including tamper-resistant screws if desired)
Build Overview: A Weekend Project with Big Payoff
1) Pick Your Code Like You’re Designing a Movie Heist
Choose four digits that will become your displayed code (for example, 3-1-5-9).
Label each PCB or block as you go so you don’t accidentally build “3-1-5-9” and then hide “3-1-9-5” because two blocks switched places in your workbench chaos.
2) Solder Cleanly (Your Future Self Will Thank You)
The build is approachable if you can solder through-hole parts, but good habits matter:
keep joints clean, heat the pad and lead (not just the solder), and avoid cold joints that look dull or lumpy.
If you’re teaching a friend, this project is a solid “level-up”because a gadget cache that fails due to one crusty solder joint is the opposite of magical.
3) Install the DIP Switch and 7-Segment Display in the Correct Orientation
Orientation matters. If your display is rotated, your “2” becomes a cursed symbol from an ancient keypad civilization.
Dry-fit parts before soldering, confirm alignment, then solder and trim leads neatly.
4) Wire the Battery Pack and Reed Switch
Connect battery leads securely (and strain-relieve them so yanking a wire doesn’t rip a pad off the board).
Then connect the reed switch wires. Since the reed switch acts like a simple on/off switch, lead direction isn’t critical.
5) “Program” Each Digit Using the DIP Switch
Flip the DIP switches to match the segments needed for your chosen digit.
Test each block independently: bring a magnet near the reed switch and confirm the correct digit lights up.
If a segment is missing, you’ve got an easy checklist: wrong DIP setting, bad solder joint, or a segment pin that didn’t actually solder (it happens).
6) Mount Everything in the Block Enclosure
A tidy enclosure does three jobs: protects the electronics, makes the puzzle feel “real,” and helps prevent accidental wire snagging.
Many builders use internal foam as a spacer/support, screw the PCB in place, and cover the display with a clear window.
Tamper-resistant screws can discourage the occasional “I solved it with a screwdriver” speedrun.
Encoding the Correct Order: Making the Blocks “Care” About Their Neighbors
This is the clever part: you place reed switches and magnets into side slots so that a block only turns on when the correct adjacent block is present.
A common approach links the blocks like a chain:
- Block 1 has a magnet on its right side and its reed switch positioned to be triggered by the correct neighbor.
- Block 2 carries a magnet that triggers Block 1’s switch (and also has its own switch triggered by Block 3).
- Block 3 continues the chain toward Block 4.
- Block 4 finishes the chain so all digits appear only when the whole lineup is correct.
The result: a finder can physically experimentsliding and swapping blocksuntil the “right” lineup causes all four displays to light at once.
It’s tactile, intuitive, and feels earned.
Designing the “Cache Around the Cache”
A Magic Blocks gadget cache isn’t just four blocks tossed in a box. You need a container that:
- Keeps blocks separated during storage so they don’t turn on and drain batteries.
- Provides a clear start state (e.g., four labeled compartments or a foam divider).
- Explains the goal without spoiling the solution (a short instruction card can be perfect).
- Offers an obvious “next step” once the code is revealed (lock, latch, secondary container, etc.).
Pro tip: build in a reset routine that takes seconds, not minutes. Cache owners who design for easy resets tend to have happier logs,
fewer maintenance trips, and fewer “Found it… but it was broken” heartbreak entries.
Weatherproofing and Battery Life: Keeping the Magic Alive Outdoors
Electronics and weather have a complicated relationship. Moisture, temperature swings, and condensation can turn “fun puzzle” into “sad science experiment.”
Even if your blocks live inside a larger container, plan for humidity and bumps:
- Use a snug enclosure and protect the display window from gaps that invite moisture.
- Add a small desiccant pack in the main cache container (and replace it occasionally).
- Choose batteries wisely for your climate. Lithium AAs are known for long storage life and strong performance across hot/cold conditions.
Battery drain prevention is also part of “weatherproofing,” because a dead cache is basically electronic litter with better branding.
Store the blocks with at least a small gap between their sides so magnets don’t accidentally trigger the reed switches while packed away.
Safety and Etiquette: Build Smart, Hide Responsibly
Great gadget caches are fun and reviewer-friendly. Follow core geocaching placement principles:
get permission where required, avoid locations that encourage trespassing, and don’t place or design a cache that damages property or the environment.
Also, don’t bury caches unless you have explicit permission where that’s allowed.
Because Magic Blocks use magnets, include a simple safety note. Strong magnets can pinch fingers, can be hazardous if swallowed,
and may interfere with some implanted medical devices. Many safety sources recommend keeping strong magnets a safe distance from pacemakers and similar devices.
A one-line warning in the cache description is enough to help people make safe choices.
Troubleshooting Cheatsheet (Because “It’s Fine” Is Not a Diagnostic)
- Nothing lights: check battery orientation, battery contacts, and reed switch wiring continuity.
- Some segments don’t light: re-check DIP switch settings and inspect solder joints on the display pins.
- Lights only when magnet is touching: magnet may be too weak or too far from the reed switchadjust placement or magnet strength.
- Lights when it shouldn’t: magnets are activating during storageadd dividers so block sides are separated.
- Dim or uneven brightness: confirm resistor values and that segments aren’t being over/under-driven.
Fun Variations and Upgrades (If You Want to Go Full Mad Scientist)
Once you’ve built the baseline puzzle, it’s hard not to imagine upgrades:
- Multi-stage reveals: blocks show digits, digits open a lock, lock reveals a second puzzle.
- Alternate sensing: replace reed switches with Hall-effect sensors for more tunable triggering distances.
- Microcontroller flair: animate segments, add a timeout, or require a “perfect lineup” held steady for two seconds.
- Theme builds: turn the blocks into “ancient runes,” “space cargo cubes,” or “wizard bricks” depending on your cache story.
Just keep upgrades maintainable. The most beloved gadget caches are the ones that survive real weather, real hands, and real “Oops, I dropped it” moments.
Builder Experiences and Field Notes ( of Real-World Vibes)
Building Magic Blocks tends to follow a predictable emotional arclike a tiny four-episode TV series where the villain is “one solder joint that looked fine yesterday.”
Episode one is optimism: you lay out the parts, admire the clean lines of the 7-segment display, and confidently tell yourself, “This will be quick.”
Episode two is humility: you realize the DIP switch is smaller than your fingernail and somehow still smug about it. By episode three, you’re testing with a magnet
and experiencing the pure joy of the first digit lighting upan immediate, satisfying payoff that makes the project feel alive.
The most common “aha” moment happens when builders stop thinking of the blocks as electronics and start thinking of them as behavior.
A good gadget cache isn’t just wired correctlyit behaves predictably for strangers in the field. That’s why many builders end up doing
“gloved-hand tests” (because finders might be wearing gloves), “cold car tests” (because winter exists), and “friend-who-doesn’t-know-the-rules tests”
(because that friend will do exactly what a real cacher does: try things in the wrong order with maximum confidence).
Hiding the finished cache brings its own lessons. Builders often discover that the container design matters as much as the puzzle itself.
If the blocks are stored too close together, they can accidentally activate and quietly drain batteriesso the divider system becomes a hero.
If the instructions are too long, people stop reading. If the instructions are too short, people interpret “place blocks together” as “stack into a modern art tower.”
The sweet spot is usually a short, friendly prompt: “Line the blocks up side-by-side to reveal the code,” plus a hint that order matters.
You’ll be amazed how far a single sentence can go when it’s written for humans who are excited and slightly impatient.
In the field, the most rewarding logs tend to come from the moment the puzzle “clicks.”
Finders often describe a shift from random swapping to intentional reasoninglike they’ve finally learned the block language.
That’s the real magic: the puzzle teaches without lecturing. You can practically hear the gears turning when someone notices,
“Oh… this one only lights when it’s next to that one.” And when all four digits glow at once, it produces a strangely universal reaction:
a tiny victory dance, followed by immediate concern about whether they can put it back correctly.
Cache owners also report that Magic Blocks are a great “gateway gadget.” After maintaining one, you start noticing improvements you’d make next time:
adding clearer alignment marks, making the reset foolproof, or designing the container so the blocks return to their slots in only one orientation.
It’s a rare DIY project where iteration is part of the culturebecause every finder is basically user testing, and geocachers are enthusiastic
(and occasionally chaotic) testers. If you build it with that mindset, your Magic Blocks cache won’t just workit will age well, earn favorites,
and make people remember your hide long after they’ve forgotten the last 37 pinecone micros.
Conclusion
A Magic Blocks gadget cache is the kind of project that makes geocaching feel like a hands-on puzzle adventure instead of a scavenger hunt with paperwork.
It’s approachable, modular, and packed with delight: four independent blocks that only reveal a code when aligned in the correct order.
Build it cleanly, store it smartly, hide it responsibly, and you’ll create the kind of cache people talk aboutthe good kind of “talk about,” not the
“why is this glued shut” kind.