
Table of Contents >> Show >> Hide
- What “Jack And The Ghost Of The Wrecking Yard” Really Is (And Why It Works)
- Why a Wrecking Yard Is Basically a Ready-Made Movie Set
- Meet the Cast: How to Make Tiny Props Feel Like Real Characters
- Pre-Production: Permission, Safety, and Not Becoming the Ghost
- Shooting the Series: How to Capture Spooky Without Getting Muddy
- Storytelling: Turning a Photo Shoot into a “Mini Series”
- Post-Processing: Keep the Grit, Lose the Mess
- Creative Variations: Make It Yours Without Copying Anyone
- What the Experience Feels Like: Creating Your Own “Jack And The Ghost” Photo Adventure (500+ Words)
- Conclusion
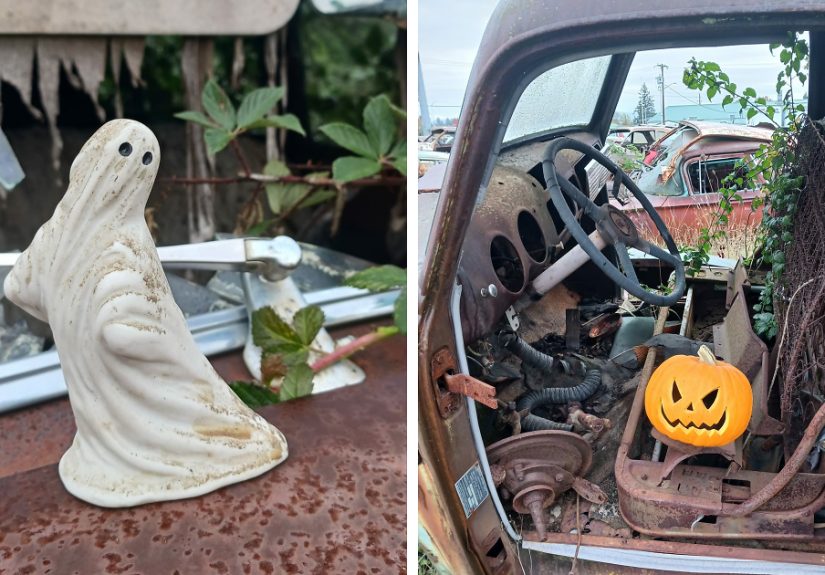
Somewhere between “cute Halloween décor” and “why does this place feel haunted even at noon,” there’s a particular kind of magic that happens when you drop a tiny, friendly character into a giant, gritty setting. That’s the whole charm behind Jack And The Ghost Of The Wrecking Yard: a playful, spooky photo-story vibe built from simple propsa jack-o’-lantern and a ghostset against the rusty grandeur of a classic car wrecking yard.
It’s the kind of concept that makes you grin first, then lean in closer. Because a wrecking yard isn’t just a pile of old metal. It’s a museum of American roads, a graveyard of chrome, a time capsule where yesterday’s daily drivers become today’s textures, shapes, and shadows. And when you add Jack (that familiar pumpkin face) plus a little ghostly sidekick, the whole place transforms into a stage.
This article breaks down what makes the “Jack + Ghost + wrecking yard” formula work so welland how to create your own version with strong storytelling, safe planning, and photography techniques that help you capture spooky without turning everything into a blurry, noisy mess.
What “Jack And The Ghost Of The Wrecking Yard” Really Is (And Why It Works)
At its heart, Jack And The Ghost Of The Wrecking Yard is a visual idea: a small Halloween duo exploring a big, dramatic location. The reason it lands is simplecontrast. You’ve got friendly, recognizable symbols of Halloween (a jack-o’-lantern and a ghost) placed in a setting that already feels like a story. Wrecking yards naturally come with mystery: stacked fenders like broken ribs, rows of windshields reflecting the sky, and half-open doors that look like they were left mid-escape.
When you photograph characters in a place like that, you’re not just taking a “cool picture.” You’re building a micro-narrative. Viewers start asking questions automatically: Who are these little guys? Why are they here? Are they lost? Are they on a mission? Are they the only ones brave enough to walk past the suspiciously creaky pile of doors?
That curiosity is the secret sauce for content that performs well online. People don’t share “a pumpkin sitting on a car” nearly as much as they share “a pumpkin and a ghost investigating a mysterious wrecking yard.” Same objects, totally different energy.
Why a Wrecking Yard Is Basically a Ready-Made Movie Set
Photographers love locations that do half the work for them. Wrecking yards are like that friend who shows up to the party already wearing a perfect outfit and somehow makes everyone else look better.
Texture and Patina That Cameras Love
Rust, peeling paint, cracked vinyl, foggy headlights, bent badgesthese surfaces catch light in interesting ways. They create depth even in simple compositions and give you instant atmosphere. Halloween imagery thrives on atmosphere. A clean studio background can feel too polite. A wrecking yard feels like it has secrets.
Instant “Americana” and Nostalgia
Even if you’re not a car person, old vehicles trigger memories: family road trips, first cars, “my uncle had one like that,” or “I can practically smell the vinyl.” Nostalgia is emotional, and emotion is what makes images stick.
Built-In Story Props Everywhere
You don’t need to bring much. The environment is packed with natural “set dressing”: mirrors, tires, steering wheels, trunk lids, dashboards, license plates, and windows that can frame your characters like little theater stages.
Meet the Cast: How to Make Tiny Props Feel Like Real Characters
The fun of a Jack-and-ghost concept is that it’s basically character photographyjust with props instead of people. To make it work, treat your props like actors with motivations.
Give Them Roles
- Jack can be the brave leader, the curious explorer, or the lovable troublemaker.
- The ghost can be the anxious sidekick, the wise guide, or the “I told you this was a bad idea” best friend.
Once you choose roles, poses become easier. The characters “do” things: peek around corners, sit on a hood like they’re waiting, face a car door like they’re listening for whispers, or pose together as if they just found a clue.
Scale Is Your Superpower
A small subject in a huge location creates drama. Use that. Place your characters low in the frame with towering car stacks behind them. Or shoot wide so they look like tiny heroes entering a giant, rusty kingdom.
Repeat Visual Motifs
Online audiences love consistency. If Jack always appears near headlights, or the ghost always “haunts” side mirrors, that repetition becomes a signature. It’s like a running jokeexcept the punchline is vibe.
Pre-Production: Permission, Safety, and Not Becoming the Ghost
Wrecking yards are not parks. They’re working environments with heavy equipment, sharp metal, and restricted areas. If you’re going to shoot a concept like this, the creative plan starts with basic, common-sense logistics.
Get Permission (Yes, Really)
A salvage yard is private property. The best shoots happen when you have a clear “yes,” a point of contact, and rules you followwhere to walk, what not to touch, and whether you’re allowed to set props on vehicles.
Dress Like You’re Visiting a Worksite
Closed-toe shoes are non-negotiable. Thick soles help. Gloves are smart if you might touch anything, and you should assume any metal edge is sharper than your confidence.
Keep It Small, Keep It Controlled
The beauty of Jack and the ghost is that they’re tiny. That means you can build scenes without climbing, moving objects, or wandering into risky areas. Your goal is a safe, contained shoot that looks adventurousnot one that actually is.
Shooting the Series: How to Capture Spooky Without Getting Muddy
This concept looks best when you lean into low lightlate afternoon, dusk, blue hour, or night. But low light photography can punish you if you rely on luck. The fix is a simple trio: stabilization, intentional exposure, and thoughtful light.
Start at Blue Hour for Free Mood
The time right after sunset (or right before sunrise) gives you a sky that’s still bright enough to hold detail while your scene can look darker, moodier, and more cinematic. It’s basically nature doing color grading for you.
Use a Tripod Like You’re Proud of It
Long exposures can make wrecking yards look like haunted dreamscapesheadlights glowing, shadows stretching, and tiny characters looking oddly heroic. A tripod keeps your scene sharp and lets you use lower ISO settings, which usually means cleaner images.
Think in “Exposure Triangles,” Not “Magic Settings”
There’s no single perfect setup, but the logic stays consistent:
- Lower ISO generally keeps noise down.
- Wider aperture (smaller f-number) gathers more light but can reduce depth of field.
- Slower shutter brightens the scene but requires stability and patience.
If your Jack and ghost are close to the camera, you may want enough depth of field so they’re both sharp. That could mean using a slightly smaller aperture and compensating with a longer shutter time. The tripod makes that possible.
Focus Like You Mean It
Autofocus can struggle at night, especially in dark, low-contrast environments. If your camera hunts, switch to manual focus and use live view zoom (if available) to lock focus on Jack’s face or the ghost’s “eyes.” Tiny characters look adorableuntil they’re tiny and blurry. Then they just look like a smudge with ambition.
Add LightBut Keep It Believable
You don’t need a Hollywood lighting truck. A small LED light, a lantern, or even a phone light can add just enough to shape your characters. The trick is to hide the light source and keep the direction consistent, so it looks like moonlight or a distant streetlamp.
Want extra drama? Backlight the ghost so it glows slightly around the edges. Want comedy? Light Jack a bit brighter than the ghost so he looks like the overconfident one leading the way.
Storytelling: Turning a Photo Shoot into a “Mini Series”
A single strong image is great. A series is betterespecially for web content, social platforms, and SEO-friendly storytelling posts. A series invites scrolling, saves, and shares because it feels like an unfolding story.
Use a Simple 5-Beat Structure
- Arrival: Jack and ghost enter the yard. Establish the setting with a wide shot.
- Discovery: They find something interestingan old truck, a stack of doors, a mysterious trunk.
- Tension: Shadows get deeper. The yard feels bigger. The characters look smaller.
- Clue or Twist: A reflection, a strange silhouette, a “what was that?” moment.
- Exit (or cliffhanger): They leave… or they don’t. (Your audience will beg for part two.)
Mix Wide, Medium, and Close Shots
Wide shots show environment and mood. Medium shots show action. Close-ups sell emotionyes, even with a pumpkin and a ghost. If Jack has a carved grin, get close enough that viewers can feel it.
Let the Location Be a Character
Photograph details: rust patterns, cracked glass, a steering wheel with spiderwebs, a row of headlights like sleepy eyes. These “cutaway shots” make your post feel richer and help your story breathe between the hero images.
Post-Processing: Keep the Grit, Lose the Mess
Halloween wrecking yard photos usually look best with a little polishingjust enough to guide the viewer’s eye without turning the whole thing into a neon filter festival.
Control Noise and Hot Pixels
Long exposures and higher ISO can introduce noise or tiny bright pixels. Many editing tools include noise reduction features, and some cameras offer long exposure noise reduction. Use these gentlytoo much smoothing can erase the delicious texture you came for.
Color Grade for Mood
If the wrecking yard has warm sodium lights, lean into the amber glow. If you’re shooting under cooler light, a subtle blue tone can amplify the ghostly feel. Keep skin tones out of it (you’ve got props), so you’re free to style the scene like a movie poster.
Guide Attention with Light
Brighten Jack and the ghost slightly so they pop against busy backgrounds. Darken the edges of the frame a touch if it helps focus the eye. The goal is: “I see the characters instantly, then I explore the yard.”
Creative Variations: Make It Yours Without Copying Anyone
The phrase “Jack and the ghost in a wrecking yard” is a jumping-off point, not a template. Here are ways to create your own original spin while keeping the same irresistible contrast.
Swap the Setting
- An old barn (creepy but cozy).
- A hardware store aisle (funny and bright).
- A backyard tool shed (relatable horror).
- A car show (Jack meets his shiny cousins).
Swap the Mood
- Comedy: Jack “tries” to fix a car with a tiny wrench.
- Mystery: The ghost leads Jack toward a hidden “clue” (like a key or a badge).
- Heartwarming: They leave a little light behindlike a lantern in a headlight housing.
Add a Constraint (Constraints Create Creativity)
Pick one rule for the series:
- Every shot must include a reflection.
- Every shot must include a door or window frame.
- Every shot must be taken from ground level.
- Every shot must have a “hidden ghost” somewhere in the background.
Constraints stop you from making random photos and push you into intentional storytellingexactly what readers (and search engines) reward.
What the Experience Feels Like: Creating Your Own “Jack And The Ghost” Photo Adventure (500+ Words)
If you’ve never built a themed photo series before, the experience is equal parts planning and play. It starts in the least spooky place possible: your notes app. You jot down ideas that feel almost silly“Jack peeking out of a cracked window,” “ghost hiding behind a side mirror,” “pumpkin sitting like a king on a hood ornament”and then you realize that “silly” is actually a strategy. Because the best Halloween photos aren’t always the scariest. They’re the ones that feel like a story you want to step into.
When you arrive at a location like a wrecking yard (or any gritty, textured space), the first thing you notice isn’t “ghost vibes.” It’s the scale. Rows and rows of vehicles, stacked parts, and paths that look like they go somewhere… until they don’t. The place feels like a maze built out of memories. And that’s when your tiny characters become powerful: they give the viewer a way to enter the scene. Jack isn’t just a pumpkinhe’s your stand-in, your little explorer. The ghost isn’t just a decorationhe’s the mood translator, turning rust into atmosphere.
At the beginning of the shoot, you tend to work too fast. You see a perfect hood, you place Jack, you snap a shot, and you move on. Then you check the back of the camera and realize: the idea is right, but the photo is only halfway there. The background is busy. Jack blends in. The ghost looks like a white blob. So you slow down. You start thinking in layersforeground, subject, background. You move two inches to the left and suddenly the headlight becomes a spotlight. You crouch lower and the stacked cars look like looming cliffs. You tilt your light slightly and the ghost gains shape instead of glare.
As the light drops, the series starts to feel like an actual adventure. You’re paying attention to small changes: a patch of sky turning deep blue, a reflection appearing in a windshield, the way a beam of light slides across a fender like a curtain opening. Long exposures teach patience in a sneaky way. You can’t rush a 10-second shutter. You set the frame, press the button, and waitquietly hoping nothing bumps the tripod. That pause becomes part of the experience. It forces you to commit to a moment instead of spraying a hundred forgettable frames.
Somewhere in the middle, you’ll hit the fun zone: the point where your characters “start talking.” Not literally, of coursebut you’ll begin to see what the scene is saying. Jack looks brave in one setup and ridiculous in another. The ghost looks protective when you place it slightly behind him, and mischievous when it’s off to the side, half-hidden like it’s plotting a prank. You’ll start building sequences without even trying: wide shot for “arrival,” medium shot for “discovery,” close-up for “reaction.” You’ll realize you’re not just photographing objectsyou’re directing a tiny Halloween movie.
And when you get home, the story continues in editing. You’ll find favorites you didn’t expect. The “throwaway” image with Jack in the corner becomes the strongest because the yard looks enormous. The cleanest shot might not be the best because it feels too neat, too safe. You’ll learn to keep the gritjust enough noise, just enough shadow, just enough mysterywhile still making the characters pop. By the time you export the final set, you’ll have something bigger than a handful of spooky photos. You’ll have a cohesive little world. And the best part is that once you’ve done it once, you’ll start seeing “stages” everywhere: alleyways, old fences, garage corners, even a pile of leaves. Jack and the ghost don’t need a wrecking yard to have an adventure. They just need you to look at ordinary places like they might be enchanted.
Conclusion
Jack And The Ghost Of The Wrecking Yard works because it’s a perfect collision: adorable Halloween icons placed inside a dramatic, nostalgic environment that already feels like a story. With smart planning, safe practices, and a few night-photography fundamentals, you can create your own original series that’s funny, spooky, and genuinely compellingwithout needing expensive gear or over-the-top effects. Give your characters roles, give your images a sequence, and let the location do what it does best: whisper a little mystery into every frame.


