
Table of Contents >> Show >> Hide
- Why DIY Props Work So Well in Photography
- Start With What You Already Have
- My Favorite DIY Props for Magical Photos
- How I Build a Magical DIY Photo Setup
- Common DIY Prop Mistakes I Learned the Hard Way
- Real DIY Photo Ideas That Feel Special
- What Making DIY Props Has Actually Taught Me
- Final Thoughts
Some photographers collect lenses. I collect odd little objects that make a picture feel like it wandered out of a dream. A scrap of fabric becomes fog. A painted piece of cardboard becomes a moonlit wall. A handful of paper stars turns an ordinary portrait into something that looks like it belongs on the cover of a storybook. That is the joy of DIY photo props: they let you build wonder without draining your wallet or your will to live.
If you have ever looked at a photo and thought, “Why does this feel special?” the answer is usually not just the camera. It is the mood. It is the texture. It is the tiny details doing quiet work in the background. Handmade props help create that feeling. They add depth, story, humor, and personality. Better yet, they make your images look less like everyone else’s and more like yours.
Over time, I learned that magical photos are rarely about expensive gear and almost always about intentional choices. A prop should not scream for attention like a karaoke machine at midnight. It should support the subject, shape the scene, and guide the viewer’s eye. That is where DIY props shine. They are customizable, affordable, reusable, and weird in the best possible way.
Why DIY Props Work So Well in Photography
DIY props do more than fill empty space. They help tell a story. A stack of old books can suggest curiosity, nostalgia, or quiet intelligence. A bunch of paper butterflies can make a portrait feel playful and surreal. A wrinkled linen cloth can add softness to a food photo, while a painted foam riser can give a product more shape and dimension. These details are not random decorations. They are visual clues.
That is the first secret: props work when they support the mood. If the goal is whimsy, you want soft shapes, light textures, and colors that feel airy. If the goal is drama, darker surfaces, sharp shadows, and a more restrained color palette do the heavy lifting. The best prop is not necessarily the fanciest one. It is the one that makes the photo feel complete.
DIY props also solve a practical problem. You do not need a dedicated studio full of premium backdrops, expensive set pieces, and storage bins labeled with suspicious levels of organization. You can create a lot with cardboard, poster board, fabric scraps, tissue paper, paint, and a few thrifted finds. A plain wall, curtain, or even a taped-up sheet of paper can become a backdrop. A white foam board can become a bounce card. A leftover tile can become a sleek surface for flat lays or product shots. Suddenly your home is not just your home. It is a low-budget movie set with snacks.
Start With What You Already Have
Before buying anything, I look around the house like a raccoon with artistic ambition. What do I already own that could become a prop? Mugs, books, baskets, ribbons, glass jars, wooden cutting boards, wrapping paper, dried flowers, mirrors, parchment paper, old picture frames, and table linens all make regular appearances in my photos. The trick is not owning fancy stuff. The trick is seeing ordinary stuff in a new way.
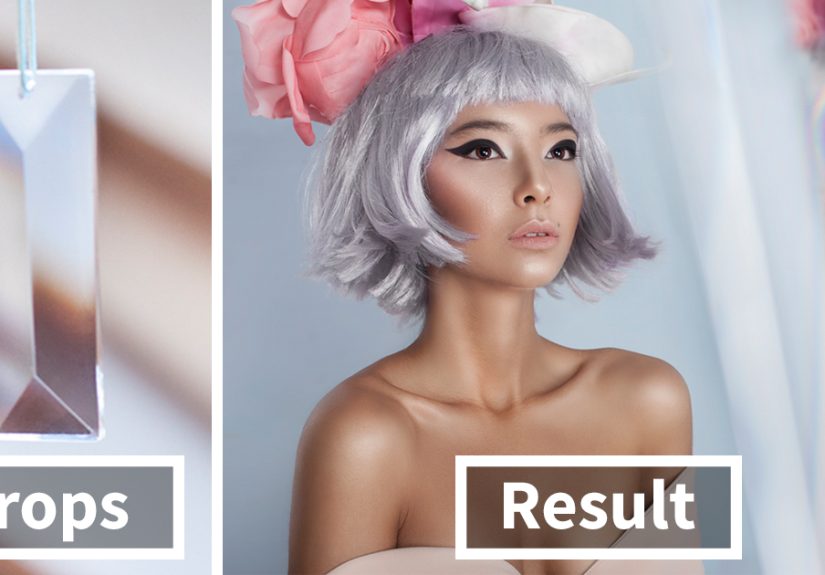
For portraits, I love starting with wearable or interactive props. Think flower crowns, handmade paper wings, oversized bows, tiny lanterns with battery-powered lights, or a stack of envelopes tied with string. Props people can hold, touch, or interact with often feel more natural than props that just sit there looking decorative and judgmental.
For flat lays and product photography, I focus on surfaces and supporting elements. Fabric adds texture. Paper clippings add shape. Confetti adds energy. Ceramic dishes, stationery, leaves, and small trays help frame the subject without cluttering the image. If you are photographing food or handmade products, a prop should feel relevant to the subject. A loaf of bread next to linen and a wooden board makes sense. A loaf of bread next to a neon cowboy boot might be memorable, sure, but maybe not in the way you intended.
My Favorite DIY Props for Magical Photos
1. Paper moons, stars, and clouds
If I had to choose one prop family to keep forever, it would be paper shapes. They are cheap, lightweight, easy to cut, and surprisingly versatile. I make crescent moons from foam board, cover them in paint or metallic paper, and hang them with clear thread for dreamy portraits. I cut tiny stars to scatter across a backdrop or float around a product shot. Clouds made from batting, tissue paper, or layered cotton can soften a scene and create a playful, weightless feeling. Basically, kindergarten craft supplies are my special effects department.
2. Painted cardboard arches and windows
Cardboard is the unofficial patron saint of DIY photography. I cut arches, faux windows, doorways, and abstract shapes from large cardboard sheets, then paint them in muted tones or bold statement colors depending on the shoot. Lean one against a wall, and suddenly the background has structure. Cut slats or shapes into dark card stock and let light pass through it, and now you have patterned shadows that look much fancier than their humble cardboard origins.
3. Foam board risers
These are ridiculously useful. I glue foam board into simple cubes and cylinders, then paint them to match the shoot. They help lift products, create levels, and add depth to flat lays or tabletop scenes. When everything sits on one flat plane, an image can feel lazy. Add a few levels, and the composition wakes up. It is like giving your subject a tiny stage and saying, “Please perform for the camera.”
4. Fabric that does not behave too well
Smooth fabric is nice. Slightly wrinkled fabric is magic. Linen, gauze, muslin, and old scarves add movement and softness without trying too hard. I use fabric as a backdrop, table surface, curtain, wrap, or foreground blur. The folds create leading lines, and the texture helps the photo feel lived-in instead of sterile. Perfectly flat fabric can look lifeless. A few thoughtful creases make it human.
5. Handwritten signs and tiny paper details
There is something charming about a prop that looks handmade because it is handmade. I create mini tags, paper tickets, labels, quotes, or tiny note cards to give a scene personality. For seasonal shoots, this works especially well. A hand-lettered tag on a jar, a paper banner in the background, or a small sign held by the subject can add context without overwhelming the frame.
6. Mirrors, clear acrylic, and reflective bits
A small mirror can make a simple setup feel cinematic. Clear acrylic sheets create clean reflections for products. Crinkled cellophane or translucent paper can catch light and create dreamy highlights. You do not need to turn every photo into a disco ball fever dream, but a little reflection can make an image feel more layered and polished.
7. Backdrops built from almost nothing
Some of my favorite backdrops have come from paper rolls, thrifted curtains, painted poster board, metallic paper squares, and strips of ribbon taped to the wall. The point is not perfection. The point is creating a visual world that supports the subject. If the backdrop matches your color palette and adds texture or shape, you are already winning.
How I Build a Magical DIY Photo Setup
Choose the mood before the materials
I never start by asking, “What can I make?” I start by asking, “What should this photo feel like?” Romantic? Playful? Moody? Nostalgic? Cozy? Modern? Once I know the feeling, the rest gets easier. Colors, textures, shapes, and props should all point in the same direction. A magical photo is not magical because it has more stuff. It is magical because the elements agree with each other.
Use light like a prop too
Window light is my best friend. Side light and backlight often make a scene feel more dimensional than flat front lighting. If the shadows are too heavy, I bounce light back with white poster board, foam board, or even foil-covered cardboard. Sometimes I use a dark board to deepen shadows and make the mood more dramatic. Light is not just illumination. It is part of the set design.
Keep the composition simple
The fastest way to ruin a magical shot is to treat every prop like it deserves a speaking role. It does not. Pick a clear hero subject, then use props as supporting cast. I often work in odd numbers, group objects in loose triangles, and leave negative space so the eye can rest. This makes the image feel more intentional and less like a yard sale with good lighting.
Add movement when possible
Magic loves motion. A hand reaching into the frame. A ribbon lifting in front of a fan. Confetti mid-air. A curtain caught in a breeze. Even a subject adjusting a hat or turning a page can make the scene feel more alive. Static props are helpful, but interactive props are often more memorable because they create action and personality.
Common DIY Prop Mistakes I Learned the Hard Way
The first mistake is using props that are cute but irrelevant. Yes, that tiny gold crown is adorable. No, it does not belong in every photo. A prop should connect to the subject, theme, or mood. Otherwise it becomes a random visual interruption.
The second mistake is overstyling. I used to believe more detail meant more magic. In reality, too many props flatten the image because the viewer no longer knows where to look. Now I remove at least one element before I shoot, then I remove another if the frame still feels crowded. Editing the set matters just as much as editing the photo.
The third mistake is ignoring texture and scale. Tiny props can disappear. Oversized props can swallow the subject whole. And when every surface is equally smooth, the image can feel lifeless. Mixing texture helps: matte paper with soft fabric, rough wood with glass, wrinkled linen with glossy ceramics. That contrast gives the eye something to enjoy.
The fourth mistake is forgetting safety and practicality. If a prop is flimsy, sharp, messy, or likely to collapse at the exact moment you finally get the expression you want, it is not magical. It is sabotage. I avoid real flames for DIY shoots, secure hanging pieces carefully, and test anything interactive before bringing it near the camera. Battery-powered lights, paper effects, and lightweight materials are usually more than enough.
Real DIY Photo Ideas That Feel Special
One of my favorite setups is a “storybook night” portrait. I use a dark backdrop, cut paper stars, a painted cardboard moon, and a small stool draped in fabric. The subject wears simple clothes, holds a book, and looks slightly off-camera as if they just heard a secret from the universe. It is inexpensive, easy to customize, and dramatic in the loveliest way.
Another favorite is a soft tabletop scene for handmade products or food. I use a neutral cloth, a painted riser, a small dish, a few scattered paper shapes, and window light from the side. Sometimes I add a hand entering the frame to place or lift an item. That small bit of action keeps the image from feeling too posed.
For playful photos, I love making giant paper props: oversized flowers, stars, bows, speech bubbles, or faux candy shapes. They photograph well because they are graphic, simple, and easy to read. Pair them with a clean backdrop and one strong color palette, and the image feels cheerful without turning into visual chaos.
What Making DIY Props Has Actually Taught Me
After years of making props for my photos, I have learned something slightly annoying but very true: the magic is not in the prop itself. It is in the attention behind it. Anyone can buy decorations. Anyone can order a backdrop online and hope the package delivers emotional depth along with the tracking number. But when you build something with your own hands, even something simple, you make choices that change the whole image. You think about color. You think about scale. You think about what this object is supposed to say. That process sharpens your eye faster than gear shopping ever will.
I have had props flop spectacularly. I once made a cardboard sun that looked less “golden hour enchantment” and more “school play emergency.” I have glued things crooked, painted things the wrong shade, and built pieces that were way too small for the frame. I have also spent an embarrassing amount of time trying to make tissue paper look elegant when it clearly wanted a different career. But those failures taught me what works: simple shapes, clear palettes, strong textures, and props that relate to the subject instead of competing with it.
I have also learned that homemade props create emotional connection. When someone sees a photo and asks, “Wait, did you make that?” the image immediately becomes more memorable. A handmade moon is not just a moon. It is a detail with personality. A tiny paper crown is not just an accessory. It is part of the story. Viewers may not know exactly why a picture feels personal, but they can feel it. DIY elements leave fingerprints on the final image, and that is a good thing.
There is also freedom in working with inexpensive materials. When I use cardboard, poster board, old fabric, and thrifted objects, I am more willing to experiment. I cut bolder shapes. I test strange color combinations. I try silly ideas. If it fails, fine. I am out a few dollars and one afternoon, not a small fortune and my remaining self-respect. That low-pressure environment invites creativity. Perfection is not the goal. Discovery is.
Some of my favorite shoots happened because I worked within limits. I did not have the “right” prop, so I made one. I did not have the “right” backdrop, so I painted one. I did not have a studio light, so I moved a table closer to a window and used white board to bounce light back into the scene. Those limitations forced me to understand styling, composition, and light more deeply. And honestly, that knowledge has stayed useful far longer than any trendy accessory would have.
Most of all, DIY props have reminded me that photography can be playful. Not every shoot has to be sleek, serious, or technically intimidating. Sometimes the best image comes from asking a ridiculous question like, “What if I made a moon out of cardboard?” and then actually doing it. Sometimes creativity looks less like genius and more like craft glue, paint on your hands, and a table full of tiny paper stars. That is still magic. Maybe that is especially magic.
Final Thoughts
I make DIY props to bring some magic into my photos because magic, in photography, is usually built rather than found. It is built through mood, detail, texture, light, and intention. Homemade props help me shape all of that in a way that feels personal and affordable. They let me create worlds instead of just recording what is already there.
If you want your photos to feel more memorable, do not wait for a perfect studio or a perfect budget. Start with a mood. Start with a few materials. Start with what is in your home right now. Make one prop. Try one backdrop. Bounce light with a piece of white board. Cut stars. Paint a riser. Drape fabric. Move things around. Make the photo a little stranger, a little softer, a little more you.
That is the real trick. The magic is not expensive. It is thoughtful.


