
Table of Contents >> Show >> Hide
- Why Londoners Went Underground
- What the Blitz-Era Underground Photos Actually Show
- How I Bring These Photos “Back to Life” Without Messing Up the Truth
- Step 1: Start with a high-quality digitization (or don’t start at all)
- Step 2: Repair damage like a conservator, not like a magician
- Step 3: Tone and contrastbecause the Blitz was not shot in “flat”
- Step 4: Colorization (optional) with labels, humility, and receipts
- Step 5: Captions that add context, not fan fiction
- The Ethics of “Bringing History to Life”
- What These Revived Photos Teach Us About the Blitz
- If You Want to Restore or Colorize Blitz Photos Yourself
- Conclusion
- Bonus: of Field Notes From My Restoration Desk
I didn’t set out to become emotionally attached to a blurry 1940s platform bench. It just… happened. One minute I’m
zooming in on a smudged photo of people huddled on the London Underground, the next I’m arguing with myself about
whether a blanket is “wartime gray” or “tired-beige-with-a-side-of-trauma.”
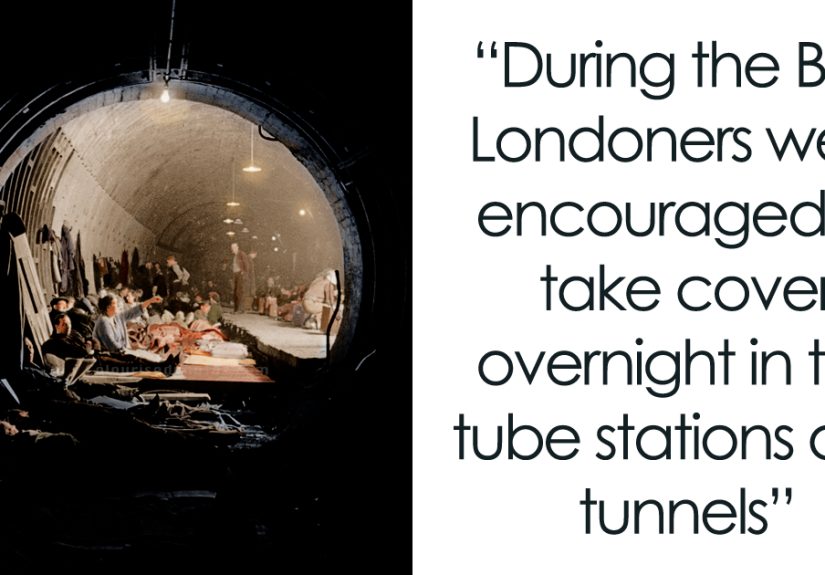
The Blitz (September 1940 through May 1941) wasn’t just a bombing campaignit was a nightly reshaping of ordinary life.
And some of the most haunting, human images from those months live below street level: Londoners sleeping shoulder-to-shoulder
on Tube platforms, turning escalators into bunkrooms, and making a temporary city in the tunnels.
This is the story of how those photos work on us nowand how I “bring them back to life” responsibly: restoring detail, recovering
contrast, sometimes colorizing for modern eyes, and always keeping the original truth intact. Because history doesn’t need a glow-up.
It needs clarity.
Why Londoners Went Underground
The Tube wasn’t built to be a bedroom, but it became one
When German bombing intensified, Londoners did what humans do best under pressure: they improvised. Public shelters existed,
private shelters existed, and yet the Underground offered something hard to beatdepth, thick walls, and a sense (sometimes real,
sometimes psychological) that you were safer down there than anywhere else.
In London, Tube stations became makeshift bomb shelters for huge crowdswell into the six figures on peak nightsbecause necessity
doesn’t wait for perfect policy. People brought pillows, thermoses, blankets, books, and the kind of patience you only unlock when
the alternative is staring at your ceiling and hoping it doesn’t become a skylight.
A nightly routine: queues, rules, and uneasy calm
Many shelterers queued before entry, then settled into a world of dim light, echoing announcements, and the steady hush of thousands
trying not to take up more space than a human body strictly requires. Over time, officials introduced systems to reduce chaosdesignated
areas, basic services, and a growing expectation that this underground community needed structure, not just shelter.
If you’ve ever tried to sleep on public transit, you know the vibe: uncomfortable, oddly intimate, and never fully quiet. Now imagine it
with blackout conditions above ground and the knowledge that the night is not “late,” it’s “dangerous.”
What the Blitz-Era Underground Photos Actually Show
1) The geography of survival
The photos don’t just capture peoplethey map out how a station becomes a shelter. Tunnels become hallways. Platforms become dormitories.
Corners become nurseries. You’ll see bodies aligned like punctuation marks along tiled walls, and luggage stacked like makeshift furniture.
2) The paperwork of being human: labels, signs, and small order
One reason these images feel so modern is that they’re full of systems: signage, station names, posted rules, the architecture of crowd control.
The Underground was already designed for flow. During the Blitz, flow turned into “how to fit a whole neighborhood into Zone 1 without everyone losing it.”
3) Faces that refuse to be background
A child asleep against a parent’s coat. Someone knitting under harsh light. A man leaning into a newspaper as if headlines can build a wall.
These details matter because they puncture the myth that civilians are just “the home front” in a wide-angle shot. The camera forces you to
look at the cost of endurancetired eyes, clenched jaws, the universal posture of “I’m fine” when you’re not.
4) Art and photography working as witnesses
Some of the most famous visual records of Tube sheltering come from both photography and artimages that translate cramped, communal fear into a
language we can still read. The point isn’t aesthetics for its own sake. It’s evidence with a pulse.
How I Bring These Photos “Back to Life” Without Messing Up the Truth
“Bringing photos back to life” can mean a lot of things onlinesome inspiring, some… questionable. For me, it’s a careful workflow with two goals:
(1) make the image readable again, and (2) make it honest about what’s been changed.
Step 1: Start with a high-quality digitization (or don’t start at all)
Restoration can’t create detail that never made it into the scan. If I’m working from a physical print, I want a high-resolution scan that captures
the edges, tones, and grainnot a compressed screenshot that’s already been through the internet’s version of a paper shredder.
- Resolution: High enough to preserve fine detail (creases, film grain, small text on signs).
- File format: A preservation-friendly master (think archival formats), plus smaller copies for web.
- Clean capture: Dust and scratches are easier to avoid than to fix.
Step 2: Repair damage like a conservator, not like a magician
My rule: fix what time did, not what history did. That means removing dust, scratches, scanning artifacts, and some stainswithout “beautifying”
expressions, changing backgrounds, or deleting uncomfortable reality. The goal is legibility, not revision.
Typical repairs include:
- Rebuilding torn edges where the paper ripped (carefully, and only where the loss is purely physical).
- Reducing blotches or spots caused by storage and handling.
- Rebalancing contrast so faces aren’t swallowed by shadow.
- Correcting warping if the scan bent the geometry.
Step 3: Tone and contrastbecause the Blitz was not shot in “flat”
Many original images are underexposed or muddy due to low light and fast shooting. I adjust tonal ranges to recover the separation between coats,
blankets, tiles, and skin. If you can’t distinguish a person from a wall, the photo loses what it’s trying to say.
Step 4: Colorization (optional) with labels, humility, and receipts
Colorization is the part that gets attentionand also the part that can mislead the fastest. Used well, it can help modern viewers connect: a red
Underground roundel, the warm tone of a wooden bench, the sickly station lighting that makes everyone look like they’ve been living on tea and adrenaline.
Used poorly, it turns history into a vibe.
So when I colorize, I do three things:
- I keep the original black-and-white version visible (before/after side-by-side whenever possible).
- I label colorization clearly as an interpretive layer, not a photographic fact.
- I research colors using period references (uniforms, signage conventions, materials), and I avoid “certainty theater.”
If a coat could be navy, black, or brown, I don’t pretend I have divine revelation. I choose a plausible tone and document that it’s an informed estimate.
The moment colorization tries to become “proof,” it stops being helpful.
Step 5: Captions that add context, not fan fiction
A restored image without context can become an empty aesthetic“wow, so cinematic!”and that’s not the assignment. I add captions that answer:
Where is this? What’s happening? What do we know, and what don’t we know? If an image is from a specific station or date range, I say so.
If it’s uncertain, I say that too.
The Ethics of “Bringing History to Life”
Don’t move the pyramids
Photo ethics exist for a reason: images shape what people believe. In journalism and documentary work, manipulation that misleads is a line you don’t cross.
Historical restoration lives in that same neighborhood, even when it’s not “news.” If your edits change the meaning, you’ve stopped restoring and started rewriting.
Preserve the master, experiment on copies
If you’re digitizing for preservation, archival best practices generally treat enhancementsespecially heavy edits like colorizationas something to avoid on
the preservation master. Keep a clean, faithful capture of the original. Do your creative or interpretive work on derivative versions.
Label everything like you want future-you to trust you
The internet loves a dramatic reveal, but clarity beats drama. I label restorations (“cleaned and contrast adjusted”), and I label colorizations
(“colorized interpretation”). That way viewers can appreciate the work without mistaking it for untouched evidence.
What These Revived Photos Teach Us About the Blitz
Resilience wasn’t a sloganit was logistics
The romantic idea of “the Blitz spirit” can flatten the experience into a poster. The images push back. Resilience is a mother keeping a child calm.
It’s strangers negotiating inches of space. It’s the quiet agreement to make room for someone older, smaller, sicker, more frightened.
Community happened, but so did friction
Put thousands of stressed people in tight quarters night after night and you’ll get both kindness and conflict. Photos capture the closenessthe shared
blankets, the improvised sleeping rowsbut they also hint at exhaustion, irritation, and the sheer strain of making “public” feel private enough to rest.
The Underground became a memory machine
When you restore these photos, the details hit differently: the texture of worn coats, the curve of a station sign, the way a child’s hand disappears into
a parent’s sleeve. Those details are not trivia. They’re how the past becomes specifichow it becomes real.
If You Want to Restore or Colorize Blitz Photos Yourself
1) Start with rights and provenance
Before you edit anything, know where it came from, who owns it, and what the usage terms are. Archival images often have clear licensing notes; respect them.
If you can’t verify provenance, be cautious about making big claims in your captions.
2) Scan smart, store smarter
Save a high-quality master. Use consistent file names. Keep at least two backups. If you’re doing this seriously, treat your hard drive like it’s a tiny museum:
organized, redundant, and allergic to mystery folders named “final_FINAL_reallythisone2.”
3) Restore lightly, then build up
Fix obvious damage first (dust, scratches), then move to tonal work (levels/curves), and only then consider color. If you colorize too early, you’ll lock in
mistakes and spend hours arguing with a pixel that was never the problem.
4) Tell the truth in the presentation
A simple format works best:
- Original scan
- Restored (cleaned + tonal)
- Colorized interpretation (optional)
- Caption with sources and uncertainty notes
Conclusion
Restoring Blitz-era Underground photos isn’t about making them “prettier.” It’s about making them readableso the people in them don’t fade into grain and
scratches and algorithmic mush. The point is to let the image communicate again: the crowding, the courage, the boredom, the fear, and the stubborn normalcy
of a city that kept going.
When I bring these photos back to life, I’m not adding history. I’m removing the noise time piled on top of itcarefully, transparently, and with enough
respect to leave the hard parts hard.
Bonus: of Field Notes From My Restoration Desk
The first time I restored a Tube shelter photo, I thought the hardest part would be the technical stuffdust removal, scratch repair, and nudging contrast
until the faces emerged from the haze. It wasn’t. The hardest part was realizing how quickly “editing” turns into “interpreting,” even when your intentions
are pure. You brighten a shadow and suddenly you’ve changed the mood. You sharpen a face and suddenly that person feels closer than you’re emotionally ready for.
I started building small rituals to keep myself honest. Before I touch anything, I sit with the original scan for a minute. No zooming, no sliders, no
heroic music. Just looking. I notice what the photo is already doing: where the eye goes first, what’s obscured, what’s unmistakable. Then I write a one-line
goal like, “Make the station signage readable,” or “Recover detail in the blankets without altering expressions.” A tiny sentencesurprisingly effective at
stopping me from turning the image into a personal art project.
There’s a strange intimacy to restoring crowded scenes. In a family snapshot, the subject is clear: two people, one moment. In a shelter photo, there are
dozens of stories happening at once. A man is asleep with his hat still on. A child is curled into a coat like it’s a sleeping bag. Someone stares into the
middle distance with the kind of calm that looks practiced. The more detail you recover, the more you feel like you’re eavesdropping across time. That’s when
I remind myself: this isn’t entertainment. It’s witness.
Colorization is where my discipline gets tested. The internet rewards color like it’s a magic trick: “Now it’s REAL!” But the truth is that black-and-white
is real tooit’s just encoded differently. When I do add color, I do it like a translator, not like a novelist. I’m trying to help modern eyes read the scene,
not rewrite the scene for modern taste. I keep palettes muted. I avoid cinematic teal-and-orange nonsense. I label everything. And I always keep the original
visible because the original is the primary document, and my work is a commentary.
Over time, the process changed how I see the London Underground today. Modern stations feel loud, bright, impatientpeople rushing, earbuds in, coffee in hand.
When I’m waiting for a train now, I sometimes catch myself imagining the same tiles and walls holding a different kind of crowd, laid out in rows with blankets
and suitcases, trying to sleep while the city shook above them. It doesn’t make the present spooky. It makes it layered. Like the station has two soundtracks:
the squeal of rails and the quiet endurance of history.
And maybe that’s the real “bringing back to life.” Not the color. Not the crispness. It’s the connectioncarefully built, clearly labeled, and strong enough
to hold complicated feelings without pretending the past was simple.


