
Table of Contents >> Show >> Hide
- Why Washing Brussels Sprouts Matters
- When to Wash Brussels Sprouts (Timing = Freshness)
- What You Need (No Fancy Gadgets Required)
- Step-by-Step: The Best Way to Wash Brussels Sprouts
- How to Wash Brussels Sprouts After Cutting or Shredding
- Extra Dirty Brussels Sprouts: What to Do
- Should You Use Vinegar, Salt, or Baking Soda?
- What NOT to Do (Food Safety Don’ts)
- What About Bagged, Pre-Trimmed, or “Pre-Washed” Brussels Sprouts?
- How to Store Brussels Sprouts After Washing
- Common Mistakes That Make Brussels Sprouts Worse
- Quick Checklist: How to Wash Brussels Sprouts Fast
- Conclusion
- Real-World Kitchen Experiences (Extra Tips That People Actually Use)
Brussels sprouts are basically tiny cabbages with big opinions. Roast them and people will fight for the crispy leaves. Boil them into sadness and people will bring it up at Thanksgiving for the next decade. Either way, there’s one step that always matters: washing Brussels sprouts the right way so you’re not seasoning your dinner with grit, mystery farm dust, or the occasional hitchhiking bug.
This guide walks you through how to wash Brussels sprouts (whole, halved, loose-leafed, and even “extra dirty”) with simple, food-safe steps. You’ll get practical options, what to avoid, and when to wash them (spoiler: not always the moment you bring them home).
Why Washing Brussels Sprouts Matters
Even if you plan to cook Brussels sprouts until they’re tender and caramelized, washing still matters. Here’s why:
- Dirt hides in the layers. The tightly packed leaves trap soil and grit, especially near the stem end.
- They’ve been handled. From harvest to transport to the produce aisle, sprouts pick up dust and germs the way socks pick up Lego piecesaggressively and without permission.
- Outer leaves aren’t always your friend. They can be bruised, bitter, yellowing, or just plain dusty.
- Better texture in the pan. Clean, properly dried sprouts roast and sauté more evenlyless steaming, more browning.
When to Wash Brussels Sprouts (Timing = Freshness)
For the best results, wash Brussels sprouts right before cooking, not days in advance. Washing adds moisture, and moisture is basically an open invitation for faster spoilage and funky fridge smells. If you’re meal-prepping, it’s fine to trim and wash them the same day you’ll cookbut if dinner is three days away, keep them unwashed until then.
What You Need (No Fancy Gadgets Required)
- A colander or salad spinner basket
- A large bowl (optional, for soaking)
- Cool running water
- Clean paper towels or a clean kitchen towel
- A small paring knife or chef’s knife
- A clean produce brush (optional, for extra dirt)
Step-by-Step: The Best Way to Wash Brussels Sprouts
Step 1: Sort and Inspect
Dump the sprouts onto a cutting board and do a quick quality check. You’re looking for:
- Yellow or wilted outer leaves
- Dark spots or bruising
- Loose leaves that look like they’ve had a long week
- Any obvious dirt clinging near the stem
Remove the ugly outer leaves now. Think of it as taking off a coat that’s seen better weather.
Step 2: Trim the Stem End (Just a Little)
Slice off a thin layer from the bottom stem endabout 1/8 inch. You’re not chopping the sprout in half; you’re just refreshing the cut end and loosening any damaged outer leaves. If removing the stem end makes more leaves fall off, that’s normal (and honestly satisfying).
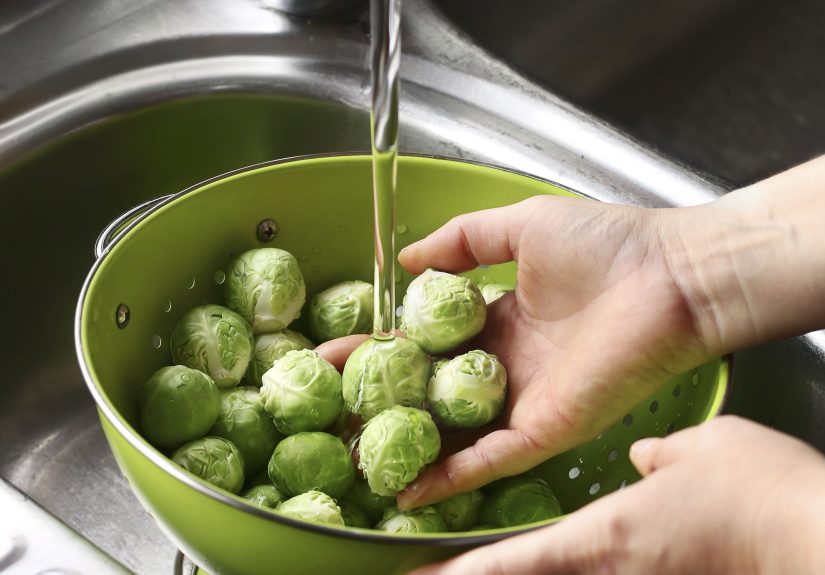
Step 3: Rinse Under Cool Running Water
Place sprouts in a colander and rinse them under cool running water. Use your hands to toss and rotate them, letting water hit all sides. If you’re washing a lot, do it in batches so the water can actually reach the sprouts instead of just splashing the top layer like a lazy rainstorm.
Step 4: Optional Soak (Best for Grit, Dust, or Tiny Stowaways)
If your Brussels sprouts are visibly dirty, or you just don’t trust anything that comes from the ground (fair), do a short soak:
- Fill a large bowl with cool water.
- Add the sprouts and swish them around.
- Let them sit for 10–20 minutes.
- Lift sprouts out (don’t dump everythingdirt settles at the bottom).
- Rinse again under running water in a colander.
That final rinse matters. The soak loosens dirt; the rinse carries it away.
Step 5: Dry Like You Mean It
Water is the enemy of crispness. If you’re roasting, drying is non-negotiable. Drain well, then pat dry with a towel, or spin gently in a salad spinner (especially if you separated leaves or halved sprouts). The drier they are, the better they brown.
How to Wash Brussels Sprouts After Cutting or Shredding
Sometimes you’ll halve sprouts for roasting, slice them thin for slaws, or shred them for sautéing. Cutting exposes more surface area, which means more places for grit to clingand more water to get trapped.
For Halved Brussels Sprouts
- Trim and halve sprouts first.
- Place them in a bowl of cool water and swish.
- Let sit 5–10 minutes if they seem gritty.
- Lift out, drain, and rinse.
- Dry thoroughly (towel + optional salad spinner).
For Shredded Brussels Sprouts
Shredded sprouts behave a little like shredded lettuce: they hold water like it’s their job.
- Rinse quickly in a colander (or dunk and swish in a bowl).
- Drain well.
- Use a salad spinner to remove as much water as possible.
- Finish with a towel if needed.
Extra Dirty Brussels Sprouts: What to Do
If your sprouts look like they just came back from a mud run, use a two-step approach:
- Soak + swish to loosen grit in the outer leaves and stem area.
- Light scrub (optional) with a clean produce brush for stubborn dirt on the outer surface.
A quick note on water temperature: cool water is great. Extremely cold water isn’t necessary, and in some produce-washing guidance, very cold water compared to the produce temperature is discouraged. In normal home kitchens, “cool tap water” is the sweet spot.
Should You Use Vinegar, Salt, or Baking Soda?
People love a kitchen hack. Sometimes it’s helpful. Sometimes it’s just… a vibe.
Vinegar Soak
A diluted vinegar soak is sometimes used by home cooks to help dislodge debris on produce. It can be fine as an optional step, but it’s not required for washing Brussels sprouts. If you use it, keep it mild (a splash of vinegar in a big bowl), then rinse well afterward so your sprouts don’t taste like a science fair volcano.
Salt Water
Salt water is often used by cooks who want to coax out tiny insects or loosen grit from leafy layers. It can help with the “ew, is that movement?” anxiety, but it’s still optional. If you use salt water, rinse thoroughly afterward and dry well.
Baking Soda
Baking soda is sometimes discussed for cleaning produce. For Brussels sprouts, it’s rarely necessary. A good rinse (plus an optional soak) is usually enough for everyday cooking.
What NOT to Do (Food Safety Don’ts)
- Don’t wash Brussels sprouts with soap, dish detergent, or household cleaners. Produce can absorb residues, and these products aren’t meant to be eaten.
- Don’t use bleach or “sanitize” produce like it’s a countertop. That’s not food-safe for home produce washing.
- Don’t wash them and then store them wet. Moisture speeds up spoilage and invites slime.
- Don’t rewash pre-washed, ready-to-eat bagged produce. It can increase cross-contamination risk in your sink or on your counter.
What About Bagged, Pre-Trimmed, or “Pre-Washed” Brussels Sprouts?
If your sprouts are labeled pre-washed or ready-to-eat, the safest move is often to leave them alone and focus on clean hands, clean tools, and clean surfaces. Rewashing can introduce germs from your sink, colander, or cutting board.
If they’re not labeled pre-washed, give them a quick rinseespecially if you see debris in the bag. Use your best judgment, but keep food safety in mind: your sink is not automatically cleaner than the facility that washed them.
How to Store Brussels Sprouts After Washing
Ideally, store Brussels sprouts unwashed and wash right before cooking. But if you already washed them (life happens), here’s how to minimize the damage:
- Dry them extremely well.
- Wrap loosely in paper towels to absorb moisture.
- Store in a breathable container or a partially open bag in the crisper drawer.
- Use within 1–2 days for best quality.
Common Mistakes That Make Brussels Sprouts Worse
- Skipping the dry step. Wet sprouts steam instead of roast.
- Over-trimming the stem. Cut too much and the sprout falls apart like a cheap suitcase.
- Soaking forever. Long soaks can waterlog the leaves and dull flavor.
- Washing in a crowded bowl. If the water can’t move, neither can the dirt.
- Washing next to raw meat prep. Cross-contamination is not a seasoning.
Quick Checklist: How to Wash Brussels Sprouts Fast
- Remove yellow/loose outer leaves.
- Trim a thin slice off the stem end.
- Rinse under cool running water, tossing to expose all sides.
- Optional: soak 10–20 minutes, then rinse again.
- Drain and dry thoroughly.
Conclusion
Learning how to wash Brussels sprouts is one of those small kitchen skills that pays off every time you cook. A simple rinse under cool running water is often enough, but a short soak can help when sprouts are extra gritty or you want peace of mind. The big rules are easy: skip soaps and cleaners, wash close to cooking time, and dry well for the best roasting and sautéing results. Clean sprouts taste better, cook better, and won’t crunch like you accidentally added sand as a “texture element.”
Real-World Kitchen Experiences (Extra Tips That People Actually Use)
In real kitchens, washing Brussels sprouts is less about perfection and more about patterns you start noticing once you’ve cooked them a few different ways. One common experience: the first time someone roasts Brussels sprouts without drying them, they wonder why the pan looks wet and the sprouts come out soft instead of crisp. The fix is simplepat them dry like you’re getting them ready for a photo shoot. People who roast sprouts regularly tend to treat drying as part of seasoning, because it directly affects browning. A surprisingly effective routine is: rinse, drain, towel-dry, then let sprouts sit on a towel for five minutes while the oven preheats. That tiny pause helps surface moisture evaporate so the sprouts caramelize faster.
Another frequent “aha” moment happens when cooks switch from only rinsing to doing an occasional soak. If you’ve ever bitten into a sprout and felt a faint grit (not crunchy-leaf gritactual grit), you remember it. Many home cooks report that a quick soak is especially useful when sprouts are sold on the stalk, or when they come from a farmers’ market, garden, or a produce bin where soil is more likely to cling. The soak isn’t about making sprouts sterile (no home method truly does that); it’s about loosening dirt trapped around the stem end and between outer leaves. People often learn to lift sprouts out of the bowl instead of dumping the bowl into a colander, because dumping can pour the settled dirt right back over the sprouts like a tiny mud waterfall.
There’s also a practical, experience-based trick for dealing with loose leaves: save them. Outer leaves that are clean and not yellow can be roasted separately into “Brussels chips.” Cooks who do this tend to wash the whole sprouts first, then peel off leaves, then dry everything thoroughly. The leaves cook faster than whole sprouts, so they become a bonus crunchy topping for bowls, pasta, or salads. It’s the kind of low-effort kitchen win that makes people feel like they have their life togetherat least until they remember the laundry.
Many people experiment with salt water because they’ve heard it helps with bugs. The experience varies, but the consistent takeaway is that if you do it, rinse afterward. Salt water can help float debris and coax out tiny stowaways, but if you skip the rinse, your sprouts may taste slightly briny in a way you didn’t plan. Likewise, vinegar soaks show up in plenty of family kitchens. People often try it once, decide the smell is dramatic, and then return to plain water because it works well and doesn’t make the kitchen smell like pickles. The most experienced sprout-cookers usually keep it simple: clean water, clean hands, clean tools, and a strong focus on drying before high-heat cooking.
Finally, a very real experience: the bagged, pre-trimmed sprouts that claim to be “ready to cook.” Some people rinse them out of habit, others don’t. The most practical approach people settle into is looking at what’s actually in the bag. If the sprouts look clean and the package says pre-washed or ready-to-eat, many cooks skip rewashing to avoid spreading germs from a sink or cutting board. Instead, they put energy into what they can controlwashing hands, keeping counters clean, and using a clean towel or paper towels. That’s the kind of boring, grown-up habit that quietly makes food better and safer. Not glamorous, but neither is food poisoning.


