
Table of Contents >> Show >> Hide
- What Is a Palm Sander?
- What You Need Before You Start
- How to Choose the Right Sandpaper Grit
- How to Use a Palm Sander Step by Step
- 1. Prep the work area
- 2. Inspect the surface
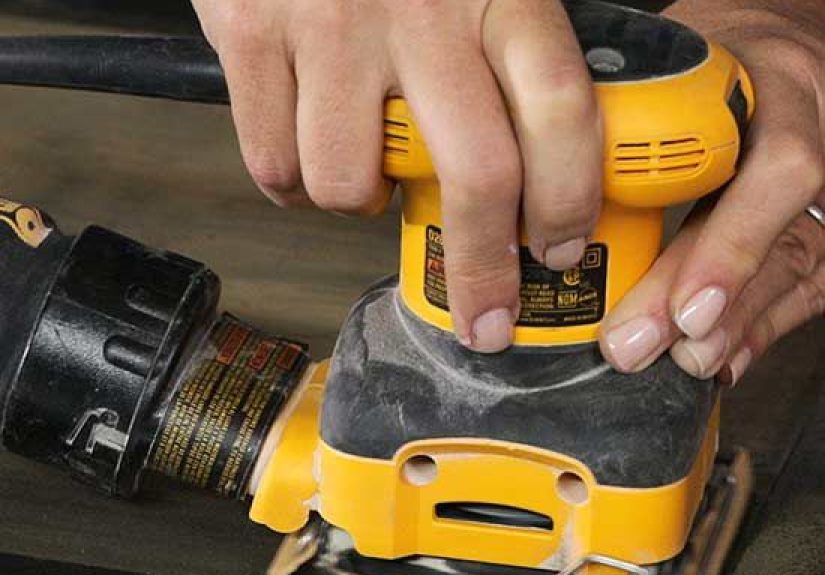
- 3. Load the sandpaper correctly
- 4. Connect dust collection if available
- 5. Start with light, even contact
- 6. Move with the grain
- 7. Let the sander do the work
- 8. Check your progress often
- 9. Change grits gradually
- 10. Finish with a light final pass
- 11. Clean thoroughly before finishing
- Common Mistakes to Avoid
- Safety Tips That Actually Matter
- Best Projects for a Palm Sander
- How to Get Better Results Every Time
- Conclusion
- Real-World Experiences and Practical Lessons With a Palm Sander
If you have ever stared at a rough board, scratched tabletop, or paint-ready cabinet door and thought, “This would look great if it would just stop feeling like a cactus,” welcome. A palm sander is one of the friendliest power tools in the DIY universe. It is small, easy to control, and far less dramatic than a belt sander, which is basically the caffeinated cousin who shows up ready to remove half the project.
Used correctly, a palm sander can smooth wood, prep surfaces for paint, help remove light finish, and create that clean, ready-for-stain look that makes a project seem far more expensive than it really was. Used incorrectly, it can leave swirls, gouges, flattened edges, and enough dust to make your shop look like a powdered donut factory.
This guide explains exactly how to use a palm sander, from choosing the right sandpaper grit to making your final pass like you know what you are doing. We will also cover common mistakes, safety tips, and real-world sanding lessons that can save you time, money, and a surprising amount of muttering.
What Is a Palm Sander?
A palm sander is a compact finishing sander designed to fit comfortably in one hand. Most models have a square, rectangular, or compact pad and use small orbital vibrations to sand surfaces smooth. In practical terms, this makes the tool excellent for finish work, light material removal, and smoothing flat boards, furniture parts, trim, and panels.
It is not the best choice for aggressive stock removal, huge floor refinishing jobs, or deep paint stripping on large surfaces. For those tasks, other sanders usually work faster. But when you want control, finesse, and less chance of turning your workpiece into an accidental sculpture, a palm sander is a strong pick.
Best uses for a palm sander
- Smoothing flat wood surfaces
- Prepping furniture before paint or stain
- Lightly removing old finish
- Leveling filler or patched spots
- Refining trim, doors, drawer fronts, and cabinet parts
When a palm sander is not the star of the show
- Heavy stock removal on rough lumber
- Large floors or decks
- Tight inside corners a rectangular pad cannot reach
- Pre-1978 painted surfaces that may contain lead, unless you are following proper lead-safe practices
What You Need Before You Start
Before sanding, gather the basics. The good news is that this is not a tool that requires a dramatic movie montage. The better news is that being prepared makes sanding faster and cleaner.
- Palm sander
- Correct sandpaper sheets or hook-and-loop pads for your model
- Safety glasses
- Hearing protection
- Dust mask or respirator rated for fine dust
- Shop vacuum or dust bag, if your sander supports it
- Clamps or a stable work surface
- Tack cloth, microfiber cloth, or vacuum for cleanup
If you are sanding old painted wood in a home built before 1978, stop and check whether lead-based paint could be present. That is not the kind of surprise project anyone wants. Fine dust is already a respiratory issue, and lead dust raises the stakes in a serious way.
How to Choose the Right Sandpaper Grit
Sandpaper grit determines how aggressively the sander cuts. Picking the wrong grit is like brushing your hair with a rake: technically something is happening, but it is not a great plan.
General grit guide
- 80 to 100 grit: Good for removing roughness, old finish, or noticeable machine marks
- 120 grit: A common starting point for many wood projects
- 150 to 180 grit: Great for smoothing and prep before finish
- 220 grit: Best for very fine final smoothing or light sanding between coats of finish
For rough wood, start coarser. For already-smooth wood, start finer. Do not jump from 80 grit to 220 grit and expect magic. Sanding works best when you move through the grits in sensible steps so each grit removes the scratches from the one before it.
A helpful rule is this: start with the least aggressive grit that still gets the job done. That saves time, protects the surface, and prevents the classic beginner mistake of sanding way too much, way too fast.
How to Use a Palm Sander Step by Step
1. Prep the work area
Secure the piece so it cannot slide around. A board that moves while you sand is not a project; it is a negotiation. Clamp smaller pieces to a bench or use a nonslip work surface. Good lighting matters too, because sanding flaws love to hide until the exact moment you apply stain.
2. Inspect the surface
Look for dents, glue squeeze-out, pencil marks, old finish, raised grain, and deep scratches. If there are nails, screws, or staples anywhere near the surface, remove them or set them below the surface first. Sandpaper loses arguments with metal.
3. Load the sandpaper correctly
Attach the sandpaper so it sits flat and secure. If your tool uses clamp-on sheets, make sure the paper is tight and centered. If it uses hook-and-loop pads, align the pad carefully, especially if the sandpaper has dust-extraction holes. A poorly attached sheet can wrinkle, tear, or sand unevenly.
4. Connect dust collection if available
Use the dust bag or hook the sander to a vacuum whenever possible. This is not just about keeping your garage from looking haunted. Dust collection improves visibility, reduces breathing hazards, and can actually improve the sanding result by clearing loose abrasive particles from the surface.
5. Start with light, even contact
Place the sander flat on the workpiece and keep the full pad in contact with the surface. Many finishing sanders work best this way, though you should always follow your model’s manual. The important part is consistency: keep the pad level and do not tilt onto one edge unless you are trying to create a brand-new problem.
6. Move with the grain
For wood, move the palm sander in smooth, overlapping passes along the grain. Think steady and controlled, not frantic and heroic. Long strokes work better than tiny scrubbing motions. A good rhythm is more effective than speed.
Overlap each pass slightly so you sand the entire surface evenly. If you stay too long in one spot, you can create dips or low spots. Palm sanders are meant to refine a surface, not dig a hole to the center of the earth.
7. Let the sander do the work
Do not press down hard. This is one of the biggest mistakes beginners make. Extra pressure does not usually make sanding faster. Instead, it can slow the cutting action, clog the paper, create swirl marks, and leave the surface uneven. Hold the tool firmly, guide it steadily, and let the abrasive do its job.
8. Check your progress often
Stop every so often and inspect the surface. Vacuum or wipe away dust so you can actually see what is going on. A smart trick is to lightly scribble pencil lines across the board before sanding. Once the pencil marks disappear evenly, you know the surface has been sanded consistently.
9. Change grits gradually
Once the surface looks uniform with your starting grit, vacuum off the dust and move to the next finer grit. Repeat the process. Each stage should remove the scratches left by the previous grit. If you still see coarse scratches after moving up, go back and finish the earlier step properly. Sanding is one of those chores where shortcuts usually file a complaint later.
10. Finish with a light final pass
For many wood projects, your final machine sanding pass will be somewhere around 150, 180, or 220 grit depending on the finish you plan to use. If the piece will be stained or clear-coated, many DIYers like to end with a quick hand-sanding pass in the direction of the grain using the final grit. This helps blend out machine marks and creates a more uniform appearance.
11. Clean thoroughly before finishing
After sanding, remove all dust from the surface, edges, and nearby cracks. Use a vacuum, clean cloth, or tack cloth. Dust left behind can interfere with paint adhesion, muddy a stain, or leave bumps in your clear finish. In other words, do not spend 30 minutes sanding beautifully just to topcoat over sawdust confetti.
Common Mistakes to Avoid
Using too much pressure
Heavy pressure is the fast lane to swirl marks, pigtails, and uneven sanding. Guide the tool; do not wrestle it.
Skipping too many grits
If you jump from coarse to very fine paper, the finer grit may polish the deeper scratches instead of removing them. They often show up later under stain or clear finish like tiny acts of sabotage.
Sanding against the grain
On wood, cross-grain scratches can stand out badly once finish is applied. Follow the grain whenever possible with a palm sander.
Not cleaning between grits
Loose dust and old grit can scratch the surface and make the next sanding stage less effective.
Using worn-out paper
Dull sandpaper does not save money if it doubles your sanding time and burns your patience. Replace it when it stops cutting cleanly.
Over-sanding veneer or edges
Thin veneer and sharp corners need a gentle touch. It is very easy to sand through veneer or round over edges accidentally. Use finer grits and lighter passes in these areas.
Safety Tips That Actually Matter
Wood dust is not just annoying. It can be a real health hazard, especially in enclosed spaces or during long sanding sessions. Always wear eye protection and use a dust mask or respirator suitable for fine particles. Hearing protection is also smart, particularly if you are sanding for more than a few minutes.
Work in a well-ventilated area and use dust extraction whenever possible. If you are sanding old paint in a home built before 1978, treat the surface as potentially hazardous until you know otherwise. Lead dust is serious business, especially around children and shared living spaces.
Also, unplug corded sanders or remove the battery before changing paper or making adjustments. This sounds obvious until you are tired, dusty, and trying to multitask like a home-improvement octopus.
Best Projects for a Palm Sander
A palm sander shines on medium-size, flat, easy-to-control surfaces. Good examples include tabletops, shelves, cabinet doors, dresser drawers, trim boards, cutting boards, and furniture parts. It is especially useful when you want a smooth finish without aggressive material removal.
For example, if you are repainting an interior door, a palm sander can scuff the old finish, smooth filled dents, and prep the surface for primer. If you are refinishing a side table, it can clean up the top, apron, and legs where flat access exists, while hand sanding can handle corners and profiles.
How to Get Better Results Every Time
- Use good lighting and inspect often
- Mark the surface lightly with pencil before sanding
- Keep the tool moving in overlapping passes
- Use dust collection whenever possible
- Replace sandpaper before it becomes useless
- Hand-sand final touch-up areas for a cleaner finish
- Be extra careful near edges, veneer, and decorative profiles
Conclusion
Learning how to use a palm sander is one of those small DIY upgrades that pays off again and again. The tool is easy to handle, forgiving for beginners, and capable of producing a genuinely professional-looking surface when you use the right grit, keep the pad flat, move with the grain, and resist the temptation to push harder.
In short, the secret is not brute force. It is patience, consistency, and a willingness to let the tool do the work. Sanding may not be the flashiest part of a project, but it is often the difference between “I made this” and “Wait, you made this?” And that, frankly, is a pretty satisfying jump.
Real-World Experiences and Practical Lessons With a Palm Sander
One of the most common experiences people have when using a palm sander for the first time is surprise. Not because the tool is hard to control, but because it feels easier than expected right up until the moment the finish goes on and reveals every rushed pass. That is the funny thing about sanding: it feels invisible while you are doing it, and then suddenly it becomes the most visible part of the entire project.
A typical beginner experience goes like this. Someone grabs a palm sander to refinish an old side table, starts with whatever sandpaper was already in the toolbox, and races across the top because the surface “looks smooth enough.” Then stain is applied, and out come the scratches, shiny unsanded patches, and a few suspicious swirl marks that were apparently hiding under the dust like tiny ninjas. It is a humbling moment, but it teaches an important lesson: sanding is not about making wood feel smoother for ten seconds. It is about creating an evenly prepared surface from edge to edge.
Another very common experience is learning that pressure is not your friend. Many people instinctively press down harder when they want faster results. In real use, that usually backfires. The sander feels louder, the paper clogs faster, your hand gets tired, and the surface can end up less even than before. Most DIYers only need one project to realize that a relaxed grip and slow, overlapping passes work better than trying to force the tool like it owes you money.
Dust is another lesson people remember quickly. On paper, dust collection sounds like a nice extra. In practice, it is the difference between enjoying a Saturday project and coughing through a beige cloud while trying to figure out where your pencil, coffee, and dignity went. Anyone who has sanded a bookshelf indoors without a vacuum attached usually becomes a believer after exactly one cleanup session.
Then there is the edge problem. A lot of first-time users do great on the wide, flat field of a tabletop and then accidentally soften every crisp edge because they tipped the sander just a little too much during the last few passes. It does not take much. That experience teaches the value of keeping the pad flat and using a lighter touch near corners, veneer, and trim details.
Experienced DIYers also learn that the best sanding sessions are strangely calm. There is a rhythm to it: mark the surface, sand evenly, vacuum, inspect in angled light, change grit, repeat. Once you stop expecting instant transformation and start reading the wood, the process becomes less frustrating and more precise. You notice where glue squeezed out. You notice where milling marks remain. You notice that one patch near the corner still reflects light differently and needs a few more passes. That awareness is what turns sanding from a chore into a skill.
Perhaps the most useful real-world lesson is this: the final finish is decided long before the stain, paint, or polyurethane shows up. A palm sander does not just smooth wood. It sets the stage for everything that comes next. When people say a project “came out great,” what they often mean is that the prep work was done with care. And yes, that includes the dusty, unglamorous, absolutely essential work of sanding.


