Table of Contents >> Show >> Hide
- What Are Daphnia and Why Culture Them?
- Supplies You Need to Start a Daphnia Culture
- How to Start Daphnia Cultures: 15 Steps
- Step 1: Choose the Right Daphnia Species
- Step 2: Pick a Stable Container
- Step 3: Use Safe, Dechlorinated Water
- Step 4: Avoid Brand-New Sterile Water
- Step 5: Add Gentle Aeration
- Step 6: Place the Culture in Indirect Light
- Step 7: Keep the Temperature Comfortable
- Step 8: Introduce the Starter Culture Gently
- Step 9: Feed Lightly at First
- Step 10: Make a Simple Yeast Suspension
- Step 11: Watch the Culture Daily
- Step 12: Perform Small Water Changes
- Step 13: Harvest Without Overharvesting
- Step 14: Split the Culture as Insurance
- Step 15: Prevent Pests and Contamination
- Best Foods for Daphnia Cultures
- Common Daphnia Culture Problems
- How Long Does It Take to Grow a Daphnia Culture?
- Practical Experiences: Lessons From Starting Daphnia Cultures
- Conclusion
Note: This guide is written for aquarium hobbyists, fish breeders, classroom keepers, and curious freshwater nerds who want a reliable small-scale Daphnia culture. Never release cultured organisms, culture water, or hitchhiking pond life into local waterways.
Starting a Daphnia culture is one of those aquarium projects that sounds like wizardry until you try it. Then you realize the “magic” is mostly clean water, patience, tiny food particles, and not treating a bucket of microscopic crustaceans like a forgotten science fair project from 1998. Daphnia, often called water fleas, are small freshwater crustaceans that move with a funny bouncing motion and make outstanding live food for fish fry, small tropical fish, bettas, guppies, killifish, newts, and many other freshwater animals.
The best part? A healthy Daphnia culture can keep producing for weeks or months with minimal gear. You do not need a laboratory, a greenhouse, or a degree in plankton psychology. You need a container, dechlorinated water, a starter culture, gentle aeration, and the self-control to avoid overfeeding. That last one is where many beginners accidentally turn their culture into a jar of regret soup.
This step-by-step guide explains how to start Daphnia cultures at home, how to feed them, how to keep them from crashing, and how to harvest them without wiping out your tiny livestock. Whether you want nutritious live fish food or a fascinating low-maintenance micro-ecosystem, these 15 steps will help you begin the right way.
What Are Daphnia and Why Culture Them?
Daphnia are filter-feeding freshwater animals. They strain microscopic particles from the water, including algae, bacteria, yeast, and other suspended food. In nature, they live in ponds, lakes, ditches, and slow-moving freshwater habitats where they play a major role in the aquatic food web. In aquariums, they are valued because they encourage natural hunting behavior and provide movement that flakes and pellets simply cannot offer. No offense to fish flakes, but they do not exactly inspire a chase scene.
Under good conditions, many Daphnia reproduce mainly through parthenogenesis, meaning females produce young without mating. That is excellent news for culture keepers because a small starter population can become a booming colony quickly when food, temperature, oxygen, and water quality are stable. Under stress, however, Daphnia may slow down, produce resting eggs, or crash entirely. The secret is not forcing fast production. The secret is keeping the culture steady.
Supplies You Need to Start a Daphnia Culture
Before adding your starter culture, gather the basics. You will need a container, dechlorinated or spring water, a Daphnia starter culture, an airline with gentle bubbling, a light source, and food such as green water, active dry yeast, spirulina powder, or a prepared Daphnia food. A turkey baster, small measuring spoon, flashlight, fine net, and backup container are also useful.
For beginners, a clear container is helpful because you can actually see what is happening. A 1-gallon jar can work for a tiny starter colony, but a 5- to 10-gallon aquarium, storage tub, or food-safe bucket gives the culture more stability. Larger water volume buffers mistakes. In a tiny jar, one heavy-handed feeding can cause a disaster by breakfast.
How to Start Daphnia Cultures: 15 Steps
Step 1: Choose the Right Daphnia Species
Common culture species include Daphnia magna, Daphnia pulex, and related small cladocerans such as Moina. Daphnia magna is larger and easier to see, making it popular for classrooms and feeding larger fry or adult fish. Daphnia pulex is smaller and useful for smaller aquarium fish. Moina are often more tolerant of warm conditions and can reproduce quickly, but they are smaller and may require slightly different management.
If you are new to Daphnia culturing, buy a starter culture from a reputable aquarium supplier, biological supply company, or experienced hobbyist. Avoid scooping pond water unless you know what you are doing, because pond samples can bring predators, hydra, mosquito larvae, dragonfly nymphs, or other tiny villains into the system.
Step 2: Pick a Stable Container
Choose a wide container with good surface area. Daphnia need oxygen, and surface area helps gas exchange. A shallow tub or aquarium often works better than a tall narrow bottle. For a first culture, 5 gallons is a comfortable size. It is large enough to resist sudden water-quality swings but small enough to move, clean, and inspect.
Avoid containers that previously held soap, detergent, pesticides, paint, or mystery garage liquids. Daphnia are sensitive animals. If a container smells like “industrial lemon apocalypse,” do not use it.
Step 3: Use Safe, Dechlorinated Water
Daphnia do not tolerate chlorine or chloramine well. Use spring water, aged aquarium water, or tap water treated with a reliable dechlorinator. If using tap water, let it aerate before adding Daphnia. Some keepers prefer hard, mineral-rich water because Daphnia need calcium and other minerals for molting and reproduction. Extremely soft or unstable water can make long-term culture harder.
A good target is neutral to slightly alkaline water, roughly pH 7.0 to 8.5. Do not chase numbers aggressively. Stability matters more than perfection. Sudden pH swings are worse than a slightly imperfect but steady reading.
Step 4: Avoid Brand-New Sterile Water
Daphnia like water that has some biological life in it. A completely sterile container with fresh water and no microbial film is like a restaurant with shiny tables but no food. If possible, seed the culture with a little mature aquarium water, aged water, or green water. This helps establish microorganisms that Daphnia can graze on between feedings.
Do not use aquarium water from a tank treated recently with medications, copper, algae killers, or chemical pest treatments. Those products may be safe for fish at label doses but rough on delicate invertebrates.
Step 5: Add Gentle Aeration
Use an air pump with airline tubing set to a slow bubble. Gentle aeration keeps oxygen available and helps suspend food particles. However, avoid strong currents. Daphnia are tiny swimmers, not whitewater kayakers. Too much turbulence can exhaust them or push them into corners.
Many experienced keepers avoid fine airstones because very small bubbles may cause problems for Daphnia. A bare airline tube with slow, large bubbles is often enough. You want movement, not a jacuzzi.
Step 6: Place the Culture in Indirect Light
Daphnia do well in bright indirect light or moderate artificial light. Light supports algae growth, which can become a natural food source. A simple shop light or aquarium light on a timer can work well. A 12-hour light and 12-hour dark cycle is a practical starting point.
Do not place the culture in harsh direct sun unless you are monitoring temperature carefully. Direct sunlight can overheat a small container fast. It can also trigger thick algae or filamentous growth that makes maintenance harder. Think “pleasant pond edge,” not “parking lot puddle in July.”
Step 7: Keep the Temperature Comfortable
Most Daphnia cultures perform well around room temperature, often between 65°F and 75°F. Some species tolerate warmer or cooler conditions, but rapid temperature changes can stress the colony. Cooler water usually holds more oxygen, while warmer water speeds metabolism and can increase the risk of crashes if feeding and oxygen do not keep up.
A basement, fish room, shaded shelf, or indoor utility area can be ideal. Avoid windowsills that swing from chilly at night to hot during the day.
Step 8: Introduce the Starter Culture Gently
Float the bag or jar if there is a major temperature difference. Then slowly add small amounts of the new culture water to equalize conditions. When ready, pour the Daphnia gently into the container. Do not dump them through a dry net unless you must; they are delicate, and rough handling reduces your starting population.
Start with a generous seed culture if possible. A larger starting group reproduces more reliably and is easier to monitor. If you only begin with a few individuals, patience becomes more important.
Step 9: Feed Lightly at First
The biggest beginner mistake is overfeeding. Daphnia eat tiny suspended particles, so food should make the water only faintly cloudy. If the water remains cloudy for more than a day, you added too much. Overfeeding can reduce oxygen, create ammonia, encourage bacteria blooms, and crash the culture.
Good foods include green water, active dry yeast mixed with water, spirulina powder, chlorella powder, commercial Daphnia food, or a very fine suspension of suitable powdered foods. Green water is often the most forgiving because live algae stay suspended and are less likely to foul the water quickly.
Step 10: Make a Simple Yeast Suspension
Yeast is popular because it is cheap, available, and effective when used carefully. Mix a tiny pinch of active dry yeast in a small cup of warm dechlorinated water. Let it hydrate, stir it well, and add only enough to make the culture water slightly hazy. For small containers, that may mean just a few drops.
Wait until the water clears before feeding again. Clear water usually means the Daphnia and microbes have consumed the suspended food. Cloudy, smelly, gray water means you are not feeding a culture anymore; you are auditioning for a swamp documentary.
Step 11: Watch the Culture Daily
A healthy Daphnia culture has active animals moving throughout the water column. Many will gather near light or food. You may see females carrying eggs in a brood chamber. That is a very good sign. The water may be clear, light green, tea-colored, or faintly cloudy after feeding, but it should not smell rotten.
Use a flashlight to check density. Shine it from the side and look for tiny hopping specks. If movement is lively and the population is growing, keep doing what you are doing. If many Daphnia are lying at the bottom, turning pale, or disappearing, check temperature, oxygen, water quality, and feeding immediately.
Step 12: Perform Small Water Changes
Change about 10% to 25% of the water weekly, or more often if the culture is heavily fed. Use water that is dechlorinated and close to the same temperature. Avoid sudden large changes unless the culture is in emergency conditions.
When removing water, use a siphon covered with fine mesh or harvest through a net so you do not accidentally throw away half your colony. Some debris on the bottom is normal and may provide microbial food, but thick foul sludge should be reduced gradually.
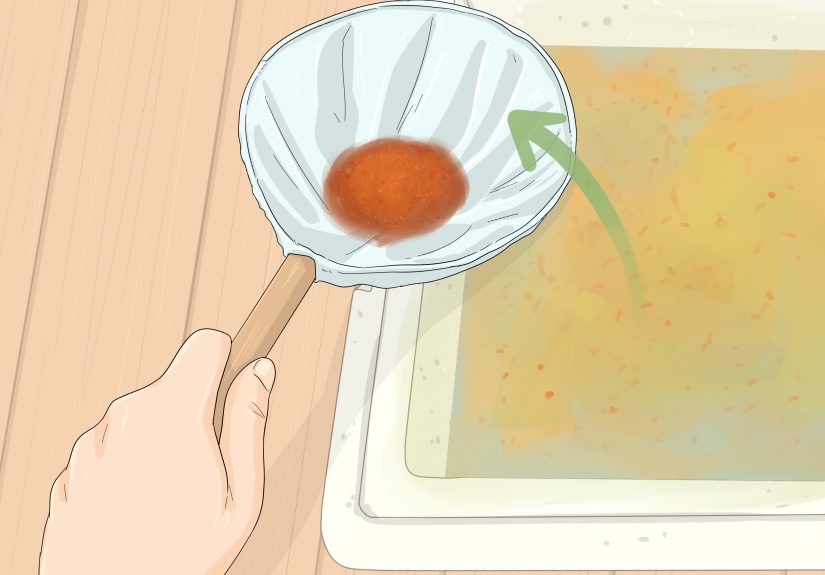
Step 13: Harvest Without Overharvesting
Once the population becomes dense, harvest with a fine aquarium net, brine shrimp net, coffee filter, or plankton sieve. Gently skim groups of Daphnia from the upper water column. Feed them directly to fish, or rinse them briefly in clean freshwater before feeding.
Do not harvest too aggressively. Taking 20% to 30% of a thriving culture is usually safer than taking most of it. Leave plenty of adults behind so reproduction continues. If you need daily live food, run multiple cultures instead of squeezing one culture until it collapses like a tiny unpaid intern.
Step 14: Split the Culture as Insurance
Every successful Daphnia keeper eventually learns this rule: one culture is a culture, two cultures are a plan. Keep at least one backup container. Use a portion of the main colony to seed a second tub or jar with clean aged water. Feed it lightly and maintain it separately.
This protects you from crashes caused by overfeeding, heat waves, contamination, pests, or plain bad luck. Daphnia cultures can fail suddenly even when you do most things right. A backup culture turns a disaster into a mild inconvenience.
Step 15: Prevent Pests and Contamination
Cover outdoor cultures with fine mesh to keep mosquitoes and predatory insects out. Indoors, keep dust, sprays, soap, and aerosol products away from the container. Avoid sharing nets or tools between aquariums and Daphnia cultures unless you rinse them well.
Hydra, copepods, mosquito larvae, planaria, and insect larvae may compete with or prey on Daphnia. Some hitchhikers are harmless, but others can reduce production. If a culture becomes heavily contaminated, the cleanest solution is often to harvest a small group of healthy Daphnia, rinse them through fine mesh, and restart in fresh prepared water.
Best Foods for Daphnia Cultures
Green Water
Green water is algae-rich water and one of the best foods for Daphnia. You can culture it by placing dechlorinated water with a small amount of aquarium water or fertilizer under strong light. Once it turns green, feed it to Daphnia in small amounts. The advantage is stability. Live algae do not spoil as quickly as powdered food, and Daphnia can graze naturally.
Yeast
Yeast is convenient but powerful. Always dilute it before feeding and use very small amounts. The water should look slightly cloudy, not like pancake batter. If the culture smells sour or the water stays cloudy, reduce feeding and perform a small water change.
Spirulina or Chlorella Powder
Spirulina and chlorella powders can work well when finely mixed. They add nutrition and help support strong reproduction. Like yeast, they should be fed sparingly. A tiny pinch goes a long way when your livestock is measured in millimeters.
Common Daphnia Culture Problems
The Culture Crashed Overnight
Sudden crashes are usually linked to overfeeding, low oxygen, heat, contaminated water, or a rapid water-parameter change. Remove dead material, transfer surviving Daphnia to clean aged water, and restart with lighter feeding.
The Water Smells Bad
A bad smell usually means too much organic waste. Stop feeding for a day or two, add gentle aeration, and change part of the water. Resume feeding only when the water clears and the animals are active.
The Population Is Not Growing
Slow growth may come from insufficient food, poor mineral content, unstable temperature, overcrowding, or old culture conditions. Try feeding a little more often, adding green water, splitting the culture, or restarting with fresher water.
There Are Mosquito Larvae
Mosquito larvae compete for food and become a nuisance if they mature. Use fine mesh covers outdoors. If larvae appear, harvest them before they pupate and feed them to fish, or restart the culture in a covered container.
How Long Does It Take to Grow a Daphnia Culture?
With a good starter culture and stable conditions, you may see noticeable population growth within one to two weeks. Warmer temperatures and good food can speed reproduction, but they also increase the risk of oxygen stress and water-quality issues. Cooler conditions may grow more slowly but often remain more stable.
For reliable production, think in cycles. Start the culture, feed lightly, observe daily, harvest only after population density increases, and split the colony before you need it. The goal is not one huge explosion of Daphnia. The goal is steady output.
Practical Experiences: Lessons From Starting Daphnia Cultures
If there is one practical lesson that matters more than all the fancy culture recipes, it is this: Daphnia punish impatience. The beginner instinct is to feed more because more food should mean more babies, right? Unfortunately, Daphnia culture math is not that simple. More food can mean more bacteria, less oxygen, cloudy water, and a sudden population crash. The best cultures often look almost boring. The water is calm, the feeding is modest, and the keeper is not constantly poking around like a raccoon with a lab notebook.
Another experience-based tip is to start with more water volume than you think you need. Tiny jars are fun for observation, but they are unstable. A 5-gallon container gives you room for small mistakes. Temperature changes happen more slowly, water quality holds longer, and feeding is easier to control. If you are culturing Daphnia to feed fish regularly, a 10-gallon tub or aquarium is even better. It does not need to be pretty. Daphnia do not care about aquascaping, rimless glass, or whether the container matches your furniture.
Lighting also matters, but not in the dramatic way beginners expect. A culture kept in total darkness may survive if fed yeast or powdered food, but moderate light encourages algae and microbial growth that provide background grazing. On the other hand, direct sun can cook a small container and produce string algae. The sweet spot is bright indirect light or a simple artificial light on a timer. When the water develops a faint green tint, many cultures become easier to maintain because food is constantly available in small natural doses.
Backups are another lesson people usually learn after losing a culture. Do not wait for disaster. Once your first container is producing well, start a second one. Use different containers, slightly different locations, and separate tools when possible. One may thrive while the other slows. One may overheat while the other remains fine. One may get contaminated while the other saves your live-food supply. Two cultures reduce panic, and three cultures make you feel like a tiny plankton farmer with a business plan.
Harvesting also requires restraint. It is exciting when the water suddenly fills with hundreds of bouncing specks, but do not scoop the colony down to almost nothing. Harvest small amounts regularly. Watch how quickly the culture rebounds. If density falls sharply after harvest, wait longer before the next one. Fish enjoy Daphnia, but your culture needs breeding adults more than your guppies need a luxury buffet every single day.
Finally, trust your senses. Healthy Daphnia cultures usually smell earthy or neutral. They show active movement. Females carry eggs. The water clears after feeding. A struggling culture smells sour, looks gray, stays cloudy, or contains sluggish animals. When something seems off, stop feeding first. Then check temperature, aeration, and water quality. Most beginner problems improve when the keeper feeds less, changes a little water, and gives the colony time to recover. In Daphnia culture, “doing less” is often the advanced technique.
Conclusion
Learning how to start Daphnia cultures is a practical skill for anyone who keeps freshwater fish, breeds fry, teaches biology, or enjoys small living systems. The process is simple, but it rewards consistency. Use safe water, provide gentle aeration, feed lightly, keep the temperature stable, and split cultures before problems happen. Daphnia are tiny, but they are not complicated when their basic needs are respected.
A thriving culture gives you nutritious live food, cleaner feeding behavior, and a front-row seat to one of freshwater nature’s most efficient little production lines. Start small, observe carefully, and remember: when in doubt, feed less. Your Daphnia will thank you by bouncing around happily and making more Daphnia, which is basically their version of a standing ovation.