
Table of Contents >> Show >> Hide
- What Does “20 Moves” Really Mean?
- Before You Start: Know the Cube Like a Friendly Rival
- Rubik’s Cube Notation Made Painless
- How to Solve a Rubik’s Cube: Quick & Easy Steps
- Common Mistakes That Slow Beginners Down
- How to Get Faster After Your First Solve
- Experience Section: What Solving a Rubik’s Cube Actually Feels Like
- Final Thoughts
Note: The phrase “solve a Rubik’s Cube in 20 moves” is mathematically true in the world of optimal solutions, but it is not how most humans learn. In plain English: a scrambled 3×3 cube is never more than 20 ideal moves away from solved, yet beginner-friendly methods usually take more turns. The good news? You do not need robot fingers, a PhD in twisty geometry, or a dramatic movie montage to solve one. You just need a simple system.
Let’s be honest: the Rubik’s Cube has a way of making smart people feel like they are losing an argument with a tiny plastic box. One minute you are “just trying something,” and five minutes later the yellow side looks worse, the blue side is offended, and somehow one corner appears to be living its own independent life.
But the cube is not random chaos wearing bright stickers. It follows rules. Once you understand those rules, solving it becomes much less “summon the puzzle gods” and much more “repeat a few smart patterns until the colors behave.” In this guide, you will learn what the famous 20-move idea really means, how the cube notation works, and the quickest easy method for beginners to solve a standard 3×3 Rubik’s Cube with confidence.
What Does “20 Moves” Really Mean?
The headline sounds magical because, well, it kind of is. The number 20 refers to the maximum number of optimal moves needed to solve any scrambled 3×3 Rubik’s Cube. This is often called God’s Number. It does not mean every beginner can grab a cube, do 20 twists, and walk away like a speedcubing legend while dramatic music swells in the background.
Instead, think of it this way: mathematicians proved that every valid scramble has a shortest path back to solved, and that path is never longer than 20 moves. Humans, however, usually learn a practical layer-by-layer method first. That method is easier to remember, easier to teach, and much kinder to your sanity. It just uses more turns than the absolute shortest possible solution.
So if your goal is to solve the cube quickly and easily, the best approach is this: learn a beginner system now, build muscle memory, and only worry about shaving down move counts later. First solve first. Bragging rights second.
Before You Start: Know the Cube Like a Friendly Rival
1) The center pieces tell you the face colors
On a 3×3 Rubik’s Cube, the center pieces define each face. The white center belongs to the white face, the blue center belongs to the blue face, and so on. That means you are not deciding where centers go; you are building the rest of the puzzle around them.
2) Edge pieces have two colors
These are the pieces that sit between corners. A white-blue edge, for example, belongs between the white center and the blue center. If you remember that simple rule, the cube starts feeling less mysterious and more like color-matching with consequences.
3) Corner pieces have three colors
Corners are the little overachievers of the cube. Each one belongs in exactly one place, where its three colors meet. Put the right corner in the right slot, and suddenly the puzzle looks much less rude.
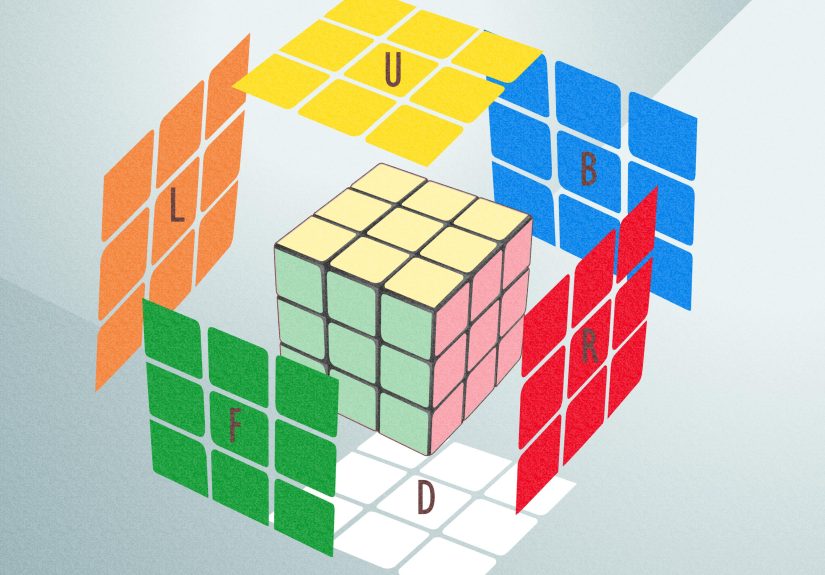
Rubik’s Cube Notation Made Painless
Most tutorials use standard notation. It looks intimidating for about 90 seconds, then it becomes surprisingly logical.
- R = turn the Right face clockwise
- L = turn the Left face clockwise
- U = turn the Upper face clockwise
- D = turn the Down face clockwise
- F = turn the Front face clockwise
- B = turn the Back face clockwise
If a move has an apostrophe, like R', turn that face counterclockwise. If a move has a 2, like U2, turn it twice for a 180-degree turn.
One important tip: clockwise and counterclockwise are always judged from the point of view of the face you are turning. Yes, this has confused basically everyone at least once. Welcome to the club.
How to Solve a Rubik’s Cube: Quick & Easy Steps
This beginner method focuses on solving the cube layer by layer. It is the fastest way to start solving consistently without memorizing a phone book’s worth of algorithms.
-
Make the Daisy
Start by putting the yellow center on top. Your goal is to place the four white edge pieces around that yellow center, creating a white “daisy.” Do not worry about the side colors yet. This step is all about gathering the white edge pieces in one easy-to-see place.
Why start here? Because the daisy gives beginners a simple staging area. It is like putting all your groceries on the counter before you start cooking. Less elegant than a chef, but far fewer disasters.
-
Turn the Daisy Into a White Cross
Now match the side color of each white edge with its center on the side of the cube. Once the colors line up, turn that face 180 degrees so the white edge moves from the top layer to the bottom layer. Do this for all four edges.
When you are done, you should have a white cross on the bottom, and the side colors of those edge pieces should also match their centers. That second part matters. A white cross that ignores the side colors is like buttoning a shirt one hole off. Technically clothing, practically a crisis.
-
Solve the White Corners
Look for white corner pieces in the top layer. Each corner belongs between three centers. Move a corner above the slot where it belongs, then use this simple trigger until the corner drops into place correctly:
R' D' R DRepeat as needed. If a white corner is stuck in the bottom layer but twisted wrong, use the same trigger to kick it out, then solve it from the top. Once all four white corners are solved, the entire first layer is complete.
-
Solve the Middle Layer Edges
Now find an edge in the top layer that does not contain yellow. Match its front color with the center on the front face. Then decide whether it needs to go to the right or to the left.
If the edge needs to go to the right, use:
U R U' R' U' F' U FIf the edge needs to go to the left, use:
U' L' U L U F U' F'Repeat until the middle layer is solved. At this point, two layers are done, and the cube finally starts looking like you know what you are doing, even if you are still whispering “please work” before every algorithm.
-
Make the Yellow Cross
Turn the cube so white is on the bottom and yellow is on top. Your goal now is to make a yellow cross on the top face. You may see a dot, an L shape, or a line. Use this algorithm:
F R U R' U' F'You may need to repeat it more than once depending on the pattern you start with. After enough repeats, the yellow cross will appear. It feels suspiciously like magic, which is one reason people keep coming back to this puzzle.
-
Position the Yellow Corners
At this stage, you want each yellow corner to be in the correct location, even if the yellow sticker is not facing up yet. Check each corner by its three colors. If a corner contains the correct three colors for that slot, it is in the right place.
Use this algorithm to cycle corners until all four are positioned correctly:
U R U' L' U R' U' LYou may need to perform the sequence more than once, rotating the top layer between attempts.
-
Orient the Yellow Corners
Now comes the part that feels wrong but works beautifully. Put a misoriented yellow corner in the front-right-top position. Then repeat:
R' D' R DKeep going until that one yellow sticker faces upward. Then turn only the top layer to bring the next unsolved yellow corner into the same front-right-top position and repeat. Do not rotate the whole cube while doing this step. Trust the process, even if the cube looks briefly cursed in the middle.
-
Finish the Last Layer
Once the yellow face is complete, you may still need to cycle the top-layer edges so every side matches its center. In many beginner solves, the cube is already very close to done by this point. Carefully use your last-layer edge algorithm from your preferred beginner guide or cube trainer until all side colors match.
The main idea is simple: at the end of a beginner solve, the last layer is mostly about permutation, not discovery. You are no longer trying to understand the cube. You are just parking the final pieces where they belong.
Common Mistakes That Slow Beginners Down
Forgetting to match side colors on the white cross
A white cross is not finished just because it is white. The edge pieces must also match the side centers. This is one of the most common beginner mistakes, and it causes trouble later.
Turning the whole cube when you only need to turn the top layer
When a tutorial says U, it means the upper face, not “spin the entire cube until your confidence leaves the room.” Cube orientation matters.
Stopping an algorithm halfway through
Algorithms are like recipes. If you leave out half the ingredients, you do not get dinner. You get a confusing pan. Finish the full sequence exactly as written.
Trying to freestyle the last layer too soon
Creativity is wonderful. It is less wonderful when used on the final layer of a Rubik’s Cube after 45 minutes of progress. Learn the structure first. Improv later.
How to Get Faster After Your First Solve
Once you can solve a Rubik’s Cube consistently, your next goal is efficiency. That does not mean chasing a perfect 20-move solution every time. It means reducing hesitation, spotting pieces faster, and using fewer unnecessary turns.
Start by practicing finger-friendly triggers like R U R' U'. Then work on looking ahead instead of pausing after every piece. Over time, you will memorize more patterns, recognize cases faster, and move from “I solved it!” to “I solved it before my coffee got cold.”
If you keep going, you can eventually graduate from the beginner method to more advanced systems like CFOP. But for now, consistent solves matter more than fancy vocabulary. Nobody gets bonus points for saying “full PLL” while still mixing up left and right insertions.
Experience Section: What Solving a Rubik’s Cube Actually Feels Like
Learning how to solve a Rubik’s Cube is one of those rare hobbies that is equally humbling, addictive, and weirdly satisfying. At first, most beginners feel a mix of curiosity and betrayal. The cube looks simple enough to solve with “just a few smart turns,” right up until the moment one good-looking side destroys another good-looking side. That is the first real lesson of cubing: local success is not the same as total progress.
Then comes the stage where every algorithm feels like a spell you are reciting from memory without fully understanding. You perform R' D' R D like it is sacred ancient text, hoping the corner will behave. It usually does. That is the second lesson: repetition builds trust. The more you repeat a sequence and see the same result, the less random the cube feels. It stops being a monster and starts being a machine.
One of the most memorable experiences for beginners is the first time the white cross appears cleanly and the side colors line up too. It sounds small, but it feels huge. Suddenly the cube is not just scrambled plastic anymore. It is a system you can influence. That tiny moment often becomes the turning point where people go from “I’m trying this once” to “Okay, I’m weirdly into this now.”
The middle layer is where patience gets tested. Many learners can solve the first layer and then immediately enter the emotional phase known as “Why did the edge go there?” This is normal. The cube teaches you to slow down and check piece relationships instead of rushing. It rewards calm observation more than frantic turning. In a world full of instant everything, that is oddly refreshing.
The last layer is a full comedy routine. You finally get the yellow cross and feel unstoppable, only to discover that the corners are technically present but spiritually unavailable. The cube loves this dramatic timing. Yet the breakthrough is incredible when the final pattern clicks. That first complete solve is not just relief; it is proof that complexity becomes manageable when broken into steps.
Many people also notice a side effect: after learning the cube, they start seeing patterns differently in everyday life. They become more comfortable with sequences, spatial thinking, and the idea that a messy problem can still have structure. No, solving a Rubik’s Cube will not automatically turn you into a genius. But it does train a useful mindset: stay patient, follow the process, and do not panic just because things look worse halfway through.
And perhaps that is why the Rubik’s Cube keeps surviving generation after generation. It is not only a toy or a puzzle. It is a miniature lesson in persistence. You scramble it, lose control, rebuild order, and realize your hands can learn what your brain once thought was impossible. That is a pretty great deal for a little cube that fits in one hand and has been roasting human confidence for decades.
Final Thoughts
If you came here hoping for a literal 20-turn miracle, here is the honest answer: that number belongs to optimal mathematics, not beginner reality. But if you came here wanting a quick, easy, and practical way to solve a Rubik’s Cube, you are in the right place. Learn the notation, master the layer-by-layer steps, repeat the core algorithms, and stay patient when the cube temporarily looks like modern art.
Once you solve it the first time, the puzzle changes forever. It stops being impossible and starts being improvable. And that is when the fun really begins.


