Table of Contents >> Show >> Hide
- Why Scrap Wood Frames Are the Perfect “Small Win” Project
- Plan First: Size, Style, and What Goes Behind the Photo
- Tools and Materials (Choose Your Adventure)
- The Core Build: A Scrap Wood Frame with Mitered Corners + Rabbet
- Step 1: Sort and prep your scrap wood
- Step 2: Choose your frame width and thickness (practical example)
- Step 3: Cut the rabbet (before assembly is usually easier)
- Step 4: Measure and mark for miters (the “inside measurement” trick)
- Step 5: Cut clean 45° miters (and make them match)
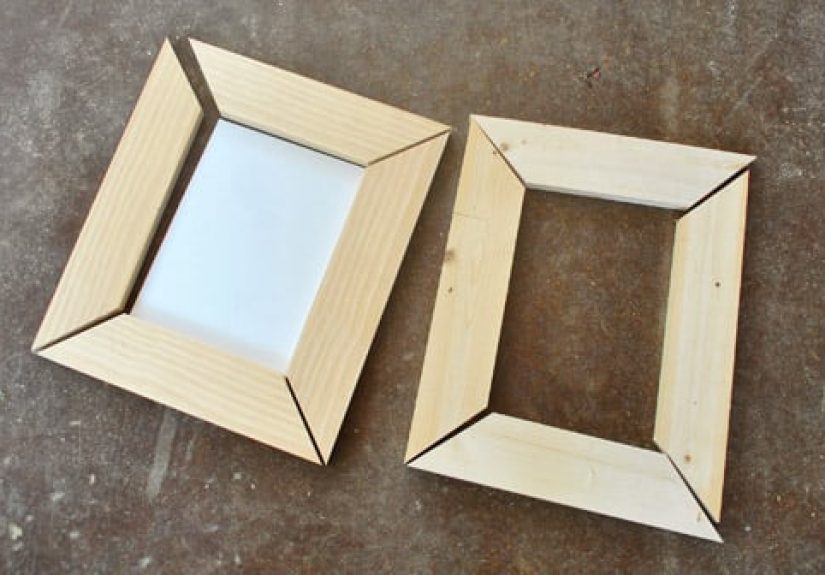
- Step 6: Dry fit like you mean it
- Step 7: Glue-up (yes, painter’s tape can be a clamp)
- Step 8: Reinforce the corners (optional, but recommended for larger frames)
- Step 9: Sanding and finishing (where frames go from “wood” to “wow”)
- Step 10: Install glazing, art, and backing
- Three Scrap-Friendly Design Ideas That Don’t Look Like Scraps
- Troubleshooting: Fix the Common “Why Does This Look Weird?” Problems
- Safety Notes (Because Fingers Are Not Scrap Wood)
- Real-World Experiences: What Making Scrap Wood Picture Frames Actually Feels Like (500-ish Words)
- Wrap-Up
Scrap wood has a reputation problem. People see a pile of offcuts and think “firewood,” when it’s really more like a buffet of future projects. And few projects are as satisfying (or as giftable) as a solid, good-looking picture frame. You get to turn leftovers into something that looks intentionallike you planned it all along and definitely didn’t just “shop” from the corner of your garage.
This guide walks you through making scrap wood picture frames that look crisp, hold up over time, and don’t require a full-blown cabinet shop. We’ll cover smart planning, simple joinery options, clean rabbets, tight miters, finishing, and the not-so-glamorous but very important “how do I keep the glass and backing in place?” part.
Why Scrap Wood Frames Are the Perfect “Small Win” Project
Frames are small enough to be approachable, but they reward careful work. They also let you experiment: rustic saw marks, modern square edges, mixed species stripes, or a “reclaimed” look that conveniently hides the fact that your board used to be something else.
- Low material cost: you’re literally using what you already have.
- High impact: framing instantly upgrades photos, prints, kids’ art, and “I swear this is abstract” doodles.
- Skill builder: you’ll practice accurate measuring, repeatable cuts, glue-ups, and finishing.
Plan First: Size, Style, and What Goes Behind the Photo
1) Pick a standard size (your future self will thank you)
If you’re framing a common photo size, sticking with standard dimensions makes life easier because pre-cut mats and glazing are widely available. That means less measuring drama and less “why is there a 1/16-inch gap that I will now notice forever?”
| Common print size | Easy frame approach | Tip |
|---|---|---|
| 4″ x 6″ | Simple miter + rabbet | Great for testing finishes and corner joints. |
| 5″ x 7″ | Miter + optional spline | Still easy to clamp with tape or a band clamp. |
| 8″ x 10″ | Miter + spline (recommended) | Big enough to show off grain and joinery. |
| 11″ x 14″ | Beefier stock + splines/biscuits | Plan for wood movement and stronger corners. |
2) Decide: no mat, or mat?
A mat (the paper border around artwork) makes almost anything look more “gallery” and helps keep the art from touching the glazing. If you’re making a frame for a print you care about, consider matting and archival materials (acid-free backing, etc.).
3) Understand the “stack” so you cut the rabbet correctly
The rabbet is the recessed ledge in the back of the frame that holds the glazing and backing. Your rabbet depth must fit your stack. Typical stack options:
- Simple: glass (or acrylic) + photo + backing board
- Matted: glass + mat + art + backing board
- Chunkier: glass + mat + foam board + art + backing board
Leave a tiny bit of breathing room so everything sits flat without forcing it. “Just barely fits” is a fun game until the glass says otherwise.
Tools and Materials (Choose Your Adventure)
Materials
- Scrap wood (ideally at least 3/4″ thick for easier rabbets and strength)
- Wood glue (PVA glue is common)
- Sandpaper (a few grits)
- Finish (wipe-on oil, polyurethane, shellac, paintwhatever matches your vibe)
- Glazing: pre-cut glass or acrylic
- Backing board (foam board, mat board, or corrugated plastic for stability)
- Framing points / glazing points (or flexible tabs) to hold the stack
- Hanging hardware (D-rings + wire, or sawtooth hanger for small frames)
Tools (minimum to “nice to have”)
- Cutting miters: miter saw, table saw sled, or miter box + hand saw
- Cutting rabbets: router + straight bit, router table, or table saw (multiple passes)
- Clamping: band clamp, corner clamps, or painter’s tape trick
- Measuring: combination square, tape measure, pencil, marking knife (optional)
- Safety: eye protection, hearing protection, dust control
The Core Build: A Scrap Wood Frame with Mitered Corners + Rabbet
Step 1: Sort and prep your scrap wood
Start by being picky. Scrap wood is allowed to have characterlike interesting grain or old nail holesbut it should still be structurally sound.
- Remove nails, staples, and mystery metal (your saw blade will remember).
- Check for twist/warp. Mild warp can be milled out; severe warp becomes “rustic décor” elsewhere.
- Flatten one face, then square an edge if possible (hand plane, jointer, or careful table saw setup).
- Rip to consistent width (even 1/16″ variation shows up as “why is this corner doing that?” later).
Step 2: Choose your frame width and thickness (practical example)
Example: You’re framing an 8″ x 10″ photo with no mat. A simple approach is a 1 1/2″ wide frame made from 3/4″ thick stock. Wider frames look more “statement”; narrow frames look clean and modern.
Step 3: Cut the rabbet (before assembly is usually easier)
Cutting the rabbet while the pieces are still straight is easier and safer than trying to route inside a glued-up rectangle. Common rabbet sizes for small frames are around 3/8″ wide by 3/8″ deep (adjust to your stack).
Router method (straight bit):
- Set your bit depth for the needed rabbet depth.
- Set a fence (or edge guide) so the rabbet width is consistent.
- Make multiple light passes rather than one heavy pass.
- Label the rabbeted edge as the “inside/back” so you don’t flip pieces later.
Table saw method:
- Raise the blade to your rabbet depth.
- Set the fence to your rabbet width.
- Make the shoulder cut, then nibble away the waste with repeated passes (or use a dado stack if you have it).
- Test-fit your glass/backing stack with scraps before committing.
Step 4: Measure and mark for miters (the “inside measurement” trick)
For a mitered frame, it’s easiest to think in terms of the inside openingthe visible window where the photo shows. Aim for the opening to be just slightly larger than the photo (often 1/16″ to 1/8″ total wiggle room, depending on the print and backing).
- Two pieces (top/bottom) get the inside length of 10″.
- Two pieces (left/right) get the inside length of 8″.
- All four pieces have 45° cuts on both ends.
Pro move: mark the “inside” edge on every piece and measure along that edge. That keeps your frame from slowly drifting into “trapezoid chic.”
Step 5: Cut clean 45° miters (and make them match)
Whether you use a miter saw, a table saw sled, or a miter box, the goal is the same: repeatable, consistent cuts. Don’t trust factory presets blindlyverify with a square or test cuts.
- Use a stop block for repeatable lengths.
- Cut opposite sides in pairs to keep dimensions consistent.
- Do a dry fit: miters should close with minimal gaps.
Step 6: Dry fit like you mean it
Lay the frame out on a flat surface. Check:
- Do the corners close tightly?
- Is the frame square (measure diagonalsequal diagonals = square)?
- Does the glass/backing stack fit in the rabbet without forcing?
Fix issues now. Later is when glue enters the chat and changes the tone.
Step 7: Glue-up (yes, painter’s tape can be a clamp)
Spread a thin, even layer of glue on both miter faces. Then clamp. If you don’t have specialty clamps, the painter’s tape method is surprisingly effective for small to medium frames:
- Lay pieces face-down in a row with miters touching.
- Run tape across each joint.
- Flip, open the “hinges,” add glue, then fold into a frame.
- Tape the final corner and gently press corners tight.
If you do have clamps, a band clamp (strap clamp) is excellent for frames. Re-check diagonals while clamping and adjust until square.
Step 8: Reinforce the corners (optional, but recommended for larger frames)
Miters are beautiful, but they benefit from reinforcementespecially if your scrap wood is softer or the frame is large. Pick a method that fits your tools and style:
- Splines: Cut a kerf across the corner and glue in a thin spline. Strong and looks fancy.
- Biscuits or loose tenons: Hidden reinforcement; great if you already have the tool.
- Brads + glue: Quick and easy; best for smaller, lighter frames.
- Pocket screws: Fast and strong; usually hidden on the back (more “utility chic”).
Step 9: Sanding and finishing (where frames go from “wood” to “wow”)
Sanding is the difference between “handmade” and “made by hand… in a moving vehicle.” Start coarse enough to remove tool marks, then work up gradually.
- Common progression: 80 → 120 → 180 → 220 (adjust based on your wood and finish).
- Sand with the grain, especially on visible faces.
- Break sharp edges lightly for a more finished feel (unless you want a crisp modern edge).
Finish options:
- Wipe-on oil: highlights grain, easy to refresh.
- Polyurethane: durable, good for high-touch areas.
- Shellac: fast drying, warm tone.
- Paint: hides mismatched scraps and leans into color.
Step 10: Install glazing, art, and backing
Once the finish is cured, assemble the stack:
- Clean the glazing (inside and out). No one wants to frame a fingerprint collection.
- Drop glazing into the rabbet.
- Add mat (if using), then artwork, then backing board.
- Secure with framing points (glazing points) spaced every few inches.
- Add a dust cover (paper backing) if you want a clean professional back.
- Attach hanging hardware appropriate for the frame weight.
Three Scrap-Friendly Design Ideas That Don’t Look Like Scraps
1) “Reclaimed” rustic frame (a.k.a. leave the saw marks on purpose)
If your scrap has weathering, nail holes, or rough texture, lean in. Use a wire brush, keep the edges slightly irregular, and finish with a matte clear coat. The goal is “heritage charm,” not “fell behind the workbench for six years.”
2) Clean modern frame with a bold reveal
Use straight-grained stock and keep the profile simple. Add interest by creating a small chamfer on the inside edge (router chamfer bit) so the photo window has a subtle shadow line.
3) Striped “scrap mosaic” frame
Glue up narrow strips from different scraps into a panel, then cut frame parts from that panel. It’s like laminated lumber, but with more personality. This is especially great for small frames where color variation looks intentional and artsy.
Troubleshooting: Fix the Common “Why Does This Look Weird?” Problems
Gaps in the miters
- Cause: your saw isn’t truly set to 45°, or the stock edges aren’t square.
- Fix: recalibrate with test cuts; true up edges; consider a shooting board for hand-tool cleanup.
Frame won’t sit flat (rocking on the table)
- Cause: twist in the stock or clamping on an uneven surface.
- Fix: clamp on a flat reference surface; mill stock flatter; add corner reinforcement to resist twist.
Rabbet too shallow for the stack
- Fix option A: use thinner backing (swap foam board thickness).
- Fix option B: deepen the rabbet carefully (multiple light passes).
- Fix option C: float the art with spacers and skip thick layers.
Safety Notes (Because Fingers Are Not Scrap Wood)
Frames involve small parts, repeat cuts, and tool setups that tempt people to get “just a little closer.” Don’t. Use guards, push sticks, and stable workholdingespecially on table saws and routers.
- Wear eye protection (always). Hearing protection is also a gift to future you.
- Use push sticks and keep hands out of the line of cut on table saw operations.
- Take multiple light passes with routers and secure the workpiece.
- When cutting glazing, consider buying pre-cut pieces; glass is not the hobby’s “hard mode” you need today.
Real-World Experiences: What Making Scrap Wood Picture Frames Actually Feels Like (500-ish Words)
Here’s the honest emotional arc most people go through the first time they make scrap wood picture frames: excitement → confidence → mild confusion → intense focus on a 1/64-inch gap → redemption. And the funny part? That arc repeats even after you’re “good,” because frames are basically a tiny, polite test of your patience.
The first “experience lesson” is that scrap wood behaves like scrap wood. Two pieces that look the same thickness will magically not be the same thickness once you put them together. You’ll swear your tape measure changed brands overnight. The cure is boring but effective: mill your stock (or at least reference one face and one edge consistently), and label your parts. A little pencil noteTOP, BOTTOM, INSIDEprevents the classic move of cutting a perfect rabbet on the wrong edge. It’s a rite of passage, but it doesn’t have to be your rite of passage.
The second lesson is that miters are honest. Butt joints can hide a lot. Miters? Miters will post your mistakes on a billboard. The “experience hack” is test cuts. Cut short offcuts first and check that your two 45° cuts make a perfect 90° corner. If there’s a gap, don’t negotiate with it. Adjust the saw. When you get it right, lock the setting and treat the saw like it’s carrying a tray of drinksgentle, steady, no sudden bumps.
Third: clamping frames feels like you need a complicated setupuntil you realize painter’s tape can act like a surprisingly competent clamp. The tape trick is one of those “why didn’t anyone tell me sooner?” moments. You lay out the pieces, tape them together, flip, glue, fold, and suddenly you’re holding a tidy rectangle that looks like a frame instead of four independent sticks living separate lives. It’s not magic, but it feels like it.
Fourth: finishing is where scrap wood frames become “real furniture energy.” If you’ve ever watched a finish hit sanded wood and the grain pops, you know the feeling. It’s like your project stops being a craft and starts being a thing you’d actually put in your house without apologizing first. The experience-based tip here is to decide what story you want to tell. If the wood is mismatched, either unify it (paint, darker stain, tone-on-tone finish) or celebrate it (clear coat and let the patchwork show). The worst option is trying to force four different species to pretend they’re identical. Wood is many things, but it is not a convincing actor.
Fifth (and quietly important): framing materials matter more than people think. If you’re framing something meaningful a photo you can’t replace, a print you paid good money for, or kid art that you’re going to cry about lateruse decent backing and keep adhesives away from the artwork. Acid-free mats and backing aren’t just fancy words; they’re the difference between “still looks great in 10 years” and “why is there a weird yellow line where the mat touched it?”
The final experience lesson is that the “perfect” frame is usually the one you finish and hang. Your first frame might have a tiny gap in one corner. That’s okay. Make a second one. By the third, you’ll have a system: your saw is dialed in, your rabbet depth is predictable, and you’ll start saving scraps specifically for framesat which point you’ve officially become the kind of person who calls a pile of offcuts a “frame inventory.” Welcome. We have tape.
Wrap-Up
Making scrap wood picture frames is one of the best ways to turn leftovers into something you’ll actually use, display, and gift. Plan the size, cut a clean rabbet, aim for consistent miters, clamp smart, reinforce when needed, and finish like you mean it. The payoff is huge: a custom frame that looks intentional, costs very little, and makes whatever’s inside it look more important. (Which, honestly, is what a good frame is supposed to do.)