
Table of Contents >> Show >> Hide
- Why an Origami Turtle Is Such a Great Project
- What You Need Before You Start
- How to Make an Origami Turtle Step by Step
- Step 1: Make a Center Crease
- Step 2: Turn the Paper Over
- Step 3: Fold the Bottom Corners to the Center
- Step 4: Flip It Again
- Step 5: Fold the Lower Side Edges Inward
- Step 6: Rotate the Model
- Step 7: Shape One Side of the Turtle
- Step 8: Fold the Top Flap Down
- Step 9: Repeat on the Other Side
- Step 10: Fold the Center Section
- Step 11: Refine the Upper Flap
- Step 12: Pre-Crease for the Head
- Step 13: Form the Head Area
- Step 14: Repeat for Balance
- Step 15: Pleat Fold the Bottom Point for the Tail
- Step 16: Turn the Turtle Over
- Step 17: Round the Shell
- Step 18: Adjust the Tail
- Step 19: Narrow the Legs
- Step 20: Final Shaping
- Tips for Cleaner, Better-Looking Folds
- Common Mistakes Beginners Make
- How to Make Your Origami Turtle Even Cuter
- Ways to Use an Origami Turtle
- Why This Craft Is Worth Your Time
- Experiences From Folding Origami Turtles
- Final Thoughts
- SEO Tags
If you have ever looked at a square sheet of paper and thought, “You know what this needs? A shell,” you are in the right place. Learning how to make an origami turtle is one of those wonderfully satisfying paper-folding projects that feels both calm and clever. It is easy enough for beginners to enjoy, detailed enough to keep experienced crafters interested, and cute enough to make you immediately want to fold a second turtle so the first one has a buddy.
This guide walks you through a beginner-friendly traditional-style origami turtle in plain American English, without turning the process into a geometry final exam. You will learn what paper works best, how to make the folds cleanly, what mistakes to avoid, and how to shape the shell, legs, head, and tail so your turtle looks charming instead of mysteriously crumpled. By the end, you will have a tiny paper reptile and, very possibly, a new hobby.
Why an Origami Turtle Is Such a Great Project
An origami turtle is a fantastic project because it sits in the sweet spot between simple and impressive. It is more exciting than a basic folded shape, but it does not demand the emotional resilience of a folding wizard. The model gives you a chance to practice useful techniques like center creases, corner folds, shaping folds, pleats, and a little gentle sculpting at the end.
It is also one of those designs that looks better as you improve. Your first turtle may look a little like it has seen some things. Your second one will be tidier. By the third, you will start making tiny aesthetic choices on purpose, like shortening the tail, tucking the head, or rounding the shell. That is when origami stops feeling like a craft you are following and starts feeling like a craft you are actually doing.
What You Need Before You Start
Materials
- 1 square sheet of origami paper
- A flat surface
- Your hands
- Optional: a bone folder or ruler edge for sharper creases
- Optional: colored pencils or markers for decoration after folding
Best Paper Size
A 6 x 6 inch square is a comfortable starting size for most people. If you are new to origami, go a little bigger rather than smaller. Larger paper gives your fingers more room to work and makes shaping the turtle much easier. Tiny paper sounds adorable until you are trying to fold a tail the size of a bread crumb.
Best Type of Paper
Lightweight origami paper is ideal. Standard kami paper works beautifully because it is thin enough to fold cleanly and sturdy enough to hold its shape. Regular printer paper can work for practice, but it is often stiffer and less forgiving. Super thick scrapbook paper may look pretty, but it can resist the smaller shaping folds that give the turtle its character.
If your paper has a colored side and a white side, start with the white side facing up unless your specific paper pattern suggests otherwise. That setup usually helps the shell become the main visible color.
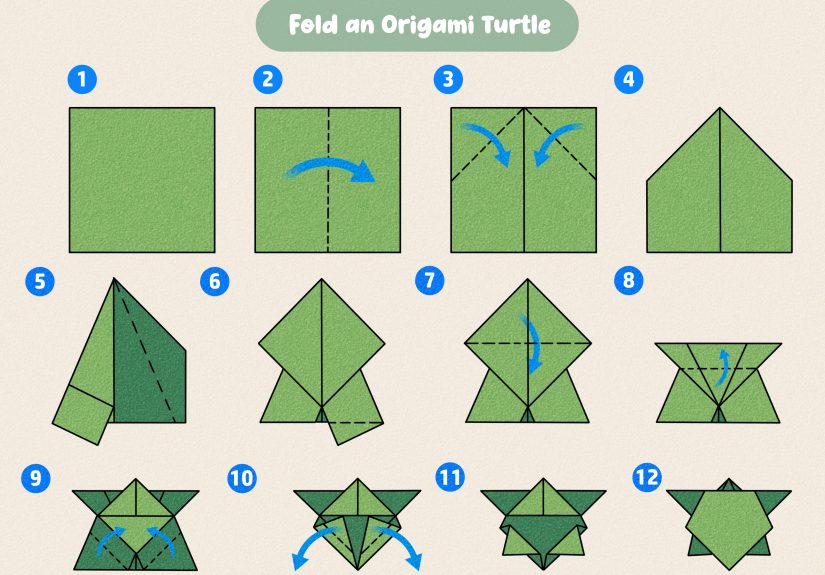
How to Make an Origami Turtle Step by Step
The following version is written to be practical and beginner-friendly. Read through the whole sequence once before folding. Origami gets much less dramatic when you know what is coming next.
Step 1: Make a Center Crease
Place your square paper with the white side facing up. Fold it in half vertically, lining up the left edge with the right edge. Crease firmly, then unfold. You now have a center guideline running from top to bottom.
Step 2: Turn the Paper Over
Flip the paper so the colored side is facing up. This may seem minor, but in origami, flipping the model at the right time is the difference between success and staring suspiciously at your own hands.
Step 3: Fold the Bottom Corners to the Center
Take the bottom left corner and fold it inward so the edge lines up with the center crease. Repeat on the bottom right corner. The lower half should now resemble a kite shape.
Step 4: Flip It Again
Turn the paper over carefully while keeping your folds crisp. The paper now has layered flaps, and these will help create the turtle’s body.
Step 5: Fold the Lower Side Edges Inward
Working with the top layer only, fold the lower side edges toward the center crease. Do this on both sides. This narrows the body and starts building the structure that will become the shell and limbs.
Step 6: Rotate the Model
Rotate the paper 180 degrees. What was the bottom is now the top. This makes the next shaping folds easier to read.
Step 7: Shape One Side of the Turtle
Fold one lower corner diagonally toward the centerline. The exact angle matters less than symmetry and neatness. You are beginning to create one side of the turtle’s front area, where the head and front leg structure will eventually develop.
Step 8: Fold the Top Flap Down
Fold the upper flap downward along the natural line created by the previous folds. Flatten carefully. This is one of those moments where the model begins to look like something intentional instead of a paper mystery.
Step 9: Repeat on the Other Side
Mirror the same folds on the opposite side. Try to keep both sides even. A turtle can be quirky, but it should not look like one side joined the project late.
Step 10: Fold the Center Section
Fold the central white square area upward or inward, depending on how your creases are forming, along the main diagonal or horizontal reference line created by the model. This helps compact the body and begins the shell structure.
Step 11: Refine the Upper Flap
Bring the top flap into alignment with the points created by the lower layers. Press the crease well. At this stage, the model should feel more locked together and less floppy.
Step 12: Pre-Crease for the Head
Make a small guiding crease on one side near the front of the model. This pre-crease will help with the next shaping fold. You are basically teaching the paper where to bend before asking it to do anything dramatic.
Step 13: Form the Head Area
Use the crease you just made to open and swivel a small section into place. Flatten it neatly. This shapes one side of the turtle’s head. Do not panic if it feels awkward at first. Many folds do.
Step 14: Repeat for Balance
Make the matching shaping fold on the other side so the front of the turtle looks even. Once flattened, the model should clearly suggest a head area and front body shape.
Step 15: Pleat Fold the Bottom Point for the Tail
Take the bottom point and make a small pleat fold to form the tail. A pleat fold is just a fold in one direction followed by a fold back in the other direction. Think accordion, but with more dignity.
Step 16: Turn the Turtle Over
Flip the model so the reverse side faces up. This is where the turtle goes from “paper object” to “tiny creature with personality.”
Step 17: Round the Shell
Fold the shell’s left and right corners inward with small mountain folds. There are no absolute measurements here. Just aim to round the body so the shell looks softer and more natural. Symmetry helps, but a little handmade charm is totally welcome.
Step 18: Adjust the Tail
If the tail looks too long, pleat it once more to shorten it and help lock the lower layers together. A short tail usually looks cleaner on a beginner turtle.
Step 19: Narrow the Legs
Gently shape the legs by folding in small portions of the paper along the sides. This gives the turtle more definition and makes the shell appear fuller. You can also shorten the front legs slightly if you want a chunkier, more cartoon-like turtle.
Step 20: Final Shaping
Take a moment to adjust the shell, head, and legs. Slightly tuck the head inward if you want a shy turtle. Open the shell area just enough to give it volume. Once the model looks balanced, you are done.
Tips for Cleaner, Better-Looking Folds
Crease Like You Mean It
Weak creases create sloppy models. Press each fold firmly with your fingertip or a flat tool. Sharp creases act like instructions that the paper can actually remember.
Do Not Rush the Setup Folds
The early folds feel boring, but they determine everything that happens later. If your centerline is off, the turtle will drift off course too.
Use Bigger Paper for Practice
If you struggle with shaping the legs or tail, switch to a larger square. A 7-inch or 8-inch sheet can be much more forgiving than a 4-inch one.
Work on a Hard Surface
Folding on a soft couch cushion might sound cozy, but it makes precise creasing nearly impossible. A table is your friend here.
Common Mistakes Beginners Make
Using Paper That Is Too Thick
Heavy paper resists layered folds and can crack at the creases. Thin origami paper behaves much better.
Ignoring Symmetry
If one side is noticeably narrower than the other, the turtle can look twisted. Check alignment every few steps instead of waiting until the end and hoping for a miracle.
Over-Folding the Shell
Too many adjustments can flatten the shell and make the turtle look tired. A few thoughtful shaping folds are enough.
Giving Up Too Soon
Most origami models look odd in the middle. That is normal. The turtle especially tends to go through an awkward phase before the shell rounding and leg shaping bring everything together.
How to Make Your Origami Turtle Even Cuter
Use Patterned Paper
Light patterns can make the shell more interesting. Think marbling, speckles, or subtle geometric prints. Very busy patterns can hide the fold lines, so use them only after you know the model well.
Add Gentle Details
Once the turtle is finished, you can draw tiny eyes, shell segments, or even a little smile. Keep it minimal. One wrong marker line can turn serene turtle into unhinged mascot.
Create a Mini Turtle Family
Fold the same model in different sizes and colors. Display them together on a shelf, desk, or gift topper. This works especially well for beach-themed decor, kids’ crafts, or handmade cards.
Ways to Use an Origami Turtle
- As a desk decoration
- As a handmade bookmark topper
- As party decor for ocean or animal themes
- As a small classroom art project
- As part of a shadow box or framed paper art display
- As a thoughtful addition to a gift wrap presentation
Why This Craft Is Worth Your Time
Origami is more than a cute pastime. It teaches patience, sequencing, visual thinking, and attention to detail. Even better, it gives you a finished object in a surprisingly short amount of time. In a world full of unfinished projects, a completed paper turtle feels like a tiny victory with flippers.
It also has a calming rhythm. Fold, line up, crease, turn, repeat. That predictable sequence can be genuinely relaxing, which may explain why so many people keep returning to paper folding long after they learn their first model. The turtle, with its rounded shell and gentle shape, feels especially satisfying because it looks soft and sturdy at the same time.
Experiences From Folding Origami Turtles
The first time most people try to make an origami turtle, there is usually a moment of total confusion somewhere in the middle. The paper is folded into a shape that seems to belong to absolutely nothing in nature, and confidence begins to wobble. Then one fold changes the angle of the front section, another creates the tail, and suddenly the whole thing clicks. That shift is part of the joy. An origami turtle does not reveal itself all at once. It arrives in stages, like a slow-moving idea with excellent posture.
One of the most memorable parts of folding turtles is how different each one looks, even when the same instructions are used. A tighter fold creates a compact turtle with a stubby little head. Softer shaping makes the shell appear rounder and more natural. Slightly longer front legs can make it look like the turtle is crawling forward. A shorter head tuck gives it a shy expression, as if it heard a suspicious noise from the craft table and decided not to investigate.
Another common experience is discovering that paper choice changes everything. Plain green origami paper gives a classic turtle look. Blue paper can turn the model into a sea turtle with barely any extra effort. Patterned paper creates shell texture instantly. Many folders begin with whatever paper is nearby, then later become unexpectedly opinionated about thickness, finish, and size. This is how craft hobbies quietly escalate. One day you fold one turtle. The next day you are standing in front of a paper display comparing shades of moss green with alarming seriousness.
Origami turtles are also one of those projects that work well across ages. Kids enjoy the animal result, especially when the turtle gets eyes or shell details added afterward. Adults tend to appreciate the rhythm of the process and the satisfying structure of the finished model. It is one of the rare crafts that can feel playful without feeling childish. You can make one at a kitchen table with a child, or fold three in peace with coffee and absolutely no one asking where the tape went.
There is also something oddly endearing about the turtle as a subject. Cranes feel elegant. Dragons feel ambitious. Turtles feel dependable. They are humble little paper creatures with excellent branding: calm, patient, portable, and hard to dislike. When people fold several models, the turtle often becomes the one they keep on the desk. It has presence without demanding attention. It just sits there looking wise, as though it has accepted the chaos of modern life and chosen serenity anyway.
For many crafters, the best experience comes after finishing the first successful turtle and immediately realizing they want to make another one better. That is a sign the project works. It is approachable enough to complete, but interesting enough to repeat. Each turtle teaches something small about symmetry, shaping, or patience. And because the final result is so giftable, the model never feels wasted. A tiny folded turtle tucked into a note card or placed beside a wrapped present can feel more personal than something expensive.
In the end, making an origami turtle is not just about learning folds. It is about turning a flat square into something with character. That transformation is what keeps people coming back to origami again and again. Also, let’s be honest, it is hard not to love a craft that lets you create an entire turtle without glue, glitter explosions, or a three-hour cleanup operation.
Final Thoughts
If you want a paper-folding project that is relaxing, beginner-friendly, and charming enough to display, an origami turtle is a terrific choice. Start with lightweight square paper, take your time with the early creases, and do not worry if the model looks awkward halfway through. That is part of the process. Once you shape the shell, head, legs, and tail, the turtle comes to life in a way that feels surprisingly rewarding for a single sheet of paper.
Make one turtle first. Then make a better one. Then make a tiny whole pond of them. That is usually how it starts.


