Table of Contents >> Show >> Hide
- Why an Orange Garland and Ornament DIY Is So Popular
- What You Need for an Orange Garland DIY
- Step 1: Choose the Right Oranges
- Step 2: Slice the Oranges Evenly
- Step 3: Dry the Orange Slices
- Step 4: How to Make an Orange Garland
- Step 5: How to Make Dried Orange Ornaments
- Best Styling Ideas for Orange Garland and Ornaments
- Common Mistakes to Avoid
- How to Store Dried Orange Decorations
- Why This DIY Works So Well for SEO-Friendly Holiday Content
- The Real Experience of Making an Orange Garland and Ornament DIY
- Conclusion
If your holiday decorating style lives somewhere between “classic cottage charm” and “I would like my house to smell like a cheerful citrus grove, please,” an orange garland and a few dried orange ornaments are about to become your new obsession. This DIY is simple, affordable, and suspiciously good at making you look like the kind of person who owns pretty linen napkins and remembers to water plants on time.
The beauty of this project is that it feels fancy without being fussy. You are, quite literally, taking oranges, drying them, and turning them into decor. That is the entire magic trick. And yet, once these amber-colored slices are draped across a mantel, wound into greenery, or hung on a tree with ribbon, they somehow whisper, “I have taste,” even if you made them while wearing pajama pants and reheating coffee for the third time.
In this orange garland DIY guide, you’ll learn how to dry orange slices, how to turn them into a garland, how to make matching ornaments, what mistakes to avoid, and how to style everything so it looks charming instead of chaotic. We’ll also talk about the real experience of making one, because no craft article should pretend your first tray of oranges won’t make you stare at the oven like it owes you money.
Why an Orange Garland and Ornament DIY Is So Popular
Dried orange decor has that rare quality every good DIY project wants: it is beautiful, inexpensive, and forgiving. Oranges bring natural color, a subtle scent, and a cozy handmade look that fits right into fall decor, Christmas decorating, winter mantels, rustic wreaths, farmhouse trees, and even gift wrapping. They also pair beautifully with greenery, cinnamon sticks, wood beads, bay leaves, ribbon, pinecones, and star anise.
In other words, dried orange slices are the social butterflies of holiday decor. They get along with everyone.
Another reason this project works so well is that it does not require advanced crafting skills. You do not need a Cricut, a glue gun arsenal, or the patience of a museum conservator. If you can slice fruit, thread string, and avoid accidentally eating your craft supplies, you are qualified.
What You Need for an Orange Garland DIY
Basic Supplies
- 3 to 6 fresh oranges
- A sharp knife or mandoline
- Paper towels or a clean kitchen towel
- Baking sheets
- Parchment paper
- Twine, jute, string, ribbon, or thin cord
- A large needle, skewer, or small craft punch for threading
- Cooling rack
Optional Add-Ons for Extra Charm
- Wood beads
- Cinnamon sticks
- Bay leaves or eucalyptus
- Star anise
- Velvet ribbon
- Small bells
- Evergreen garland or wreath base
If you want a minimalist dried orange garland, keep it simple with orange slices and twine. If you want something fuller and more decorative, add beads, cinnamon, or greenery. Both look lovely. One just says, “I’m understated.” The other says, “I own scented candles in multiple sizes.”
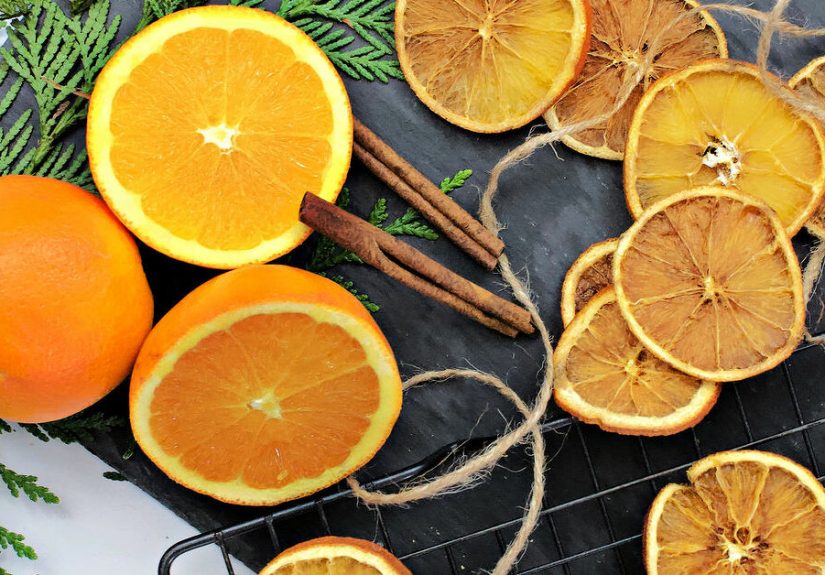
Step 1: Choose the Right Oranges
Navel oranges are a favorite for this project because they are easy to find, easy to slice, and have a bright, classic color. Blood oranges create a deeper, moodier look, while mandarins and clementines make adorable smaller ornaments. Grapefruit, lemons, and limes can also join the party if you want color variation.
Pick fruit that feels firm and fresh. Soft, bruised oranges can still work, but they are harder to slice neatly. Since this is decor, not a beauty pageant, perfection is not required. Still, the better the fruit looks going in, the prettier your finished slices will be hanging on display.
Step 2: Slice the Oranges Evenly
The Best Thickness for Dried Orange Slices
A good target is about 1/8 inch to 1/4 inch thick. Thinner slices tend to dry faster and more evenly. Slightly thicker slices can look gorgeous, but they take longer and are more likely to stay tacky in the center if you rush the drying process.
Uniformity matters more than perfection. If one slice is paper-thin and the next is chunky enough to qualify as a citrus steak, they will not dry at the same rate. A mandoline helps, but a sharp knife and a steady hand work just fine.
Blot the Slices Before Baking
Once sliced, lay the orange rounds on paper towels and gently pat both sides to remove excess moisture. Do not mash them like you are trying to settle a personal grudge with citrus. A light blot is enough. This step helps the slices dry more efficiently and reduces extra surface moisture in the oven.
Step 3: Dry the Orange Slices
Oven Method
Line a baking sheet with parchment paper and arrange the slices in a single layer. Then bake them low and slow. Most home-and-craft methods land in the neighborhood of 175°F to 200°F, with drying times ranging from about 3 to 6 hours depending on slice thickness, oven behavior, and how dry you want the finished result.
Flip the slices partway through, and keep an eye on them during the later stages. If your oven runs hot, the edges may brown faster. That is not automatically bad. A little caramelized color can look beautifully rustic. But if the centers are still wet while the edges are getting dark, lower the heat, rotate the trays, and keep going.
The slices are ready when they are dry to the touch and no longer feel sticky. If they still seem damp or soft in the middle, give them more time. This is not the moment to practice optimism. Moist slices can mold later, and nobody wants a garland with plot twists.
Dehydrator Method
If you own a dehydrator, congratulations on being better prepared than the rest of us. A dehydrator can produce beautifully even slices with less babysitting. It usually takes at least several hours, often around 8 or more depending on thickness and machine settings. If you already use a dehydrator for fruit, herbs, or snacks, this method is a great option.
Cool Completely Before Crafting
After drying, move the orange slices to a cooling rack or clean surface and let them cool fully. This matters more than people think. Warm slices can still feel slightly flexible, and if you start threading too early, they are easier to tear. Cool slices are sturdier, calmer, and emotionally ready for garland duty.
Step 4: How to Make an Orange Garland
Simple Orange Garland Method
Cut a length of twine or ribbon based on where you want to hang it. A mantel garland might need 5 to 7 feet, while a tree strand or shelf accent may need less. Thread a large needle with your twine, then carefully pass it through each orange slice. You can go through the center for a classic look or near the rind if you want a slightly different hang.
Space the slices closely for a fuller look, or leave room between them for a lighter, more minimal design. Both styles work. A dense garland looks rich and old-fashioned. A spaced-out garland feels airy and modern.
Ways to Make It Prettier
If you want more texture, alternate orange slices with wood beads, cinnamon sticks, or dried leaves. This adds rhythm and gives the garland more visual movement. Threading beads between slices also helps keep the fruit from clustering too tightly if you prefer a balanced design.
For a layered holiday look, drape the dried orange garland over evergreen greenery on a mantel or staircase. The warm orange tones against deep green branches are basically the decorative equivalent of applause.
Step 5: How to Make Dried Orange Ornaments
Making an orange slice ornament is even easier than making a garland. Instead of threading multiple slices together, use one slice per ornament and add a hanging loop. Poke a small hole near the rind, or use a natural opening in the center if the slice has one. Then thread ribbon, jute, or twine through it and tie a knot or bow.
That alone is enough for a lovely rustic ornament. But if you want to dress it up, attach a cinnamon stick, a star anise pod, or a small sprig of evergreen. You can tie the extras on with thin string or floral wire. Velvet ribbon makes the ornament feel a bit more polished, while plain jute keeps it cozy and farmhouse-inspired.
These ornaments also look beautiful on gift packages. Tie one onto a wrapped present, and suddenly your gift looks like it belongs in a magazine instead of under fluorescent checkout lighting.
Best Styling Ideas for Orange Garland and Ornaments
On a Christmas Tree
Hang individual dried orange ornaments throughout the tree, especially on inner branches where lights can glow through them. They catch light beautifully and add natural color among shiny baubles.
Across a Mantel
Drape your orange garland across evergreen branches for a layered look. Add taper candles, brass accents, or stockings if you want a classic holiday setup.
On a Stair Rail
A thin garland threaded with orange slices and beads can wrap around a banister without looking bulky. This is a great way to use natural holiday decor without turning your staircase into a pine-scented obstacle course.
On Gifts and Wreaths
Single slices make beautiful package toppers, while clusters of two or three slices can be tucked into wreaths, swags, and centerpieces. They also pair especially well with bay leaves, rosemary, and cinnamon for a grocery-store-meets-stylist kind of charm.
Common Mistakes to Avoid
- Slicing too thick: Thick slices look nice at first but may stay wet in the middle.
- Skipping the blotting step: Extra juice means longer drying and a greater chance of uneven results.
- Using high heat: This can brown the edges too fast before the centers dry properly.
- Not flipping or rotating trays: Ovens are moody. Help them help you.
- Stringing while warm: Warm slices are softer and easier to tear.
- Storing before fully dry: If there is lingering moisture, your decor may not age gracefully.
How to Store Dried Orange Decorations
If you make your orange garland and ornaments ahead of time, store them in a cool, dry place once completely dry. A box, paper bag, or sealed container works well, depending on your climate. The main goal is to protect them from moisture and crushing. If you stack slices, separate delicate layers with tissue paper.
For short-term storage during the season, many crafters simply keep extra dried slices in a bag or container until they are ready to thread or hang them. Just be sure the slices are truly dry before putting them away. “Almost dry” is the craft version of “almost on time.” It sounds promising, but it usually ends badly.
Why This DIY Works So Well for SEO-Friendly Holiday Content
Let’s be honest: people love a holiday DIY that is affordable, beautiful, and beginner-friendly. That is exactly why searches for dried orange garland, orange slice ornaments, natural Christmas decor, and DIY holiday garland keep coming back every year. This project checks every box. It uses simple materials, creates photogenic results, and offers enough personalization to feel creative without becoming overwhelming.
It is also one of those rare crafts that feels useful beyond one exact moment. A dried orange garland works in late fall, through Christmas, and straight into winter decorating. The ornaments can go on the tree, dress up gifts, or even accent wreaths and table settings. In the world of DIY decor, that is what we call excellent mileage.
The Real Experience of Making an Orange Garland and Ornament DIY
There is a particular kind of optimism that arrives when you begin this project. You slice the oranges, line up the trays, and think, “This will be a quick little festive craft.” Then the oven starts working, the house slowly fills with warm citrus scent, and time gets weird. You check the slices after an hour. They are still soft. You check again later. Still soft, but now they look encouraging. Suddenly, you are deeply invested in the emotional journey of fruit.
That is part of the charm, honestly. Making an orange garland is not a high-speed craft. It asks you to slow down a little. You cannot rush the drying without sacrificing the result, so the process becomes pleasantly old-fashioned. It feels more like tending to something than “finishing a project.” While the oranges bake, you start noticing how nice your kitchen smells. You make tea. You wipe the counter. You begin to feel suspiciously like the main character in a cozy holiday movie, even if your sink is still full of dishes.
And then there is the threading stage, which is where the craft becomes oddly satisfying. Once the slices are cool, they look like tiny stained-glass suns. Some are brighter than others. Some have darker caramelized edges. A few will be imperfect, and those are usually the prettiest ones. Stringing them together on twine feels simple and repetitive in the best way, almost meditative. You start with one slice, then another, then a bead, then maybe a cinnamon stick, and before long you have something that looks far more elegant than its ingredient list suggests.
The finished garland has a personality that store-bought decor often lacks. It is not shiny or mass-produced. It has natural variation, texture, and warmth. It tells the truth about being handmade, which is exactly why it looks so good. The ornaments feel the same way. Tied with velvet ribbon or plain jute, they bring softness and color to a tree without screaming for attention. They just sit there looking quietly beautiful, like they know they nailed it.
There is also something memorable about the way this project becomes part of the atmosphere of your home. It is visual, yes, but it is also sensory. The scent of citrus, the feel of rough twine, the soft clink of beads, the glow of dried slices near twinkle lightsthose details make the experience feel bigger than the craft itself. It becomes part of decorating, part of hosting, part of the season.
And if you make it with family or friends, even better. Kids can help thread. A friend can tie ribbon. Someone can be in charge of “checking the oranges” every fifteen minutes like they were appointed to a very serious board position. The project naturally creates little moments. That may be the best thing about it. You are not just making decor. You are making a ritual, a memory, and a very convincing argument that oranges deserve a bigger role in holiday history.
Conclusion
If you want a holiday craft that looks beautiful, smells amazing, costs very little, and does not require an engineering degree, this is it. Learning how to make an orange garland and ornament DIY is mostly about patience, a low oven, and a willingness to let simple materials do the heavy lifting. Slice carefully, dry thoroughly, cool completely, and style with confidence.
The result is timeless natural decor that feels warm, creative, and just a little nostalgic. Which is a pretty impressive career pivot for a bag of oranges.