Table of Contents >> Show >> Hide
- Why Overnight Pull-Apart Bread Is So Smart
- Ingredients & Equipment
- Step-by-Step: Easy Overnight Pull-Apart Bread
- Sweet vs. Savory: Flavor Variations to Try
- Troubleshooting & Pro Tips for Perfect Pull-Apart Bread
- How to Serve Overnight Pull-Apart Bread
- Real-Life Experience: What I’ve Learned Making Overnight Pull-Apart Bread
- Final Thoughts
Imagine waking up to the smell of warm, buttery, cinnamon-sugar bread without
having to do anything more complicated than turning on the oven and locating
your coffee mug. That’s the magic of an easy overnight pull-apart bread
recipe: you do the (very simple) prep the night before, let the fridge do
the work, then bake and pull apart soft, golden pieces in the morning.
Whether you call it pull-apart bread, monkey bread, bubble bread, or “that
ridiculously good thing everyone devours in 10 minutes,” the idea is the
same: small pieces of dough coated in butter and flavorings, piled into a
pan, and baked into one dramatic, shareable loaf. Many classic recipes use
refrigerated biscuit dough or frozen rolls, while others use a homemade
yeast dough that can chill in the fridge overnight for extra flavor.
This guide takes an ehow-style, step-by-step approach to walk you through an
easy overnight pull-apart bread using simple ingredients and equipment you
probably already have. You’ll get a base recipe, lots of sweet and savory
variation ideas, and pro tips so your bread turns out soft, fluffy, and
utterly tear-apart-able every time.
Why Overnight Pull-Apart Bread Is So Smart
Pull-apart bread is already a crowd-pleaser, but the overnight method takes
it to the next level for busy mornings, holidays, and brunches.
- Minimal morning work: All the messy cutting and coating happens the night before.
- Better flavor and texture: Slow refrigeration gives yeast dough more flavor and helps rolls stay soft and fluffy.
- Flexible timing: You can bake as soon as you wake up or let it sit while you make coffee and eggs.
- Endlessly customizable: Go classic cinnamon-sugar, cheesy garlic, herb-packed, or even apple-cinnamon breakfast “buns.”
- Perfect for sharing: Everyone pulls off pieces with their hands, which makes it fun, casual, and family-friendly.
Ingredients & Equipment
You can make overnight pull-apart bread two ways: the ultra-easy shortcut
way with biscuit dough or frozen rolls, or the slightly more involved (but
still very doable) from-scratch route. We’ll focus on the shortcut and give
notes for using homemade dough too.
Shortcut Base: Biscuit Dough or Frozen Rolls
For an easy overnight pull-apart bread, you’ll need:
- 2 cans refrigerated buttermilk biscuit dough (8 biscuits each) or about 24 small frozen dinner rolls
- 1/2 cup (1 stick) unsalted butter, melted
- 3/4 cup packed brown sugar
- 1/3 cup granulated sugar (for coating pieces)
- 2 teaspoons ground cinnamon (for a classic sweet version)
- Pinch of salt
- 1 teaspoon vanilla extract (optional, for extra flavor)
This combination mirrors many classic monkey bread recipes that rely on
biscuit dough, melted butter, sugar, and cinnamon to create that sticky,
pull-apart texture without complicated steps.
Savory Option: Mix-and-Match Pull-Apart Bread
If you prefer something savory, keep the biscuit dough or rolls and switch
your flavorings:
- 1/2 cup (1 stick) butter, melted
- 1–2 cups shredded cheese (mozzarella, cheddar, Parmesan, or a blend)
- 2–4 tablespoons chopped herbs (parsley, chives, thyme, rosemary)
- 2–3 cloves minced garlic or 1–2 teaspoons garlic powder
- Optional add-ins: chopped olives, cooked bacon, sun-dried tomatoes, or jalapeños
Many savory pull-apart breads follow this template: dough pieces tossed in
melted butter, cheese, herbs, and a few fun toppings, then baked together
into one loaf.
From-Scratch Dough (Optional Upgrade)
Want to go full baker mode? You can make a simple yeast dough and let it
rise overnight. A typical pull-apart dough uses:
- All-purpose flour
- Yeast (instant or active dry)
- Warm milk (or buttermilk) for a soft crumb
- Butter for richness
- Sugar to feed the yeast and lightly sweeten
- Salt and sometimes an egg for structure
After kneading, many recipes have you shape the dough into a ball, place it
in a greased bowl, and refrigerate it for at least 4 hours or overnight for
a slow, flavorful riseperfect for an overnight pull-apart loaf or rolls.
Equipment Checklist
- 1 Bundt pan, tube pan, or 9×5-inch loaf pan
- Nonstick spray, butter, or oil to grease the pan
- Mixing bowls
- Small saucepan or microwave-safe bowl for butter mixture
- Plastic wrap or a reusable cover
Step-by-Step: Easy Overnight Pull-Apart Bread
Step 1: Prep the Pan and Butter Mixture
- Generously grease your Bundt or loaf pan with butter or nonstick spray. Don’t be shythis is your insurance policy against sticking.
- In a bowl, stir together the granulated sugar and cinnamon for coating.
- In another bowl, whisk melted butter with brown sugar, a pinch of salt, and vanilla (if using). This becomes your gooey sauce that seeps between all the dough pieces as they bake.
For a savory version, skip the cinnamon and granulated sugar. Stir garlic,
herbs, salt, and cheese into the melted butter instead, saving some cheese
for sprinkling between layers.
Step 2: Cut and Coat the Dough
- Open the cans of biscuit dough and separate the biscuits. If using frozen rolls, make sure they’re thawed just enough to cut.
- Cut each biscuit or roll into 4 pieces. Smaller pieces give you more nooks and crannies to catch the sauce.
- For sweet bread, roll each piece in the cinnamon-sugar mixture.
- Drop the coated pieces into the pan, scattering them evenly. For extra flavor, you can sprinkle chopped nuts, raisins, or chocolate chips between layers.
Many tested recipes recommend quartering biscuit dough pieces for the best
pull-apart texture and easier serving.
Step 3: Pour, Cover, and Chill Overnight
- Pour the brown sugar-butter mixture (or savory butter mixture) evenly over the dough pieces in the pan.
- Cover the pan tightly with plastic wrap or a reusable cover.
- Refrigerate for 8–12 hours, or up to about 18 hours.
In the fridge, the dough will slowly rise and absorb flavor from the butter
and sugar (or garlic and herbs). This slow fermentation is what makes
overnight monkey bread and pull-apart loaves so convenient and flavorful.
Step 4: Bake in the Morning
- Take the pan out of the fridge and let it sit at room temperature while the oven preheats to 350°F (about 20–30 minutes).
- Bake 30–40 minutes for a Bundt pan (less for a loaf pan), until the top is deeply golden and the center no longer looks doughy.
- If the top browns too quickly, tent loosely with foil for the last 10–15 minutes.
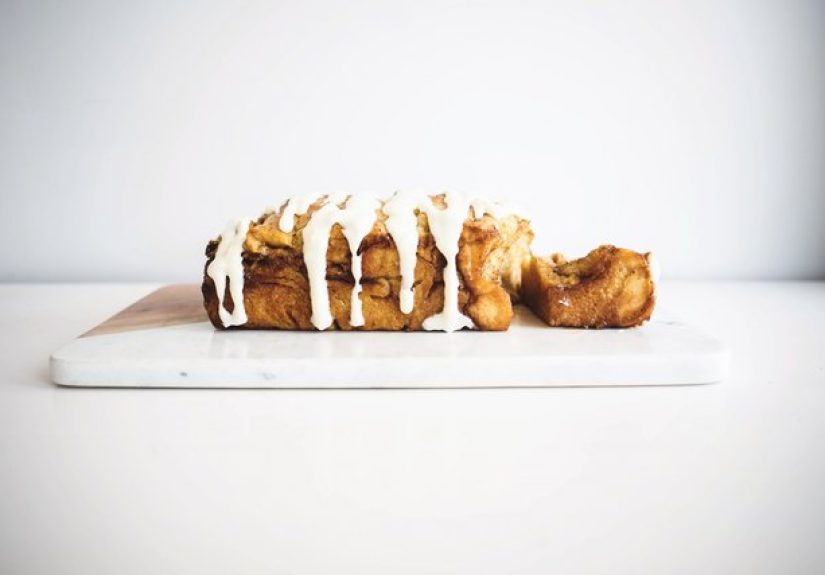
- Let the bread cool in the pan for about 5–10 minutes, then invert onto a plate. Expect a glorious cascade of sauce or melted cheese.
Classic monkey bread recipes use this same process, often baking at 350°F
until the bread is golden and the sugar mixture bubbles into a caramel-like
sauce.
Sweet vs. Savory: Flavor Variations to Try
Sweet Overnight Pull-Apart Ideas
- Classic Cinnamon: The brown sugar–cinnamon combo we’ve already covered. You can drizzle with a simple glaze (powdered sugar, milk, vanilla) once it’s cooled slightly.
- Apple Cinnamon: Tuck small diced apples between layers and add a pinch of nutmeg. Think easy overnight apple-cinnamon “buns” in pull-apart form.
- Orange-Cranberry: Stir orange zest into the sugar mixture and dot dried cranberries among the dough pieces.
- Pecan Sticky Bread: Scatter pecans in the bottom of the pan before adding the dough, then pour the butter-brown sugar mixture on top.
Savory Pull-Apart Bread Ideas
- Cheesy Garlic Herb: Toss dough pieces in butter, minced garlic, parsley, and shredded cheese. Serve with marinara or alongside pasta or soup.
- Pizza Pull-Apart: Add mini pepperoni slices, Italian seasoning, and mozzarella.
- Mediterranean Mix: Use crumbled feta, olives, oregano, and a pinch of red pepper flakes.
- Breakfast Pull-Apart: Add cooked bacon or sausage, cheddar, and chives. Serve with scrambled eggs.
Troubleshooting & Pro Tips for Perfect Pull-Apart Bread
If Your Bread Is Dense or Doughy
- Give it more time at room temperature. If the dough is very cold or hasn’t risen enough after chilling, it may bake up heavy. Let it sit out for 30–45 minutes before baking so the yeast can wake up.
- Check your yeast freshness. If you’re using from-scratch dough, always use fresh yeast and warm (not hot) liquid.
- Aim for a deep golden top. Pull-apart breads often look done on the outside before the center is finished. If needed, bake a little longer and tent with foil.
Many bakers recommend rolling and layering dough, then giving it a generous
rise time so each piece puffs and separates nicely in the oven.
If It’s Too Gooey or Burnt
- Use the right pan size: Overly deep or under-filled pans can lead to underbaked centers or burnt edges.
- Don’t drown it in sauce: Stick roughly to the recommended butter and sugar amounts. Too much liquid can prevent the center from baking through.
- Cover with foil at the right time: If the top browns quickly, cover for the last 10–15 minutes while the interior finishes baking.
Make-Ahead, Storage, and Reheating
- Fridge: Leftover pull-apart bread keeps 2–3 days wrapped tightly and refrigerated.
- Reheat: Warm slices in a 300°F oven for 8–10 minutes or in the microwave for 15–20 seconds.
- Freeze: Wrap baked bread or portions tightly and freeze up to 2–3 months. Thaw overnight in the fridge and reheat before serving.
How to Serve Overnight Pull-Apart Bread
Overnight pull-apart bread is a brunch superstar, but it also works as:
- A holiday breakfast centerpiece next to eggs, fruit, and coffee
- A dessert with ice cream (yes, cinnamon pull-apart bread + vanilla ice cream is dangerously good)
- A game-day snack (especially the cheesy, garlicky versions)
- A side dish with soups, stews, or pasta
It’s rich and indulgent, so pair it with lighter sides like fresh fruit,
yogurt, or a simple salad to balance things out a bit (and make yourself
feel virtuous enough to grab one more piece).
Real-Life Experience: What I’ve Learned Making Overnight Pull-Apart Bread
After a few rounds of overnight pull-apart bread experiments, some patterns
start to show upand they can save you from learning the hard way at 7 a.m.
when everyone’s hungry and staring at the oven.
First big lesson: don’t pack the pan too tightly. It’s
tempting to really cram in those dough pieces because more bread sounds like
more fun, but yeast dough needs room to rise. When the pan is overfilled,
the center pieces often stay doughy while the top burns. Leaving a small gap
at the top of the pan (about 1 inch) gives the bread space to expand and
bake evenly.
Second lesson: chill time is flexible, but not infinite.
Most overnight recipes do best between 8 and 12 hours in the fridge. Less
than that and you might not get enough rise or flavor; much more and the
dough can over-proof and collapse. If you think you’ll sleep in, err on the
lower side of yeast or plan on baking a bit earlier.
Third lesson: temperature matters. If you go straight from
fridge to oven, the dough can be sluggish and dense. Letting the pan sit on
the counter while the oven preheats makes a huge difference. The dough
relaxes, some of the chill comes off, and your pull-apart bread gets a
better lift. On chilly mornings, setting the covered pan near (but not on)
the warm oven is a simple hack.
Another thing I’ve noticed: the flavor balance is everything.
With sweet versions, it’s easy to go overboard on sugar and butter, turning
the center into a sugary puddle instead of a gooey-but-structured bread.
Using the recommended amountsand keeping most of the sauce on top rather
than pooling at the bottomhelps the bread caramelize beautifully without
turning soggy. With savory versions, salt is your best friend. Dough,
cheese, and butter are naturally mild, so don’t be afraid to season the
butter mixture generously with salt, garlic, and herbs.
Then there’s the “wow” factor. Pull-apart bread is already
impressive, but inverting it onto a pretty plate or board makes it look like
you’ve been up since dawn handcrafting every swirl. A quick drizzle of glaze
over the top of sweet bread or a sprinkle of fresh herbs and grated cheese
over a savory version takes it from “homemade” to “photo-worthy.”
Finally, the most important lesson: this bread is meant to be fun.
It’s not a fussy French loaf or a sourdough that demands a multi-day
schedule. It’s a cozy, hands-on, “everybody grab a piece” kind of treat.
Kids can help cut the dough, roll pieces in sugar or cheese, and layer them
in the pan. Guests can pull off pieces at the table without needing a knife.
And you, lucky baker, get to look extremely put-together while secretly
knowing you did almost all the work the night before in comfy clothes.
Once you get comfortable with the basic overnight pull-apart bread method,
you can riff endlesslyswap flavors, play with shapes, try a from-scratch
dough when you have extra time, or stick with canned biscuits when you
don’t. Either way, you’ll end up with a golden, tear-apart loaf that smells
like a bakery and tastes like pure comfort.
Final Thoughts
Making an easy overnight pull-apart bread recipe is all about smart prep and
big payoff. A few simple ingredients, a bit of cutting and coating, and an
overnight rest in the fridge give you a stunning, pull-apart loaf that feels
special but fits into real-life schedules. Whether you go classic cinnamon,
cheesy garlic, or something wildly creative, this is the kind of recipe that
quickly becomes a family traditionand a guaranteed “Can you text me that
recipe?” moment.