Table of Contents >> Show >> Hide
- What Is a Military Bun?
- Before You Start: Tools You Need
- How to Make a Military Bun: 13 Steps
- Step 1: Start With Detangled Hair
- Step 2: Decide Where the Bun Should Sit
- Step 3: Smooth the Hair Back
- Step 4: Create a Secure Ponytail
- Step 5: Add More Smoothing Product If Needed
- Step 6: Twist the Ponytail
- Step 7: Wrap the Twist Around the Base
- Step 8: Pin the Bun in Place
- Step 9: Cover With a Hairnet
- Step 10: Flatten and Shape the Bun
- Step 11: Check the Front, Sides, and Back
- Step 12: Set the Style
- Step 13: Do a Comfort Test
- Military Bun Tips for Different Hair Types
- Common Military Bun Mistakes to Avoid
- How to Make Your Military Bun Last All Day
- 13-Step Military Bun Checklist
- Real-Life Experience: What Actually Makes a Military Bun Work
- Conclusion
- SEO Tags
A military bun is the hairstyle equivalent of a well-packed duffel bag: compact, practical, neat, and ready for inspection. Whether you need a clean bun for a uniform, work, dance class, ROTC, nursing school, aviation training, law enforcement, or simply a no-nonsense day when your hair needs to behave, this guide walks you through exactly how to make a military bun in 13 easy steps.
The goal is simple: smooth hair, a secure base, tucked ends, minimal flyaways, and a bun that sits close enough to the head that it looks professional instead of like it is preparing for takeoff. A good military bun should feel firm, comfortable, and balanced. It should not pull so tightly that your scalp complains before lunch.
What Is a Military Bun?
A military bun is a sleek, low-to-mid bun usually worn at the back of the head. It is designed to look polished, stay secure during movement, and keep hair away from the face, collar, and equipment. Unlike a messy bun, which proudly says, “I woke up five minutes ago and made it fashion,” a military bun says, “I have a comb, a plan, and possibly excellent time management skills.”
Military grooming rules vary by branch, role, uniform, and update cycle, but the common idea is consistent: hair should be neat, professional, controlled, and secured. For everyday non-military use, you do not need to memorize every regulation. You only need the styling principles: keep the bun centered, compact, smooth, and firmly pinned.
Before You Start: Tools You Need
Making a military bun is much easier when you have the right supplies ready before your hands are trapped in a half-twisted ponytail. Gather everything first, because searching for bobby pins with one hand while holding your bun with the other is a tiny domestic obstacle course.
Basic Supplies
- Brush or comb
- Fine-tooth comb for smoothing
- Hair elastic that matches your hair color
- Bobby pins or hair pins
- Hairnet that matches your hair color
- Gel, pomade, styling cream, or edge control
- Light hairspray
- Optional bun maker or sock bun form
- Optional toothbrush or small styling brush for flyaways
If you are styling textured, curly, coily, thick, or layered hair, you may also want a leave-in conditioner, detangling spray, wide-tooth comb, and stronger pins. If your hair is fine or slippery, dry shampoo or texturizing spray can help add grip.
How to Make a Military Bun: 13 Steps
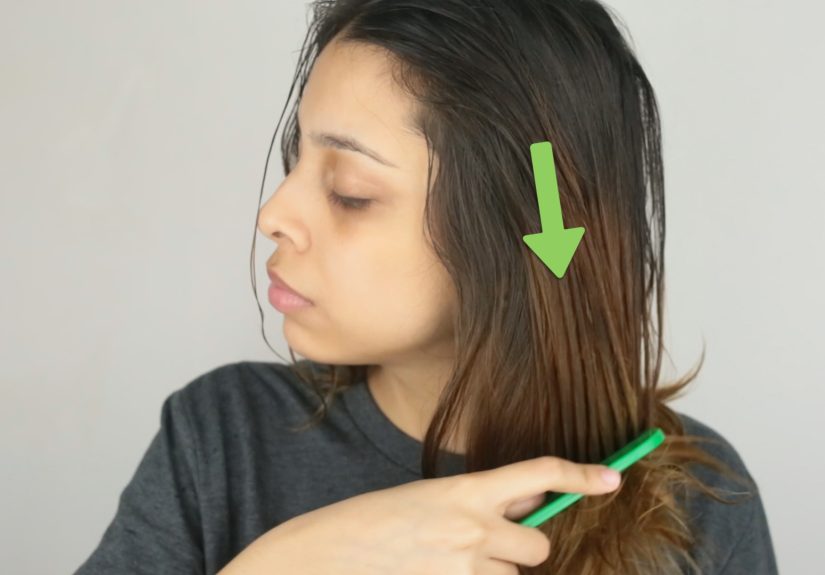
Step 1: Start With Detangled Hair
Begin by removing knots from your hair. Use a brush, comb, or your fingers depending on your hair type. Straight and wavy hair can usually be brushed dry. Curly and coily hair may be easier to detangle when slightly damp and conditioned. Do not rip through tangles; that creates breakage and turns a simple bun into a dramatic hair negotiation.
Your hair does not have to be freshly washed. In fact, second-day hair often holds a military bun better because it has more natural grip. Freshly washed hair can be too soft and slippery, especially if you use a smoothing conditioner.
Step 2: Decide Where the Bun Should Sit
Most military-style buns sit at the back of the head, either low near the nape or slightly higher around the center-back area. For a clean, regulation-inspired look, avoid placing the bun on top of your head. A high ballerina bun may be pretty, but it is not usually the classic military bun shape.
A helpful guide is to position the bun so it feels centered and does not interfere with hats, helmets, collars, or headgear. For everyday styling, place it where it looks balanced from the side and back.
Step 3: Smooth the Hair Back
Use a brush to pull your hair toward the bun position. Work slowly around the hairline, crown, and sides. If you want a softer look, use a paddle brush. If you want a sharper, inspection-ready finish, use a fine-tooth comb after brushing.
Add a small amount of gel, pomade, or styling cream near the hairline and crown. The key phrase is “small amount.” Too much gel can make hair look wet, stiff, or flaky later. Start with less and add more only where needed.
Step 4: Create a Secure Ponytail
Gather your hair into a ponytail at the chosen bun location. Wrap a hair elastic around it until it feels secure but not painful. The ponytail is the foundation of the military bun, so take your time here. If the ponytail is loose, the bun will wobble. If it is too tight, your scalp may feel sore.
Look in a mirror and check for bumps. Smooth them before moving on. Once the bun is pinned, fixing bumps becomes much harder.
Step 5: Add More Smoothing Product If Needed
After the ponytail is secured, apply a tiny bit more gel or pomade to flyaways around the hairline, temples, and nape. Use a fine-tooth comb or small brush to lay them down. For baby hairs or shorter pieces, a clean toothbrush works surprisingly well. It is basically a tiny drill sergeant for your flyaways.
Avoid forcing every natural edge into place if it causes tension. A neat style should not hurt. Clean and controlled is the goal, not scalp-level engineering.
Step 6: Twist the Ponytail
Hold the ponytail straight out from your head and twist it from base to ends. Keep the twist firm but not so tight that the hair bends awkwardly or creates pressure at the roots. Twisting helps the hair wrap smoothly and makes the bun easier to control.
If your hair is very thick, you can divide the ponytail into two sections, twist each section, and wrap them around the base one at a time. This creates a flatter, more controlled bun.
Step 7: Wrap the Twist Around the Base
Circle the twisted ponytail around the elastic, keeping it close to the head. Tuck the ends underneath the bun so they do not stick out. The bun should look compact and smooth, not like a cinnamon roll that survived a windstorm.
If your hair is long, continue wrapping until all the hair is contained. If your hair is layered, tuck shorter pieces as you wrap. A little styling cream on the ends can help prevent them from popping out.
Step 8: Pin the Bun in Place
Insert bobby pins around the bun, catching both the bun and the hair close to your scalp. Use enough pins to make the bun feel secure. For most hair types, four to eight pins are enough. Thick, long, or heavy hair may need more.
For better hold, place pins in a cross shape or insert them at different angles. If your pins slide out, try hair pins, U-pins, or textured bobby pins. You can also lightly spray the pins with hairspray before inserting them for extra grip.
Step 9: Cover With a Hairnet
A hairnet is one of the best secrets for a sharp military bun. Choose a hairnet close to your hair color, wrap it over the bun, twist any extra netting, and wrap it again until it fits snugly. Then pin the net in place.
The hairnet keeps layers, ends, and tiny escape artists contained. It also helps the bun look smoother and more uniform, especially during long days, workouts, or outdoor activities.
Step 10: Flatten and Shape the Bun
Use your hands to gently press the bun closer to your head. The finished shape should be rounded but not bulky. If the bun sticks out too far, remove a few pins, flatten the coil, and repin it wider and closer to the scalp.
If your hair is very long, a braided bun may sit flatter than a twisted bun. Simply braid the ponytail, wrap the braid around the base, tuck the end, and pin it. This method also gives extra control to layered or slippery hair.
Step 11: Check the Front, Sides, and Back
Use a mirror to inspect the whole style. Look for bumps, loose ends, visible elastics, and pins that are sticking out. The best military bun looks neat from every angle, not just from the one angle your bathroom mirror is politely showing you.
For the cleanest finish, make sure the bun is centered. If it leans to one side, it can look less polished and may feel uncomfortable as the day goes on.
Step 12: Set the Style
Finish with a light mist of hairspray. Focus on the hairline, crown, sides, and bun. Do not soak the hair. A military bun should look controlled, not crunchy.
If you have textured hair or stubborn flyaways, you can tie a silk or satin scarf over the smoothed hair for 10 to 15 minutes while the product sets. Remove the scarf carefully, and the surface should look sleeker.
Step 13: Do a Comfort Test
Move your head gently from side to side. Look down, look up, and smile like you just passed inspection on the first try. If the bun pulls, pinches, or gives you a headache, loosen and adjust it. A secure bun should feel stable, not punishing.
This step matters because tight hairstyles worn repeatedly can stress the scalp and hairline. If a bun hurts, it is too tight. Professional does not mean painful.
Military Bun Tips for Different Hair Types
For Fine or Slippery Hair
Fine hair often needs extra grip. Try styling your bun on second-day hair, or add dry shampoo before brushing. Use smaller bobby pins and a light hairnet so the bun does not collapse. A bun maker can also create shape if your hair is thin, but choose one close to your hair color and keep it fully covered.
For Thick Hair
Thick hair may create a bun that feels heavy or bulky. The trick is to distribute the hair. Divide the ponytail into two twists or two braids, then wrap each section around the base in opposite directions. This makes the bun flatter, more secure, and easier to pin.
For Curly or Coily Hair
Moisture and patience are your best friends. Lightly dampen the hair or use leave-in conditioner before smoothing. Work in sections if needed. A boar-bristle brush or smoothing brush can help create a polished surface, while gel or edge control can manage the hairline. Avoid pulling too hard at the edges; comfort and hair health matter.
For Short or Layered Hair
If your hair barely reaches a ponytail, use more pins and a hairnet. Twist small sections toward the ponytail and pin them before forming the bun. For layers, apply styling cream to the ends and tuck them under the net. A small bun form may help, but do not use one so large that it overwhelms your hair.
Common Military Bun Mistakes to Avoid
Making the Bun Too Loose
A loose bun may look fine at home but slowly unravel during the day. Make sure the ponytail base is secure, the ends are tucked, and the bun is pinned from several angles.
Making the Bun Too Tight
A bun that causes pain, headaches, or scalp tenderness is too tight. Tight styles can contribute to hair breakage and tension along the hairline when worn often. Keep the bun firm but comfortable.
Using Pins That Do Not Match Your Hair
Visible pins can make the style look messy. Use pins close to your hair color when possible. Slide them under the bun or into the hairnet so they stay hidden.
Skipping the Hairnet
You can make a bun without a hairnet, but a net makes the style look cleaner and last longer. It is especially useful for layered, thick, curly, or freshly washed hair.
Using Too Much Product
Gel and hairspray are helpful, but too much can create flakes, stiffness, or buildup. Use enough to control flyaways, then stop before your hair starts looking laminated.
How to Make Your Military Bun Last All Day
For a long-lasting military bun, build the style in layers: smooth first, secure the ponytail, twist or braid tightly enough to control the hair, pin carefully, cover with a hairnet, and finish lightly with hairspray. Each step adds support. When you skip one, the bun has to work harder, and buns are not known for their emotional resilience.
Keep a small emergency kit in your bag with extra bobby pins, a hair elastic, travel-size hairspray, and a spare hairnet. This is especially helpful during long shifts, training days, humid weather, or any situation where your hair may face sweat, wind, or the mysterious chaos of removing a hat.
13-Step Military Bun Checklist
- Detangle your hair.
- Choose a low-to-mid bun position.
- Smooth hair back with a brush or comb.
- Secure a firm ponytail.
- Add light gel or pomade for flyaways.
- Twist the ponytail.
- Wrap the twist around the base.
- Pin the bun securely.
- Add a matching hairnet.
- Flatten and shape the bun.
- Check all angles in the mirror.
- Set with light hairspray.
- Make sure it feels comfortable.
Real-Life Experience: What Actually Makes a Military Bun Work
The biggest lesson about making a military bun is that the first attempt is rarely the best attempt. Many people expect the bun to come together perfectly in three minutes, but the truth is that a neat bun is a skill. It gets faster with repetition. The first few tries may involve uneven coils, rebellious layers, and bobby pins disappearing into another dimension. That is normal.
One practical experience many people share is that the ponytail matters more than the bun itself. If the ponytail is smooth, centered, and secure, the bun usually turns out well. If the ponytail is bumpy or loose, the final bun will fight you every step of the way. Spending an extra minute smoothing the ponytail can save five minutes of repinning later.
Another useful lesson is that different hair behaves differently on different days. Hair that is freshly washed may slide out of pins. Hair that is slightly oily may hold beautifully but need dry shampoo at the roots. Humid weather can bring flyaways out of hiding. Cold, dry weather can create static. The best military bun routine is flexible. You learn when to use gel, when to use pomade, when to dampen the hair, and when to stop touching it before you accidentally make it worse.
For thick hair, the two-section method can be a game changer. Instead of forcing one large twist into a bulky knot, divide the ponytail into two parts. Twist or braid each part, wrap one clockwise and the other counterclockwise, then pin both close to the head. The result is flatter and more balanced. It also reduces that heavy feeling that can happen when all the hair sits in one dense coil.
For curly and coily hair, preparation makes the biggest difference. A little moisture, leave-in conditioner, and careful sectioning can help the hair smooth into place without harsh pulling. Many people find that brushing in small sections creates a cleaner finish than trying to force all the hair back at once. A scarf placed over the hair for a short setting period can also help create a sleek surface without piling on more product.
For short or layered hair, the hairnet is the hero. Layers tend to poke out right when you think you are finished. A matching hairnet keeps those ends contained and gives the bun a more uniform shape. It also reduces the need for excessive hairspray, which can leave hair stiff or flaky by the end of the day.
Comfort is another experience-based rule that should never be ignored. A bun can look perfect and still be wrong if it hurts. If the skin around your hairline feels pulled, if your scalp aches, or if you get a headache, redo the bun with less tension. A military bun should stay put because it is well-structured, not because your roots are under siege.
Finally, practice your bun before you actually need it. Do not wait until five minutes before an event, shift, class, inspection, or photo. Try the style on a normal day. Walk around. Put on a jacket. Wear a cap if needed. See what loosens first. Your hair will tell you where the weak spots are. Once you know your best bun position, favorite pins, ideal product amount, and fastest method, the whole process becomes much easier. Eventually, you will be able to make a clean military bun almost automaticallyand yes, you may feel slightly too powerful afterward.
Conclusion
Learning how to make a military bun is all about balance: smooth but not stiff, secure but not painful, polished but not overcomplicated. With the right tools and a repeatable method, you can create a bun that looks clean, professional, and ready for a long day.
Start with detangled hair, build a strong ponytail, wrap the bun close to the head, secure it with pins, and use a hairnet for a neat finish. Adjust the method for your hair type, and remember that comfort is part of good styling. A bun that lasts all day should not punish your scalp to prove a point.
Note: Grooming standards can vary by military branch, school, employer, unit, and uniform requirement. Always check the current rules that apply to you before wearing this style for official purposes.