Table of Contents >> Show >> Hide
- What You Need Before You Fold
- How to Make a Loop De Loop Paper Airplane: 10 Steps
- Step 1: Place the paper vertically and fold it in half lengthwise
- Step 2: Fold the top corners down to the center crease
- Step 3: Fold the top point down to create a blunt nose
- Step 4: Fold the top corners in again toward the center
- Step 5: Fold the small bottom flap upward to lock the folds
- Step 6: Fold the airplane in half outward
- Step 7: Fold down the first wing
- Step 8: Fold down the second wing to match
- Step 9: Make small upward tabs at the back of both wings
- Step 10: Open the wings, add a slight upward angle, and test fly
- Why This Loop De Loop Paper Airplane Works
- Common Mistakes That Ruin the Loop
- How to Fine-Tune Your Paper Airplane for Better Loops
- Best Places to Fly a Loop De Loop Paper Airplane
- Final Thoughts
- Hands-On Experiences With a Loop De Loop Paper Airplane
- SEO Tags
If your paper airplanes usually fly three feet, panic, and immediately audition for the role of “tiny crumpled disappointment,” this one is for you. A loop de loop paper airplane is less about brute force and more about smart folding, careful trimming, and knowing when to stop bending things like an overconfident backyard aerospace engineer. The good news? You do not need fancy tools, a physics degree, or a wind tunnel in your garage. You just need one sheet of paper, a few sharp folds, and a willingness to make a couple of tiny adjustments until your plane stops behaving like a melodramatic leaf.
In this guide, you will learn exactly how to make a loop de loop paper airplane in 10 steps, why the design works, how to throw it for the best stunt flight, and what to fix when your airplane dives, stalls, or decides that looping is optional. This is a practical, beginner-friendly stunt plane that borrows from classic glider and acrobatic paper airplane designs: a blunt nose for stability, broad wings for lift, and small upward rear tabs that help create the pitch needed for a smooth loop. In other words, it is simple enough for first-timers and fun enough for anyone who still thinks folding paper is an excellent use of a perfectly normal afternoon.
What You Need Before You Fold
Before you start making your loop de loop paper airplane, gather the basics:
- One sheet of standard 8.5 x 11-inch printer paper
- A flat surface for crisp folds
- Your fingers, which are still the most underrated tool in origami history
- Optional: a ruler for extra-sharp creases
Regular printer paper is a great place to start because it is light enough to glide yet stiff enough to hold shape. If your paper is too flimsy, the wings can sag. If it is too heavy, the airplane may fly fast but resist the smooth, floaty motion that helps a paper airplane complete a loop. For most people, plain office paper hits the sweet spot.
How to Make a Loop De Loop Paper Airplane: 10 Steps
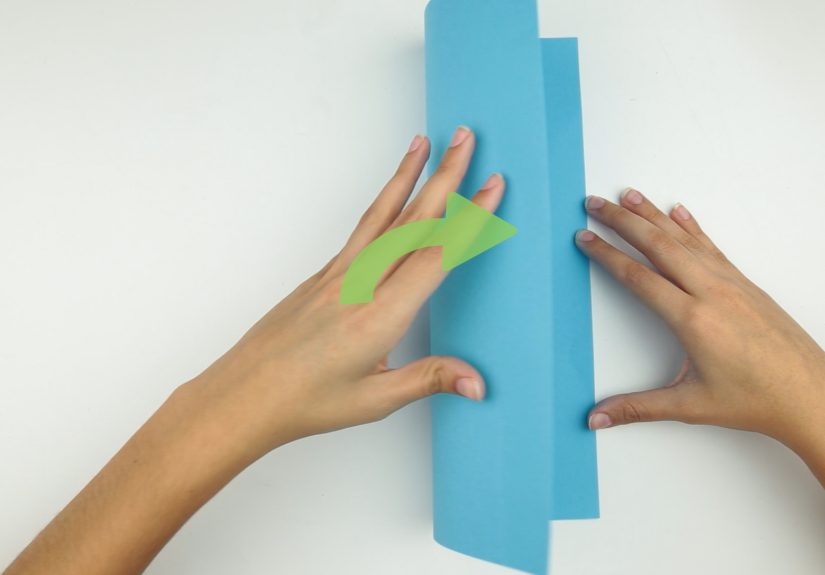
Step 1: Place the paper vertically and fold it in half lengthwise
Set the paper on a table in portrait orientation, meaning the short side is at the top and bottom. Fold it in half lengthwise from top to bottom so the long edges meet. Press the crease firmly, then unfold it. You now have a center line, which is basically your runway, your navigation system, and your folding therapist all at once.
Step 2: Fold the top corners down to the center crease
Take the top left corner and fold it inward so the edge lines up with the center crease. Repeat with the top right corner. You should now have a pointed top, like a standard paper airplane beginning. Try to keep both sides as symmetrical as possible. If one side is off, your plane may end up flying like it has unresolved emotional issues.
Step 3: Fold the top point down to create a blunt nose
Instead of keeping the sharp point, fold the top tip downward so it sits a little below the two slanted edges you just created. This makes the nose blunt rather than needle-like. That matters because stunt planes generally benefit from a slightly broader front section and a more forgiving shape than high-speed darts. A blunt nose can help the airplane stay steadier and avoid turning into a dramatic nose-diver.
Step 4: Fold the top corners in again toward the center
Now fold the new top left and right corners inward again so they meet at the center crease. The edges should come down neatly, forming a narrower top section. You should still see a small flap or point from the earlier fold underneath. This second corner fold helps refine the body shape and adds structure to the front of the airplane.
Step 5: Fold the small bottom flap upward to lock the folds
If a little triangular flap is sticking out below the folded corners, fold it upward over the two flaps to lock them in place. This lock helps hold the nose together and keeps the airplane from unfolding mid-flight, which is exciting in the worst possible way. A locked fold also gives your stunt plane a cleaner, sturdier body.
Step 6: Fold the airplane in half outward
Fold the entire airplane in half along the original center crease, with the locked side on the outside. The nose should be on the outside edge of the fold, and the airplane should now look more like a real folded plane. Run your fingers down the spine to sharpen the body crease. Strong center folds make a surprisingly big difference in flight consistency.
Step 7: Fold down the first wing
Take one side of the folded plane and fold the wing down so the top edge of the wing runs roughly parallel to the bottom body edge. Leave enough body depth so the center fuselage remains firm. Wide wings are helpful here because a loop de loop paper airplane needs lift and control more than it needs raw speed. After you make the fold, press it firmly.
Step 8: Fold down the second wing to match
Flip the airplane over and fold the second wing down to match the first. This is where patience pays off. If the two wings are uneven, your plane may twist, spiral, or crash before it has any chance to show off. Hold the folded plane at eye level and check that both wings look symmetrical. Tiny differences can create big behavior changes in the air.
Step 9: Make small upward tabs at the back of both wings
At the rear edge of each wing, fold up a small tab, about a quarter inch high. These are your elevator tabs, and they are the secret sauce behind the loop. Keep the tabs equal on both sides and start small. Very small. No, smaller than that. Upturned rear tabs make the back of the plane act differently in airflow, helping the nose rise during flight. Too much bend, though, and your airplane may stall, flip, or perform a highly unnecessary backbend.
Step 10: Open the wings, add a slight upward angle, and test fly
Open the wings so the airplane can sit in a flight position. Give each wing a slight upward angle from the body if needed. This subtle lift in the wings can improve stability. Now launch the plane gently forward with a slight upward toss. Do not hurl it. A loop plane is not a football, and your living room is not the Super Bowl. A smooth, moderate throw gives the plane enough speed to rise, pitch up, and complete a loop or a partial looping arc.
Why This Loop De Loop Paper Airplane Works
A stunt paper airplane works because of balance, airflow, and control. When you launch the airplane, your hand provides the initial thrust. As it moves through the air, the wings create lift, drag slows it down, and gravity pulls it back toward Earth. That part is true for every paper airplane. The fun begins when you tune the airplane to change its pitch.
The little upturned tabs at the rear of the wings act like simple elevators. When those tabs are bent upward, they help the plane’s nose rise. If the plane has enough forward speed and the balance is reasonably stable, it can arc upward into a loop or at least a dramatic looping climb. This is why loop planes are usually thrown gently but with enough snap to get moving. Too little speed and the plane flops. Too much speed and it may shoot forward before the loop has time to develop.
The other big factor is center of gravity. If the nose is too light, the plane may wobble and stall. If the nose is too heavy, it may fly straight and fast but ignore your stunt ambitions entirely. The best loop de loop paper airplane lives in that happy middle ground where the nose has enough weight to keep the plane stable, but the rear tabs still have enough influence to pitch it upward.
Common Mistakes That Ruin the Loop
Most failed stunt flights come down to a handful of very fixable problems.
1. The tabs are bent too high
This is the classic mistake. People get excited, crank the tabs skyward, and then wonder why the plane leaps up and immediately collapses like a tiny folding chair. If that happens, flatten the tabs a little and try again.
2. The wings are uneven
Uneven wings create uneven lift. That can turn your intended loop into a sideways spiral, a wobble, or a hard left turn into a lamp. Make sure both wings match as closely as possible.
3. The throw is too hard
A stunt plane usually does better with a controlled toss than a heroic launch. Throwing too hard can make it dive, shoot too far forward, or become unstable before the tabs can do their job.
4. The paper is worn out
After enough crashes, your airplane starts to look less like a marvel of home engineering and more like a receipt from a haunted grocery store. Soft creases and bent edges reduce performance. When in doubt, fold a fresh one.
5. The center body is too loose
If your main fold or nose lock is sloppy, the plane flexes too much in the air. That makes its flight harder to predict. Clean, crisp folds are not just pretty. They are functional.
How to Fine-Tune Your Paper Airplane for Better Loops
If your airplane does not loop on the first try, congratulations: you are doing real paper airplane science. Tiny changes matter. Try one adjustment at a time so you can see what actually helps.
- If the plane dives: bend the rear tabs up slightly more.
- If the plane rises and stalls: reduce the tab angle a little.
- If it turns left or right: check for uneven wings or uneven tabs.
- If it flies straight but never loops: use a gentler upward launch and slightly increase the rear tab angle.
- If it feels unstable: refold the body and sharpen every crease.
For example, if your plane climbs sharply and immediately flops backward, the tabs are probably too aggressive. If it glides nicely but stays stubbornly boring, the tabs may be too flat. The best stunt plane usually comes from two or three tiny test adjustments, not one giant fold-and-pray moment.
Best Places to Fly a Loop De Loop Paper Airplane
Indoor spaces usually work best because wind can bully a paper stunt plane into chaos. A hallway, classroom, garage, or large room gives you more consistent results. Outdoors can work on a calm day, but even a light breeze can change the loop, stretch it into a climb, or shove your airplane sideways.
If you want to get extra nerdy in the best possible way, try making two identical planes and changing only the tab angle on one of them. That is an easy, low-cost experiment that teaches you a lot about trimming, balance, and how small control surfaces affect flight.
Final Thoughts
Learning how to make a loop de loop paper airplane is one of those rare hobbies that is cheap, fast, creative, and just scientific enough to make you sound impressive at family gatherings. The basic idea is simple: build a stable plane, add small upward rear tabs, and tune the flight until the airplane pitches into a loop. The magic is not in one perfect fold. It is in the small adjustments that turn an ordinary paper airplane into a stunt flyer.
So fold one, test it, tweak it, and make another. Because once you see a sheet of office paper pull off a clean loop in your living room, your afternoon schedule may suddenly become much less productive and much more interesting.
Hands-On Experiences With a Loop De Loop Paper Airplane
One of the best things about making a loop de loop paper airplane is that the process teaches you far more than the final flight. On paper, it sounds simple: fold plane, bend tabs, throw plane, admire genius. In reality, the experience is usually a hilarious mix of small victories, weird crashes, and tiny engineering lessons that sneak up on you while you are standing in a hallway talking to yourself like a sports commentator.
The first experience most people have is overconfidence. You finish folding the airplane, give it a mighty throw, and it immediately nose-dives into a couch cushion. That is when the project gets interesting. You realize a loop plane is not about throwing harder. It is about trimming smarter. A quarter-inch change in the rear tabs can turn a crash into a climb. Straightening one crooked wing can turn a sad spiral into a graceful arc. That kind of instant feedback makes this activity incredibly satisfying, especially for kids, parents, teachers, and frankly any adult who still enjoys turning ordinary paper into airborne drama.
Another common experience is discovering how sensitive paper airplanes are to symmetry. A plane that looks almost right can still fly very wrong. One wing slightly lower than the other, one tab bent more than its twin, or one soft crease near the nose can completely change the flight path. That is frustrating for about thirty seconds, and then it becomes addictive. You start testing, adjusting, and launching again. Suddenly you are not just making a toy. You are running tiny flight experiments without calling them that.
People also learn very quickly that different spaces create different results. A loop de loop paper airplane that performs beautifully in a calm hallway may act wild outside. Even a mild breeze can interrupt the pitch, flatten the loop, or shove the plane sideways. Indoors, you get cleaner feedback and a better sense of what your folds are actually doing. Outdoors, you learn humility. Both are valuable.
There is also a surprisingly fun social side to the experience. In classrooms, families, or office break rooms where productivity has already quietly left the building, paper airplane testing becomes an event. One person folds the “serious” version. Someone else makes one with giant tabs and accidentally invents a chaos machine. Another person insists theirs is fine even though it keeps turning into a wall-seeking missile. Everyone learns something, and everyone suddenly has opinions about lift, drag, and whether Steve is throwing too hard.
Perhaps the most useful experience is realizing that failure is not failure here. A bad flight gives you data. If the airplane stalls, flatten the tabs. If it dives, raise them slightly. If it rolls to one side, check symmetry. If it still behaves like it is being controlled by a mischievous ghost, fold a fresh one and start clean. Every launch tells you something. That is why paper airplanes are such a sneaky, effective way to learn design thinking and basic aerodynamics. You build, test, adjust, and improve.
And then, eventually, it happens: the plane lifts, climbs, curves over the top, and completes a satisfying loop. It lasts maybe a second. It feels like a major aviation breakthrough. You will absolutely try to do it again immediately. That moment is the whole reason people keep folding paper airplanes. It is simple, inexpensive fun, but it also delivers that wonderful little spark of discovery. Not bad for one sheet of paper and a few folds.