Table of Contents >> Show >> Hide
- What Is Mail Merge in Microsoft Word?
- What You Need Before You Start
- How to Mail Merge in Microsoft Word: Step by Step
- A Quick Real-World Example
- Common Mail Merge Problems and How to Fix Them
- Can You Use Mail Merge for Labels, Envelopes, and Emails?
- Best Practices for a Better Word Mail Merge
- Conclusion
- Experience and Practical Lessons From Real Mail Merge Work
If you have ever copied the same letter 200 times and changed only the name at the top, congratulations: you have already met the problem that mail merge was invented to solve. Microsoft Word mail merge lets you create one master document and automatically personalize it for every person on your list. It is part productivity tool, part sanity saver, and part “why didn’t I learn this years ago?” moment.
Whether you are sending client letters, event invitations, invoices, thank-you notes, mailing labels, envelopes, or bulk email messages, mail merge in Microsoft Word can turn a repetitive chore into a fast, polished workflow. The magic is simple: Word connects your main document to a data source such as an Excel spreadsheet, Outlook contacts, or a list you build in Word. Then it drops the right details into the right places for each recipient.
In this step-by-step guide, you will learn exactly how to mail merge in Word, how to set up your recipient list the right way, how to preview results before printing, and how to avoid the classic mistakes that make people whisper rude things at their monitors.
What Is Mail Merge in Microsoft Word?
Mail merge is a feature in Microsoft Word that combines two parts: a main document and a data source. The main document is the template with the content that stays mostly the same for everyone. The data source is the list of personalized details, such as first names, company names, street addresses, ZIP codes, email addresses, or membership numbers.
Word uses merge fields as placeholders inside the document. When you run the merge, each field pulls information from the matching column in your list. So instead of typing “Dear Sarah,” “Dear James,” and “Dear Priya” a hundred times, you insert one greeting field and let Word do the heavy lifting.
Common things you can create with Word mail merge
Mail merge is not just for letters. You can use it for form letters, envelopes, mailing labels, directory-style documents, and email messages. In other words, it is the office equivalent of meal prep: do the setup once, enjoy the benefits many times.
What You Need Before You Start
Before you begin your Word mail merge, get these basics ready:
1. A main document. This can be a blank document or an existing letter, notice, certificate, or announcement.
2. A recipient list. Excel is the most common choice, but Word can also use Outlook contacts, Access data, delimited text files, or a brand-new list you create inside Word.
3. Clean data. This part matters more than people think. If your spreadsheet is messy, your merge will be messy too. Mail merge is powerful, but it is not a therapist for bad spreadsheets.
How to prepare your Excel list for a smooth merge
If you are using Excel, put your data on one worksheet, use clear column headers in the first row, and keep one recipient per row. Good column names might include FirstName, LastName, Company, Address1, City, State, ZIP, and Email.
Keep names in separate columns whenever possible. A spreadsheet works better when FirstName and LastName are split instead of living together in one awkward cell like roommates who should have moved out months ago. Also, format ZIP codes or postal codes as text so leading zeros stay intact. Finish your edits before connecting the file to Word, save the spreadsheet locally, and make sure there are no blank rows hiding in the middle like tiny trapdoors.
How to Mail Merge in Microsoft Word: Step by Step
Step 1: Create or open your main document
Open Microsoft Word and either start with a blank document or open the letter you want to personalize. Type the text that will stay the same for everyone. For example:
Dear [Name],
Thank you for registering for our spring workshop. We are excited to see you on April 18.
Do not type each person’s details manually. Leave those spots for merge fields.
Step 2: Start the mail merge
Go to the Mailings tab in Word. Click Start Mail Merge, then choose the type of document you want to create. For most people, that will be Letters. If you are new to the feature, the Step-by-Step Mail Merge Wizard is a friendly option because it walks you through the process in a side panel instead of making you guess which button does what.
Step 3: Select your recipients
Click Select Recipients. Word will give you a few options:
Use an Existing List: Best for Excel spreadsheets or other saved databases.
Choose from Outlook Contacts: Useful if your mailing list already lives in Outlook.
Type a New List: Perfect for quick jobs when you do not already have a file.
If you choose an Excel file, browse to it, open it, and select the worksheet that contains your data. Word will connect the document to the list. After that, use Edit Recipient List if you want to sort, filter, or uncheck certain recipients. This is extremely handy when you want to send a letter to everyone except the one person who still owes you three approvals and a reply from last Tuesday.
Step 4: Insert merge fields
Now place your cursor wherever personalized information should appear. Then use one of these options from the Mailings tab:
Address Block: Inserts a formatted mailing address.
Greeting Line: Inserts a greeting like “Dear Ms. Carter.”
Insert Merge Field: Lets you choose exact fields such as FirstName, Company, or InvoiceNumber.
A simple example might look like this inside Word:
Dear «FirstName»,
We are writing to confirm your appointment at «Company» on «EventDate».
You can mix merge fields with normal text, punctuation, and line breaks. That flexibility is what makes Word mail merge so useful for real business documents.
Step 5: Preview the results
Before you print 500 letters with the wrong greeting, click Preview Results. Use the next and previous record arrows to move through your list and check how each version looks. This is the moment to catch missing apartment numbers, weird capitalization, and the mysterious spreadsheet typo that turned “Stacy” into “Stcaey.”
Previewing matters because a merge is only as polished as the data behind it. If something looks off, go back to the spreadsheet or use recipient list tools in Word to fix the issue before finishing.
Step 6: Finish and merge
Once everything looks right, click Finish & Merge. Word will offer a few choices:
Edit Individual Documents: Creates a new document containing all merged versions. This is great when you want one last review before printing or saving.
Print Documents: Sends the merged output directly to the printer.
Send E-Mail Messages: Lets you use the merge as an email campaign if your list includes email addresses.
Save your main mail merge file when you are done. Word keeps the connection to the data source, so you can reuse the template later instead of rebuilding it from scratch.
A Quick Real-World Example
Let’s say you run a small design studio and want to send a personalized welcome letter to 50 new clients. Your Excel file contains these columns:
FirstName | LastName | Company | Address1 | City | State | ZIP
Your Word document says:
Dear «FirstName»,
Welcome to «Company». We are thrilled to work with you and look forward to helping your team this quarter.
With mail merge, Word creates 50 unique letters from one document. Same message, personalized details, zero copy-paste marathons. That is the beauty of it.
Common Mail Merge Problems and How to Fix Them
Problem 1: ZIP codes lose leading zeros
This usually happens because Excel treats ZIP codes like numbers. Format that entire ZIP column as text before connecting it to Word. Otherwise, 02110 becomes 2110, which is not a ZIP code so much as a cry for help.
Problem 2: Word shows weird field names like F1 or F2
Your header row may not be set up correctly. Make sure your first row contains actual column names and that the data begins below it.
Problem 3: Dates, phone numbers, or currency look wrong
Mail merge may display some values in their stored format rather than the pretty version you expected. In those cases, advanced users can toggle field codes in Word and format the merge field output directly. If you want the simplest fix, create clean helper columns in Excel and make those columns display exactly the way you want the final result to appear.
Problem 4: Only some recipients should get the document
Use Edit Recipient List to filter, sort, or uncheck names before completing the merge. This saves time and prevents accidental sends.
Problem 5: Email merge options seem limited
That is because they are. Word can send individual mail merge emails, but it is not a full email marketing platform. You typically cannot add CC or BCC recipients in the standard merge flow, and attachments are not part of the normal setup. For personalized plain announcements, it works well. For advanced campaigns, use a dedicated email tool.
Can You Use Mail Merge for Labels, Envelopes, and Emails?
Absolutely. The steps are nearly the same, but you choose a different document type at the start.
Mail merge labels
Choose Labels from Start Mail Merge or use the step-by-step wizard. You will select the label brand and product number, connect your data source, place the address block, and then let Word populate the full sheet. This is ideal for holiday cards, product mailers, and office admin jobs that would otherwise eat your entire afternoon.
Mail merge envelopes
Choose Envelopes, test the envelope layout first, add the address block where you want it, preview several records, and then print. Running a small test batch is smart here because envelope printing has a special talent for becoming dramatic at the worst possible moment.
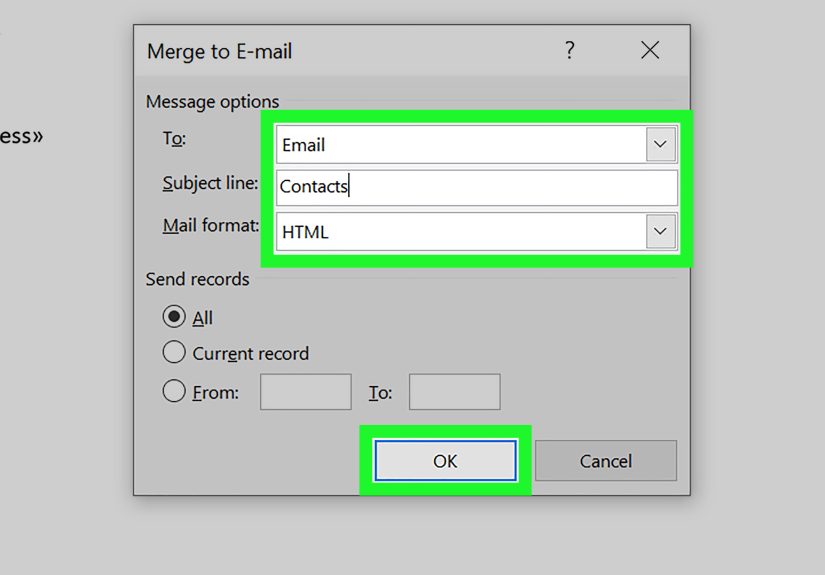
Mail merge email messages
Choose Email Messages and make sure your data source includes an email address column for every intended recipient. Then write the message in Word, insert your merge fields, preview the results, and use Finish & Merge to send. Word can send HTML or plain text message bodies depending on your setup.
Best Practices for a Better Word Mail Merge
Keep your source data simple. Clean columns beat complicated formulas every time.
Name fields clearly. FirstName is better than ColumnA_Final_ReallyFinal.
Preview multiple records. Never trust the first one alone.
Use Edit Individual Documents for big jobs. It gives you one final checkpoint before printing or sending.
Save the template. Reusable mail merge templates are tiny gifts from your past self to your future self.
Conclusion
Learning how to mail merge in Microsoft Word is one of those practical skills that pays off immediately. It saves time, reduces repetitive typing, and helps you create polished, personalized documents without doing everything by hand. The key is not just knowing which buttons to click. It is setting up clean data, inserting the right merge fields, previewing carefully, and choosing the right output option for your project.
Once you understand the workflow, Word mail merge becomes surprisingly easy. One document, one list, many personalized results. That is the whole game. And once you use it well, manually editing a hundred letters starts to feel like churning your own butter: technically possible, but wildly unnecessary.
Experience and Practical Lessons From Real Mail Merge Work
The most useful lesson I have seen with mail merge is that the technical part is rarely the hardest part. The real challenge is usually the data. People assume Word is the tricky piece, but Word is often the easy part once the spreadsheet is clean. In real office workflows, the difference between a five-minute merge and a fifty-minute headache usually comes down to whether someone took the time to organize the list before opening Word.
For example, one of the most common issues in business settings is inconsistent naming. A spreadsheet may contain “Bob,” “Robert,” and “Mr. Robert Jenkins” all in the same name column. Technically, mail merge will still run, but the final result can look unprofessional. That is why experienced users often create separate columns for salutation, first name, and last name. It feels like extra work at the beginning, but it gives you control later. Suddenly you can write “Dear Mr. Jenkins” in one campaign and “Hi Robert” in another without rebuilding the list.
Another practical lesson is to test with a tiny batch first. This sounds obvious, but people skip it all the time. They connect the full spreadsheet, click Finish & Merge, and hope for the best like gamblers at a slot machine. A better habit is to preview several records, then merge only three to five documents into a new file. Check spacing, punctuation, page breaks, and odd data combinations. It is much easier to fix a greeting line before printing 400 copies than after.
I have also learned that mail merge is especially valuable for teams that repeat similar communication every month. Membership reminders, donation acknowledgments, appointment letters, alumni outreach, customer welcome kits, HR notices, and event invitations all become easier when the template is saved properly. Once a good merge file exists, future campaigns are mostly about swapping in a fresh spreadsheet and proofreading carefully. That turns Word from a one-time document editor into a reusable system.
There is also a quiet psychological benefit to mail merge: it reduces boring work without making your message feel robotic. People still see their own names, companies, addresses, dates, and details. That small layer of personalization matters. A letter that begins with a person’s name and references the right account or event feels intentional, even when the process behind it is automated.
Finally, the best mail merge users treat the process like publishing, not just printing. They think about formatting, readability, brand voice, and data accuracy. They do not rely on automation blindly. They review, test, and refine. That is what separates a quick merge from a professional one. Mail merge in Microsoft Word is not just a feature. Used well, it is a repeatable workflow that saves time, reduces errors, and makes routine communication look more thoughtful than it took to produce. Which, honestly, is the dream.