Table of Contents >> Show >> Hide
- Before You Start: Safety Comes First
- Tools and Materials You May Need
- Choose the Right Porch Light
- Step 1: Turn Off the Power
- Step 2: Remove the Old Fixture
- Step 3: Inspect the Electrical Box
- Step 4: Attach the New Mounting Bracket
- Step 5: Connect the Ground Wire
- Step 6: Connect the Neutral and Hot Wires
- Step 7: Mount the Porch Light
- Step 8: Seal the Fixture Against Weather
- Step 9: Install the Bulb and Restore Power
- Step 10: Check the Final Details
- Common Porch Light Installation Mistakes
- Porch Light Ideas for Better Function and Style
- Maintenance Tips After Installation
- Real-World Experience: What Homeowners Learn When Installing a Porch Light
- Conclusion
A porch light is one of those small home upgrades that quietly does a lot of heavy lifting. It welcomes guests, helps you find your keys, improves curb appeal, discourages suspicious late-night wandering, and saves you from stepping on the one porch toy, garden hose, or mysterious leaf pile placed exactly where your foot wanted to land. In other words, a good porch light is part decoration, part safety feature, and part tiny outdoor superhero.
Learning how to install a porch light is usually a manageable project when you are replacing an existing fixture that already has a proper electrical box and wiring. However, because this job involves household electricity and outdoor weather exposure, it is not a “wing it and hope the sparks look festive” kind of project. The safest approach is to understand the process, use outdoor-rated materials, turn off power completely, test before touching wires, and call a licensed electrician whenever anything looks damaged, outdated, confusing, or not up to local code.
This guide explains how to install a porch light safely, how to choose the right fixture, what tools you need, how to seal the fixture against weather, and when to step away and bring in a professional. The goal is simple: a porch light that looks great, works properly, and does not turn your front entry into an accidental science experiment.
Before You Start: Safety Comes First
Outdoor light installation is not just about attaching a pretty fixture to the wall. A porch light sits where electricity meets rain, humidity, wind, insects, temperature changes, and the occasional overly confident spider. That means safety matters from the first step.
This article is intended for replacing an existing porch light, not running a brand-new electrical circuit. If there is no existing electrical box, if wires are frayed, if the old fixture was mounted directly to siding or brick without a proper box, or if the wiring looks unfamiliar, stop and call a licensed electrician. Local building codes may also require permits or professional installation, especially when new wiring is involved.
When to Call an Electrician
Call a qualified electrician if you notice aluminum wiring, cloth-covered wiring, scorch marks, moisture inside the electrical box, loose wires, no grounding wire, an unstable mounting box, repeated breaker trips, or a fixture location exposed directly to heavy rain without proper weatherproofing. Also call a professional if you are uncomfortable identifying wires or using a voltage tester. There is no shame in choosing safety. In fact, your porch light will not judge you. It has no eyebrows.
Tools and Materials You May Need
Gathering everything before you begin makes the project smoother. Nobody wants to be standing on a ladder with one screw in hand while realizing the screwdriver is in the garage, the wire nuts are missing, and the new fixture is upside down.
- Outdoor-rated porch light fixture
- Non-contact voltage tester
- Screwdrivers
- Wire strippers, if needed
- Wire connectors approved for the wire size
- Mounting bracket, usually included with the fixture
- Exterior-rated silicone caulk
- Ladder or step stool
- Safety glasses
- Work gloves
- Light bulb with the correct wattage and base type
- Fixture gasket, if included
Always read the manufacturer’s instructions before installation. Fixture designs vary. Some porch lights use a simple strap-style mounting bracket, while others use a circular plate, decorative cap nuts, integrated LED wiring, motion sensors, dusk-to-dawn sensors, or special sealing gaskets.
Choose the Right Porch Light
The best porch light is not just the prettiest one on the shelf. It must be suitable for its location. Outdoor lighting is typically labeled for damp or wet locations. A damp-rated fixture is generally suitable for covered areas where the light is protected from direct rain, such as a covered porch. A wet-rated fixture is designed for areas exposed directly to rain, snow, or sprinkler spray.
If your porch has a deep roof overhang and the wall rarely gets wet, a damp-rated fixture may be acceptable. If the fixture is on an uncovered wall, beside a garage, near a patio, or anywhere wind-driven rain can reach it, choose a wet-rated fixture. When in doubt, wet-rated is usually the safer and more durable choice.
Match the Fixture Size to the Door
For good curb appeal, the porch light should look proportional to the entryway. A tiny fixture beside a large front door can look like it wandered in from a dollhouse. A huge lantern beside a narrow side door may look like it expects a castle moat. As a general visual rule, many wall lanterns look balanced when they are about one-quarter to one-third the height of the door, depending on whether you use one fixture or a pair.
Think About Brightness
Porch lights should be bright enough to illuminate the entry without turning the neighborhood into a baseball stadium. Many homeowners prefer warm white light around the entry because it feels welcoming and reduces glare. If you are using an LED bulb, check the fixture label for compatibility, maximum wattage, and whether the bulb is approved for enclosed or outdoor fixtures.
Step 1: Turn Off the Power
Go to your electrical panel and turn off the breaker that controls the porch light. Do not rely only on the wall switch. A switch can be wired in ways that leave parts of the circuit energized, and nobody wants a surprise handshake from electricity.
After turning off the breaker, return to the porch and flip the light switch to confirm the old fixture no longer turns on. Then use a non-contact voltage tester at the fixture and wires before touching anything. Test the voltage tester on a known working outlet first so you know the tester itself is functioning.
Step 2: Remove the Old Fixture
Once you have confirmed the power is off, remove the screws, nuts, or decorative caps holding the old porch light to the wall. Support the fixture as you loosen it. Some older fixtures may be stuck to paint or caulk, so work gently to avoid damaging siding, stucco, or brick.
Carefully pull the fixture away from the wall to expose the wiring. You will usually see a black or red hot wire, a white neutral wire, and a bare copper or green ground wire. Before disconnecting anything, take a photo with your phone. That picture can be surprisingly helpful later, especially if your future self asks, “Wait, where did that wire go?”
Remove the wire connectors and separate the old fixture wires from the house wires. If the fixture has a mounting bracket attached to the electrical box, unscrew and remove it unless the new fixture instructions say it can be reused.
Step 3: Inspect the Electrical Box
The electrical box should be firmly mounted, undamaged, and large enough to contain the wire connections safely. It should also be appropriate for an outdoor wall fixture. If the box is loose, cracked, too small, recessed too deeply, full of water, or missing entirely, do not continue with a basic fixture swap. That is a job for proper repair or replacement.
Also inspect the wire ends. If they are corroded, brittle, scorched, or too short to connect securely, stop and get professional help. A porch light is only as safe as the electrical connections behind it.
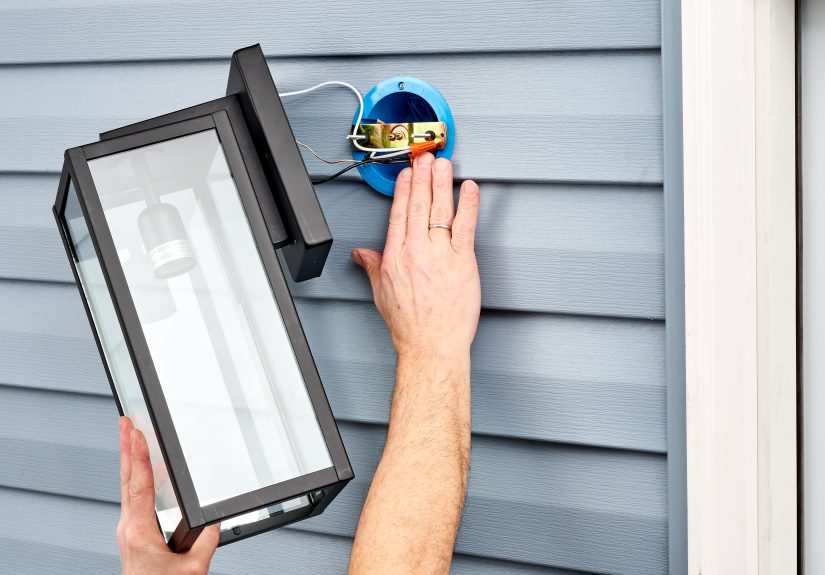
Step 4: Attach the New Mounting Bracket
Most porch lights include a mounting bracket. Attach the bracket to the electrical box using the screws provided. Make sure the bracket is level and secure. If the fixture uses a crossbar, threaded nipple, or decorative mounting plate, follow the manufacturer’s sequence carefully.
This is a good time to test-fit the fixture body against the wall before wiring. The fixture should sit flat or nearly flat. If siding, stone, or uneven brick prevents a tight fit, you may need a mounting block or box extension designed for exterior fixtures. Do not force the fixture into place and hope caulk will solve everything. Caulk is useful, but it is not magic frosting for electrical mistakes.
Step 5: Connect the Ground Wire
Connect the fixture’s ground wire to the house ground wire and to the grounding screw on the mounting bracket or electrical box if required by the fixture instructions. Ground wires are usually bare copper or green.
The ground connection helps provide a safer path for fault current if something goes wrong. Do not skip it. If your existing wiring has no ground wire, call an electrician before installing a modern metal fixture.
Step 6: Connect the Neutral and Hot Wires
Connect the white fixture wire to the white house wire using an approved wire connector. Then connect the black fixture wire to the black or red house wire. Twist the connector firmly according to its instructions and gently tug each wire to confirm the connection is secure.
If the fixture has extra wires for a motion sensor, photocell, smart control, or integrated LED driver, follow the manufacturer’s wiring diagram exactly. Do not guess based on color alone if the diagram says otherwise. Electrical wiring is one of the few places where guessing is not charming.
Carefully fold the wires into the electrical box. Avoid pinching them between the fixture and bracket. The wire connectors should remain inside the box, not floating outside behind the fixture body.
Step 7: Mount the Porch Light
Place the fixture body over the mounting bracket and secure it with the included screws, nuts, or decorative caps. Keep the fixture straight as you tighten it. Do not overtighten, especially on glass, thin metal, or decorative finishes.
If the fixture includes a gasket, make sure it sits evenly between the fixture base and the wall or mounting surface. The gasket helps reduce water entry. A twisted or crushed gasket can leave gaps, which is exactly what rain is waiting for.
Step 8: Seal the Fixture Against Weather
For many wall-mounted porch lights, a thin bead of exterior-rated silicone caulk around the top and sides of the fixture base helps keep water from running behind the light. Leave the bottom uncaulked unless the manufacturer says otherwise. Leaving a small opening at the bottom allows any trapped moisture to drain instead of collecting inside.
Use a neat bead, smooth it with a caulk tool or gloved finger, and wipe away excess before it cures. Good caulking should look tidy, not like the fixture lost a battle with a toothpaste tube.
Step 9: Install the Bulb and Restore Power
Install a bulb that matches the fixture’s rating. Never exceed the maximum wattage listed on the fixture label. If the fixture is enclosed, use a bulb rated for enclosed fixtures. If the porch light is exposed to cold or damp conditions, choose a bulb suitable for outdoor use.
Once everything is secure, turn the breaker back on. Flip the wall switch and test the porch light. If it has a motion sensor, adjust the sensitivity, range, and timer according to the instructions. If it has a dusk-to-dawn sensor, test it by covering the sensor briefly or waiting until evening.
Step 10: Check the Final Details
Step back and look at the fixture from the sidewalk or driveway. Is it straight? Is the glass secure? Is the caulk neat? Does the light spread evenly across the entry? A few minutes of final inspection can prevent future annoyance.
After the first heavy rain, check the fixture area for signs of water intrusion, fogging inside the glass, or loose caulk. Outdoor fixtures live a harder life than indoor lights, so occasional maintenance is normal.
Common Porch Light Installation Mistakes
Using an Indoor Fixture Outdoors
Indoor fixtures are not designed for moisture, corrosion, or temperature swings. Even if an indoor light looks perfect for your porch, it may not be safe or durable outside. Always choose a fixture rated for the location.
Skipping the Voltage Test
Turning off a switch is not enough. Turning off a breaker is better. Testing the wires is the step that confirms the power is actually off. Make it a habit every time.
Mounting Without a Proper Electrical Box
A porch light should be attached to a secure electrical box designed to hold wiring connections. If your old fixture was screwed directly into siding, wood, brick, or stucco with wires tucked behind it, have the installation corrected.
Over-Caulking the Fixture
Sealing the top and sides is often helpful, but sealing every possible exit point can trap moisture. Water sometimes finds a way in; good installation also gives it a way out.
Choosing the Wrong Brightness
A porch light that is too dim makes the entry feel unsafe. A porch light that is too bright can glare into windows and annoy neighbors. Aim for useful, comfortable illumination.
Porch Light Ideas for Better Function and Style
If you are replacing your porch light, consider upgrading the function at the same time. A motion-sensor porch light can improve security and save energy. A dusk-to-dawn fixture turns on automatically at night and off in the morning. A smart porch light can be scheduled or controlled by an app, although smart fixtures may require specific wiring and Wi-Fi conditions.
Style matters too. A black lantern can look crisp on white siding. Bronze fixtures pair nicely with brick, stone, and warm wood tones. Brushed nickel or stainless finishes often suit modern homes, though coastal environments may require corrosion-resistant materials. Clear glass offers brighter light, while seeded or frosted glass softens glare and hides dust a little better. Dust, sadly, remains undefeated.
Maintenance Tips After Installation
Clean the glass a few times a year so the light can do its job. Check screws and caps for looseness. Inspect caulk and gaskets annually, especially after winter or storm season. Replace bulbs with the correct type, and never ignore flickering, buzzing, burning smells, or repeated breaker trips.
If insects keep turning your porch light into their personal nightclub, consider warm-colored LED bulbs or fixtures designed to reduce bug attraction. Keeping the area clean and sealing gaps around the fixture can also help.
Real-World Experience: What Homeowners Learn When Installing a Porch Light
Many porch light projects begin with confidence. The old fixture looks simple. The new one looks simple. The box says “easy installation,” which is a phrase that has humbled many perfectly capable people. Then the old fixture comes off and suddenly the project becomes a tiny mystery novel starring three wires, two rusty screws, one crooked electrical box, and a homeowner whispering, “Interesting.”
One of the most common experiences is discovering that the old porch light was not installed as neatly as expected. Maybe the previous fixture was sealed with a heroic amount of caulk. Maybe the mounting bracket is slightly bent. Maybe the siding block is cracked. Maybe the fixture was painted around so many times that removing it feels like uncovering a fossil. This is why patience matters. Rushing the removal step can damage the wall surface or pull on wires unnecessarily.
Another lesson is that outdoor fixtures are less forgiving than indoor ones. Inside the house, a fixture can sit on a flat ceiling or wall and live a calm life away from rain. Outside, the mounting surface may be uneven brick, lapped siding, stucco, or stone. A fixture that looked perfect in the store may not sit flush without the right mounting block or adapter. The best fix is not brute force. It is choosing the correct mounting method so the fixture is supported, level, and sealed.
Homeowners also learn the value of taking photos before disconnecting the old fixture. That one quick picture can answer questions later, especially when wire colors are faded or the fixture includes sensor wiring. Labeling wires with tape can also help if the setup is more complicated than expected.
Caulking is another area where experience teaches restraint. Beginners often want to seal every edge because water is the enemy. That instinct is understandable, but outdoor fixtures need thoughtful sealing, not total burial. A neat bead around the top and sides helps shed water while leaving the bottom open for drainage. The result looks cleaner and performs better.
Finally, many people realize that the best porch light installation is not just about getting the light to turn on. It is about how the entry feels afterward. The right fixture can make a front door look more polished, make guests feel welcome, and make everyday routines easier. Coming home at night feels better when the entry is bright, warm, and safe. And yes, it is deeply satisfying to flip the switch and see the new porch light glow exactly as planned. That tiny moment is the DIY equivalent of a victory parade, just with fewer trumpets and more screwdrivers.
Conclusion
Installing a porch light can be a rewarding upgrade when the existing wiring and electrical box are in good condition. The key is to work safely, choose an outdoor-rated fixture, shut off power at the breaker, test before touching wires, make secure connections, mount the fixture properly, and seal it against weather. A porch light may be small, but it plays a big role in safety, style, and everyday convenience.
If anything about the wiring, box, grounding, moisture protection, or local code requirements seems uncertain, call a licensed electrician. A professional repair costs far less than a dangerous installation. Done correctly, your new porch light will make your entry brighter, safer, and much more inviting. Your front door gets the spotlight. Your guests get a warm welcome. Your keys finally get found on the first try. Everybody wins.