
Table of Contents >> Show >> Hide
- Why Divide and Transplant Daylilies?
- When Is the Best Time to Divide Daylilies?
- Before You Start: What Daylilies Need in a New Spot
- How to Divide and Transplant Daylilies: 13 Steps
- Step 1: Water the plant the day before
- Step 2: Pick the right day
- Step 3: Prepare the new planting area first
- Step 4: Trim back the foliage
- Step 5: Dig around the clump, not through it
- Step 6: Shake or wash off excess soil
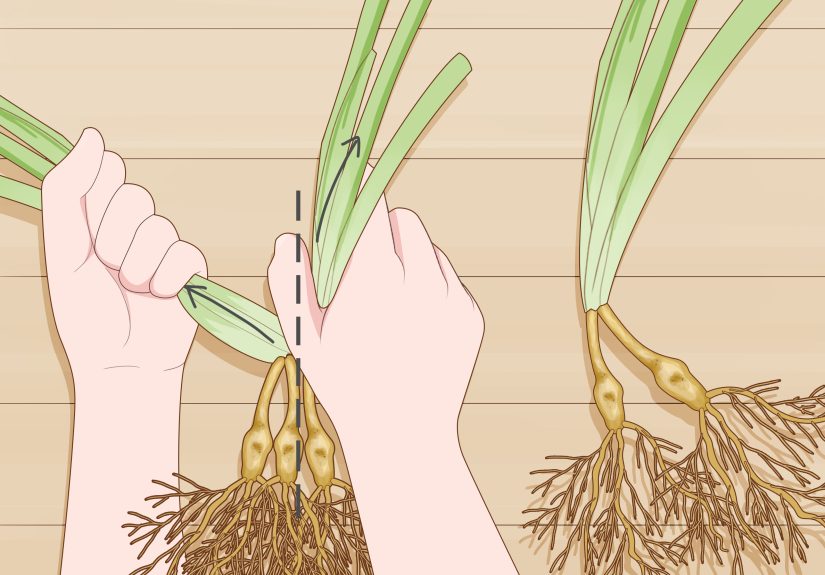
- Step 7: Pull the fans apart or cut dense sections
- Step 8: Keep healthy divisions with roots attached
- Step 9: Dig a proper planting hole
- Step 10: Set the crown at the correct depth
- Step 11: Spread the roots and backfill gently
- Step 12: Space the divisions generously
- Step 13: Water thoroughly and follow up
- What Happens After Transplanting?
- Common Mistakes to Avoid
- Quick Tips for Better Results
- Conclusion
- Real-World Gardening Experiences with Dividing and Transplanting Daylilies
Daylilies are the overachievers of the perennial garden. They bloom generously, forgive mediocre timing, survive beginner mistakes, and somehow still look cheerful while plotting a quiet takeover of your flower bed. But even these easygoing plants eventually get crowded, sulk a little, and produce fewer blooms. That is your cue. If your once-happy clump now looks packed, patchy, or strangely stingy with flowers, it is probably time to divide and transplant daylilies.
The good news is that this job is much less intimidating than it sounds. You are not performing plant surgery with a headlamp and a whispered prayer. You are simply helping a vigorous perennial breathe again. With the right timing, a sharp shovel, and a little patience, you can turn one tired clump into several healthy plants that settle in, root up, and reward you with stronger growth down the road.
In this guide, you will learn exactly how to divide daylilies, when to move them, how deep to plant them, and what to expect after transplanting. You will also get 13 practical steps, common mistakes to avoid, and a longer experience-based section at the end packed with real-world lessons gardeners learn after a few muddy afternoons.
Why Divide and Transplant Daylilies?
Daylilies do not ask for much, but they do appreciate elbow room. Over time, their fans multiply and form dense clumps. When that happens, roots compete for water and nutrients, air circulation drops, and flowering can decline. Sometimes the center of the clump begins to thin out, leaving you with a plant that looks like it is having a midlife crisis in public.
Dividing daylilies solves several problems at once. It rejuvenates older clumps, improves bloom production, gives you free plants, and lets you move favorite varieties to better spots in the yard. It is also one of the easiest ways to tidy up a perennial bed without spending money at the garden center while pretending you “just went in for potting mix.”
When Is the Best Time to Divide Daylilies?
The best time to divide and transplant daylilies is usually early spring as new growth begins, or late summer to early fall after flowering. In many gardens, dividing after bloom is ideal because the plant can focus on root growth instead of flowers. Spring also works well, especially if you caught the clump before it fully leafed out.
That said, climate matters. In colder regions, give divisions enough time to establish before the ground freezes. In hotter regions, avoid transplanting during brutal heat if you can help it. Daylilies are sturdy, but even sturdy plants appreciate not being moved during weather that feels like a hair dryer aimed at the flower bed.
Before You Start: What Daylilies Need in a New Spot
Choose a site with well-drained soil and at least six hours of sun for the best flowering. Light shade is tolerated, especially in hot climates, but heavy shade usually means fewer blooms and more leafy attitude. If your soil is compacted or poor, work in compost before replanting. Daylilies are adaptable, but they perform best in loose, fertile soil with reliable moisture and decent drainage.
Have your tools ready: a shovel or spading fork, garden knife, pruners, hose, compost, mulch, and a watering can or hose. The goal is simple: dig, divide, replant fast, and keep roots from drying out.
How to Divide and Transplant Daylilies: 13 Steps
Step 1: Water the plant the day before
A well-hydrated clump is easier to dig and less likely to suffer transplant shock. Water deeply the day before you plan to divide. Moist soil also holds together better around the roots, which makes the whole process a little less like wrestling a root-covered boulder.
Step 2: Pick the right day
Choose a cool, cloudy day if possible. If the forecast offers mild temperatures and maybe even a little post-transplant rain, take the hint. Avoid transplanting in the hottest part of the day. Your back will appreciate that, and so will the plants.
Step 3: Prepare the new planting area first
Do not dig up your daylilies and then begin wondering where they should live next. Prepare the new bed in advance. Loosen the soil, remove weeds, and mix in compost if needed. Daylilies like soil that drains well but does not dry out instantly. Think “comfortable garden bed,” not “swamp” and definitely not “concrete.”
Step 4: Trim back the foliage
If you are dividing in late summer or during warm weather, trim the foliage back to about 5 to 8 inches. This reduces water loss and makes the clump easier to handle. If you are working in spring before much top growth has developed, only trim what is necessary. You are aiming for manageable, not buzz-cut punishment.
Step 5: Dig around the clump, not through it
Insert your shovel or fork several inches outside the clump to avoid slicing straight through the best roots. Work all the way around, loosening the soil as you go. Then lift the whole plant. Mature daylily clumps can be surprisingly heavy, so use your legs, not your pride.
Step 6: Shake or wash off excess soil
Once the clump is out of the ground, shake loose soil from the roots or rinse it off with a garden hose. Seeing the crown and root structure clearly makes division much easier. It also reveals how many usable fans you actually have, which is often more than you expected and occasionally more than you wanted.
Step 7: Pull the fans apart or cut dense sections
Small or moderately dense clumps can often be pulled apart by hand. Larger, older clumps may need a sharp knife, a spade, or even two back-to-back garden forks to separate sections cleanly. Do not panic if the root mass is tough. Daylilies are famously resilient and generally recover well from a decisive split.
Step 8: Keep healthy divisions with roots attached
Each division should ideally have 2 to 3 fans of leaves and a healthy root system. You can replant single fans, but larger divisions usually establish faster and look better sooner. Discard mushy, damaged, or clearly diseased sections. This is not the time for sentimentality.
Step 9: Dig a proper planting hole
Make each hole wide enough to spread the roots without bending or cramming them into a tight wad. The hole does not need to be theatrical, but it does need to be roomy. Crowded roots at planting time can slow establishment and lead to poor performance later.
Step 10: Set the crown at the correct depth
This step matters more than many gardeners realize. Set the crown, where roots and foliage meet, at the original depth or about 1 inch below the soil surface. Planting too deep can reduce flowering and slow recovery. In other words, do not bury the crown like a treasure chest.
Step 11: Spread the roots and backfill gently
Fan the roots out naturally, backfill with soil, and firm the ground gently to remove large air pockets. Do not stomp the soil like you are flattening grapes in an old-world vineyard. Firm is enough. The goal is good root-to-soil contact without turning the bed into brick.
Step 12: Space the divisions generously
Space most standard daylily divisions about 18 to 24 inches apart. Larger or vigorous cultivars may appreciate 24 to 30 inches. Miniature types can go closer. Spacing is not just about today’s neatness; it is about giving the plant room to form a healthy clump before you are right back here dividing again.
Step 13: Water thoroughly and follow up
Water each new division deeply right after planting. Then keep the soil evenly moist, not soggy, while the plant establishes. A light mulch layer can help conserve moisture and suppress weeds, but keep mulch from smothering the crown. During dry spells, continue deep watering about once a week until the plants are settled in.
What Happens After Transplanting?
Freshly divided daylilies usually spend their first stretch focusing on roots, not showing off. That means bloom production may be reduced for a season, especially if you divide in spring or move very mature clumps. Do not read too much into a short-term dip in flowering. A healthy division often rebounds beautifully once it is established.
You may also notice some limp foliage right after transplanting, particularly if the weather turns hot or windy. That is normal. Keep up with watering, avoid over-fertilizing, and let the plant settle. Too much nitrogen too soon can encourage leafy growth at the expense of flowers. Daylilies are low-drama, but they still prefer thoughtful aftercare over enthusiastic overmanagement.
Common Mistakes to Avoid
- Planting too deep: A buried crown often means slower recovery and fewer flowers.
- Dividing in extreme heat: Technically possible, unnecessarily rude.
- Keeping divisions too small: One fan can live, but 2 to 3 fans usually establish faster.
- Ignoring spacing: Crowding the new bed just restarts the problem.
- Letting roots dry out: Replant promptly after division.
- Overwatering: Moist is good; swampy is not.
- Expecting instant bloom glory: Strong roots come first, flower fireworks later.
Quick Tips for Better Results
If your daylilies are in heavy clay, amend the new bed with compost before replanting. If you are moving them in late summer, cut back the foliage before you start digging. If you are dividing a massive old clump, wash the roots so you can see where natural sections separate. And if you have more divisions than space, congratulations: you now have gifts for neighbors, relatives, or that one friend who always says, “Your garden looks amazing,” and clearly means, “Please give me plants.”
Conclusion
Learning how to divide and transplant daylilies is one of those useful garden skills that pays you back immediately and for years afterward. You get healthier plants, more room in the bed, and a pile of free divisions that can fill gaps all over the landscape. Better yet, the process is simple once you know the basics: divide at the right time, keep solid roots attached, plant the crown at the correct depth, water well, and give the new plants space to settle in.
Daylilies may have a reputation for being easy, but easy does not mean careless. A little preparation goes a long way. Follow these 13 steps, avoid the classic mistakes, and your newly divided clumps should reward you with fresh growth, stronger performance, and eventually a better flower show than the crowded originals. Not bad for a job that starts with a shovel and ends with more plants than you had before.
Real-World Gardening Experiences with Dividing and Transplanting Daylilies
One of the most common experiences gardeners report is surprise at how fast daylilies go from “pleasant clump” to “small botanical empire.” A plant that looked perfectly placed three summers ago can suddenly start elbowing its neighbors, blooming less, and sending up so much foliage that the center turns crowded and tired. Many people put off dividing because the clump still looks alive, but once they finally dig it up, the difference is obvious. The outer fans are vigorous, the middle is congested, and the whole plant seems relieved to be split and reset.
Another real-world lesson is that the job is almost always more physical than expected. Gardeners often begin the project thinking they will casually pop a clump out before lunch, only to discover that established daylily roots grip the soil like they signed a long-term lease. That is why experienced growers love spading forks, sharp knives, and a garden hose. Once the soil is washed away and the fans become visible, the plant suddenly makes more sense. What looked like one giant mass becomes a collection of smaller, workable divisions.
Timing also shapes the experience. People who divide in cool weather usually describe the process as straightforward and successful. People who divide in peak summer heat often describe a few days of wilt, extra watering, and the gardening equivalent of apologizing to the plant. Daylilies are forgiving, but they do have opinions. If you move them during a hot spell, trimming the foliage and staying on top of moisture makes a noticeable difference.
Many gardeners also learn, sometimes the hard way, that planting depth is not a minor detail. A division tucked too deeply may survive just fine, but it often lags and flowers poorly. By contrast, divisions set at the right depth tend to establish faster and look more confident within a few weeks. The same goes for spacing. Newly divided plants can look a little lonely at first, which tempts people to crowd them together. A year or two later, those same gardeners are back outside with a shovel, laughing at their own optimism.
There is also a quiet pleasure in what happens after the work is done. Dividing daylilies is one of the few garden chores that creates immediate abundance. You start with one overgrown plant and end with several healthy divisions ready for new spots along a path, beside a mailbox, or in that bare area you kept meaning to fill. Gardeners often talk about sharing extra fans with neighbors, trading cultivars with friends, or moving favorite plants around the yard until the design finally feels right. It is practical work, but it also feels generous. The bed looks cleaner, the plants look younger, and suddenly you have enough daylilies to be very popular on your street.


