
Table of Contents >> Show >> Hide
- Before You Cut: Pick Your Goal (Because “Just a Little Off” Is Not a Plan)
- Tools You’ll Actually Need (Not “Whatever’s in the Junk Drawer”)
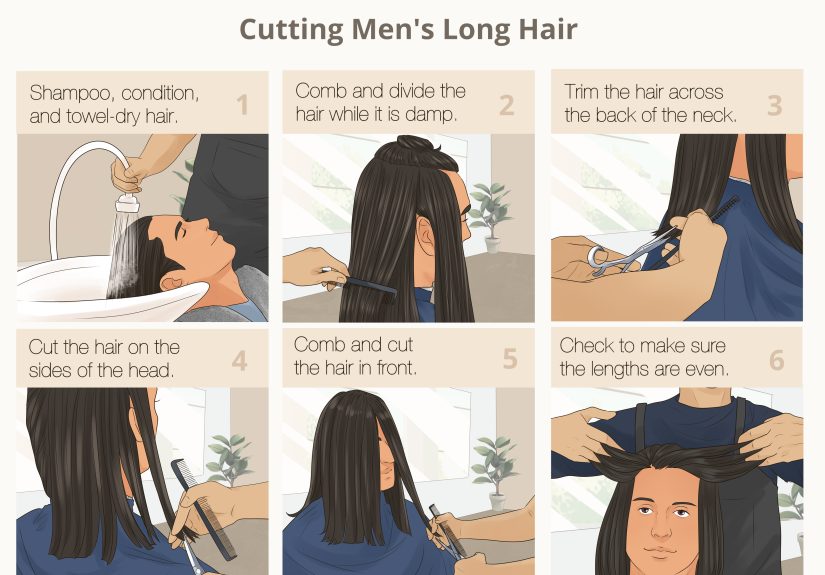
- The 13-Step Long-Hair Cut for Men
- Step 1: Set Up Your Cutting Zone
- Step 2: Start With Clean, Detangled Hair
- Step 3: Decide Your Baseline Length (And Subtract 25%)
- Step 4: Map Your Hair’s “Grain” and Cowlicks
- Step 5: Create Four Sections (The “Quadrants”)
- Step 6: Trim the Back Perimeter First (The Foundation)
- Step 7: Use Point Cutting for a Softer Finish
- Step 8: Match the Sides to the Back (One Side at a Time)
- Step 9: Add Subtle Long Layers (Optional, But Great for Movement)
- Step 10: Face-Framing: Clean Up the Front Without Going Full “Oops Bangs”
- Step 11: Reduce Bulk Carefully (If Your Hair Is Thick)
- Step 12: Cross-Check for Balance (The “Mirror Walkaround”)
- Step 13: Finish the Details: Neckline, Sideburns, and Styling
- Troubleshooting: Fixes for the Most Common “Oh No” Moments
- Maintenance: How to Keep Men’s Long Hair Looking Fresh Between Cuts
- Extra: of Real-World “Been There” Experiences (So You Don’t Have To)
- Conclusion
Cutting men’s long hair at home can feel like defusing a bomb: one wrong snip and suddenly you’re Googling “hats that look intentional.” The good news? Long hair is forgiving when you work slowly, cut less than you think you need, and use the right technique. This guide walks you through a clean, natural-looking trim (plus optional layers and face-framing) in 13 practical stepswith zero “close your eyes and hope” energy.
Before You Cut: Pick Your Goal (Because “Just a Little Off” Is Not a Plan)
Long haircuts for men usually fall into three home-friendly categories. Choose one before the scissors come out:
- The Maintenance Trim (“Dusting”): Keep length, remove split ends, tidy shape.
- The Shape-Up: Clean perimeter (the bottom line), reduce bulk, refine face framing.
- Light Layers: Add movement so your hair doesn’t hang like a wet curtain after a long day.
If you’re aiming for a dramatic change (shag, mullet overhaul, heavy layering, major length chop), you’ll get better results with a pro. But if you want a tidy, healthy, wearable long haircut at home? Keep reading.
Tools You’ll Actually Need (Not “Whatever’s in the Junk Drawer”)
Must-Have
- Haircutting scissors (shears): Sharp, designed for hair. Kitchen scissors are the fast lane to frayed ends.
- Fine-tooth comb: For control and even tension.
- Clips or hair ties: Sectioning is the difference between “salon-y” and “oops.”
- Spray bottle (optional): For light dampeningespecially helpful for straight hair.
- Two mirrors or a 3-way mirror setup: You must see the back. Trust is not a strategy.
Nice-to-Have
- Thinning shears: For bulk reduction (use sparingly).
- Clippers or trimmer: For neckline clean-up or sideburn polish (not mandatory for long hair).
- Cape or towel + vacuum plan: Your shower drain should not meet your hair today.
The 13-Step Long-Hair Cut for Men
This method prioritizes a natural finish: a clean perimeter, subtle layering (optional), and face framing that doesn’t scream “I did this at 1 a.m.” Read all steps once before startingyes, like a recipe. No one wants to discover Step 9 while holding scissors in Step 3.
-
Step 1: Set Up Your Cutting Zone
Pick a bright spot with strong overhead light. Lay down a towel or stand on an easy-to-clean surface. Place a mirror in front and a second mirror behind (or use a tri-fold mirror) so you can check the back and sides. Keep your tools on the counter, not balanced on the sink like a tiny, dangerous Jenga tower.
-
Step 2: Start With Clean, Detangled Hair
Wash and condition, then detangle thoroughly. Knots hide length and create uneven cutting. If your hair is curly or wavy, consider cutting it dry or mostly dry (curl shrinkage is real). If it’s straight, a slight dampness can help control flyawaysjust don’t soak it and guess where it’ll land when dry.
-
Step 3: Decide Your Baseline Length (And Subtract 25%)
Long hair cuts best when you aim for “a little less than you think,” then reassess. Want to remove one inch? Start with half an inch. You can always cut more; you cannot “uncut” hair (tragically). If you’re growing it out, you may only need a dusting: a thin trim to remove split ends while keeping length.
-
Step 4: Map Your Hair’s “Grain” and Cowlicks
Look at how your hair naturally falls: where it parts, where it flips, where it insists on doing its own thing. Long hair often has “habit zones” at the crown, temples, and nape. Cutting against the natural direction can create awkward bumpsso you’ll use the grain to guide how you section and blend.
-
Step 5: Create Four Sections (The “Quadrants”)
Part hair down the middle from forehead to nape. Then split ear-to-ear across the crown. Clip each quadrant: front-left, front-right, back-left, back-right. Sectioning keeps your cut even, prevents accidental over-cutting, and makes you feel like a person who knows what they’re doing (because now you do).
-
Step 6: Trim the Back Perimeter First (The Foundation)
Release the back sections only; keep the front clipped away. Comb the back hair straight down in its natural fall. Take a thin horizontal slice at the bottom. Using the tips of your shears, trim your planned amountsmall, controlled snips. This sets your baseline. If the baseline is shaky, everything built on it becomes modern art.
-
Step 7: Use Point Cutting for a Softer Finish
Instead of chopping straight across like you’re cutting wrapping paper, angle the scissors vertically and snip lightly into the ends. This is called point cutting, and it helps the ends look natural, not blunt and helmet-like. Think “soft feathers,” not “perfect ruler line.”
-
Step 8: Match the Sides to the Back (One Side at a Time)
Release one front section. Comb it down and bring it slightly back toward the shoulder so it meets the back length. Use the back as your guide and trim just enough to match. Repeat on the other sidebut don’t assume your face is perfectly symmetrical (almost nobody’s is). Your job is to make the haircut look balanced, not to win a geometry contest.
-
Step 9: Add Subtle Long Layers (Optional, But Great for Movement)
If your hair feels heavy, flat, or “triangle-y” (wide at the bottom), light layers can help. Keep it conservative: you’re not creating a dramatic shag at home; you’re adding movement. Take a small section from the crown, lift it up, and trim minimally using point cutting. Work in small sections and keep a consistent guide length so layers blend instead of stair-stepping.
-
Step 10: Face-Framing: Clean Up the Front Without Going Full “Oops Bangs”
Face-framing layers can make long men’s hair look intentionalespecially with a middle part, bro flow, or tucked-behind-ear style. Start longer than you think (often somewhere between cheekbone and chin as a safe zone). Take a thin section around the face, pull it forward, and lightly point cut for softness. The goal is a gentle shape, not sudden curtain bangs you didn’t request.
-
Step 11: Reduce Bulk Carefully (If Your Hair Is Thick)
If your hair is thick, you might need bulk reductionbut go easy. Use thinning shears sparingly, and never right at the ends (that’s a frizz invitation). Focus on mid-lengths and interior sections, using a few snips at a time, then comb out and reassess. Over-thinning is how hair becomes wispy in all the wrong ways.
-
Step 12: Cross-Check for Balance (The “Mirror Walkaround”)
Dry and style your hair the way you normally wear it, then check: front view, side views, and back view. Look for uneven corners, a lopsided perimeter, or heavy spots. Fix issues with tiny point cuts. If you find yourself saying “I’ll just take a bit more” repeatedly, pause. That’s how “just a trim” becomes “I guess I’m a medium-length guy now.”
-
Step 13: Finish the Details: Neckline, Sideburns, and Styling
Long hair still benefits from tidy edges. You can clean up stray hairs at the nape and around the ears with a trimmerlightly. Don’t carve a sharp neckline unless you’re confident; a soft natural nape often looks better with long hair. Finish with conditioner or a light styling cream, especially on mid-lengths and ends to prevent frizz and puff.
Troubleshooting: Fixes for the Most Common “Oh No” Moments
If the ends look blunt or choppy
Do gentle point cutting across the perimeter to soften the line. Avoid going shorter; just refine texture.
If one side looks longer
Check your posture and head tilt in the mirror. Re-comb and compare side to side, then take tiny snips to match. Often it’s a styling illusionuntil it’s not, so verify carefully.
If your layers look “stair-stepped”
You likely took too thick a section or cut at inconsistent angles. Blend by taking smaller sections and point cutting lightly. Avoid big horizontal chopsthose create the step effect.
If curls sprang up and got shorter than expected
That’s shrinkage. Next time, cut dry or cut less while damp, then recheck after styling. For curly long hair on men, conservative trims are your best friend.
Maintenance: How to Keep Men’s Long Hair Looking Fresh Between Cuts
- Trim schedule: If growing it out, a small trim every couple of months can reduce split ends while preserving length.
- Condition like you mean it: Focus conditioner on mid-lengths and ends, not your scalp.
- Use lighter styling products: Heavy gels can make long hair look greasy or stiff. Creams, light pomades, and leave-ins are often better.
- Protect hair when wet: Wet hair is more fragile. Detangle gently and avoid aggressive towel rubbing.
Extra: of Real-World “Been There” Experiences (So You Don’t Have To)
People who try trimming men’s long hair at home tend to share the same three emotional stages: confidence, concentration, and the sudden desire to own more hats. Here’s what those experiences usually look likeand how to use them to your advantage.
The “I Only Took Off a Little” Lie
The most common DIY haircut story starts with “I only want half an inch,” followed by “why does the floor look like a golden retriever shed here?” The lesson: hair looks like nothing in your fingers, but like everything in the trash. That’s why the best at-home cutters do multiple micro-passes: trim a little, step back, style, re-check, repeat. It feels slow, but it prevents the panic-snipping spiral.
Sectioning Feels Annoying… Until It Saves Your Weekend
Skipping sectioning is tempting because clips seem like a “salon thing,” but it’s actually a “not ruining your perimeter” thing. In real life, most uneven long-hair trims happen because someone cut the front while the back was still tucked into a hoodie or tangled into a collar. When you section into quadrants and keep hair controlled, you can replicate the same angle and tension each time. Translation: your haircut looks intentional instead of accidental.
The Mirror Problem Nobody Mentions
Cutting the back of your head is where confidence goes to get humbled. People often realize, mid-cut, that their “mirror plan” is just them squinting at a reflection of a reflection like a confused raccoon. A better setup changes everything: strong light, a stable second mirror, and the patience to turn your bodynot your neckso your head stays level. When your head tilts, the cut lies. When the cut lies, your hair tells the truth… loudly.
Texture Is the Secret Sauce
The biggest difference between “home haircut” and “barber-approved” is the finish at the ends. People who chop straight across often get that blunt, heavy lookespecially on thick or straight hair. The ones who use point cutting usually end up with a softer line, better movement, and fewer “why does it look like a Lego piece?” moments. Texture also hides tiny imperfections, which is great because home haircuts are basically a controlled imperfection hobby.
The Surprise Benefit: You Learn Your Hair’s Personality
After one or two careful trims, most people get weirdly good at understanding their hair’s habits: where it flips near the shoulders, where it gets bulky at the sides, where it refuses to lay flat unless bribed with conditioner. That knowledge helps even if you go back to a professional laterbecause now you can explain what you want with actual words, not vague gestures and hope.
Conclusion
Cutting men’s long hair at home doesn’t require superhero skillsjust patience, sharp shears, and the discipline to cut less than your ego suggests. Follow the 13 steps, focus on a clean perimeter and soft texture, and you’ll end up with long hair that looks healthier, sits better, and feels lighter without losing the length you worked for. And if it goes sideways? Remember: long hair grows back, and hats have never been more socially accepted.


