Table of Contents >> Show >> Hide
- Why a DIY Zombie Costume Works So Well
- Step 1: Choose Your Zombie Character
- Step 2: Gather Your Zombie Costume Supplies
- Step 3: Distress the Clothing
- Step 4: Create a Realistic Zombie Makeup Base
- Step 5: Add Wounds, Scars, and Texture
- Step 6: Make or Apply Fake Blood
- Step 7: Style Zombie Hair
- Step 8: Finish with Zombie Accessories
- Step 9: Keep the Costume Safe and Comfortable
- Common Zombie Costume Mistakes to Avoid
- Best Zombie Costume Ideas by Budget
- How to Create a Last-Minute Zombie Costume
- Real-World Experience: What Actually Makes a Zombie Costume Work
- Conclusion
There are two kinds of Halloween costumes: the ones that cost a suspicious amount of money and the ones people remember. A zombie costume belongs firmly in the second category. It is classic, flexible, budget-friendly, and wonderfully forgiving. Rip your shirt a little too much? Congratulations, you survived a lawnmower attack. Smudge your makeup? Excellent, you now look like you crawled out of a haunted subway tunnel. Forget to iron your clothes? Perfect. Zombies do not steam garments.
Learning how to create a zombie costume is less about buying a complete outfit and more about building a character. Are you a zombie prom queen, zombie office worker, zombie bride, zombie athlete, zombie chef, or zombie who was apparently attacked while folding laundry? The best zombie costumes tell a tiny story before you even open your mouth and groan dramatically near the snack table.
This guide walks you through a complete DIY zombie costume, including outfit planning, clothing distressing, zombie makeup, fake blood, hair styling, safety tips, and realistic finishing details. The goal is simple: create a scary, wearable, comfortable zombie look without turning your bathroom into a crime scene that requires three adults, one mop, and emotional support.
Why a DIY Zombie Costume Works So Well
A homemade zombie costume works because imperfection is the whole point. Unlike superheroes, princesses, or movie characters that require exact colors and accessories, zombies thrive on chaos. Your costume can be cheap, last-minute, and still look intentional. In fact, the more “wrong” it looks, the more believable it becomes.
The strongest zombie costume usually combines four elements: distressed clothing, pale or grayish skin, dark hollow eyes, and controlled fake blood. Notice the word “controlled.” A little fake blood looks cinematic. Too much can make you look like you wrestled a ketchup dispenser and lost.
The other advantage is flexibility. You can create a zombie costume for adults, kids, couples, groups, school events, Halloween parties, haunted houses, theater performances, and neighborhood trick-or-treating. You can make it funny, creepy, cute, gruesome, or surprisingly fashionable. Somewhere out there, a zombie is wearing a blazer better than most living people.
Step 1: Choose Your Zombie Character
Before cutting fabric or applying makeup, decide who your zombie used to be. A generic zombie is fine, but a specific zombie is better. A zombie nurse, zombie football player, zombie bride, zombie teacher, zombie cowboy, zombie prom date, or zombie fast-food worker gives your costume instant personality.
Easy zombie costume ideas
For a simple classic zombie, use an old T-shirt, jeans, boots, pale makeup, dark eye circles, and fake blood. For a zombie office worker, use a button-down shirt, tie, pencil skirt or slacks, and a coffee stain that looks like the final meeting really got out of hand. For a zombie bride or groom, distress thrift-store formalwear and add gray makeup, wilted flowers, and a tragic backstory. For a zombie athlete, use an old jersey, knee socks, sneakers, and dirt marks around the knees and elbows.
Kids can wear lighter, less scary versions: torn sleeves, smudged gray face paint, messy hair, and minimal fake blood. For school-friendly events, skip gore and lean into cartoonish undead details like greenish shadows, silly groans, and mismatched socks.
Step 2: Gather Your Zombie Costume Supplies
You do not need professional special-effects gear to make a convincing zombie costume. Most of the materials can come from your closet, a thrift store, a craft aisle, or the kitchen. The trick is choosing items you are willing to permanently alter because fake blood, dirt effects, and fabric cuts may not wash out completely.
Basic supplies
- Old shirt, dress, jacket, scrubs, uniform, or thrift-store clothing
- Old pants, skirt, leggings, or jeans
- Comfortable shoes you can walk in safely
- Scissors or a seam ripper
- Sandpaper, a cheese grater, or a stiff brush for distressing fabric
- Gray, white, black, purple, green, and red face paint or costume makeup
- Makeup sponge, brush, cotton swabs, and blending sponge
- Fake blood or homemade fake blood
- Hair gel, dry shampoo, baby powder, or temporary hair color spray
- Optional: liquid latex, scar wax, tissue paper, spirit gum, or prosthetic wounds
For safety, use products intended for skin when applying anything to your face or body. Craft paint belongs on pumpkins, posters, and questionable school projects, not on your cheeks. Always test makeup on a small patch of skin before Halloween night, especially for kids or anyone with sensitive skin.
Step 3: Distress the Clothing
Distressed clothing is the backbone of a great DIY zombie costume. Start with clothing that fits well. It should not drag on the ground, block movement, or create a tripping hazard. A terrifying zombie is fun. A zombie who falls down the porch steps is less fun and usually requires paperwork.
How to make clothes look old and undead
Lay the clothing flat on a protected surface. Use scissors to make small starter cuts near hems, cuffs, elbows, knees, shoulders, and collars. Then pull the fabric with your fingers to create natural tears. Avoid cutting perfectly straight lines because real damage usually looks uneven. Rub sandpaper or a cheese grater over the edges to fray them.
Focus on areas that would realistically wear out first: knees, elbows, cuffs, pockets, and hems. Add a few diagonal tears across the chest or back, but do not shred the entire outfit into confetti. Negative space matters. If every inch is torn, the eye has nowhere to land.
How to add dirt and age
To make clothing look freshly unearthed, use brown and black makeup, cocoa powder, charcoal-colored eye shadow, or washable fabric paint. Apply grime around hems, cuffs, knees, elbows, and pockets. Smudge upward from the bottom of pants or skirts, as if your zombie has shuffled through mud, leaves, and at least one emotionally complicated graveyard.
For a dry, dusty effect, lightly brush gray or brown powder over the shoulders and back. For an old stain effect, dilute brown paint with water and dab it onto fabric with a sponge. Let it dry completely before wearing. If you are using food-based materials, keep in mind that they may attract insects or stain, so reserve them for short events and washable items.
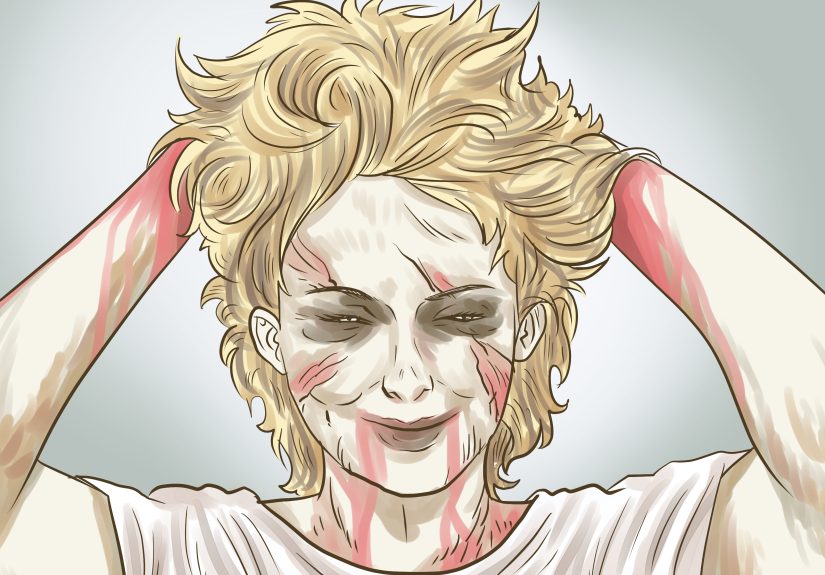
Step 4: Create a Realistic Zombie Makeup Base
Zombie makeup does not have to be complicated. A pale base, hollow eyes, and strategic shadows can transform almost anyone into the recently reanimated. Start with clean, moisturized skin. Apply a thin layer of white, gray, or light green face paint using a damp sponge. The goal is not clown-white coverage; the best undead skin looks uneven, tired, and slightly translucent.
Build zombie skin tone
Mix a little gray or green into white face paint to avoid a flat look. Dab, do not swipe. Leave some natural skin tone showing around the edges so the makeup appears more organic. Add gray or purple shadows under cheekbones, around temples, beside the nose, and under the lower lip. Blend well. Zombies are many things, but they are rarely known for crisp contour lines.
Use darker makeup around the eyes to create a sunken look. Blend black, brown, burgundy, or purple shadow under the eyes and into the crease. Keep the darkest color closest to the lash line and inner corners. Add a little red around the lower lash line for irritation, but avoid putting non-eye-safe products too close to the eyes.
Make the mouth look undead
For lips, use a pale concealer or grayish foundation to reduce natural color. Add a little purple or brown in the center and corners of the mouth. For a hungry zombie effect, dab fake blood around one side of the lips and let it drip slightly downward. Do not overdo it unless your character just completed a buffet.
Step 5: Add Wounds, Scars, and Texture
Wounds add drama, but they should look intentional. Choose one or two focal points: a cheek wound, forehead scrape, torn neck area, or injured arm. Too many wounds can look messy and distract from the costume.
Simple tissue wound method
For a beginner-friendly wound, apply a skin-safe adhesive or liquid latex to the area, then press on small torn pieces of tissue. Add another thin layer of adhesive, let it dry, and gently tear the center open to create raised edges. Cover the tissue with foundation or face paint close to your skin tone, then paint the inside with dark red, burgundy, and a little black. Finish with fake blood.
If you have sensitive skin or are making a zombie costume for kids, skip latex and prosthetics. You can create excellent scratches with red and brown face paint. Use a fine brush to draw irregular lines, then soften one edge with a sponge. Add tiny dots of darker red at the deepest points.
Use shadows for realism
The secret to realistic zombie makeup is not only red blood. It is contrast. Add dark shading under torn skin, around fake wounds, and in hollows of the face. Use yellow, purple, and brown around wounds to suggest bruising. Realistic gore is layered, not just red. Think “art class,” but with more groaning.
Step 6: Make or Apply Fake Blood
Fake blood can make or break a zombie costume. Store-bought fake blood is convenient, but homemade versions can work well too. A simple edible-looking blood mixture often uses corn syrup, chocolate syrup or cocoa powder, and red food coloring. The syrup gives shine and thickness, while chocolate deepens the color so it does not look like melted candy.
Simple fake blood recipe
- 1 cup light corn syrup
- 1 to 2 tablespoons chocolate syrup or a small amount of cocoa powder
- Red food coloring, added slowly until the color looks right
- Optional: one tiny drop of blue or green food coloring to darken the red
Mix the ingredients in a bowl and test the color on a paper towel. Blood on white paper often looks brighter than it will on fabric or skin, so adjust slowly. Add more chocolate for old blood, more syrup for shine, or a tiny bit of water for splatter. Be careful: food coloring can stain skin, clothes, counters, towels, tile grout, and possibly your soul.
Where to place fake blood
Apply fake blood where it makes sense: around a wound, near the mouth, on torn sleeves, across the collar, or on the hands. Splatter lightly by dipping an old toothbrush in fake blood and flicking it onto clothing outside or over a protected surface. For drips, use a small spoon or brush and let gravity help.
Avoid applying sticky fake blood to areas that will touch furniture, car seats, other people, or rental costumes. If you are going to a party, bring tissues or wipes. Nobody wants a hug from someone who leaves syrup-based evidence.
Step 7: Style Zombie Hair
Zombie hair should look neglected, dusty, and slightly tragic. Start by teasing sections at the roots with a comb. Add dry shampoo, baby powder, or gray temporary hair spray for a dusty effect. Use gel or hairspray to make small sections clump together. For longer hair, create loose, uneven tangles or a messy half-up style.
If you are wearing a wig, choose one that can be roughed up. Trim uneven pieces, tease it, and add a little powder or temporary color. Avoid heavy products near open flames and check that wigs or accessories are labeled flame resistant when possible. The undead should glow with personality, not actual fire.
Step 8: Finish with Zombie Accessories
Accessories help sell the story. A zombie student can carry a torn notebook. A zombie chef can wear a stained apron and hold a rubber spatula. A zombie gardener can carry fake flowers and wear muddy gloves. A zombie businessperson can wear a crooked tie and carry a coffee cup labeled “Still Dead Before Coffee.”
Choose soft, flexible props. Avoid sharp, hard, long, or heavy accessories, especially for children. If your costume will be worn outdoors at night, add reflective tape, glow sticks, or a light-colored bag. You can hide reflective tape on the back of sleeves, shoes, or a prop so the costume stays spooky while still being visible.
Step 9: Keep the Costume Safe and Comfortable
A zombie costume should be scary, not dangerous. Make sure clothing fits properly, shoes are comfortable, and the costume allows easy walking, sitting, and bathroom breaks. Avoid masks that block vision. Makeup is usually a better option because it keeps the eyes clear and makes facial expressions visible.
Decorative contact lenses can look dramatic, but they should only be used with an eye exam and prescription from an eye care professional. Never buy costume lenses from novelty shops, street vendors, beauty supply stores, or random online sellers that do not require a prescription. Red eyes are scary; eye infections are not a costume upgrade.
Test face paint ahead of time on a small area of skin. Use non-toxic makeup, remove it before bed, and avoid applying products too close to the eyes or lips unless they are specifically made for those areas. For kids, keep makeup lighter and simpler. For adults, remember that wearing heavy face paint for hours can irritate skin, so moisturize before application and cleanse gently afterward.
Common Zombie Costume Mistakes to Avoid
Using too much fake blood
Fake blood is powerful. Use it like hot sauce: enough to make an impact, not enough to ruin the whole dish. Strategic placement looks more realistic than pouring it everywhere.
Making the clothes too shredded
If the outfit is too destroyed, it may become uncomfortable, revealing, or fragile. Distress edges, cuffs, and focal areas while keeping the structure wearable.
Forgetting shoes
Clean, shiny sneakers can break the illusion. Smudge them with washable brown makeup or dust, but keep the soles safe and dry.
Ignoring the back of the costume
People will see you from all angles. Add dirt, tears, or powder to the back of the shirt, shoulders, and hair.
Skipping a movement test
Before leaving the house, walk, sit, bend, climb stairs, and check your visibility. If anything drags, slips, pokes, or blinds you, fix it before you join the living.
Best Zombie Costume Ideas by Budget
Under $10
Use clothes you already own, dark eye shadow, pale powder, and a little homemade fake blood. Tear an old shirt, mess up your hair, and add dark circles. This is the classic “I woke up like this, unfortunately in a cemetery” look.
Under $25
Buy thrift-store clothing, face paint, fake blood, and a small makeup sponge set. Add a character theme, such as zombie teacher, zombie waiter, or zombie gym member. This budget level gives you more control and stronger visual impact.
Under $50
Add prosthetic wounds, liquid latex, scar wax, temporary hair spray, and better makeup. This is ideal for parties, contests, photos, or haunted attractions. Spend most of the budget on safe makeup and comfortable clothing rather than one flashy prop.
How to Create a Last-Minute Zombie Costume
If Halloween is tonight and your planning style can best be described as “panic with snacks,” do not worry. Grab an old T-shirt, dark pants, and comfortable shoes. Cut a few jagged tears near the collar and sleeves. Rub brown or black eye shadow around the hems and elbows. Apply pale powder or light foundation to your face, darken the eye sockets, mess up your hair, and dab fake blood around your mouth or collar.
In ten minutes, you can become a convincing zombie. In twenty minutes, you can become a zombie with emotional depth. In thirty minutes, you may start judging everyone else’s costumes, which means the transformation is complete.
Real-World Experience: What Actually Makes a Zombie Costume Work
After seeing plenty of Halloween costumes in real life, the zombie looks that stand out are not always the most expensive or the bloodiest. They are the ones with a clear idea. A plain ripped shirt can look forgettable, but a ripped shirt with a name tag, coffee stain, crooked tie, and one gray handprint across the shoulder suddenly becomes a whole story. People do not just see “zombie.” They see “zombie accountant who absolutely did not survive tax season.” That small detail makes the costume funnier, scarier, and easier to remember.
One practical lesson is to build the outfit before doing makeup. Many people paint their face first, then pull a tight shirt over their head and accidentally smear half the zombie onto the collar. Put on your base clothing first, protect it with a towel if needed, then apply makeup. Add the messiest fake blood last. Fake blood has a talent for migrating. It starts on your cheek and somehow ends up on the refrigerator handle.
Another experience-based tip is to take photos during the process. Makeup that looks dramatic in the mirror may disappear under party lighting or streetlights. A quick phone photo helps you see whether the eye shadows are dark enough, whether the wounds read clearly, and whether the clothing distressing is visible. If the costume looks flat, increase contrast: darker hollows under the cheekbones, more dirt around the knees, a stronger tear near the collar, or a small blood detail near the mouth.
Comfort matters more than people expect. A zombie costume often gets worn for hours, and the best one is the costume you do not want to rip off after fifteen minutes. Avoid sticky blood on your palms if you need to touch your phone, open doors, hold a drink, or supervise children. Keep heavy makeup away from areas where glasses sit. Wear shoes you trust. A slow zombie shuffle is funny; limping because your boots are attacking your ankles is less charming.
For group costumes, coordination makes a huge difference. A zombie family, zombie wedding party, zombie sports team, or zombie office staff looks impressive because the theme is instantly readable. Everyone can use the same makeup palette but different clothing. One person can be freshly bitten with brighter red details, while another can look older and dustier with gray and brown tones. This variety makes the group look like it wandered out of a movie scene instead of a discount bin.
Finally, the best zombie costume includes performance. You do not have to act all night, but posture helps. Drop your shoulders slightly, tilt your head, slow your steps, and let your hands hang loosely. When someone asks what happened, give a short answer in character: “Monday.” That usually explains everything.
Conclusion
Creating a zombie costume is one of the easiest and most entertaining ways to build a Halloween look with personality. Start with a clear character, distress old clothing, use pale and shadowy makeup, add fake blood with restraint, and finish with messy hair and safe accessories. Whether you are making a creepy adult zombie costume, a kid-friendly undead outfit, or a whole zombie group theme, the secret is storytelling. Your costume should look like something happened before you arrived.
Keep the look comfortable, visible, and safe. Choose clothing that fits well, use non-toxic makeup, test products ahead of time, avoid unsafe decorative contacts, and make sure you can walk without tripping over your own dramatic backstory. With a little planning and a willingness to ruin an old shirt for art, you can create a zombie costume that is scary, funny, affordable, and unforgettable.