Table of Contents >> Show >> Hide
- Why Build a PVC Room Divider?
- Plan Your PVC Room Divider Before You Cut
- Materials and Tools You Will Need
- Step-by-Step: How to Build a PVC Room Divider
- Design Ideas for a Better-Looking PVC Room Divider
- Common Mistakes to Avoid
- Estimated Cost and Time
- How to Maintain a PVC Room Divider
- Experience Notes: What Building a PVC Room Divider Teaches You
- Conclusion
A room divider is one of those magical home projects that solves three problems at once: it adds privacy, defines a space, and makes you look like the kind of person who owns a level and knows where it is. Even better, a PVC room divider is lightweight, affordable, beginner-friendly, and customizable enough to fit a studio apartment, shared bedroom, home office, classroom, craft corner, or laundry area that has been pretending not to exist.
Unlike a permanent wall, a DIY PVC room divider does not require framing lumber, drywall dust, a permit, or the emotional stamina to patch 47 screw holes later. You can build it in an afternoon using PVC pipe, fittings, fabric, and a few basic tools. The finished divider can be freestanding, foldable, curtain-style, or semi-permanent depending on your space and how much privacy you need.
This guide walks you through how to build a PVC room divider from planning to finishing, with practical tips for measurements, stability, fabric panels, safety, and design upgrades. The goal is simple: a divider that stands upright, looks intentional, and does not wobble like a baby giraffe in a wind tunnel.
Why Build a PVC Room Divider?
PVC pipe is popular for DIY projects because it is light, inexpensive, easy to cut, and simple to assemble. For room dividers, those qualities matter. You want something strong enough to hold fabric but light enough to move when you decide the “home office corner” should become the “reading nook corner” or, more realistically, the “hide the laundry basket corner.”
A PVC pipe room divider works especially well when you need a temporary or flexible solution. Renters can use it without drilling into walls. Parents can divide a shared kids’ room. Remote workers can create a video-call background that does not include cereal boxes. Teachers can build classroom privacy screens. Small-space dwellers can separate sleeping, dressing, and working zones without making the room feel boxed in.
Best Uses for a DIY PVC Room Divider
A PVC room divider is useful in many situations, including separating a bedroom from a living area, creating a dressing screen, hiding storage shelves, blocking visual clutter, making a craft booth, forming a temporary workspace, or adding privacy around a guest bed. It is also great for basements, dorm rooms, playrooms, studios, and open-plan apartments where “one big room” sounds elegant until someone starts making coffee during your Zoom meeting.
Plan Your PVC Room Divider Before You Cut
The best PVC room divider starts with a tape measure, not a shopping cart. First, decide where the divider will go. Measure the width of the area and the height you want to cover. Most room dividers are between 5 and 6.5 feet tall. A 6-foot divider gives better privacy, while a shorter one feels airier and is easier to move.
For a basic freestanding divider, a practical size is about 5 feet wide by 6 feet tall. That is wide enough to create real separation but not so huge that it becomes awkward to carry through a doorway. If you need more width, build multiple panels and connect them with elbows, tee fittings, or removable couplings.
Choose the Right PVC Pipe Size
For most indoor room dividers, 3/4-inch or 1-inch PVC pipe works well. Half-inch pipe is very light but may flex too much on taller frames. One-inch pipe offers better stiffness and stability, especially if you plan to hang heavier fabric. Furniture-grade PVC looks cleaner than standard plumbing PVC because it often comes without printed markings, but regular white PVC can still look polished with sanding, paint, or fabric sleeves.
If your divider will be moved often, choose 1-inch pipe for the frame and wider base feet. If it will stay in one place and hold lightweight fabric, 3/4-inch PVC is usually enough. Think of it like choosing pasta: angel hair is lovely, but you would not build a fence with it.
Materials and Tools You Will Need
The exact supply list depends on your divider size, but the following materials will build a simple rectangular freestanding PVC room divider approximately 5 feet wide and 6 feet tall.
Materials
- Four 6-foot lengths of 1-inch PVC pipe for the vertical sides and optional center supports
- Two 5-foot lengths of 1-inch PVC pipe for the top and bottom rails
- Four 12- to 18-inch PVC pieces for stabilizing feet
- Two 1-inch PVC elbow fittings for the top corners
- Two 1-inch PVC tee fittings for the bottom corners
- Two additional tee or cross fittings if adding a center support or extended feet
- Fabric panel, curtain, canvas drop cloth, shower curtain, outdoor fabric, or lightweight upholstery fabric
- Curtain rings, grommets, zip ties, hook-and-loop tape, snap clips, or fabric pockets
- Optional PVC primer and cement for permanent joints
- Optional spray paint made for plastic
- Optional rubber end caps, felt pads, or anti-slip pads
Tools
- Tape measure
- Marker
- PVC cutter, hacksaw, or miter saw
- Deburring tool, utility knife, or sandpaper
- Level
- Scissors or fabric cutter
- Sewing machine, fabric glue, iron-on hem tape, or no-sew adhesive
- Safety glasses and gloves
Step-by-Step: How to Build a PVC Room Divider
Step 1: Measure and Sketch the Divider
Start by sketching a simple rectangle. Write down the finished height and width. For example, if you want a 6-foot-tall by 5-foot-wide divider, your top and bottom rails should be close to 60 inches, and your vertical pieces should be close to 72 inches. Keep in mind that PVC fittings add a little extra length, so your finished frame may be slightly larger than the pipe measurements alone.
Also sketch the base. A tall divider needs feet that extend forward and backward. For a 6-foot-high frame, feet that extend 12 to 18 inches on each side give much better balance. If the divider will sit in a busy area, go wider rather than narrower. A room divider should quietly do its job, not audition for a slapstick routine.
Step 2: Cut the PVC Pipe
Mark your pipe carefully before cutting. Use a PVC cutter for clean, fast cuts, or use a hacksaw if that is what you have. The important part is to cut as squarely as possible so the pipe seats evenly inside the fittings. Crooked cuts can make the frame lean, twist, or refuse to cooperate like a chair from a mystery furniture box.
For a basic 5-foot by 6-foot divider, cut two top and bottom rail pieces at 60 inches, two side pieces at 72 inches, and four foot pieces between 12 and 18 inches. If your divider will have a bottom fabric rail, center support, or removable curtain rod, cut those pieces now as well.
Step 3: Deburr and Smooth the Ends
After cutting, remove burrs from the inside and outside edges of the pipe. Burrs can catch on fabric, prevent fittings from seating fully, and make assembly frustrating. Use sandpaper, a deburring tool, or a utility knife to smooth each cut end. This is a small step, but it makes the finished divider look cleaner and fit better.
Step 4: Dry-Fit the Frame
Before gluing anything, assemble the entire frame dry. Connect the top rail to the two vertical sides using elbow fittings. Connect the bottom corners using tee fittings so the openings for the feet point forward and backward. Insert the foot pieces into the tees. Stand the frame upright and check the shape.
This dry-fit stage is where you catch mistakes before they become permanent little plastic regrets. Make sure the divider stands level, the feet are balanced, and the fabric panel will have enough room to hang smoothly. If the frame feels wobbly, widen the feet, add a bottom rail, or include a center support.
Step 5: Decide Which Joints to Glue
You do not have to glue every joint. In fact, for a portable PVC room divider, it is often better to leave some joints unglued so you can take the frame apart for storage or moving. A smart approach is to glue only the base fittings and corner fittings that need extra strength, while leaving the top rail or fabric rail removable.
If you use PVC primer and cement, follow the product instructions carefully. Work in a well-ventilated area, keep primer and cement away from flame or heat, and wear eye and hand protection. PVC cement sets quickly, so align each joint before pushing it together. Once it grabs, it is not interested in your second thoughts.
Step 6: Add the Fabric Panel
Fabric is what turns the PVC frame from “plumbing project in the living room” into a real room divider. Choose fabric based on the level of privacy you want. Canvas, blackout curtains, duck cloth, or upholstery fabric provide more coverage. Sheer curtains, linen blends, or lightweight cotton create a softer, brighter screen.
There are several ways to attach the fabric. The easiest method is to use a curtain panel with a rod pocket and slide it over the top rail before closing the frame. Another option is to add grommets to the fabric and hang it with curtain rings or zip ties. For a neat custom look, sew a pocket at both the top and bottom of the fabric so the panel stays taut between two PVC rails.
Step 7: Make the Divider Stable
Stability matters more than style. A beautiful divider that tips over every time the dog sighs is not a success story. To improve stability, use wider feet, add rubber caps to the ends, place anti-slip pads under the base, or add sand-filled PVC sections at the bottom. You can also position the divider near a wall, sofa, bed, or desk to reduce accidental bumps.
If you are using the divider around children, pets, or high-traffic areas, keep it lightweight but balanced. Avoid hanging heavy planters, shelves, or thick blankets unless the frame is reinforced. PVC is strong for its weight, but it is not a steel wall, and it does not appreciate being treated like one.
Design Ideas for a Better-Looking PVC Room Divider
Paint the Frame
White PVC can look clean and modern, but paint gives you more design control. Use spray paint formulated for plastic, and lightly sand the pipe first to help the paint bond. Matte black creates an industrial look. Warm beige blends into neutral decor. Gold or brass paint can make the divider feel more decorative, especially with linen or velvet fabric.
Use Fabric That Matches the Room
The fabric panel is the visual star. In a bedroom, choose soft cotton, linen, or blackout fabric. In a home office, consider a solid neutral or subtle pattern that looks good on camera. In a kids’ room, washable fabric is your best friend. For a craft room or studio, canvas drop cloth can look surprisingly chic after washing and hemming.
Create Multiple Panels
If you want a folding room divider effect, build two or three narrow PVC frames instead of one wide frame. Connect them with removable straps, zip ties, fabric hinges, or short pipe connectors. Multiple panels are easier to move and can bend around corners. They also give the divider a more furniture-like feel.
Add Function Without Overloading It
You can clip lightweight accessories to the frame, such as fairy lights, small photos, a calendar, or a headphone hook. Keep additions light and balanced. A PVC room divider can be stylish and useful, but it should not become a vertical junk drawer with ambition.
Common Mistakes to Avoid
Using Feet That Are Too Short
Short feet are the number one reason a PVC room divider wobbles. If the divider is tall, the base must be wide enough to resist tipping. For most 6-foot frames, 12-inch feet are the minimum, and 18-inch feet are better for busy spaces.
Skipping the Dry Fit
Dry-fitting lets you test the shape before committing. PVC cement is fast and permanent, so do not glue until you are happy with the frame. Assemble, check, adjust, and only then decide what to cement.
Choosing Fabric That Is Too Heavy
Heavy fabric can pull the frame forward or make the top rail sag. If you want a thicker fabric, use 1-inch PVC, add a center vertical support, and keep the fabric evenly distributed. For most indoor dividers, medium-weight curtain panels or canvas work well.
Forgetting About Storage
If you plan to store the divider, leave some joints unglued. A fully glued 6-foot frame may be sturdy, but it may also be impossible to fit into a closet, car, or hallway without performing advanced geometry.
Estimated Cost and Time
A basic DIY PVC room divider can usually be built in a few hours. The cost depends on pipe size, fittings, fabric, and finishing details. Standard PVC and a ready-made curtain panel are the budget-friendly route. Furniture-grade PVC, premium fabric, paint, and decorative hardware will cost more but create a more polished result.
For most beginners, plan on one afternoon for measuring, cutting, assembling, and attaching fabric. Add extra time if you are painting the PVC or sewing custom fabric panels. Paint and fabric adhesive may need drying time, so do not schedule your grand room-divider reveal five minutes before guests arrive.
How to Maintain a PVC Room Divider
Maintenance is simple. Wipe the PVC frame with a damp cloth when it gets dusty. Wash or spot-clean the fabric based on the material. Check the fittings occasionally, especially if the divider is moved often. If a joint loosens, press it back together or add a small piece of removable tape inside the fitting for a tighter temporary fit.
If you painted the frame, avoid harsh cleaners that may damage the finish. Touch up scratches as needed. If the divider is used in a classroom, studio, or children’s space, washable fabric will save you from mysterious stains that no one remembers creating.
Experience Notes: What Building a PVC Room Divider Teaches You
Building a PVC room divider sounds simple, and it is, but the project teaches a few useful lessons that are hard to learn from a shopping list alone. The first lesson is that measurements are not just numbers; they are decisions. A divider that looks perfect on paper can feel too tall, too narrow, or too bulky once it is standing in the room. Before cutting pipe, it helps to mark the footprint on the floor with painter’s tape. This gives you a real-world preview of how much space the divider will occupy.
The second lesson is that stability is not optional. Many first-time builders focus on height and fabric but underestimate the base. A narrow base may stand during assembly, then wobble the moment someone walks past it. Wider feet instantly make the divider feel more professional. If the divider will sit on carpet, slightly longer feet help. On hard floors, rubber caps or anti-slip pads make a noticeable difference.
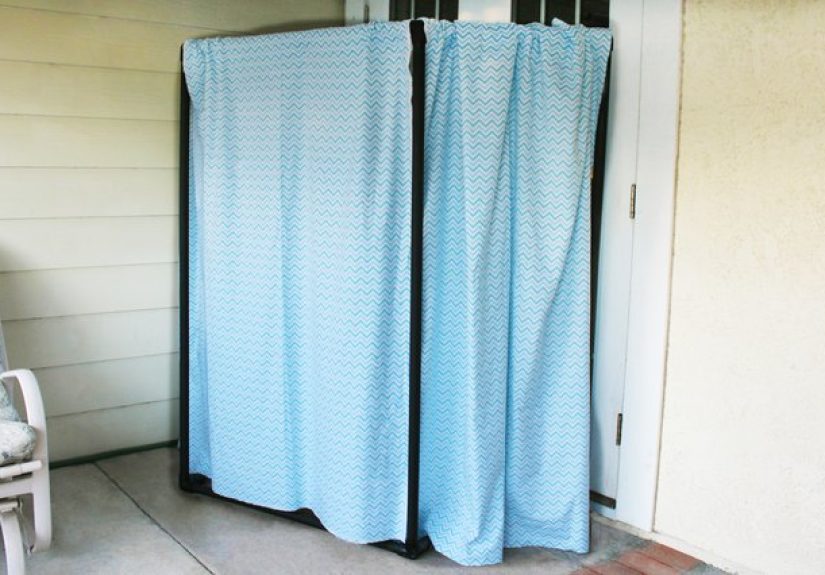
The third lesson is that fabric changes everything. A plain PVC frame may look unfinished, but the right fabric turns it into decor. A drop cloth gives a relaxed farmhouse look. A dark curtain creates privacy for a bedroom or workspace. A patterned cotton panel can brighten a kids’ room. If the divider is used as a video-call backdrop, solid fabric usually looks cleaner than a busy print. The camera already has enough drama without adding flamingos and zigzags.
Another practical experience: do not glue too soon. Dry-fit the frame, move it into position, hang the fabric, and live with it for a few minutes. You may decide the feet need to rotate, the fabric needs a lower rail, or the height should be reduced. Leaving some joints unglued also makes the divider easier to move later. A removable top rail is especially helpful if you use a curtain with a rod pocket.
Painting is worth considering, but patience matters. PVC is slick, so lightly sanding the surface and using paint made for plastic gives better results. Spray in thin coats rather than trying to cover everything at once. Thick coats can drip, and nothing says “homemade” quite like paint tears running down a pipe.
Finally, the best PVC room divider is the one that matches your actual life. If you need privacy, choose opaque fabric. If you need light, choose sheer panels. If you move often, make it collapsible. If kids or pets are involved, make the base extra stable and avoid dangling cords. The beauty of PVC is that it lets you adjust, rebuild, and improve without starting from scratch. It is DIY with a forgiving personality, and frankly, we should all aspire to that.
Conclusion
Learning how to build a PVC room divider is a practical DIY skill for anyone who wants more privacy, better organization, or a smarter room layout without building a permanent wall. With a few pieces of PVC pipe, simple fittings, stable feet, and the right fabric, you can create a divider that is affordable, portable, and surprisingly good-looking.
The key is to plan before cutting, dry-fit before gluing, and prioritize stability before decoration. Once the frame is solid, the design possibilities are wide open. Paint it, dress it with fabric, make it foldable, or keep it simple and clean. Whether you are carving out a home office, hiding storage, or giving a shared bedroom some breathing room, a PVC room divider is a weekend project that delivers instant results without demanding contractor-level courage.