
Table of Contents >> Show >> Hide
- What “Model Pyramid” Means (So You Build the Right Thing)
- Materials Checklist (Choose Your Adventure)
- Easy Way #1: Build a Paper Pyramid Using a Net (Fast + Classroom-Friendly)
- Easy Way #2: Build a Cardboard (or Foam Board) Scale Pyramid (Sturdy + Display-Ready)
- Easy Way #3: Build a Stick-Frame Pyramid (Engineering-Style + Surprisingly Strong)
- Make Your Pyramid Smarter (Optional Math + Labels)
- Quick “Don’t Ruin It at the Last Second” Checklist
- Conclusion
- Experiences & Lessons People Commonly Learn While Building a Model Pyramid (500+ Words)
Building a model pyramid is one of those “looks fancy, actually doable” projects. It’s part geometry lesson, part craft
session, and part test of whether glue has a personal vendetta against your fingertips. The good news: you don’t need a
laser cutter, a PhD, or an ancient workforce of 20,000. You just need a plan, the right materials, and a tiny bit of patience.
In this guide, you’ll learn three easy ways to build a model pyramideach with step-by-step instructions,
the best materials to use, common mistakes to avoid, and smart tricks to make your pyramid look clean and sturdy.
Whether you’re doing a school project, a classroom activity, a museum-style display, or a “why not?” weekend build, there’s a method here that fits.
What “Model Pyramid” Means (So You Build the Right Thing)
A pyramid is a 3D shape with a polygon base (often a square) and triangular faces that meet at a single top point (the apex).
A “model pyramid” usually means a small, physical version you can holdmade from paper, cardboard, sticks, or foam board.
Quick pick: which pyramid should you make?
- Square pyramid (most common): a square base + 4 triangles.
- Triangular pyramid (also called a tetrahedron): 4 triangles, no square base.
- Step pyramid (more advanced): layered “terraces” like a wedding cake with ambition.
Materials Checklist (Choose Your Adventure)
Here are the basics you’ll mix and match depending on the method:
- Paper method: cardstock (best), scissors, ruler, pencil, glue stick or tape.
- Cardboard/foam board method: cereal box cardboard or foam board, craft knife, cutting mat, hot glue or tacky glue.
- Stick-frame method: popsicle sticks / coffee stirrers / straws, glue (wood glue or hot glue), optional string or tape for joints.
- “Make it pretty” extras: paint, sand paper, paper-mâché, markers, textured paper, label stickers.
Two tools that secretly matter a lot
- A ruler (or straightedge): clean edges make the whole model look more professional.
- Something to score folds: a butter knife, empty pen, or bone folder makes paper folds crisp instead of wrinkly.
Easy Way #1: Build a Paper Pyramid Using a Net (Fast + Classroom-Friendly)
This is the quickest, cleanest method for most peopleespecially if the project is about geometry.
A net is a flat layout of a 3D shape’s faces that you cut out and fold into the final form.
If you’ve ever made a cube from paper, this is the pyramid version.
Best for
- School projects and math demonstrations
- Quick builds with minimal mess
- Accurate shapes (when measured properly)
Step-by-step
- Pick your pyramid type. Most people start with a square pyramid. You need a square base and four identical triangles.
-
Make or print a net. If you’re drawing it yourself: draw a square base, then attach four trianglesone on each side of the square.
Add small glue tabs along some edges. - Cut it out carefully. Smooth cuts matter more than people think. Jagged edges = “my pyramid was in a minor accident.”
- Score the fold lines. Run a blunt edge along the fold lines with a ruler as a guide. This helps folds stay sharp and aligned.
- Fold all faces inward. Pre-fold every edge before gluing. It’s easier to fix alignment now than after the glue sets.
- Glue or tape the tabs. Work around the shape, pressing edges together until they hold. Use tape inside if you want a cleaner outside finish.
- Reinforce (optional, but helpful). Add a small strip of tape inside each seam, especially if it’s going to be handled a lot.
Pro tips for a paper pyramid that doesn’t look “lumpy”
- Use cardstock, not printer paper. Regular paper warps easily and collapses faster than a cookie in milk.
- Keep triangles identical. If one triangle is even slightly bigger, the apex won’t meet cleanly.
- Let glue dry before decorating. Wet paint + wet glue = arts-and-crafts soup.
Common paper pyramid problems (and fixes)
- Apex won’t close: one or more triangles aren’t the same size, or folds aren’t crisp. Re-score and refold before regluing.
- Base buckles: paper is too thin or glue is too wet. Switch to cardstock and use glue stick or thin layers of tacky glue.
- Edges separate: not enough tab area or not enough pressure time. Use tape inside for a stronger hold.
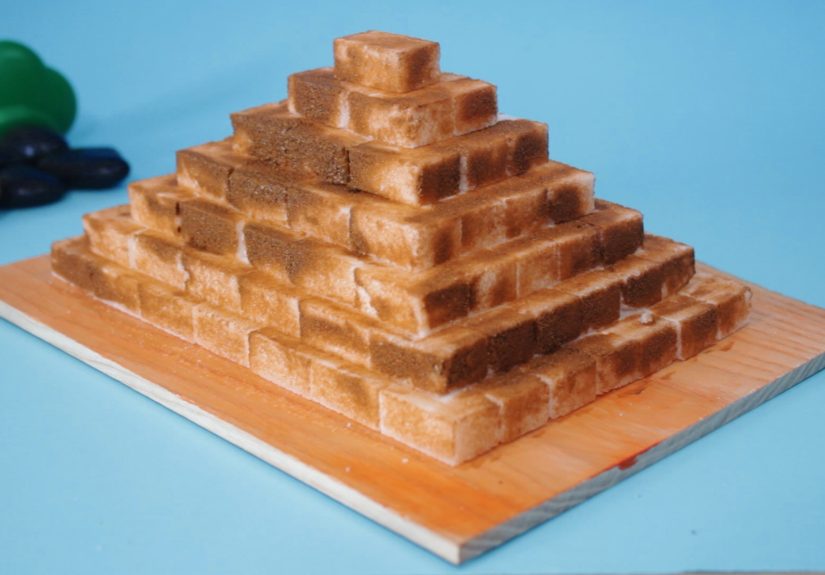
Easy Way #2: Build a Cardboard (or Foam Board) Scale Pyramid (Sturdy + Display-Ready)
If you want a pyramid that feels solidsomething you could put on a table at a science fair without worrying it’ll collapse if someone breathes near itthis is your method.
Cardboard and foam board give you strength, cleaner faces, and better “wow factor,” especially when painted.
Best for
- History projects (Ancient Egypt vibes)
- Science fairs and display models
- People who like straight lines and clean corners
Step-by-step
- Choose your size. Start simple: a base that’s 6″ x 6″ or 8″ x 8″ is easy to manage and looks substantial.
- Decide the height. A classic look is when the pyramid height is about 60–80% of the base width. Example: 8″ base width → ~5″–6″ height.
-
Calculate the triangle face shape. Each side face is an isosceles triangle. You need:
- Triangle base = one side of the square base (e.g., 8″)
- Triangle height = the slant height (not the vertical height). If you want accuracy: slant height = √((base/2)2 + height2).
- Draw your pieces. Draw one square base and four identical triangles. Add glue flaps if you’re not using hot glue.
- Cut cleanly. Use a craft knife and a cutting mat for sharp edges. Replace blades if cuts start tearing the paper surface.
- Dry-fit before gluing. Tape the triangles temporarily and check that the apex meets neatly.
-
Glue the sides. Hot glue is fast and strong; tacky glue is slower but gives you repositioning time.
Build the four triangles into a “tent,” then attach to the base. - Add internal support (optional but excellent). Glue a cardboard “X brace” inside the pyramid near the base to keep faces from bowing.
Make it look like stone (without actually quarrying limestone)
- Texture: brush on watered-down glue and sprinkle fine sand, or use tissue paper and glue for a stone-like surface.
- Paint: start with a base coat, then dry-brush lighter tones to bring out texture.
- Weathering: a little diluted brown/gray wash in creases makes it look aged.
Common cardboard model mistakes
- Wavy faces: glue is too wet, or cardboard is too thin. Use foam board or double-layer the triangles.
- Gaps at seams: triangles weren’t identical or base wasn’t perfectly square. Re-measure and dry-fit before gluing.
- Glue blobs: hot glue can get messy fast. Apply small beads and press quickly; trim cooled blobs with a craft knife.
Easy Way #3: Build a Stick-Frame Pyramid (Engineering-Style + Surprisingly Strong)
If you want a model that teaches structure (not just shape), build a pyramid as a framework using sticks or straws.
This method is popular in STEM challenges because triangles are naturally rigid, and pyramids distribute forces down to a stable base.
Best for
- STEM/engineering projects
- Demonstrating stability and load paths
- Models you can actually pick up without panicking
Option A: Square-base stick pyramid
- Build the base square. Glue four sticks into a square. Use a ruler to keep corners at 90 degrees.
- Add diagonal bracing (highly recommended). Add one or two diagonals across the base to prevent racking (the “parallelogram wobble”).
- Build four side triangles. Each face is a triangle connecting a base edge to the apex. You’ll need four identical “legs” from base corners to the top.
- Join at the apex. Tape or tie the top first, then glue. (It’s easier to adjust before glue hardens.)
- Reinforce joints. Wrap joints with a thin strip of tape or a dab of glue + a small paper collar.
Option B: Tetrahedron (triangular pyramid) stick model
A tetrahedron uses only triangles, which makes it a fantastic “why triangles rule the world” demo.
Build a triangle base, then connect each corner to the top point with equal-length sticks.
Want solid faces, not just a frame?
- Skin it: trace each triangular opening onto paper, cut, and glue panels onto the frame.
- Go fancy: use translucent paper and put a small LED tea light inside for a glowing geometry lantern.
Stick-frame troubleshooting
- Pyramid leans: leg lengths aren’t equal. Measure sticks before building, or trim after dry-fitting.
- Base twists: add diagonal bracing. Squares love turning into diamonds when you’re not looking.
- Joints pop: switch to wood glue (stronger) or reinforce with tape wraps.
Make Your Pyramid Smarter (Optional Math + Labels)
If this is a school project, adding quick math labels can turn “nice craft” into “serious academic artifact.”
You don’t need to overload itjust a few clean annotations go a long way.
Easy labels to add
- Base edge (b)
- Vertical height (h)
- Slant height (ℓ)
- Apex and vertices
Simple formulas (square pyramid)
- Volume: V = (1/3) × (base area) × h = (1/3) × b2 × h
- Lateral surface area: L = (1/2) × (perimeter of base) × ℓ = (1/2) × (4b) × ℓ = 2bℓ
- Total surface area: SA = b2 + 2bℓ
If you’re building from a net, you can even measure the triangles and calculate surface area directly by adding the areas of the faces.
That’s a strong way to show you understand the geometrynot just the glue.
Quick “Don’t Ruin It at the Last Second” Checklist
- Measure twice, cut once (or measure once, cut, then measure again while quietly regretting).
- Dry-fit before glue so you don’t lock in mistakes.
- Keep edges crisp by scoring folds and using a straightedge.
- Reinforce the inside if the model will be handled or transported.
- Let it dry fully before painting or decorating.
Conclusion
A model pyramid doesn’t have to be complicated to look impressive. If you need speed and clean geometry, build a
paper net pyramid. If you want a sturdy, display-ready piece, go with a cardboard or foam board scale model.
And if your goal is to show real structural thinking (or survive a classroom “shake test”), the stick-frame pyramid is your best friend.
Pick the method that matches your time, tools, and goalsand remember: the apex is a meeting point, not a negotiation.
If it doesn’t close, something is off, and the pyramid is simply being honest about it.
Experiences & Lessons People Commonly Learn While Building a Model Pyramid (500+ Words)
In classrooms, makerspaces, and kitchen-table craft sessions, model pyramids have a funny way of teaching the same lessons over and overregardless of age.
These aren’t “ancient secrets,” just very modern realities of paper, glue, and human optimism.
The first common experience is the “my pyramid is somehow… curved” moment. Most beginners start with regular printer paper because it’s nearby.
The net folds, it glues, it technically becomes a pyramiduntil the faces begin to bow outward like they’re trying to escape.
The fix is almost always material-related: cardstock, light cardboard, or even gluing printer paper onto a stiffer backing.
The bigger lesson is simple: in models, stiffness is a feature. Thin materials don’t just look flimsythey change the geometry.
Another near-universal experience: tabs and seams reveal the truth. When all four triangles meet perfectly at the apex, you feel like a precision engineer.
When they don’t, the pyramid doesn’t “kind of” failit fails very specifically, usually with one triangle drifting off like it has other plans.
Builders quickly learn that small errors stack up: a slightly uneven cut, a fold that’s a few degrees off, or triangles that aren’t identical.
That’s why experienced builders dry-fit first, score folds, and only glue once everything aligns.
It’s not perfectionismit’s self-defense against geometry.
People also tend to discover that glue has a personality. Liquid school glue is forgiving, but it’s wetand wet plus paper equals warping.
Hot glue is fast and strong, but it’s also a dramatic substance that sets quickly and leaves visible blobs if you hesitate.
Tape is surprisingly powerful for prototypes and inside seams, and many builders end up using a “hybrid approach”:
tape inside for strength and glue outside (or minimal adhesive) for a clean finish.
The practical takeaway is that adhesives are tools, not moral choices. Use what matches your material and timeline.
For stick-frame pyramids, the recurring lesson is triangles are your best friends, but squares are suspicious.
Builders often create a perfect square base, lift the sides, and then notice the whole structure “racks” into a diamond shape under light pressure.
That’s not bad luckit’s physics. A square frame can deform unless it’s braced. The moment a diagonal brace goes in, the base stiffens dramatically.
Many people remember this experience because it’s so visible: one extra stick changes the feel of the entire model.
It’s a great real-world demonstration of why trusses and triangular supports show up everywhere in engineering.
A surprisingly common “final stage” experience is the transportation problem. A pyramid might look great on the table, but then it rides in a backpack,
gets nudged, and arrives looking like it survived a small earthquake. Builders who’ve been through this once tend to add subtle reinforcements the next time:
tape along inside seams, an internal brace near the base, or a second layer of cardstock on each face.
The model doesn’t get much heavier, but it becomes far more durableespecially for school projects that need to survive a commute.
Finally, many builders discover that decorations can either elevate the project or accidentally hide good craftsmanship.
If you paint too early, moisture can soften cardboard. If you add heavy decorations only on one side, the model can warp or lean.
The best results usually come from light, even finishes: thin paint layers, dry-brushed texture, or paper wraps applied symmetrically.
The “experience lesson” here is that finishing is part of building, not something you slap on at the end.
When structure and decoration work together, the model looks intentionaland that’s what people notice first.
In the end, the most consistent experience is this: building a model pyramid teaches precision without being punishing.
It rewards careful measuring, clean folds, and smart reinforcement, and it makes mistakes visible enough to learn from quickly.
That’s why it’s still a classic projectsimple materials, big learning, and a final result that actually looks cool.


