
Table of Contents >> Show >> Hide
- Why Slats Win: The Design Logic (and the Practical Stuff)
- Before You Build: Is This a Guardrail or a Privacy Screen?
- Materials That Don’t Hate the Outdoors
- Planning the Slat Layout: The “Math, But Make It Cute” Section
- Project Path #1: Replace Old Lattice With a Slatted Screen (The “Kitka Energy” Upgrade)
- Project Path #2: Build a Slatted Privacy Zone (The “Brick House” Move)
- Project Path #3: A Real Slat Railing for Stairs or a Deck Edge
- Detail Moves That Make It Look Professional
- Common Mistakes (So You Don’t Learn Them the Hard Way)
- Maintenance: Keeping Slats From Turning Into “Rustic” By Accident
- Budget Snapshot: What This Usually Costs
- Conclusion: A Small Pattern Change With a Big Payoff
- of Real-World DIY Experiences (What It Feels Like to Build a Slat Railing)
If you’ve ever looked at your deck, porch, or stair railing and thought, “This would be adorable… if it weren’t trying to be 1998 lattice,” welcome.
Slat railings (and slat screens) are one of those rare DIY upgrades that feel designer-level but are basically “wood + math + a weekend.”
The inspiration story that keeps making the rounds comes from two modern DIY standouts: Kitka’s deck enclosure refresh and The Brick House’s slatted privacy zoneboth proof that a simple pattern change can make an exterior feel intentional instead of “leftover building materials with feelings.”
In this guide, we’ll break down what makes slat railings look so good, how to plan a build that’s safe and code-smart, and several project pathsfrom a simple screen overlay to a full guardrail rebuild.
Expect specifics, real-world constraints, and a little humorbecause nothing says “fun” like realizing your “quick project” needs exactly 148 screws.
Why Slats Win: The Design Logic (and the Practical Stuff)
Slat railings work because they’re clean, rhythmic, and modern without being cold. They can read Scandinavian, mid-century, coastal, or “I watched one home tour and now I’m confident.”
But beyond aesthetics, slats can solve real problems:
- Privacy: Block sightlines from neighbors without building a fortress.
- Safety: Replace loose balusters or questionable lattice with a stronger, more consistent barrier.
- Visual order: Turn a messy deck edge into something that looks planned.
- Budget impact: Wood slats are often cheaper than replacing an entire railing system.
The “Kitka + Brick House” vibe is especially appealing because it’s not fussy. It’s a strong graphic pattern made from basic materialstypically cedar or another rot-resistant woodinstalled with careful spacing and a finish that either celebrates the grain or lets it weather gracefully.
Before You Build: Is This a Guardrail or a Privacy Screen?
This is the most important question in the whole article, so I’m going to be dramatic for a second:
Not everything that looks like a railing is allowed to function like a railing.
If it’s a guardrail (fall protection)
A guardrail is the barrier that prevents someone from falling off an elevated surface (deck, balcony, landing).
In many U.S. jurisdictions, guardrails are required when the walking surface is more than about 30 inches above grade (always verify locally).
Guardrails typically have minimum height requirements (often 36 inches for residential in many areas, sometimes 42 inches in other contexts),
and spacing rules intended to keep small kids from slipping through.
If it’s a privacy screen (visual protection)
A privacy screen can be more flexible: it may attach above an existing code-compliant railing, or it may be freestanding.
You can use tighter gaps for more privacy, or wider gaps for a breezier look. But if it’s mounted on a deck, wind load becomes real.
(Translation: your “cute slat wall” can turn into a sail during a storm if it’s not anchored correctly.)
A common sweet spot: keep your existing guardrail structure (posts/top rail) if it’s solid and code-compliant, then add a slatted infill panel or screen where it makes sense.
That’s often the fastest path to a modern look without rebuilding everything from scratch.
Materials That Don’t Hate the Outdoors
Outdoor slats live a hard life: sun, rain, temperature swings, and the occasional barbecue smoke bath. Choose materials like you’re hiring for a tough job.
Wood options
- Cedar: Lightweight, rot-resistant, classic for screens and rail infill. Smells good too (bonus).
- Redwood: Beautiful and durable, often pricier depending on region.
- Pressure-treated lumber: Budget-friendly, but can warp as it dries. Best when you plan for movement and use a good finish.
- Hardwoods (ipe, etc.): Extremely durable, heavier, tougher on blades, often overkill unless you love perfection.
Fasteners and hardware
- Exterior-rated screws: Deck screws designed for treated lumber if applicable.
- Stainless steel screws: Excellent for coastal/humid areas to reduce staining and corrosion.
- Construction adhesive (optional): Sometimes used with screws for stiffness, but don’t rely on glue alone outdoors.
- Post anchors / structural hardware: If you’re building freestanding panels or rebuilding posts, use proper connectorsthis is not the time for “it feels sturdy.”
Finish options
- Penetrating oil: Enhances grain, easier to refresh, needs maintenance.
- Semi-transparent stain: Adds UV protection and color control.
- Clear sealer: Preserves tone briefly but typically needs reapplication and may still gray over time.
- Paint: Crisp and modern, but prep is everything and peeling is a mood-killer.
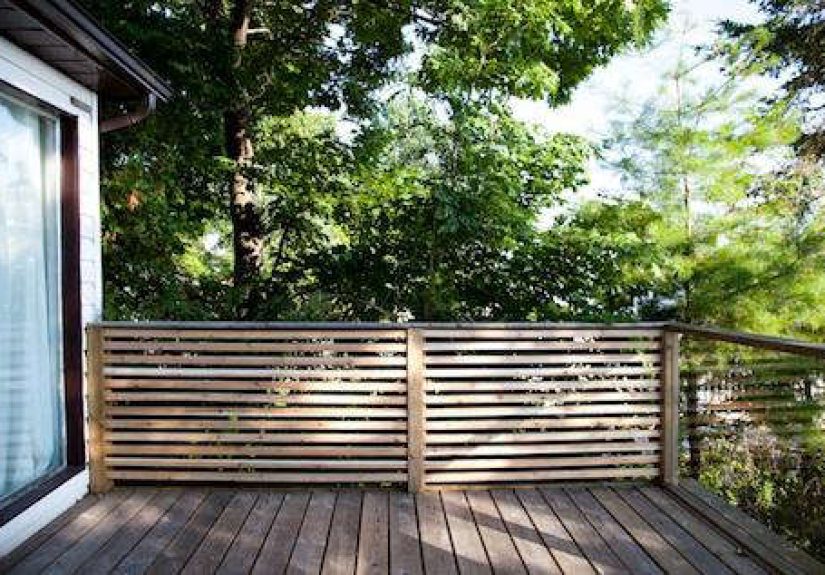
Planning the Slat Layout: The “Math, But Make It Cute” Section
The magic of a slat railing is consistent spacing. If the gaps wander, the whole thing reads “I eyeballed it,” which is brave but not the vibe.
Pick orientation: vertical or horizontal
- Vertical slats: Often feel taller and more architectural. Can be less “ladder-like” for climbing (helpful around kids).
- Horizontal slats: Modern and wide-looking, great for privacy. But they can invite climbing if used as a guard infillthink carefully about safety.
Choose slat size and gap
Common DIY slat sizes: 1×2, 1×3, or ripped plywood strips for interior projects (outdoors, solid wood is usually better).
Typical gaps range from 1/4 inch (very private) to 1 inch (more airy). If it’s a true guardrail infill, you generally want to ensure openings are small enough to meet local code.
A simple counting method
To estimate how many slats you need, use this idea:
Number of slats ≈ (panel width + gap) ÷ (slat width + gap)
Example: 72-inch-wide panel, slats are 2.5 inches wide (typical 1×3 actual width), and you want 1/2-inch gaps.
(72 + 0.5) ÷ (2.5 + 0.5) = 72.5 ÷ 3.0 ≈ 24 slats.
Then you fine-tune by adjusting the end margins so the pattern looks centered and intentional.
Pro tip: use spacer blocks (scrap wood cut to your gap size). They speed up install and keep your gaps consistenteven when your patience starts to wobble.
Project Path #1: Replace Old Lattice With a Slatted Screen (The “Kitka Energy” Upgrade)
This is the classic scenario: the deck is fine, but the enclosure is… not. Maybe it’s diagonal lattice, maybe it’s flimsy skirting, maybe it’s a patchwork of “temporary” solutions that have been temporary since the last presidential administration.
A slatted screen instantly modernizes the edge and makes the space feel finished.
Step-by-step approach
-
Remove the old paneling:
Take off lattice or outdated infill. Inspect the framing behind it for rot or loose fasteners. -
Decide: overlay or rebuild:
If the existing frame is square and solid, you can attach slats directly. If it’s warped or undersized, rebuild a clean frame first. -
Build a frame (if needed):
Use exterior-rated lumber to create a rectangular frame that fits your opening. Add a center brace if the span is wide. -
Pre-finish slats:
Stain or seal before installation, especially if you want all faces protected evenly.
(Yes, it’s extra work. Yes, it’s worth it when water isn’t sneaking into raw edges.) -
Install slats with spacers:
Start from one side or from the center and work outward to keep margins balanced. -
Cap edges for a polished look:
Add trim pieces around the perimeter or a top cap to hide end grain and unify the design.
Design note: A slatted screen can echo other exterior lineshorizontal siding, window trim, or even the rhythm of deck boards. When those align, it looks “architect-designed” even if you built it in old sneakers.
Project Path #2: Build a Slatted Privacy Zone (The “Brick House” Move)
Sometimes you don’t need to change the whole deckjust create a pocket of privacy where you actually sit.
The Brick House-style slatted enclosure is about carving out a “room” outdoors: a defined spot for coffee, reading, or pretending you’re on vacation in your own backyard.
Where this works best
- Along a side yard or porch where neighbors have a direct view
- Near outdoor seating, hot tubs, or dining areas
- As a backdrop wall for planters, lighting, or outdoor art
Two build methods
-
Attached screen:
Fasten posts to an existing deck frame or structural members, then attach slats across the posts. -
Freestanding panel:
Build a rigid framed panel and mount it securely (or set posts properly in footings).
This can be great if you want a movable “screen wall” concept, but it still needs serious anchoring outdoors.
The key here is structural confidence. A privacy wall catches wind. If you can wiggle it with one hand, the weather will absolutely take that as a personal challenge.
Project Path #3: A Real Slat Railing for Stairs or a Deck Edge
If you’re rebuilding an actual guardrail, treat it like a safety project first and a design project second.
The slats can be gorgeous, but the frameworkposts, top rail, connectionsdoes the life-saving work.
Guardrail fundamentals to respect
- Height: Many residential contexts use a 36-inch minimum; other situations may require 42 inches. Verify locally.
- Openings: Many codes limit openings so a small sphere can’t pass through (the famous “4-inch rule,” with stair-specific exceptions).
- Strength: Railings must resist people leaning, bumping, or fully trusting them during a dramatic conversation.
- Attachment: Posts and rails should be properly fastened to structural members, not just trim boards.
If that sounds like a lot, it’s because it is. If you’re unsure, there’s no shame in hiring a pro for the structural portion and DIY-ing the slat infill.
You still get the look, and your future self gets to keep enjoying gravity in the normal way.
Detail Moves That Make It Look Professional
1) Add a “picture frame” border
Slats look sharp when they sit inside a clean perimeter frame. The border hides imperfect ends and makes the whole panel feel intentional.
2) Keep end gaps symmetrical
Tiny detail, huge effect. If one side ends with a 1/8-inch gap and the other ends with a 1-inch gap, the human brain notices.
Center your layout or adjust spacing slightly so the pattern “lands” evenly.
3) Hide fasteners (or commit to them)
You can face-screw slats neatly with consistent placement, use trim-head screws, or explore hidden fastening methods.
The goal isn’t “invisible,” it’s “on purpose.”
4) Think about nighttime
Slats look incredible with soft lighting. Consider downlights on a top cap, string lights behind the screen, or low-voltage path lighting nearby.
Bonus: lighting makes the space feel finished and helps prevent the classic outdoor injury known as “I swear that step wasn’t there.”
Common Mistakes (So You Don’t Learn Them the Hard Way)
- Skipping pre-finishing: Bare wood edges weather unevenly. Pre-finish saves regret.
- Inconsistent spacing: Use spacers. Your eyes are great, but they are not precision tools.
- Ignoring wood movement: Outdoor wood expands and contracts. Leave room so slats don’t buckle.
- Under-building the frame: Slats are only as straight as the structure behind them.
- Weak anchoring for tall screens: If it’s tall, treat it like a wind-catching structurebecause it is.
Maintenance: Keeping Slats From Turning Into “Rustic” By Accident
“Rustic” is a style choice. “Weathered because I forgot” is a lifestyle choice. Choose wisely.
- Clean seasonally: Mild soap and water goes a long way.
- Check fasteners: Tighten anything that loosens as wood cycles through seasons.
- Refresh finishes: Penetrating oils often need reapplication; stains last longer but still fade.
- Inspect for rot: Especially at end grain and post bases.
Budget Snapshot: What This Usually Costs
Costs vary by region and wood type, but slat projects are often “high impact, medium spend.”
Cedar slats and exterior screws add up, but compared to a full railing replacement system, it can be a bargainespecially if you reuse solid posts and rails.
A practical way to estimate:
Material cost ≈ (number of slats × cost per slat) + frame lumber + fasteners + finish
Then add a small “Oops Fund” for extra boardsbecause wood has a sense of humor and it loves showing it.
Conclusion: A Small Pattern Change With a Big Payoff
The big lesson from the Kitka and Brick House-inspired slat projects is that you don’t always need a full remodel to get a major upgrade.
Swapping lattice for slats, adding a privacy zone, or refining a railing infill can transform the feel of an outdoor space in a weekend or two.
It’s modern, practical, and customizable: tight gaps for privacy, wider gaps for airiness, vertical for height, horizontal for width.
Just remember the golden rule: if it’s protecting someone from a fall, treat it like a safety systemnot a decorative panel.
Once that’s handled, slats are one of the most satisfying DIY “before/after” projects you can dobecause the result looks expensive even if you built it with a tape measure and sheer determination.
of Real-World DIY Experiences (What It Feels Like to Build a Slat Railing)
Here’s what people usually don’t tell you about a slat railing project: the build is half carpentry and half mindset.
The carpentry part is straightforwardcut, space, fasten, repeat. The mindset part is learning to love repetition without losing your joy (or your level).
The first “experience moment” tends to happen right after you remove the old lattice. There’s a burst of confidenceyour deck instantly looks cleaner.
Then you notice what the lattice was hiding: uneven framing, a bowed edge, or a corner that’s not quite square.
This is where the best DIYers make the same decision: fix the structure now, because slats are honest.
They will highlight crooked framing the way a bright bathroom light highlights a bad haircut.
The next moment is the spacing debate. You’ll probably mock up two or three versionstight for privacy, medium for balance, wide for airy.
And somehow, the “perfect” gap changes depending on where you stand. That’s normal.
A helpful trick is to tape painter’s tape strips onto a wall or lay slats on the ground with spacers, then step back.
Your eyes will choose faster than your brain will.
Installing the first five slats is fun. Installing the next twenty is meditative. Installing the final ten is a test of character.
This is where spacers earn their keep. When you’re tired, spacers keep you consistent. Consistency is what makes the project look professional.
Many DIYers also learn a surprising truth: pre-finishing slats feels like a chore, but it’s the kind of chore that saves you later.
Once the slats are up, staining between them can become a tiny, frustrating game of “how did I get finish on everything except the actual wood?”
There’s usually a “hardware epiphany,” too. Exterior screws are not all created equal.
Using quality, outdoor-rated fasteners reduces splitting, staining, and future loosening.
People often switch to trim-head screws mid-project for a cleaner look, or they start drilling pilot holes once they see a slat crack near the end.
That’s not failureit’s adjusting. DIY is basically a series of small upgrades to your plan.
Finally, there’s the satisfaction factorslats deliver it instantly. You get that crisp rhythm, the clean lines, the feeling that your outdoor space has a “design point of view.”
The best part is how the project changes how you use the space. A privacy zone invites you to actually sit outside.
A refreshed railing makes the deck feel cared for. And once you’ve done one slat panel, you’ll start spotting other places where the same pattern could work:
trash bin screens, AC enclosures, porch skirting, even a small garden divider. It’s the DIY equivalent of learning a new recipe and suddenly wanting to cook everything.


