
Table of Contents >> Show >> Hide
- Why Old Fence Pickets Are Coastal Cottage Gold
- Step 1: Hunt Down the Perfect “Before” Shelf
- Step 2: Source and Prep Your Fence Pickets
- Step 3: Design Your Coastal Cottage Shelf Layout
- Step 4: Build the Fence-Picket Backing
- Step 5: Paint and Finish for a Coastal Cottage Look
- Step 6: Attach the Shelf to the Fence-Picket Backing
- How to Style Your Coastal Cottage Fence-Picket Shelf
- Safety, Durability, and Maintenance Tips
- Budget Breakdown and Variations
- Real-Life Experiences and Lessons Learned
- Conclusion: A Coastal Cottage Shelf With Heart
If you’ve ever stared at your tired old fence and thought, “Wow, that’s seen some things,”
I have good news: those weather-beaten fence pickets are basically free coastal cottage decor
waiting to happen. One of the cutest ways to give them a second life is by turning them into
a coastal cottage shelf, just like the popular DIY projects you’ll see on Hometalk and other
home decor sites.
In this guide, we’ll walk through how to transform a humble thrift-store shelf and a few old
fence boards into a charming, beachy focal point for your home. We’ll talk planning, tools,
step-by-step instructions, styling ideas, safety tips, and real-life lessons from people who
have actually done it. Think of this as your friendly, slightly paint-splattered road map to
a budget-friendly coastal shelf makeover.
Why Old Fence Pickets Are Coastal Cottage Gold
Coastal cottage style is all about relaxed, sun-faded charm: soft whites, sandy neutrals, driftwood
tones, and pieces that look like they’ve lived by the water for a few seasons. Old fence pickets
naturally deliver that look. They’re usually:
- Weathered and textured – Sun, rain, and wind create a patina that people literally pay for in the store.
- Perfectly imperfect – Knots, nail holes, and rough edges fit right into coastal, farmhouse, and cottage vibes.
- Budget-friendly – Often free if you’re replacing a fence or can pick up a few boards from neighbors or curbside giveaways.
- Eco-conscious – Upcycling keeps wood out of the landfill and reduces the need for new materials.
DIYers across the U.S. use reclaimed fence boards to update bookcases, build rustic shelves,
and create backing for cabinets and hutches. When you pair those boards with a small thrifted
shelf, you get a piece that looks like it came from a coastal boutique, not the bargain bin.
Step 1: Hunt Down the Perfect “Before” Shelf
The original Hometalk-style coastal cottage shelf makeover starts with a wonky little shelf
from a thrift store. That’s exactly what you want: something inexpensive, solid enough to hold
decor, and begging for a makeover.
When you’re hunting for your base shelf, look for:
- Solid construction – Real wood or sturdy MDF is best. Wobbly legs can often be tightened, but avoid anything truly unstable.
- Simple lines – Clean, basic shapes work best under rustic finishes and won’t fight with your fence-picket backing.
- Reasonable size – A small wall shelf or narrow bookcase is ideal for a cottage look and easier to hang securely.
It’s okay if the shelf has scratches, a weird stain color, or a dated finish. We’re painting it
anyway. Just make sure it’s structurally sound and sized appropriately for the wall where you
want to hang it.
Step 2: Source and Prep Your Fence Pickets
Next up: those glorious, tired fence boards. Whether you’re pulling them from your own yard or
rescuing them from the curb, give them a little spa day before they go inside your home.
Where to Find Old Fence Boards
- Your own fence if you’re replacing or repairing sections
- Neighborhood groups and marketplaces where people offer “free fence boards” or “curb alerts”
- Friends, family, or neighbors who are redoing their fences
How to Clean and Prep Fence Pickets
- Inspect for damage. Avoid boards with rot, soft spots, or signs of insect damage.
- Remove old hardware. Pull out nails and screws, or tap them flush with a hammer so they don’t catch your hands or tools.
- Clean the surface. Use a stiff brush to scrub off dirt, cobwebs, and loose debris. If needed, lightly wash and let them dry completely.
- Lightly sand. A quick sanding with medium-grit paper knocks down splinters while maintaining that weathered character.
You’re not aiming for “perfect.” A coastal cottage shelf should look like it’s been around for
a whilein a charming way.
Step 3: Design Your Coastal Cottage Shelf Layout
Before you cut anything, lay your shelf on the floor and play with the fence pickets behind it.
This is where you figure out proportions, placement, and overall vibe.
- Measure your shelf. Note the width and height of the back panel area or the overall width if you’re backing the entire piece.
- Decide on orientation. Most coastal cottage shelves use vertical fence boards for a “gate” or “picket fence” feel.
- Plan the shape. You can keep the top straight, or cut a gentle arch or wave pattern to mimic beachy lines.
Snap a quick photo on your phone once you like the layout. That picture will save you from
second-guessing yourself later when everything is in pieces on your workbench.
Step 4: Build the Fence-Picket Backing
Now the fun, sawdusty part: cutting and attaching the fence boards to create the backing for
your coastal cottage shelf.
Tools and Materials
- Old fence pickets, cleaned and sanded
- Circular saw, miter saw, or jigsaw
- Drill or screwdriver
- Wood screws or brad nails
- Two thin cross braces (1x2s or similar)
- Measuring tape and pencil
- Safety gear: eye protection, mask, and gloves
Step-by-Step Back Panel
- Cut the pickets to length. Measure the height you want for your shelf backing and cut each board to that length.
- Arrange the boards. Lay them side by side, face down, in the order you like. Mix tones and textures for a naturally varied look.
- Add cross braces. Place two thin boards horizontally across the backone near the top, one near the bottomand screw through them into each picket to tie everything together.
- Shape the top (optional). Draw a gentle arch or wave across the tops of the boards and cut with a jigsaw for a more whimsical, cottage-style silhouette.
At this point, you’ve created a rustic, fence-inspired panel that will sit behind your thrifted
shelf and instantly give it a coastal cottage personality.
Step 5: Paint and Finish for a Coastal Cottage Look
Coastal decor is rarely “full coverage, high-gloss, perfectly pristine” paint. We’re going for
soft, layered, and slightly weathered. A few classic finishes work especially well:
- White or off-white chalk paint on the shelf frame for a cottage feel.
- Dry-brushed white over the fence boards so the grain and weathering still show through.
- Soft blues or sea-glass greens on small accents or the inside of the shelf for a subtle coastal pop.
Dry-Brushing Technique in a Nutshell
- Dip just the tip of your brush into the paint.
- Wipe most of it off on a paper towel.
- Lightly drag the brush over the wood, letting it catch on the raised areas.
- Build up the coverage slowly until you like the look.
Finish with a clear matte or satin sealer if the shelf will be in a busy area, especially if you’ll
be dusting or wiping it down often.
Step 6: Attach the Shelf to the Fence-Picket Backing
Once your paint is dry, it’s time to marry the two main characters of this project: the shelf and
the picket panel.
- Center the shelf. Place the shelf in front of the backing and find the center point on both pieces so everything lines up.
- Mark and pre-drill. Mark screw locations from inside the shelf going into the fence panel. Pre-drill to avoid splitting the wood.
- Screw from inside. Drive screws from the inside of the shelf into the panel, so no hardware shows on the front.
- Check for level. Place a level on the top of the shelf to be sure it’s perfectly straight.
If your finished piece is heavy, consider adding a French cleat or heavy-duty D-rings on the back
and anchoring it into wall studs when you hang it.
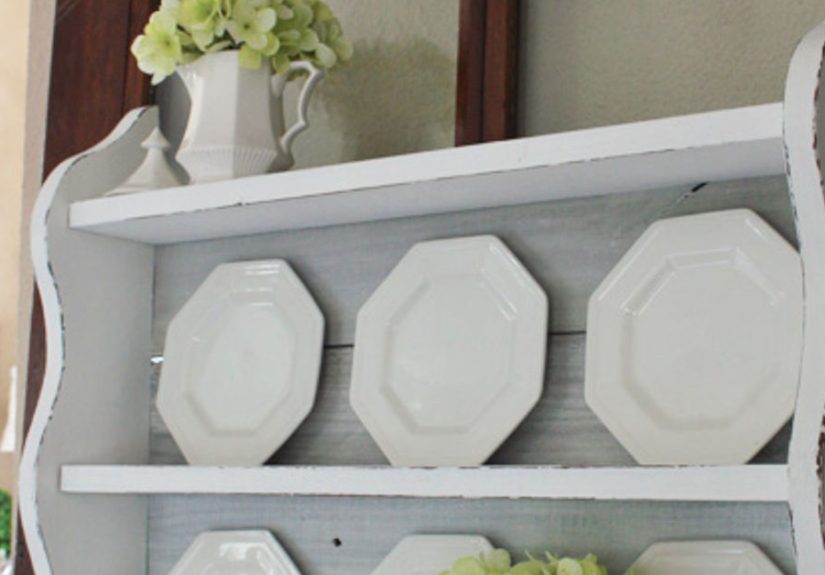
How to Style Your Coastal Cottage Fence-Picket Shelf
Now for the best part: decorating! A coastal cottage shelf isn’t just storage; it’s a mini display
area for all your favorite seaside-inspired treasures.
Color and Texture Ideas
- Color palette: whites, creams, sandy beige, soft blues, and seafoam green.
- Textures: woven baskets, rope accents, linen napkins, and ceramic vases.
- Metals: brushed nickel, antique brass, or galvanized details for a subtle nautical edge.
Decor Ideas to Try
- Stacked white dishes with a small shell or starfish on top
- Mason jars filled with beach glass, sand, or driftwood pieces
- Small framed prints of coastal landscapes or vintage seaside postcards
- A mini lantern or LED candle for soft evening glow
- A trailing plant in a white or gray pot to bring in a bit of “beach cottage garden” charm
Try to mix heights and shapes so your shelf feels curated instead of cluttered. Think “cozy beach
rental that you never want to check out of,” not “souvenir shop exploded here.”
Safety, Durability, and Maintenance Tips
Even the prettiest coastal shelf needs to be safe and practical. Here are a few things to keep
in mind:
- Use proper wall anchors. If you can’t hit studs, choose heavy-duty anchors rated for more than the shelf’s expected weight.
- Seal reclaimed wood. A clear sealer helps trap any residual dust and makes cleaning easier.
- Dust gently. Use a soft cloth or duster so you don’t snag delicate edges or chip your paint.
- Keep away from moisture. Avoid hanging it directly in splash zones like a shower area; a powder room or hallway is usually fine.
With basic care, a reclaimed fence-picket shelf can last for many years and just keep getting
prettier as the finish softens and ages.
Budget Breakdown and Variations
One of the big perks of this project is cost. Many DIYers report spending less than the price of
one mass-produced wall shelfand ending up with something unique.
- Thrifted shelf: $3–$15, depending on size and condition
- Fence pickets: often free if salvaged, or a few dollars each if purchased new
- Paint and sealer: $10–$25, depending on what you already have
- Hardware and screws: usually under $10
For well under $50, you can create a coastal cottage shelf that looks like a custom piece from a
boutique or artisan shopand you get the satisfaction of saying, “Oh, that? I made it.”
Fun Variations to Try
- Boat-shaped shelf: Curve the top of the fence boards more dramatically and angle the sides to mimic a small boat profile.
- Multi-shelf unit: Stack two small shelves on the same backing panel for extra display space.
- Color-washed boards: Use diluted paint in sea-glass colors on individual boards for a beachy striped effect.
Real-Life Experiences and Lessons Learned
If you talk to people who have made coastal cottage shelves from fence pickets, you’ll hear the
same thing over and over: “I had no idea it would turn out this good.” But you’ll also hear some
helpful “Do this, not that” advice.
Lesson 1: Don’t Skip the Planning Photo
Many DIYers admit they rushed from “Oooh, idea!” to “Where’s my saw?” without taking the time to
sketch or snap a quick layout photo. Then halfway through reassembly, they couldn’t remember which
board went where, and that perfect pattern of knots and tones was gone. Spending five minutes to
photograph your layout before you start cutting can save an hour of frustration later.
Lesson 2: Old Boards Can Be Heavier Than They Look
Weathered fence pickets often feel deceptively light in your hands, but once you screw several
together and attach a shelf, the combined weight adds up. People who underestimated this ended
up rehanging their shelf with stronger anchors or moving it to a wall with studs available. The
takeaway: overbuild your hanging system from the beginning. It’s much easier than patching
drywall later.
Lesson 3: Embrace Imperfections (Within Reason)
Tiny cracks, uneven edges, and mismatched board widths all add to the coastal charm. One DIYer
even shared that the board she almost threw outbecause it had a knot hole right in the middle
became everyone’s favorite part of the piece. She centered that board directly behind a little
white vase, and the knot looked like a sunburst. The only time to walk away from imperfection is
when it’s structural: rotted spots, flaky wood, or boards that crumble when you cut them.
Lesson 4: Styling Makes a Big Difference
People who felt “meh” about their shelf right after hanging it often ended up loving it once they
styled it correctly. A coastal cottage shelf looks best with a mix of objects:
- One or two taller items (like a narrow vase or lantern)
- Stacked items (books or plates) to ground the display
- Something with movement (a trailing plant or draped beads)
- One small “story piece” like a shell from a favorite trip or a framed snapshot
As one DIYer said, “My shelf didn’t click until I added a tiny framed photo of my kids at the
beach. After that, the whole thing made sense.”
Lesson 5: The Project Snowball Is Real
Very often, one successful coastal cottage shelf leads to more projects. Once you see how
dramatically a few old boards and a little paint can transform a space, you start eyeing other
pieces: bookcases, side tables, cabinet doors, even headboards. It’s not uncommon for people to
reuse the same paint colors and finishes throughout a room to build a cohesive coastal cottage
look.
That’s the magic of this kind of DIY: you’re not just making a shelf, you’re building a story
into your home. Every time you walk past it, you remember the afternoon you spent sanding in the
driveway, the paint on your jeans, and the moment you stepped back and thought, “Wowthis actually
looks amazing.”
Conclusion: A Coastal Cottage Shelf With Heart
A “Coastal Cottage Shelf Using Old Fence Pickets” isn’t just a mouthful of a titleit’s a perfect
example of what makes DIY so satisfying. You rescue a quirky little shelf from a thrift store,
give some beat-up fence boards a second life, and end up with a piece that feels like it has a
story baked into every nail hole and brushstroke.
Whether you’re decorating a beach house, a city apartment, or a landlocked suburban hallway,
this simple project brings a bit of ocean breeze to your walls. It’s budget-friendly, eco-conscious,
and endlessly customizable. Most importantly, it’s something you created with your own handsand
that’s the kind of coastal cottage charm you just can’t buy off the shelf.


